 Skip to content
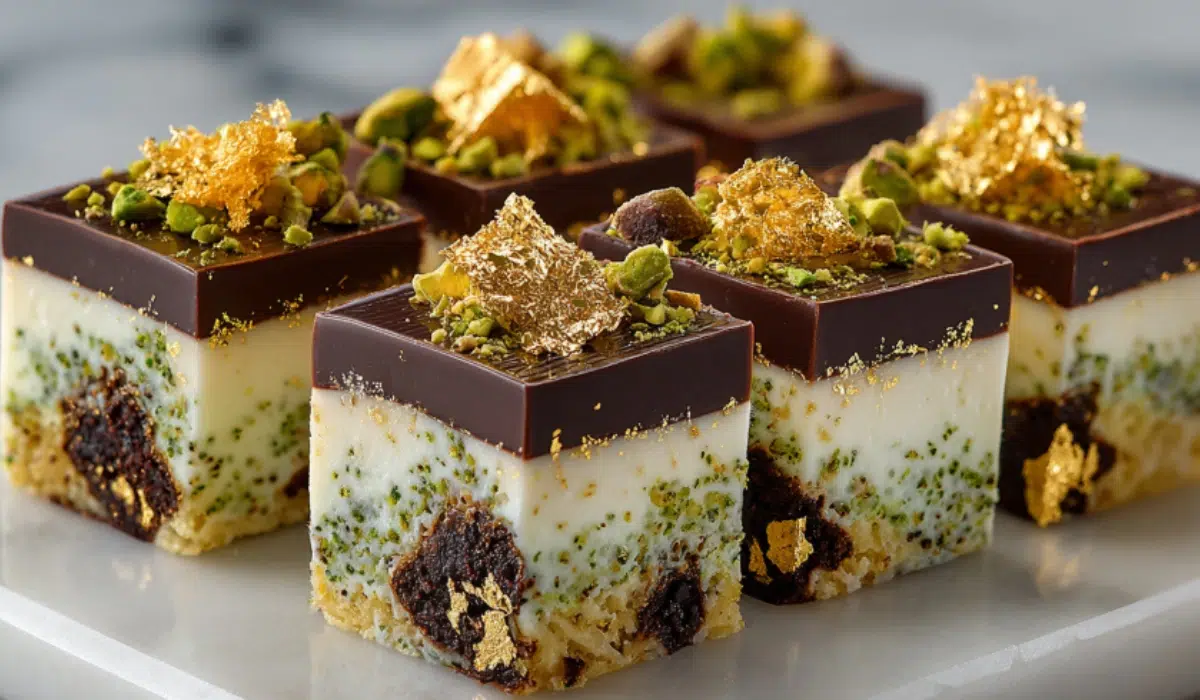
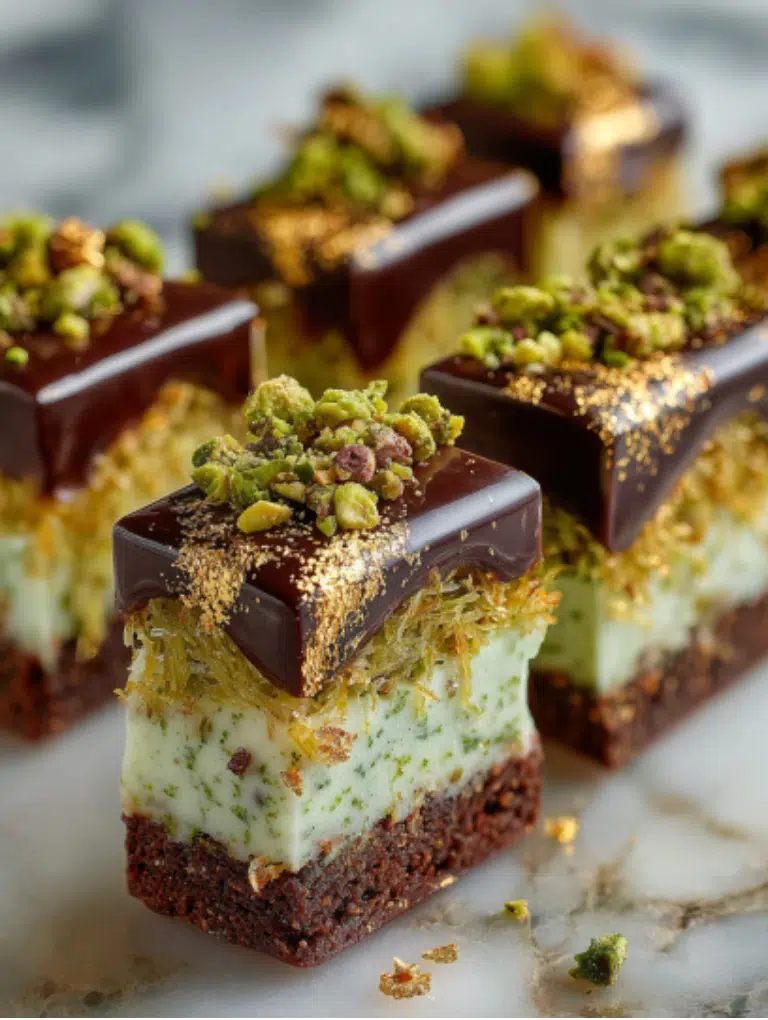
Dubai chocolate bars have taken the dessert world by storm, and for good reason. They combine silky chocolate, nutty pistachio cream, crispy kataifi pastry, and a splash of tahini for balance. The result? A bar that is crunchy, creamy, and surprisingly easy to make at home.
Whether you want a gift-worthy treat or a personal indulgence, this recipe brings the viral Dubai chocolate bar right into your kitchen. You don’t need professional equipment, just a few quality ingredients and a little patience.
Table of Contents
Why This Dubai Chocolate Bar Recipe Works
What makes the Dubai chocolate bar stand out is the balance of textures and flavors. The glossy chocolate shell gives you that satisfying snap. Inside, a mix of pistachio cream and tahini adds richness without being heavy. The crispy kataifi pastry brings a nutty crunch that ties it all together.
It is indulgent yet not overwhelming, which is why people love gifting it. Each bite feels like a mix of a classic chocolate bar and a Middle Eastern dessert. And the best part? You can control the sweetness and choose your own chocolate, so it never tastes too sugary.
Ingredients and Smart Substitutions
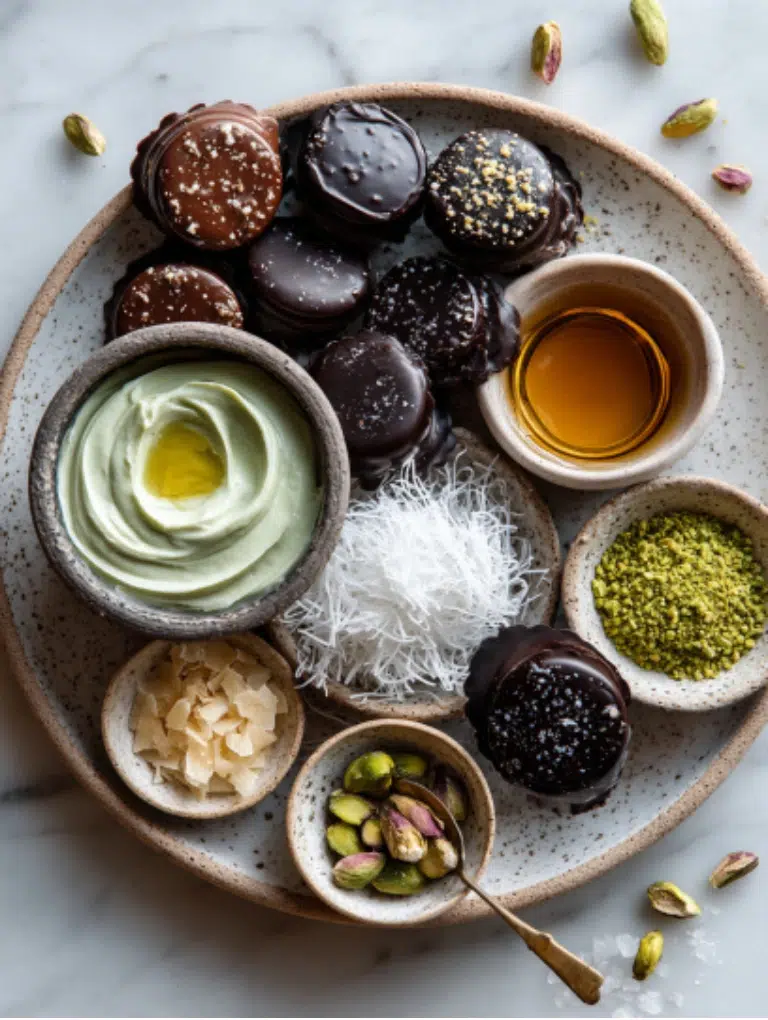
To make a true Dubai chocolate bar recipe at home, gather these essentials.
- Chocolate: Milk or dark both work. Dark chocolate gives a deeper flavor, while milk makes it creamier. Add a little cocoa butter if you want a shinier snap.
- Pistachio filling: Pistachio paste or cream is the heart of the recipe. If you can’t find cream, pistachio butter or even a homemade blend of pistachios and sugar will work.
- Kataifi pastry: This finely shredded phyllo adds the crunchy layer. No kataifi? Use crushed Shredded Wheat as a substitute.
- Tahini : even in small amounts, cuts sweetness and adds nutty depth, as noted by the National Library of Medicine.
- Sea salt: A sprinkle balances out the richness.
- Optional extras: Rose water or cardamom for fragrance, toasted nuts for more crunch, or even dried fruit for a chewy twist.
- Decoration: Colored cocoa butter splatters give it that signature Dubai look. Gel colors mixed with white chocolate are an easy substitute.
This mix gives you flexibility. Stick to the basics for the classic version or play with add-ins to make it your own.
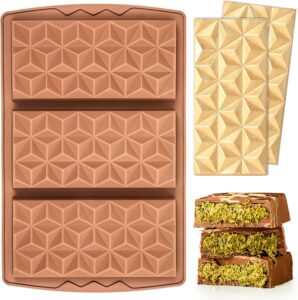
Tools and Mold Guide
You don’t need a professional kitchen to make Dubai chocolate bars, but the right tools will save you time and frustration.
- Chocolate bar molds: Deep silicone molds give the cleanest finish. Standard molds work too, but deeper ones hold the layers better.
- Thermometer: A digital one helps you temper chocolate to the right range.
- Mixing bowls and spatula: Heat-safe bowls for melting chocolate and a sturdy spatula for mixing.
- Piping bags or spoons: Useful for spreading pistachio cream neatly.
- Brush: Handy for painting cocoa butter or colored chocolate into molds.
No mold? Line a small loaf pan with parchment and build your bar in layers. Once set, slice into rectangles for a rustic version.
Tempering Chocolate Made Simple
Tempering gives your Dubai chocolate bar that glossy finish and crisp snap, as explained by the Fine Chocolate Industry Association.
Quick microwave method
- Break chocolate into pieces.
- Microwave in 20-second bursts, stirring often, until mostly melted.
- Stir until smooth. If it cools too much, gently reheat a few seconds.
Seed method
- Melt two-thirds of your chocolate until it reaches about 113–122°F (45–50°C).
- Stir in the remaining one-third finely chopped chocolate to cool it to 80–82°F (27–28°C).
- Rewarm slightly to 86–89°F (30–32°C), depending on the type of chocolate.
Signs you got it right:
- Chocolate sets with a shine.
- It snaps cleanly when broken.
- No gray streaks or dull spots.
If it looks dull or streaky, just remelt and try again.
Step by Step Dubai Chocolate Bar Recipe
- Decorate the molds (optional): Melt a little white chocolate, stir in oil and gel food coloring, then flick or brush into the molds. Chill for 10 minutes.
- Toast the kataifi: Melt butter in a pan, add shredded kataifi, and cook until golden and crisp, about 6–8 minutes. Let it cool slightly.
- Mix the filling: Combine toasted kataifi with pistachio cream and tahini until smooth but still textured.
- Temper the chocolate: Use the microwave or seed method to bring your chocolate to the right range for a glossy finish.
- Coat the molds: Spread a thin layer of tempered chocolate inside each mold. Chill for 5–10 minutes until firm.
- Add the filling: Spoon or pipe in the pistachio-kataifi mixture, leaving space at the top for sealing.
- Seal the bar: Pour more chocolate over the filling to cover completely. Tap molds gently to release air bubbles.
- Chill and unmold: Refrigerate for at least 30 minutes, then pop the bars out carefully.
Now you have your own Dubai chocolate bars ready to impress.
Decorating and Finishing Touches
The beauty of Dubai chocolate bars is in their bold look. A few small steps can make them look shop-bought.
- Cocoa butter splatter: Mix white chocolate with a drop of oil and gel color, then flick or brush across the mold before filling. This creates the signature speckled effect.
- Pistachio dust: Crush a few nuts into fine powder and sprinkle over the bars once set.
- Edible gold leaf: A tiny piece adds a luxe touch if you’re making these for gifts.
- Clean edges: Warm a sharp knife and trim around the bars if needed. This keeps the finish smooth and professional.
Playful or elegant, decoration lets you make each batch unique.
Tips and Troubleshooting
Even with a solid recipe, little mistakes can happen. Here’s how to handle them:
- Cracking shells: Usually from a thin layer of chocolate. Coat molds twice for extra strength.
- Bloom or dull finish: Caused by poor tempering. Re-melt and follow the temperature curve closely.
- Soggy crunch: Make sure kataifi is fully toasted before mixing with pistachio cream.
- Leaking filling: Leave a thin gap at the top before sealing with chocolate.
- Color bleeding: Let decorations set fully before adding warm chocolate.
These fixes keep your bars looking sharp and tasting just right.
Storage and Make Ahead
Dubai chocolate bars keep well if you store them correctly.
- Room temperature: Store in a cool, dry place in an airtight container for up to 5 days.
- Refrigerator: Extend freshness to about 2 weeks, but always bring bars back to room temp before serving for the best texture.
- Freezer: Wrap tightly in parchment and store for up to a month. Defrost slowly in the fridge to avoid condensation.
- Gifting: Wrap each bar in foil or parchment, then place in a decorative box for a professional look.
Proper storage keeps the chocolate glossy and the filling crisp.
Nutrition and Serving Ideas
On average, one serving has about 420 calories, with healthy fats from pistachios and tahini balanced by the chocolate shell, according to USDA FoodData Central.
Serving ideas:
- Cut bars into smaller pieces and serve with coffee or mint tea.
- Slice into bite-sized cubes for party platters.
- Pair with unsweetened espresso for a bold contrast.
For gifting: Wrap each bar in parchment or foil, then slip it into a small box. It makes a thoughtful homemade present that feels luxurious.
Variations You Can Try
Once you master the base Dubai chocolate bar recipe, you can have fun experimenting.
- Chocolate types: Try dark for an intense bite, milk for creamy sweetness, or white for a lighter base.
- Nut twists: Swap pistachio cream for hazelnut or almond butter for a new flavor.
- Mini cups: Use silicone cupcake molds to make smaller, individual versions.
- Labubu molds: Kids and collectors love this playful character-shaped version.
- Tart bar style: Press the filling into a tart pan and cover with chocolate for a shareable dessert.
- Bake Master inspired: Add a hint of rose water or cardamom for Middle Eastern flair.
Each variation keeps the signature crunch and cream but gives you a new flavor story.
US Sourcing Guide
Some ingredients in a Dubai chocolate bar recipe may feel tricky to find, but they’re easier than you think.
- Kataifi pastry: Look in the freezer section of Middle Eastern or Mediterranean grocery stores. Many US shops carry it under “shredded phyllo dough.” You can also order it online.
- Pistachio cream: Brands like Cortas and Sicilian imports are often sold at international markets or specialty food stores. Pistachio butter is a good backup if cream is unavailable.
- Tahini: Widely available in most US supermarkets. Look for brands with a smooth, pourable texture.
- Food coloring and cocoa butter: Baking supply shops and major online retailers carry gel colors and cocoa butter for chocolate decorating.
- Chocolate molds and tools: Kitchen stores or online sellers like Amazon and Williams Sonoma have bar molds, thermometers, and piping bags.
With these sources, you can confidently recreate the viral treat at home.
Origin in Brief
The Dubai chocolate bar was created by Fix Dessert Chocolatier in Dubai, led by pastry chef Sarah Hamouda. What started as a local treat quickly turned viral thanks to its bold flavors and eye-catching design. The combination of pistachio, kataifi, tahini, and glossy chocolate struck a chord with dessert lovers worldwide.
Today, the bar has inspired countless home recipes, spin-offs, and even big-name brands adding their own versions. Making it at home lets you enjoy the same luxury without hopping on a plane to Dubai.
Conclusion
Making a Dubai chocolate bar at home is easier than it looks, and the results are impressive. With just a few specialty ingredients and some simple techniques, you can recreate the glossy shell, nutty filling, and signature crunch that made this treat world famous.
Whether you gift it to friends or keep a stash for yourself, each bite delivers the perfect mix of sweet, salty, and crunchy. Once you try it, you’ll see why this recipe has captured so much attention.
FAQs
What chocolate works best for a Dubai chocolate bar recipe?
Use good quality couverture or a bar with cocoa butter listed high in the ingredients. Dark chocolate gives a bolder flavor. Milk chocolate tastes creamier. White chocolate works for a lighter base and colorful splatters. Pick one you enjoy eating on its own.
Do I need to temper the chocolate or can I skip it?
You can skip it, but tempering gives a glossy finish and a clean snap. Melt, seed, then rewarm to the working range. If the shell looks dull, remelt and repeat. Tempering helps the bars release from the mold without sticking.
What can I use instead of kataifi for the crunch layer?
Crush plain Shredded Wheat or cornflakes for a quick swap. Toast them lightly for extra crunch. Keep the pieces small so the shell seals cleanly.
Is pistachio cream the same as pistachio butter or paste?
Not exactly. Pistachio cream often includes sugar and oil, so it tastes sweeter and spreads easily. Pistachio butter is ground nuts with a thicker, natural texture. Pistachio paste can be pure nuts or a pastry paste with sugar. Any of the three works, but you may need a teaspoon of tahini or a touch of oil to loosen thicker versions.
How do I stop the bar from cracking when I unmold it?
Brush a slightly thicker first coat, chill, then add a second thin coat before filling. Do not overfill. Tap the mold to release bubbles. Let the final seal set fully before unmolding.
How should I store the bars and for how long?
Keep bars in an airtight container in a cool, dry spot for up to 5 days. Refrigerate for about 2 weeks, then bring to room temp before serving. Freeze for 1 month, wrapped in parchment, and thaw slowly in the fridge to avoid condensation.
Can I make a nut-free version that still tastes good?
Yes. Swap pistachio filling for sunflower seed butter or tahini only, then boost crunch with extra toasted kataifi or crushed cornflakes. Always check product labels for cross-contact if you cook for someone with allergies.
Dubai Chocolate Bar Recipe
6
bars30
minutes10
minutes421
kcalMake glossy Dubai chocolate bars with pistachio cream, crispy kataifi, and a hint of tahini. Simple steps, clean snap, and gift ready results with bright speckles and rich, balanced flavor.
Ingredients
400 g milk or dark chocolate, finely chopped
120 g kataifi shredded phyllo
4 tablespoons 60 g unsalted butter
200 g pistachio paste or cream
¼ cup 60 g tahini
30 g white chocolate, optional for splatter
1 teaspoon coconut oil or vegetable oil
Gel food coloring, optional
Pinch flaky sea salt, optional
Directions
- Chill bar molds. For decoration, melt white chocolate with oil, tint, then flick into molds. Chill 10 minutes.
- Melt butter in a pan. Add kataifi. Toast until golden and crisp, 6 to 8 minutes. Cool.
- Mix toasted kataifi with pistachio paste and tahini until spreadable.
- Temper chocolate using seed or quick microwave method.
- Brush or spread a thin layer of tempered chocolate inside each mold. Chill 5 to 10 minutes.
- Add filling, leaving space at the top.
- Cover with more chocolate. Tap gently to release bubbles.
- Chill 30 minutes, then unmold. Sprinkle sea salt if using.
Equipment
 Silicone chocolate barSilicone chocolate bar
Notes
- Coat molds twice for a stronger shell.
- Fully toast kataifi to keep the crunch.
- Do not overfill, leave a small headspace before sealing.
- If chocolate looks dull, remelt and repeat tempering.
- Bring chilled bars to room temperature before serving.
- Store airtight in a cool, dry place up to 5 days, fridge 2 weeks, freezer 1 month.
Nutrition Facts
- Calories: 421kcal
- Fat: 28g
- Saturated Fat: 12g
- Sodium: 312mg
- Carbohydrates: 35g
- Sugar: 15g
- Protein: 10g


