 Skip to content
 Classic American cookies are a staple in every US household, but achieving that bakery-style depth often feels like a trade secret. These brown butter chocolate chip cookies bridge the gap between a simple home snack and a gourmet dessert. By focusing on the chemistry of the Maillard reaction, we elevate the standard chocolate chip cookie into something with complex toffee notes and a sophisticated salty-sweet balance that satisfies every craving.
Why You’ll Love This Recipe
The Umami-Toffee Boost: This recipe incorporates a unique twist by adding 2 tablespoons of non-fat dry milk powder to the butter as it melts, intensifying those rich, caramelized flavors I adore.
Scientific Flavor Depth: By adding extra milk powder, you provide more protein and lactose for the Maillard reaction, effectively doubling the nutty, caramelized brown butter flavor without altering the fat-to-liquid ratio for an unparalleled taste experience. Much like the complex layers found in my gingerbread cheesecake cookies, this recipe builds depth from the ground up.
Superior Texture: You get those coveted crisp edges paired with a fudgy, chewy center that stays soft for days, delivering that bakery-style bite every time. If you appreciate a cookie with great texture, you’ll also love my maple cinnamon cookies.
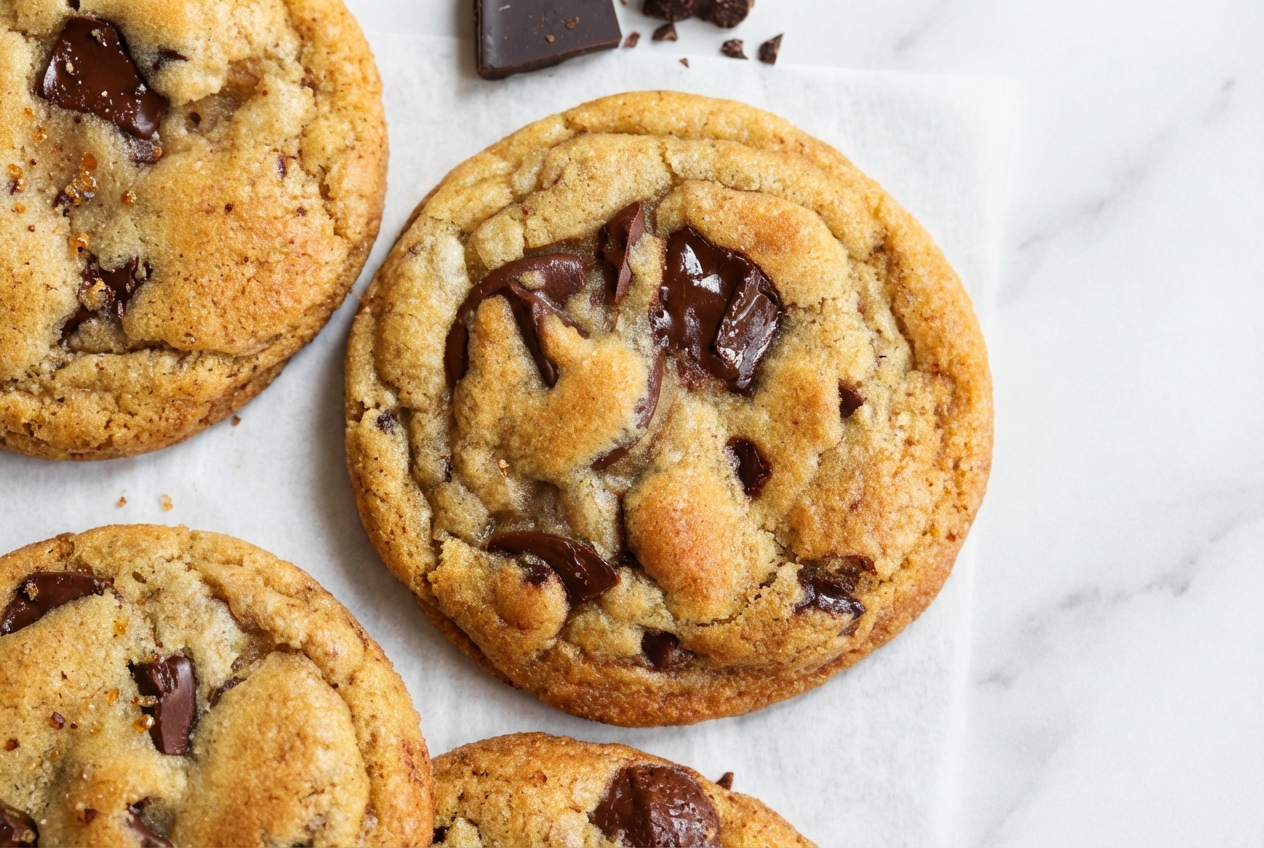
Complexity: The use of dark chocolate chunks creates decadent chocolate puddles that contrast beautifully with the toasted milk solids, ensuring a sophisticated treat.
Ingredients Needed

Gathering the right ingredients is the first step to any great recipe. Here’s what you’ll need for these ultimate brown butter chocolate chip cookies, each playing a crucial role in developing that irresistible flavor and texture.
Ingredients
- 140g Salted butter
- 50g Granulated sugar
- 100g Brown sugar
- 1 Large egg
- 15ml Milk
- 1 teaspoon Pure vanilla extract
- 1/4 teaspoon Salt
- 175g All purpose flour
- 3/4 teaspoon Baking soda
- 100g Dark chocolate chunks
- 50g Chocolate chips
- Flaky sea salt for sprinkling
Ingredient Notes and Substitutions
Salted vs Unsalted Butter: I prefer salted butter for browning because the salt crystals help distribute the flavor compounds more evenly as the butter cooks, enhancing the natural toffee notes. If you only have unsalted, simply add an extra pinch of fine salt to your dry ingredients.
Dark Chocolate Chunks vs Chips: While chips are convenient, chopped bar chocolate (chunks) has a higher cocoa butter content and fewer stabilizers, allowing it to melt into luxurious, gooey puddles. The standard of identity for cacao products defines these distinctions, impacting their melt and texture.
Sugar Selection: If you only have light brown sugar on hand, a simple trick is to add a teaspoon of molasses to it. This will help mimic the deep, caramelized notes and moisture content of dark brown sugar, crucial for that signature chew.
How to Make Brown Butter Chocolate Chip Cookies
Browning the Butter with a Twist
- Begin by melting the 140g of salted butter in a small, light-colored saucepan over medium heat. As the butter starts to liquefy, whisk in the 2 tablespoons of non-fat dry milk powder. Continue stirring constantly, ensuring the milk solids don’t burn, until the crackling sounds subside, and the butter transforms into a rich golden amber color with fragrant dark brown specks collecting at the bottom. This transformation usually takes about 8-10 minutes, so stay by the stove!
- Immediately pour the perfectly browned butter into a large mixing bowl to halt the cooking process. Transfer this bowl to the freezer for about 10 minutes, allowing it to cool and firm up. You’re looking for it to become opaque and firm, but not rock-hard, ideally reaching a temperature of 34°C (93°F).
Preparing the Dough Base
- While the butter cools, take a medium bowl and thoroughly whisk together the 175g all-purpose flour, 3/4 teaspoon baking soda, and 1/4 teaspoon salt. Whisk vigorously to ensure there are no lumps, which helps in achieving an even texture later.
- Once your brown butter has cooled to the right consistency, combine it with the 50g granulated sugar and 100g brown sugar in the large mixing bowl. Mix these together until the texture resembles wet, cohesive sand, ensuring the sugars are fully incorporated into the butter.
- Now, add the 1 Large egg, 15ml milk, and 1 teaspoon pure vanilla extract to the mixture. Beat these until the dough becomes beautifully creamy and everything is smoothly emulsified.
Final Mix and Bake
- Gradually add the whisked flour mixture to the wet ingredients. Fold it in gently with a spatula or mix on low speed just until the flour is almost fully incorporated. Before the last streaks of flour disappear, fold in the 100g dark chocolate chunks and 50g chocolate chips. This prevents overworking the dough, which can lead to tough cookies.
- Cover the bowl tightly with plastic wrap and refrigerate the dough for 1 to 2 hours. This crucial hydration rest allows the flour to absorb moisture, which is key to preventing your cookies from spreading too much during baking.
- Preheat your oven to 375°F (190°C) and line your baking sheets with parchment paper.
- Portion the chilled dough into approximately 14 smooth, uniform balls. Place them on the prepared baking sheets, ensuring they are about 3 inches apart to allow for proper spreading.
- Bake for 8-10 minutes, watching closely until the edges turn a beautiful golden brown and the centers still look delightfully soft and slightly underbaked. It’s vital not to overbake for that perfect chew.
- After removing from the oven, let the cookies cool on the baking sheet for 2 minutes. While they are still warm, sprinkle generously with flaky sea salt. Then, carefully transfer them to a wire rack to finish cooling completely.
The Science of Cookie Perfection

Achieving the perfect brown butter chocolate chip cookie isn’t just about following steps; it’s about understanding the delicious science behind them. From the moment butter browns to the final bake, every detail matters.
The Evaporation Factor: When browning butter, moisture evaporates, changing its composition. Starting with 140g of butter, you should aim for approximately 113-115g after browning. If your browned butter weighs significantly less, your dough might be too dry, impacting the final texture. This is especially relevant given the 80.0 percent minimum milkfat requirements for butter, which means about 20% of its initial weight is water.
Temperature Control: The temperature of your brown butter before mixing is paramount. Using liquid or hot brown butter will melt the sugars too quickly, ruining the emulsification and leading to greasy, flat cookies. Aiming for that ideal 34°C (93°F) ensures the sugars and fats combine correctly, much like the precision needed for my red velvet cookies to achieve their signature crinkled tops.
The Maillard Reaction: This magical chemical process is at the heart of brown butter’s incredible flavor. It’s the interaction between amino acids and lactose (sugars) under heat that creates hundreds of new aromatic compounds, giving these cookies their signature nutty, caramelized, and toasted notes. This deep flavor development is similar to how we achieve richness in other baked goods, even in simple treats like chocolate thumbprint cookies, where chocolate’s fats and sugars react.
Flour Hydration and Dough Chill: Chilling the dough for 1 to 2 hours allows the flour to fully hydrate, preventing the cookies from spreading too much in the oven. This creates a thicker, chewier cookie with those gorgeous crinkled edges.
Pro Tips & Troubleshooting
Pro Tips
- Chilling the Butter is Key: Cooling the brown butter back to a solid or semi-solid state before creaming with sugar prevents your cookies from spreading into flat, greasy puddles. It helps create a stable emulsion.
- Chop Your Chocolate Bars: For those coveted “chocolate puddles,” use chopped chocolate bars instead of standard chips. Bar chocolate has more cocoa butter and melts more smoothly, creating a truly decadent experience.
- The Pan Bang Trick: Immediately after taking the cookies out of the oven, gently bang the baking sheet on the counter a few times. This helps to create those beautiful ripples and wrinkles on the surface, pushing the warm air out and settling the cookie.
- Measure Flour Accurately: Always spoon and level your flour or, even better, use a kitchen scale for precise measurement. Too much flour is the number one reason for cakey, dry cookies.
- Molasses for Depth: If you only have light brown sugar, add a teaspoon of molasses to it. This boosts the moisture and rich, deep flavor, mimicking dark brown sugar perfectly.
Common Mistakes to Avoid
- Using Hot Brown Butter: Never add brown butter while it’s still liquid or hot. This melts the sugars prematurely, leading to a dough that’s too loose and cookies that spread excessively and turn greasy.
- Leaving the Stove Unattended: Browning butter requires your full attention. It goes from perfectly nutty to burnt in a matter of seconds, so stir constantly and watch for those amber hues.
- Overmixing the Dough: Once you add the flour, mix only until just combined. Overmixing develops too much gluten, which can result in tough, chewy cookies instead of tender ones.
- Baking at Low Temperatures for Too Long: Baking at 350°F (175°C) for an extended period can dry out your cookies. Higher heat, like 375°F (190°C), helps to set the edges quickly while keeping the center fudgy and soft.
Serving & Storage

These brown butter chocolate chip cookies are truly best enjoyed warm, straight from the oven, with the chocolate still gooey and fragrant. A cold glass of whole milk is their absolute perfect companion, balancing the richness beautifully.
For an extra indulgent treat, consider sandwiching a scoop of homemade vanilla bean ice cream between two slightly cooled cookies for the ultimate ice cream sandwich. You could also drizzle a touch of homemade salted caramel over them just before serving to heighten those toffee notes.
Store any leftover cookies in an airtight container at room temperature for up to 3-4 days to maintain their freshness and chewiness. If you want to keep them longer, you can freeze the baked cookies for up to 2 months. Simply thaw them at room temperature or warm gently in a low oven for a few minutes to bring back that freshly baked taste.
Brown Butter Chocolate Chip Cookies
Ingredients
Equipment
Method
- Melt 140g of salted butter in a small saucepan over medium heat. Whisk in 2 tablespoons of non-fat dry milk powder and stir constantly until the butter turns a rich golden amber color with fragrant dark specks (about 8-10 minutes).
- Immediately pour the browned butter into a large mixing bowl and place in the freezer for about 10 minutes to cool until opaque and firm, ideally reaching 34°C (93°F).
- In a medium bowl, whisk together 175g all-purpose flour, 3/4 teaspoon baking soda, and 1/4 teaspoon salt until no lumps remain.
- Combine the cooled brown butter with 50g granulated sugar and 100g brown sugar. Mix until the texture resembles wet sand.
- Add 1 large egg, 15ml milk, and 1 teaspoon vanilla extract. Beat until the mixture is creamy and fully emulsified.
- Gradually fold the dry flour mixture into the wet ingredients using a spatula. Just before the flour is fully incorporated, fold in 100g dark chocolate chunks and 50g chocolate chips.
- Cover the bowl and refrigerate the dough for 1 to 2 hours to allow for proper flour hydration and to prevent excessive spreading.
- Preheat your oven to 375°F (190°C) and line baking sheets with parchment paper.
- Portion the chilled dough into 14 balls and place them 3 inches apart on the sheets.
- Bake for 8-10 minutes until the edges are golden brown but the centers are still soft. Let cool on the sheet for 2 minutes, sprinkle with flaky sea salt, then transfer to a wire rack.


