 Skip to content
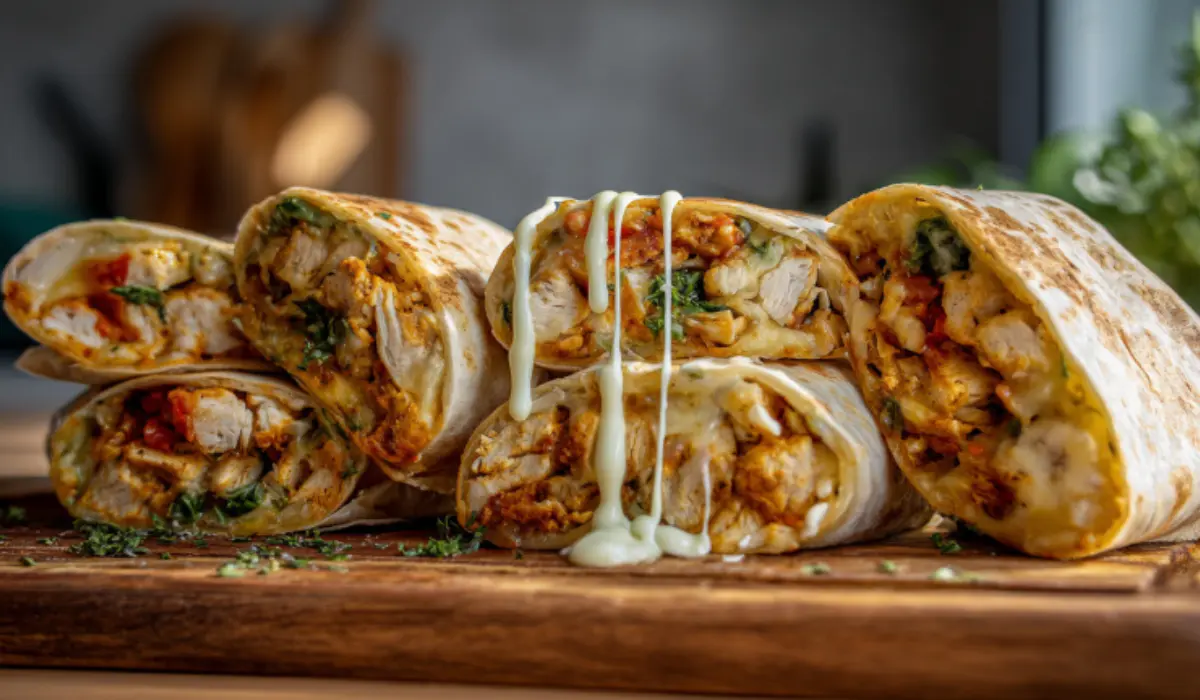
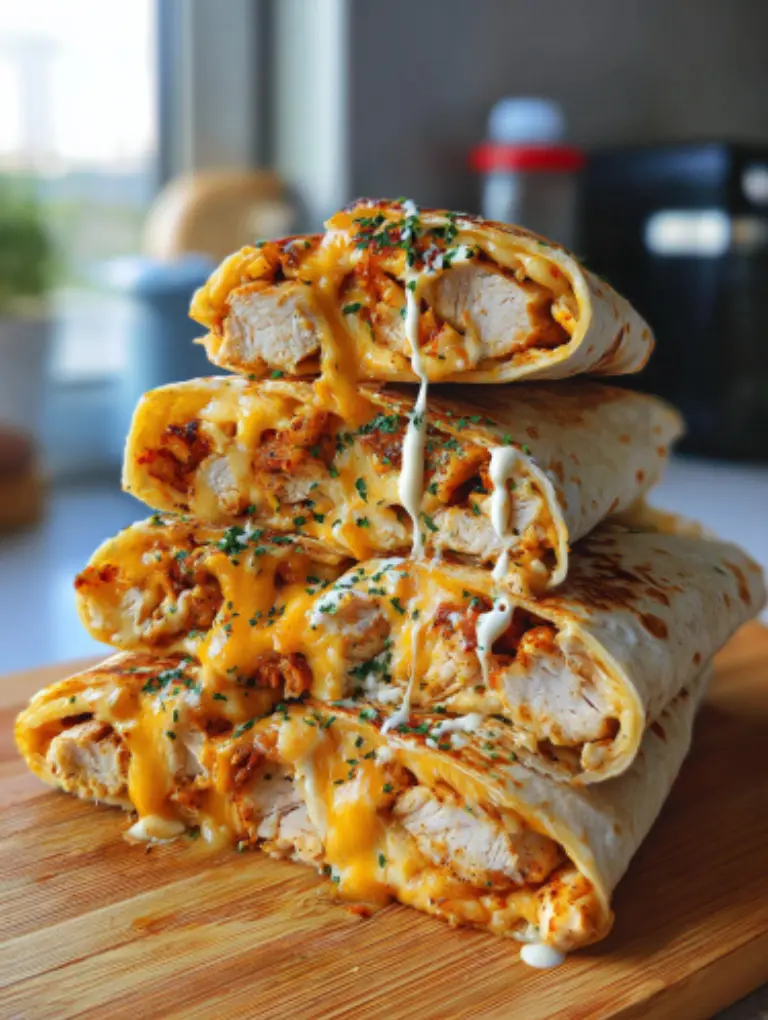
Craving something cheesy, garlicky, and ready in minutes? These Mouthwatering Cheesy Garlic Chicken Wraps hit that sweet spot between comfort and convenience. Tender chicken meets a creamy garlic sauce, then melts together with a generous layer of oozy cheese inside a golden, toasty tortilla. You get crisp edges, a soft center, and big flavor in every bite. This version keeps the method simple and the results bold, so you can make it on a weeknight or for game day. Grab a skillet, warm the tortillas, and dinner practically makes itself.
Why You’ll Love This Recipe
- Quick and easy: You can have these wraps sizzling on your skillet in under 20 minutes perfect for busy nights.
- Simple ingredients: Everything you need is likely already in your fridge or pantry, from chicken and cheese to a bit of garlic and mayo.
- Flavor-packed: Each bite brings creamy garlic sauce, melty cheese, and juicy chicken for a combo that never gets old.
- Versatile: Enjoy it hot off the pan, meal-prepped for lunch with Sonoma chicken salad, or served as party bites for a crowd.
- Comfort food done right: Cheesy, golden, and satisfying without feeling heavy.
This recipe stands out because it nails that balance rich and garlicky yet light enough to eat any time of day. The yogurt adds a subtle tang, the hot sauce gives gentle heat, and the cheese pulls everything together. One bite, and you’ll understand why it’s everyone’s favorite wrap.
Mouthwatering Cheesy Garlic Chicken Wraps
Golden, crispy tortillas filled with tender chicken, creamy garlic sauce, and melted cheese. A quick, flavorful wrap perfect for weeknights, meal prep, or satisfying comfort-food cravings anytime.
2
wraps10
minutes10
minutes476
kcalIngredients
- For the Chicken and Sauce
7 oz cooked chicken, chopped or shredded (rotisserie works great)
2 garlic cloves, minced or grated
2 tbsp light mayonnaise
1 tbsp Greek or plain yogurt
2 tsp hot sauce (like Frank’s)
¼ tsp salt
- For Assembly
2 large tortillas (regular or low-carb)
3 oz grated cheese (cheddar–mozzarella blend)
1 green onion, finely chopped
Olive oil spray
Directions
- In a medium bowl, combine chicken, garlic, mayonnaise, yogurt, hot sauce, and salt. Mix until evenly coated.
- Lay a tortilla flat. Add 2 tbsp of cheese to the lower third, top with ⅔ cup of chicken mixture, and sprinkle more cheese and green onions.
- Fold in the sides, roll tightly, and place seam-side down.
- Heat a skillet over medium, coat lightly with oil spray, and toast wraps for 3–4 minutes per side until golden and crisp.
- Cover with a lid during the final minute to melt the cheese fully.
- Let rest for one minute before slicing in half.
Notes
- Gluten-Free: Use certified gluten-free tortillas.
- Dairy-Free: Swap for vegan mayo, yogurt, and cheese shreds.
- Make Ahead: Prepare and refrigerate assembled wraps for up to 24 hours before cooking.
- Reheat Tip: Reheat in a skillet or air fryer to maintain crispness.
- Flavor Boost: Add paprika, roasted garlic powder, or extra hot sauce.
Nutrition Facts
- Calories: 476kcal
- Fat: 27g
- Saturated Fat: 11g
- Cholesterol: 120mg
- Sodium: 1090mg
- Carbohydrates: 19g
- Fiber: 1g
- Sugar: 2g
- Protein: 38g
- Calcium: 376mg
- Iron: 3mg
Ingredients Needed
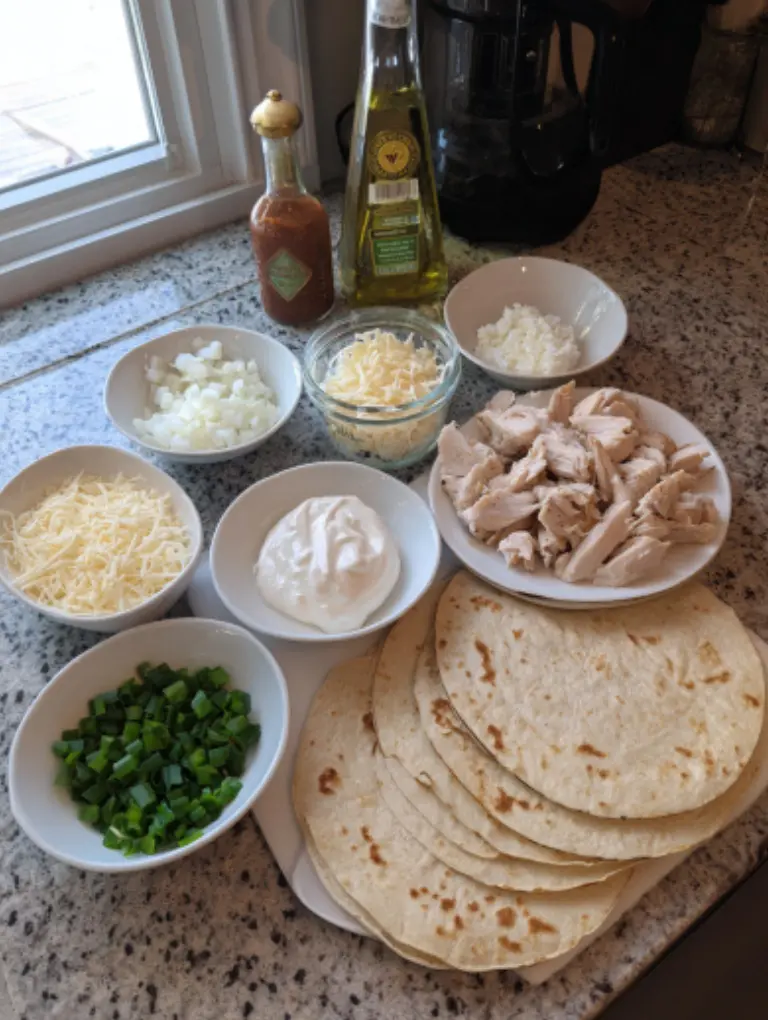
These Cheesy Garlic Chicken Wraps come together with just a few simple ingredients, all working perfectly to create flavor, texture, and melt-in-your-mouth satisfaction.
For the Chicken and Sauce
- Cooked chicken (about 7 oz / 200 g): Shredded or chopped; rotisserie chicken works great for convenience.
- 2 garlic cloves, minced or grated: Fresh garlic gives a stronger aroma; adjust to taste.
- 2 tablespoons light mayonnaise: Adds creaminess and helps bind the filling.
- 1 tablespoon Greek yogurt or plain yogurt: Adds tang and lightens up the sauce.
- 2 teaspoons hot sauce (like Frank’s): Balances richness with a touch of heat.
- ¼ teaspoon salt: Enhances the overall flavor.
For Assembly
- 2 large tortillas: Regular or low-carb; soft, pliable wraps fold and toast best.
- 3 oz grated cheese (about 90 g): A mix of cheddar and mozzarella melts beautifully.
- 1 green onion, finely chopped: Adds freshness and mild sharpness.
- Olive oil spray: Helps achieve a golden, crisp exterior when toasting.
Equipment
- Nonstick skillet or griddle
- Mixing bowl
- Silicone spatula or spoon
- Tongs or turner
- Knife and cutting board
Notes & Substitutions
- Gluten-free: Use certified gluten-free tortillas.
- Dairy-free: Substitute dairy-free mayo, plant-based yogurt, and vegan cheese shreds.
- Budget-friendly: Use leftover chicken or canned chicken breast; both work well.
- Flavor twist: Add paprika, smoked salt, or roasted garlic powder for extra depth.
- Texture tip: Mix cheddar (sharp flavor) with mozzarella (perfect melt) for the best balance.
- Grease-conscious swap: For a richer melt with less grease, choose part-skim mozzarella, which has less fat per serving than cheddar, as reflected in USDA-sourced data on MyFoodData and cheddar cheese data.
How to Make Cheesy Garlic Chicken Wraps
Follow these clear, step-by-step instructions to make perfectly crispy, gooey wraps every time.
Before You Start
- Prep the ingredients: Mince the garlic, chop the chicken, and grate the cheese before heating the pan.
- Preheat: If you’re using the oven or air fryer instead of a skillet, preheat to 375°F (190°C).
- Warm tortillas: Briefly heat each tortilla in a dry pan for 15 seconds per side this keeps them pliable and prevents tearing.
Skillet Method (Best for Classic Texture)
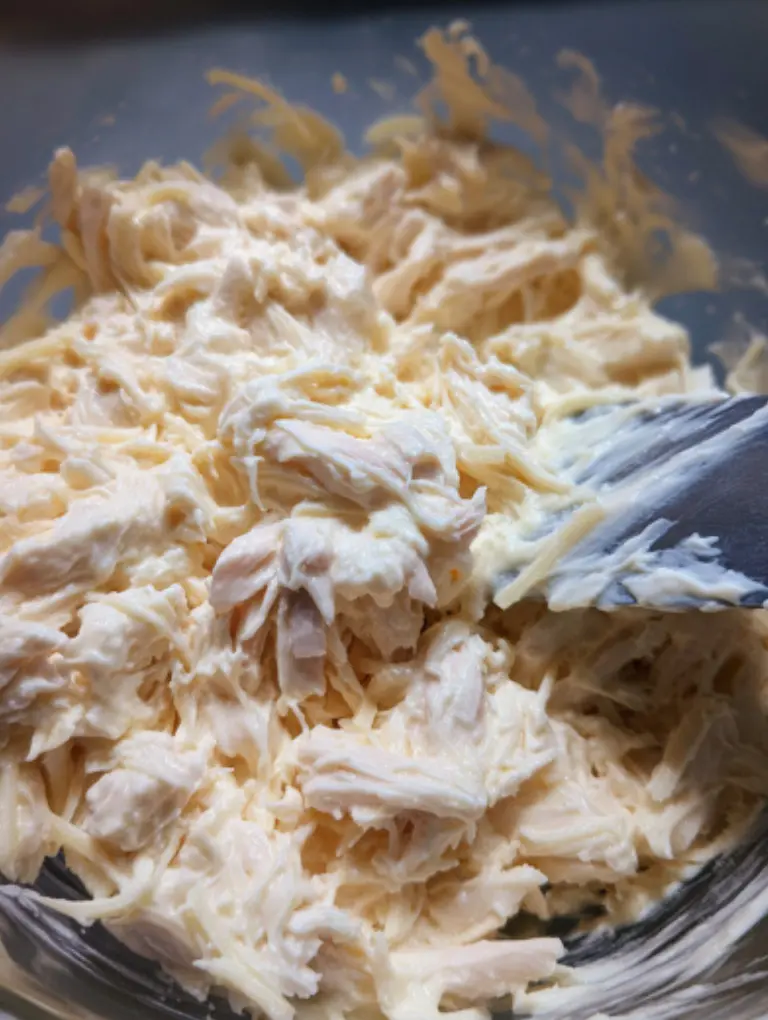
- Mix the filling: In a medium bowl, combine chopped chicken, garlic, mayonnaise, yogurt, hot sauce, and salt. Stir until evenly coated.
- Tip: The yogurt lightens the sauce while keeping the creamy consistency.
- Assemble: Lay one tortilla flat. Sprinkle 2 tablespoons of cheese in the lower third, spoon on ⅔ cup of chicken mixture, then top with another tablespoon of cheese and a pinch of green onion.
- Why this matters: Layering cheese both under and over the filling helps seal the wrap when it melts.
- Fold: Tuck in the sides, then roll tightly from the bottom up, securing the filling.
- Visual cue: The edges should meet cleanly without cracks or gaps.
- Toast: Heat a nonstick skillet over medium heat and lightly coat with olive oil spray. Place the wraps seam-side down.
- Cook: Pan-toast for 3–4 minutes per side until golden brown and crisp. Cover with a lid for the last minute to melt the cheese fully.
- Serve: Let rest for 1 minute before slicing in half for a clean cut.
Air Fryer Method (Crispiest Results)
- Preheat the air fryer to 375°F (190°C).
- Brush or spray wraps with olive oil.
- Place seam-side down in the basket and air-fry for 6–8 minutes, turning halfway.
- Remove when golden and bubbling at the edges.
Oven Method (Batch-Friendly)
- Preheat the oven to 375°F (190°C).
- Line a baking sheet with parchment paper and lightly oil it.
- Arrange wraps seam-side down and bake for 10–12 minutes, flipping halfway for even color.
- For extra crispness, broil for the last 1–2 minutes.
Folding & Toasting Tips
- Keep the filling about 1 inch from the edges to avoid leaks.
- Always place wraps seam-side down first to seal.
- If wraps start to unroll, use a toothpick to secure them before cooking.
- For melty perfection, let wraps sit covered for 1 minute after cooking before slicing.
Pro Tips & Troubleshooting
Expert Tips for Best Results
- Use freshly grated cheese: Pre-shredded cheese often contains anti-caking agents that stop smooth melting. Grating your own gives that irresistible cheese pull.
- Don’t overcrowd the pan: Toast two wraps at a time max, so each gets even browning and crisp texture.
- Keep fillings balanced: Overstuffing makes wraps tear or leak. Aim for a ¼-inch border around the edges.
- Control heat: Medium heat allows the cheese to melt while the tortilla crisps without burning.
- Use a lid: Covering the skillet traps steam, heating the center evenly so the filling stays hot.
Common Mistakes to Avoid
- Overmixing the filling: It can make the texture pasty. Stir just until combined.
- Skipping preheating: Cold pans cause soggy wraps and uneven browning.
- Using too much sauce: Excess moisture leads to sogginess. Stick to the listed measurements.
- Cutting too soon: Give wraps one minute to rest before slicing this keeps the cheese from spilling out.
- Leaving wraps unattended: They brown quickly; check the bottom after two minutes to avoid burning.
Creative Shortcut
Short on time? Use rotisserie chicken straight from the grocery store. Mix it with the sauce and assemble no cooking or shredding needed. It saves 10 minutes and still delivers great flavor.
Serving, Storage & Variations
Serving Ideas
- Simple & Classic: Slice each wrap in half and serve with extra hot sauce or garlic mayo on the side.
- Make it a Meal: Pair with a crisp green salad, creamy scalloped potatoes, or a side of tomato soup.
- Party Style: Cut wraps into bite-sized rolls, secure with toothpicks, and serve with spinach and artichoke wonton cups as warm appetizers.
- Extra Touch: Sprinkle chopped parsley or a drizzle of garlic butter before serving for a richer flavor.
Storage Guidelines
- Refrigerate: Wrap leftovers tightly in foil or airtight containers; cooked poultry dishes keep 3 to 4 days in the fridge.
- Freeze: Wrap individually and store in a freezer bag; cooked meat or poultry leftovers keep 2 to 6 months frozen.
- To Thaw: Move frozen wraps to the fridge overnight.
Reheating Methods
- Skillet: Reheat over medium heat for 3–4 minutes per side until crisp and the filling is hot; leftovers should reach 165°F internally.
- Oven: Warm at 350°F (175°C) for 10–12 minutes.
- Air fryer: Heat at 370°F (188°C) for 4–5 minutes for a crisp finish.
- Avoid microwaving it softens the tortilla and makes it soggy.
Variations
- Spicy Kick: Add jalapeños, cayenne, or extra hot sauce to the mix.
- Veggie Wrap: Replace chicken with sautéed mushrooms, spinach, and bell peppers.
- Low-Carb Version: Use low-carb tortillas or lettuce wraps.
- Dairy-Free Option: Substitute dairy-free mayo, yogurt, and vegan cheese shreds.
- BBQ Twist: Swap hot sauce for BBQ sauce and add caramelized onions for sweetness, or try pesto chicken flatbread for a herb-forward spin.
Tip: Some of these variations tie in perfectly with the FAQs below (like meal prep and gluten-free options).
Nutritional Information
Here’s the approximate nutrition breakdown for one cheesy garlic chicken wrap. These values are based on the original Cooked & Loved recipe, adjusted for standard US ingredients and serving size.
| Nutrient | Per Serving (1 wrap) |
|---|---|
| Calories | 476 kcal |
| Protein | 38 g |
| Total Fat | 27 g |
| Saturated Fat | 11 g |
| Carbohydrates | 19 g |
| Fiber | 1 g |
| Sugar | 2 g |
| Cholesterol | 120 mg |
| Sodium | 1090 mg |
| Calcium | 376 mg |
| Iron | 3 mg |
| Vitamin A | 543 IU |
| Vitamin C | 5 mg |
These wraps pack a solid protein boost from the chicken and cheese while keeping carbs moderate. Greek yogurt can provide live cultures that may support gut health, and it adds a slight tang that balances the richness of the mayo and cheese.
Nutrition tip: If you make ingredient swaps (like low-fat cheese or different tortillas), use an online calculator such as MyFitnessPal or Cronometer to double-check your personalized values.
Conclusion
These Mouthwatering Cheesy Garlic Chicken Wraps prove that fast food can be homemade, wholesome, and irresistibly satisfying. Each bite hits that perfect trio crispy tortilla, creamy garlic filling, and gooey melted cheese. They’re quick enough for weeknights, crowd-pleasing for parties, and versatile enough for meal prep.
If you try this recipe, drop a star rating and leave a comment to share your twist did you air-fry, oven-bake, or go all-in on the skillet crisp? Your feedback helps other food lovers find and perfect their version too.
Love this recipe? Share it on Pinterest or Facebook, and check out our Thai peanut chicken wraps for a bold, nutty twist.
What variation will you try next extra spicy, veggie-loaded, or double cheese? Let us know below!
Frequently Asked Questions (FAQ)
Can I use rotisserie chicken for these cheesy garlic chicken wraps?
Absolutely. Rotisserie chicken saves time and adds flavor. Just remove the skin, shred the meat, and mix it with the garlic sauce as directed. It reheats beautifully inside the wrap without drying out.
Which cheese melts best without making the wrap greasy?
A mix of cheddar and mozzarella works perfectly cheddar adds sharpness while mozzarella gives that smooth stretch. If you prefer less oil, try part-skim mozzarella or Monterey Jack for a cleaner melt.
How do I keep the wrap from tearing or leaking while I fold it?
Warm the tortilla slightly before filling. Keep the mixture about an inch from the edges, then fold in the sides before rolling tightly from the bottom. Always place seam-side down in the pan to seal it naturally.
What is the best way to make these in an air fryer?
Preheat the air fryer to 375°F (190°C). Spray the wraps lightly with oil, place them seam-side down, and cook for 6–8 minutes, flipping halfway. The result is extra crispy on the outside and perfectly melted inside.
Can I make cheesy garlic chicken wraps ahead for meal prep?
Yes! Prepare and fill the wraps, then store them uncooked in the fridge for up to 24 hours. When ready to eat, cook them fresh in a skillet or air fryer for the best texture.
How do I reheat leftovers so the tortilla stays crisp?
Reheat in a skillet for 3–4 minutes per side or use an air fryer at 370°F (188°C) for 5 minutes. Avoid microwaving; it makes the wrap soft and limp.
Are these wraps freezer-friendly, and for how long?
They freeze well for up to 2 months. Wrap each one tightly in foil or parchment, then place in a freezer bag. Reheat directly from frozen in the oven or air fryer until hot and crisp.


