 Skip to content
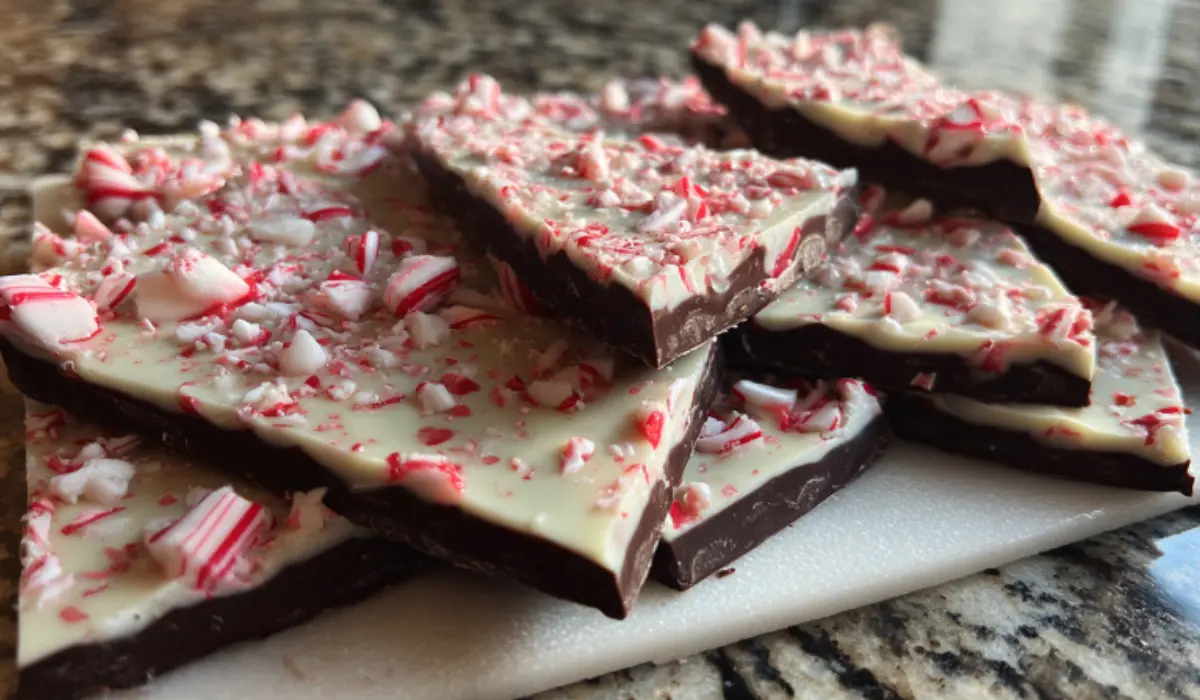
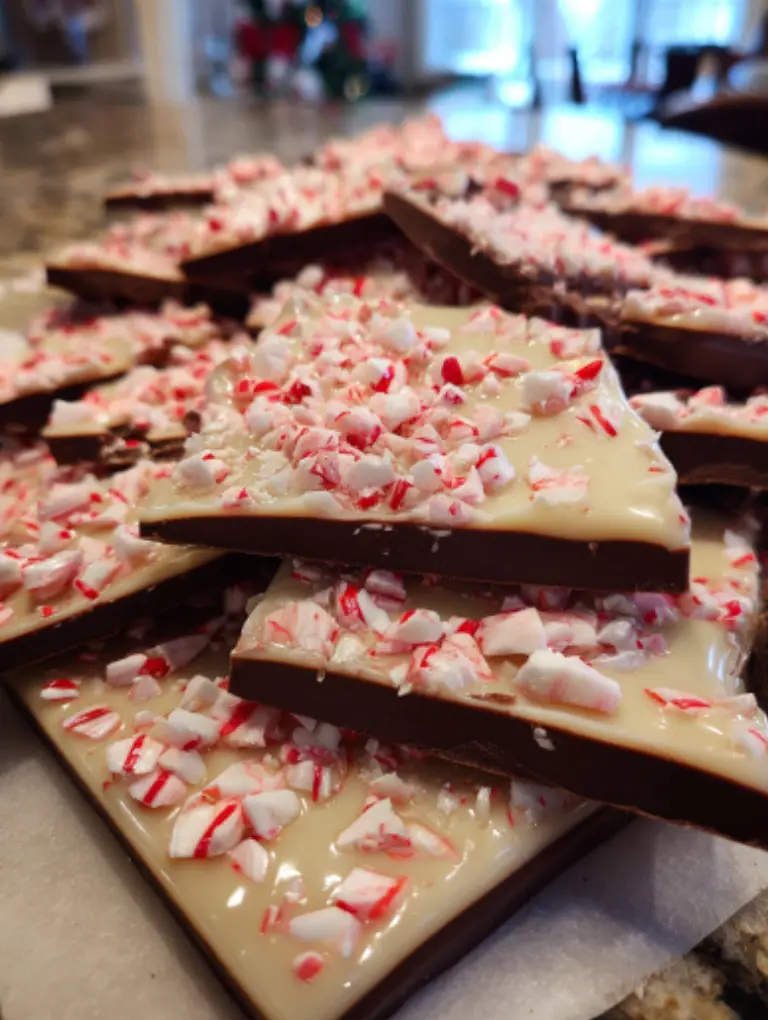
Few things say holiday magic like a tray of homemade candy. This Christmas candy recipe brings together creamy chocolate, cool peppermint, and the satisfying crunch of crushed candy canes in one irresistible bite. It’s a treat that looks festive, tastes decadent, and takes less effort than you’d expect. Whether you’re filling gift tins, planning a dessert table, or sneaking a piece for yourself, this simple peppermint bark is your ticket to sweet holiday cheer.
Christmas Candy Recipe
This Christmas candy recipe blends creamy milk and white chocolate with crushed peppermint for a festive, no-bake treat that’s quick, giftable, and loved by everyone during the holidays.
24
pieces15
minutes15
minutes330
kcalIngredients
1 ½ pounds milk chocolate, coarsely chopped
1 ½ pounds white chocolate, chopped
1 teaspoon oil-based peppermint flavoring (not extract)
30 peppermint hard candies, crushed and divided
Directions
- Prep the pan: Line a 9×13-inch baking pan with parchment or wax paper. Scatter one-third of the crushed peppermint on the bottom.
- Melt milk chocolate: In a double boiler or microwave-safe bowl, melt milk chocolate slowly, stirring until smooth.
- Layer and chill: Pour over peppermint in the pan, spread evenly, and top with another third of peppermint. Chill 30 minutes until firm.
- Melt white chocolate: Using a clean bowl, melt white chocolate gently. Stir in peppermint flavoring until silky.
- Top and set: Spread over chilled milk chocolate layer. Sprinkle remaining peppermint on top. Chill another 30 minutes until fully set.
- Break and serve: Lift bark from the pan and break or cut into pieces. Store in an airtight container.
Notes
- Avoid moisture: Keep utensils and bowls completely dry to prevent seizing.
- Flavor boost: Add a dash more peppermint flavoring if you love a stronger mint.
- Diet swaps: Use dairy-free chocolate and gluten-free candy canes for vegan or GF versions.
- Storage: Keep in a cool, dry spot for up to two weeks, or freeze for two months.
Nutrition Facts
- Calories: 330kcal
- Fat: 18g
- Saturated Fat: 11g
- Cholesterol: 13mg
- Sodium: 45mg
- Potassium: 81mg
- Carbohydrates: 41g
- Sugar: 37g
- Protein: 3g
- Calcium: 98mg
Why You’ll Love This Recipe
- Quick to make: Two melt-and-layer steps, then chill. You get festive candy in under an hour, mostly hands off.
- Simple ingredients: Chocolate, peppermint flavor, and candy canes. Nothing fussy, just holiday staples.
- Beginner friendly: No thermometer required. Clear texture cues help you nail the glossy melt and clean snap.
- Perfect for gifting: Break into shards, tuck into tins, and pair with Reindeer Chow at parties and cookie swaps.
- Big flavor, pretty finish: Cool peppermint cuts through rich chocolate, while the red and white candy pieces add sparkle on the platter.
Ingredients Needed
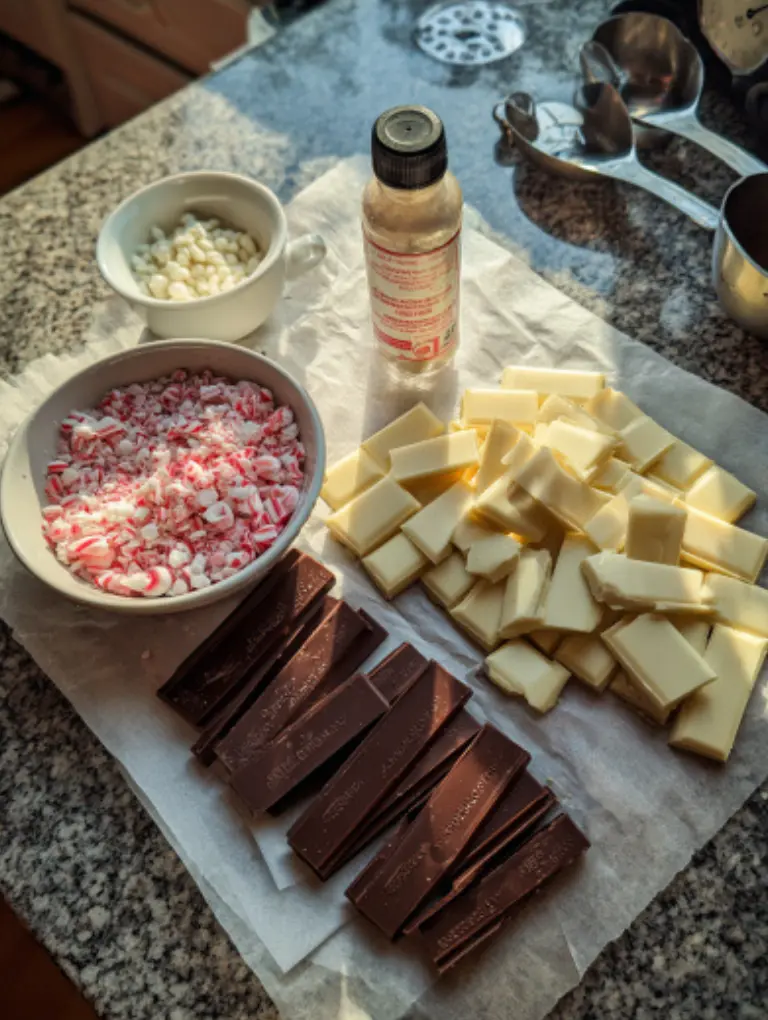
For the Peppermint Bark
- 1 ½ pounds milk chocolate, coarsely chopped
- 1 ½ pounds white chocolate, chopped
- 1 teaspoon oil-based peppermint flavoring, or more to taste
- 30 peppermint hard candies, crushed and divided
Notes & Substitutions
- Chocolate choices: Use high-quality bars for smoother melting. Candy melts work in a pinch, but real chocolate gives the best flavor.
- Peppermint extract: Choose oil-based flavoring—alcohol-based extracts can cause chocolate to seize. Adjust to taste if you like a stronger mint hit.
- Candy canes: Regular red-and-white mints work fine. Crush gently for even texture large chunks add crunch, fine dust gives sparkle.
- Dietary swaps: Use dairy-free or vegan chocolate for a plant-based version. Gluten-free candy canes make the whole recipe gluten-free.
- Budget tip: Buy chocolate chips in bulk around the holidays—they melt easily and taste great.
How to Make Christmas Candy
Before You Start
Line a 9×13-inch pan with wax or parchment paper. Have all ingredients measured and ready since melted chocolate sets quickly. Crush the peppermint candies using a zip-top bag and rolling pin, aiming for a mix of small bits and glittery dust.
Step-by-Step Instructions
- Melt the milk chocolate.
Use a double boiler or a heatproof bowl over simmering water. Stir often until smooth and glossy. Avoid water contact—just one drop can make the chocolate grainy. - Build the first layer.
Scatter one third of the crushed peppermint over the lined pan. Pour in the melted milk chocolate and spread evenly. Sprinkle another third of peppermint on top for extra crunch. Refrigerate for about 30 minutes until firm. - Melt the white chocolate.
In a clean bowl, melt the white chocolate gently. Stir constantly and remove from heat just before fully melted to prevent scorching. Add the peppermint flavoring and mix until silky. - Add the top layer.
Spread the white chocolate over the chilled milk-chocolate layer. Smooth quickly before it starts to set. Sprinkle the remaining peppermint evenly over the surface. - Chill and break.
Refrigerate again for about 30 minutes until completely firm. Lift the bark from the pan and break it into rustic pieces with your hands or cut with a sharp knife for clean edges.
Visual and Texture Cues
- Right melt: Chocolate should flow smoothly off a spoon, not clump.
- Set test: When pressed gently, the bark should snap cleanly without bending.
- Tip: If your kitchen is warm, chill longer for perfect layers that hold their shape.
Pro Tips & Troubleshooting
Expert Tips
- Use dry tools only, because even a little moisture can make chocolate seize and turn grainy, as explained by Iowa State University Extension.
- Temper if you can. For a glossy finish and crisp snap, melt chocolate to about 115°F, cool to 90°F, then spread.
- Chill only until set, then store tightly wrapped in a cool, dry place rather than the refrigerator, which can promote bloom and off flavors, according to University of Idaho Extension.
- Crush candy right. Smash gently so you get bits, not dust texture makes every bite pop.
- Clean layers: Let the first layer fully harden before pouring the next for defined contrast.
Common Mistakes to Avoid
- Overheating chocolate: Melt slowly on low heat or short microwave bursts.
- Mixing water and chocolate: Even steam can ruin texture keep bowls and spatulas bone dry.
- Skipping cooling time: If the base isn’t firm, layers will blend and lose that pretty stripe.
- Rushing the spread: White chocolate sets fast, so pour and smooth right after melting.
Creative Trick
For perfect shards, lift the chilled bark out of the pan, flip it over, and score the back lightly with a knife before snapping it breaks into neater, giftable pieces.
Serving, Storage & Variations
Serving Ideas and Garnishes
Arrange the bark pieces on a holiday platter or tuck them into small cellophane bags tied with ribbon. They make ideal party favors or stocking stuffers. Serve alongside coffee, hot cocoa, or Grinch Punch for a sweet after-dinner treat. For a festive twist, drizzle a little melted dark chocolate over the top before chilling.
Oreo truffles make ideal party favors or stocking stuffers alongside your bark.
Storage and Freezer Guide
- Room temperature: Store in an airtight container in a cool, dry spot, which University of Idaho Extension recommends over refrigeration to avoid flavor pickup and bloom.
- Refrigerator: If your kitchen runs warm, refrigerate up to three weeks. Let pieces sit at room temperature 10 minutes before serving for best texture.
- Freezer: Freeze for up to two months in airtight bags. Thaw in the fridge overnight to avoid condensation.
Reheating or Softening
If the bark feels too firm straight from the fridge, leave it on the counter for about 10 minutes to soften slightly before serving.
Variations
- Dark Chocolate Swirl: Replace half the milk chocolate with dark chocolate for a richer flavor.
- Nutty Toffee Crunch: For true toffee vibes, try this saltine toffee recipe and sprinkle chopped pecans or almonds between layers.
- Kid-Friendly Sprinkle Bark: Swap crushed candy canes for holiday sprinkles same fun crunch, milder mint.
- Vegan Option: Use dairy-free chocolate and coconut oil instead of butter for melt-smooth layers.
- Extra Minty Version: Add crushed mint Oreos between layers for a cool, creamy contrast.
Nutritional Information
Per-Serving Table (Approximate Values)
| Nutrient | Amount per Serving (1 piece, about 1.5 oz) |
|---|---|
| Calories | 330 |
| Total Fat | 18 g |
| Saturated Fat | 11 g |
| Carbohydrates | 41 g |
| Sugars | 37 g |
| Protein | 3 g |
| Cholesterol | 13 mg |
| Sodium | 45 mg |
| Calcium | 98 mg |
| Potassium | 81 mg |
Notes on Calculation and Ingredient Swaps
These numbers come from standard nutritional data for milk and white chocolate combined with peppermint candy. Using dark or dairy-free chocolate will slightly lower sugar but increase fat. Opt for sugar-free peppermint candy to reduce carbs if desired.
To verify accuracy after any substitutions, use online tools such as Cronometer or MyFitnessPal. They allow quick recalculations when adjusting chocolate types or serving sizes.
Conclusion
This Christmas candy recipe delivers everything the season promises sweetness, sparkle, and the joy of giving something homemade. It’s a fast, no-stress treat that looks beautiful and tastes like pure holiday cheer. With just a few ingredients, you can create glossy layers of chocolate and peppermint that vanish faster than wrapping paper on Christmas morning.
If you make this recipe, share your results in the comments and leave a star rating. Tell us your twist did you try dark chocolate or extra mint? Your feedback helps others make their candy even better. And don’t forget to spread the sweetness by sharing this recipe on Pinterest or Facebook!
Frequently Asked Questions (FAQ)
Can I make this without a candy thermometer?
Yes. This recipe doesn’t require one since you melt chocolate rather than cook sugar syrup. If you ever make toffee or caramels, a thermometer helps track standard stages like soft ball (235–240°F) and hard crack (300–310°F), benchmarks listed by Michigan State University Extension, but here simple visual cues smooth melt and shiny flow work perfectly.
How do I keep chocolate from seizing?
Avoid all contact with water or steam. Even a few drops can turn melted chocolate into a thick paste. Always use dry tools, and melt slowly over low heat or short microwave bursts.
How long does homemade Christmas candy last?
At room temperature in a sealed container, it stays fresh up to two weeks. If stored in the refrigerator, it can last three weeks, and up to two months in the freezer if well wrapped.
Can I freeze peppermint bark or toffee?
Yes. Freeze pieces in airtight containers or freezer bags with parchment between layers, and you can freeze peppermint fudge the same way. Thaw in the fridge overnight to avoid moisture beads forming on the chocolate surface.
What’s the best way to ship this as a gift?
Pack pieces snugly in a sturdy tin with parchment layers; the USDA notes that homemade cookies and candy are good candidates for mailing, while perishable foods are not.
How thick should the bark or toffee layer be?
Aim for about ¼ inch thick. Thinner layers cool faster and break neatly, while thicker bark can be harder to bite.
Can I make this gluten-free or dairy-free?
Yes. Use certified gluten-free candy canes and dairy-free chocolate such as Enjoy Life or Hu brand. The taste and texture stay rich and festive.


