Skip to content
 There’s something incredibly comforting and satisfying about a perfectly cooked quesadilla. For me, beef quesadillas are more than just a quick meal; they are a timeless classic that brings warmth and flavor to any weeknight table. I’ve spent years in my kitchen perfecting the art of the beef quesadilla, and I’m thrilled to share my secrets for achieving not just a delicious filling, but also an unbelievably crispy tortilla. Prepare to learn how to make the most flavorful and truly crispy beef quesadillas, complete with my special method for a perfect crust and a vibrant homemade cilantro-lime crema that will elevate every bite.
Why You’ll Love This Recipe
I know you’re going to fall in love with these crispy skillet beef quesadillas, and it all comes down to a few key elements that really set this recipe apart.
The Crispy Cheese Layer: My absolute favorite part of this recipe, and what truly makes these beef quesadillas special, is the unique crispy cheese crust. Before you even place the tortilla, you’ll sprinkle a thin layer of shredded cheese, like Oaxaca or Monterey Jack, directly onto the hot, dry skillet. As the tortilla goes on top, this cheese melts, crisps up, and forms an irresistible frico-like layer. This isn’t just for flavor; this Maillard reaction creates an amazing crunch and also acts as a moisture barrier, ensuring your tortilla stays perfectly crispy and never soggy.
The Cilantro-Lime Crema: Forget plain sour cream! Serving these beef quesadillas with my quick homemade cilantro-lime crema is a game-changer. The fresh herbs and bright, acidic lime juice in this emulsified crema cut through the richness of the savory beef and cheesy filling. It offers a smooth, cooling texture and a burst of fresh flavor that balances the entire dish beautifully.
Beyond these special touches, you’ll love how quick and easy this is for a weeknight dinner. It’s incredibly family-friendly, budget-conscious, and a much more satisfying alternative to any takeout. Every bite is cheesy, savory, crispy, and bursting with flavor.
Ingredients Needed
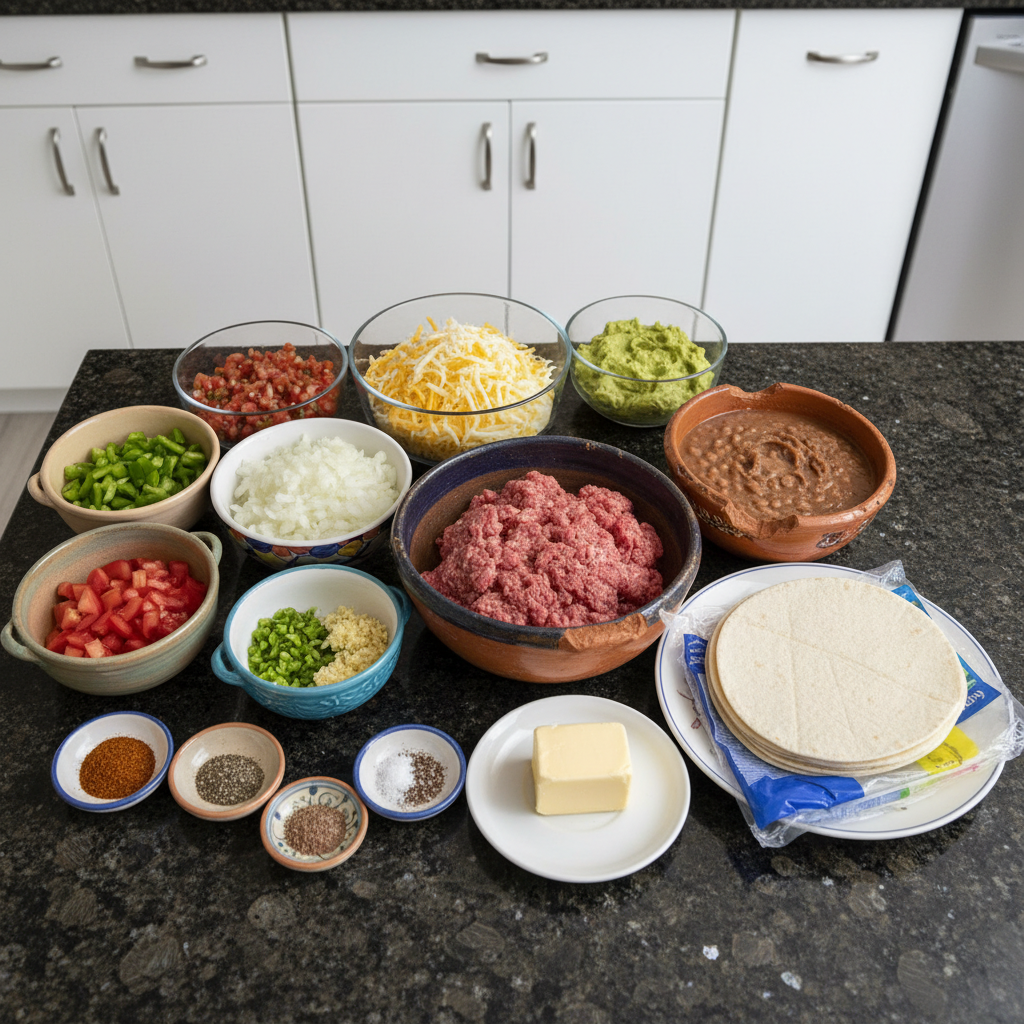
Gathering your ingredients is the first step to making these amazing beef quesadillas. Here’s exactly what you’ll need:
- 1 tbsp. Unsalted Butter
- 1/2 cup finely chopped Tomatoes (any variety)
- 1/2 cup finely chopped Bell Pepper (any color)
- 1/3 cup finely chopped White Onion
- 1 clove Garlic (minced)
- Salt + freshly cracked Black Pepper
- 1/2 lb. Ground Beef
- 1 tbsp. Taco Seasoning
- 1/3 cup Refried Beans
- 3 10″ Flour Tortillas
- 1 1/2 cups Shredded Cheese (such as cheddar, pepperjack, monterey jack, or chihuahua cheese)
- Guacamole
- Pico de Gallo
Ingredient Notes & Substitutions
Let’s talk a bit more about some of these ingredients to ensure your beef quesadillas are absolutely perfect.
Ground Beef: I always recommend using a lean ground beef, like 80/20 or even 90/10 lean. This helps to minimize excess grease in your filling, so you won’t need to drain fat, and it results in a cleaner, more flavorful texture for your quesadillas.
Cheese: The best melting cheeses are key here! I love a blend of cheddar, pepper jack, Monterey Jack, Chihuahua, or Oaxaca cheese for complex flavor and that perfect gooey melt. Oaxaca and Monterey Jack are especially fantastic for creating that crispy bottom crust. If you’re looking for a dairy-free option, many brands now offer excellent plant-based shredded cheeses that melt well.
Tortillas: For this crispy technique, 10-inch flour tortillas are my go-to. Their size allows for ample filling, and their structure holds up beautifully to the cheese crust. While corn tortillas offer a different flavor, flour tortillas are ideal for achieving that signature crispiness.
Refried Beans: Don’t skip these! Refried beans are crucial. They act as a creamy binder for the beef filling, preventing it from crumbling and falling out of your quesadilla, and they add a wonderful depth of flavor and texture. If you prefer, you can use whole cooked pinto or black beans, lightly mashed, or omit them entirely if you must, but I highly recommend them.
Taco Seasoning: A good taco seasoning is essential. Store-bought is convenient, but for superior flavor control, I sometimes make my own quick blend with cumin, oregano, chili powder, and smoked paprika.
Fresh Aromatics: Using fresh tomatoes, bell pepper, onion, and garlic truly makes a difference. They provide a vibrant, robust flavor base that dried or jarred alternatives simply can’t match.
How to Make Crispy Skillet Beef Quesadillas
Follow these steps to create your irresistibly crispy and flavorful beef quesadillas. For the best flavor, I like to use the same skillet for both the beef mixture and cooking the quesadillas.
Prepare Your Cheese
If you are using more than one type of cheese, mix them together in a bowl now so they are ready for assembly.
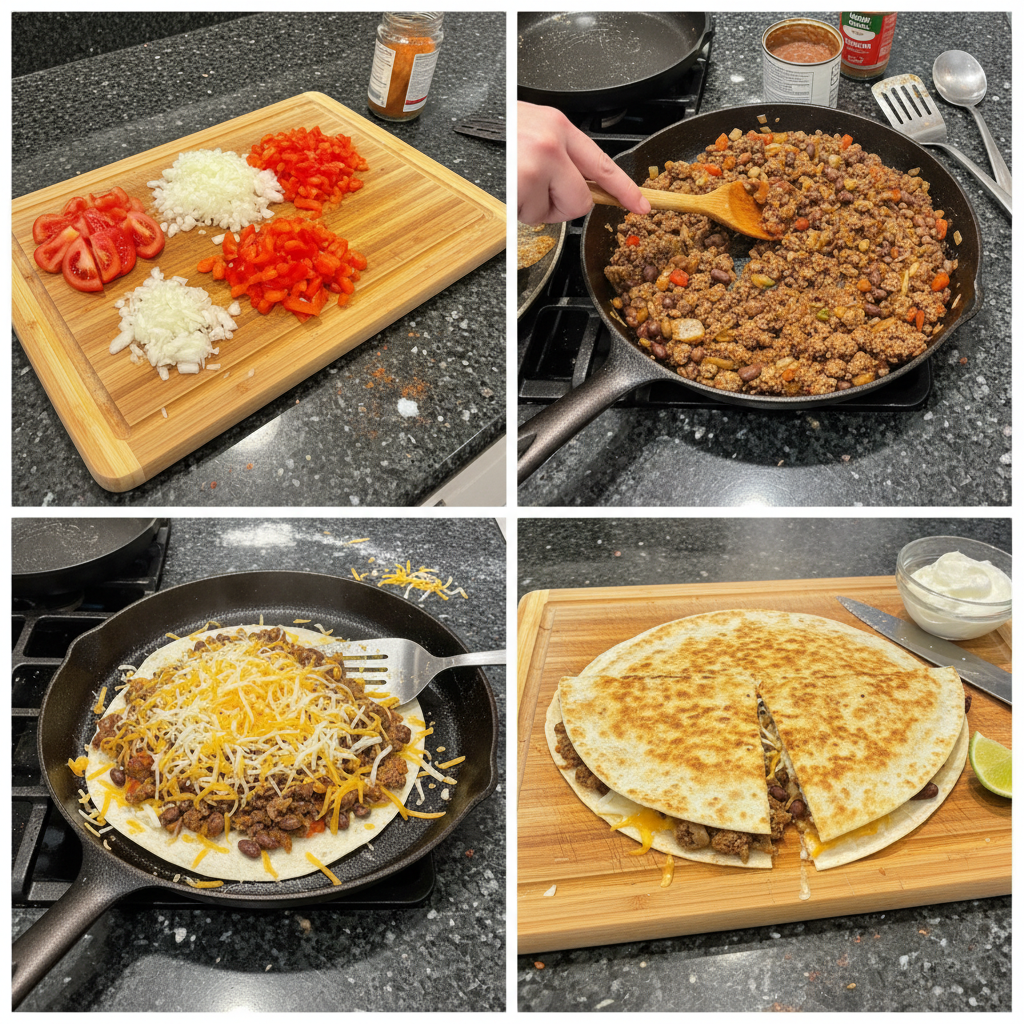
Sauté the Vegetables
Melt the unsalted butter in a large skillet over medium-high heat. Add the finely chopped tomatoes, bell pepper, and white onion, along with the minced garlic and a pinch of salt and freshly cracked black pepper. Sauté these vegetables for 5-7 minutes, stirring occasionally, until they are fragrant and softened.
Brown the Beef
Add the ground beef and taco seasoning to the skillet with the vegetables. Using a wooden spoon, break the beef into small, crumbles. Continue to cook for about 5 minutes, stirring frequently, until the beef is browned and crumbled.
Stir in Refried Beans
Stir the refried beans into the beef and vegetable mixture until they are completely blended and the mixture is cohesive. Spoon the entire beef mixture into a large bowl and cover it with foil to keep it warm while you assemble the quesadillas.
Assemble and Cook Your Quesadillas
Wipe out your skillet if needed, then place it back over consistent medium-high heat. Here’s where our unique crispy secret comes in. Once the skillet is hot, sprinkle a thin layer of shredded cheese (about 1/4 of the 1/2 cup allotted for each quesadilla, focusing on Oaxaca or Monterey Jack if you have them) directly onto the dry skillet. Immediately place one 10-inch flour tortilla on top of this melting cheese.
Quickly sprinkle the remaining portion of the 1/2 cup of cheese across the surface of the tortilla. Spoon 1/2 cup of the warm beef mixture onto one half of the tortilla, spreading it evenly to cover the cheese on that side.
Once the cheese on the empty half of the tortilla is melted and slightly bubbly, carefully fold that half over onto the beef mixture. Use a spatula to gently press down on the top of the folded tortilla to ensure even contact with the hot skillet. Cook for about 2 minutes, or until the bottom is beautifully browned and deep golden-brown and crispy.
Flip and Finish
Carefully flip the quesadilla. Cook for another 2 minutes, pressing down again with the spatula, until the second side is also browned and crispy. The cheese inside should be perfectly melted and gooey.
Rest and Cut
Transfer the quesadilla to a cutting board and allow it to cool for about 30 seconds. This brief rest helps the cheese set slightly and prevents the filling from spilling out. Use a pizza cutter or a sharp knife to cut it in half.
Repeat and Serve
Repeat this process with the remaining two tortillas, the rest of the cheese, and the remaining beef mixture. Serve your crispy beef quesadillas hot with a squeeze of fresh lime juice and a dollop of our homemade cilantro-lime crema, guacamole, or pico de gallo.
Mastering Crispy Quesadillas & Preventing Soggy Tortillas
Achieving that perfectly crispy beef quesadilla is an art, and I want to share all my secrets for preventing soggy tortillas and ensuring every bite is golden and crunchy.
The Skillet Secret: Temperature & Technique
The key to truly crispy tortillas lies in your skillet and its temperature. I recommend using a heavy-bottomed cast iron skillet or a high-quality non-stick skillet for the best results, as they distribute heat evenly. It’s crucial to preheat your skillet to a consistent medium-high heat. This ensures that when the tortilla hits the pan, it immediately begins to brown and crisp without burning or absorbing too much moisture. I cook the initial cheese layer and the tortilla directly on a dry skillet, without any oil, to promote maximum crispiness and allow the cheese to form its frico crust.
The Crispy Cheese Barrier: Our Unique Twist in Action
This is my signature technique for achieving superior crispiness. By sprinkling a thin layer of cheese directly onto the hot, dry skillet *before* placing the tortilla, we create what I like to call a “frico” crust. This cheese quickly crisps and caramelizes through the Maillard reaction, then adheres to the bottom of the tortilla. This not only adds an incredible, savory crunch but also forms a crucial moisture barrier. This barrier acts like a shield, preventing any moisture from the beef filling from seeping into the tortilla and making it soggy. This technique also works wonders for achieving crispiness in dishes like our perfect air fryer grilled cheese. It’s a simple step that makes a world of difference.
Pressing for Perfection & Moisture Control
Beyond the cheese barrier, how you handle the quesadilla during cooking significantly impacts its crispiness. It’s important to press down evenly with a spatula during cooking. This ensures full, consistent contact between the tortilla and the hot skillet, promoting even browning and a uniform crispy texture across the entire surface. Additionally, it’s vital to ensure your beef filling isn’t overly wet. While the refried beans act as a binder, any excess liquid from the beef or vegetables should be cooked off before assembly to minimize internal moisture that could steam and soften the tortilla. The thickness of your tortillas can also play a role; a slightly thicker flour tortilla can sometimes withstand more moisture than a very thin one.
Making Ahead, Freezing, & Reheating
These beef quesadillas are fantastic for meal prep, making busy weeknights even easier.
Meal Prep Tips: Filling & Assembly
The beef filling is perfect for making ahead. You can cook the entire beef mixture as instructed, let it cool completely, and then store it in an airtight container in the refrigerator for up to 3-4 days. When you’re ready to make your quesadillas, simply reheat the filling gently in a pan or microwave before assembling. You can also get ahead by grating your cheese and chopping any desired toppings in advance. This recipe scales beautifully; double the filling for a larger family meal, or make a single quesadilla for dinner for two.
Freezing Fully Assembled Quesadillas (or Filling)
You can freeze the beef filling separately. Once cooled, transfer it to freezer-safe bags or containers and freeze for up to 3 months. Thaw overnight in the refrigerator before reheating and assembling.
For fully assembled, uncooked quesadillas: Assemble them without cooking, then lay them flat on a baking sheet lined with parchment paper and freeze until solid. Once frozen, wrap each quesadilla tightly in plastic wrap, then place them in a freezer-safe bag or container. They can be stored for up to 2-3 months. Cook from frozen, adding a few extra minutes to the cooking time.
For fully assembled, cooked quesadillas: Let them cool completely. Wrap each quesadilla tightly in plastic wrap, then in foil, and freeze for up to 2 months.
The Best Ways to Reheat Quesadillas
The key to reheating is restoring that glorious crispiness.
Oven: This is my preferred method for reheating quesadillas. Preheat your oven to 375°F (190°C). Place the quesadilla directly on a baking sheet or on a wire rack set over a baking sheet. Reheat for 10-15 minutes, or until heated through and crispy.
Air Fryer: An air fryer also works wonderfully! For more tips on achieving perfect crispiness, check out our ultimate guide to crispy air fryer French fries. Place the quesadilla in a single layer in the air fryer basket. Cook at 350°F (175°C) for 5-8 minutes, flipping halfway through, until hot and crispy.
Skillet: If you only have one or two to reheat, a lightly oiled skillet over medium heat works too. Cook for 3-5 minutes per side, pressing down with a spatula, until golden and crispy.
Pro Tips & Troubleshooting
Over my years of cooking, I’ve gathered some invaluable insights and learned from common mistakes. Here are my pro tips to ensure your beef quesadillas are always a triumph, and some pitfalls to avoid.
Pro Tips
- Skillet for Flavor: Always use the same skillet to cook both your beef mixture and your quesadillas. Those delicious browned bits and seasonings left behind from the beef will infuse your tortillas with an extra layer of flavor and depth.
- Fresh Ingredients First: Trust me, fresh vegetables, garlic, and herbs make all the difference. Their vibrant flavors and aromas are unmatched by dried or pre-chopped alternatives.
- Lean Beef for Best Results: Opt for an 80/20 or even 90/10 lean ground beef. This minimizes excess grease, meaning you won’t have to drain fat, and results in a cleaner, richer flavor profile for your filling.
- Cheese Blend for Complexity: Don’t stick to just one cheese! A blend of cheddar, pepper jack, Monterey Jack, or even authentic Mexican Chihuahua cheese offers a more complex flavor and ensures optimal melt.
- The Power of Beans: Refried beans are more than just a filler; they act as a creamy binder, preventing your delicious beef filling from falling out and adding a crucial textural element to every bite.
- Brighten with Lime: A generous squeeze of fresh lime juice over your finished beef quesadillas is essential. It instantly brightens the rich, savory flavors of the beef and cheese, adding essential acidity and balance.
- Homemade Cilantro-Lime Crema: Elevate your quesadillas with this simple, fresh crema. Just combine sour cream (or Mexican crema), fresh lime juice, finely chopped fresh cilantro, and a pinch of salt. It’s the perfect cool, tangy counterpoint.
Common Mistakes to Avoid
- Skipping Fresh Aromatics: Using jarred garlic or pre-minced vegetables might save a minute, but you’ll sacrifice immense fresh flavor and potentially introduce unwanted preservatives.
- Ignoring Lime Juice: Without that squeeze of fresh lime juice, your beef quesadillas might feel heavy or lack the vibrant balance that cuts through the richness.
- Omitting Refried Beans: If you don’t use refried beans, you might find your filling is less cohesive and prone to falling out, and you’ll miss that wonderful creamy texture.
- Uneven Browning: Not pressing down on the quesadilla with a spatula during cooking is a common culprit for uneven browning and a less-than-crispy result.
- Overcrowding the Skillet: Resist the urge to cook multiple quesadillas at once. Cook one quesadilla at a time to maintain a consistent skillet temperature and achieve optimal crispiness on both sides.
- Too High Heat: While we want a hot skillet, excessively high heat will burn the tortilla before the cheese melts or the filling heats through. Stick to a steady medium-high heat.
Serving & Storage
Once your crispy beef quesadillas are ready, you’ll want to enjoy them hot! Here’s how I love to serve them and how to handle any delicious leftovers.
Serving Ideas
These beef quesadillas are best served immediately and hot from the skillet.
- Our Signature Cilantro-Lime Crema: My top recommendation! Its fresh, tangy profile is the perfect counterpoint to the rich, savory quesadillas.
- Classic Toppings: Don’t forget the staples! A dollop of sour cream, fresh pico de gallo, and creamy guacamole are always a hit.
- Hearty Sides: For a more complete meal, serve alongside spicy smashed black beans or classic creamy refried black beans. You might also enjoy a bowl of hearty albondigas soup on the side.
- Fresh Garnish: A simple sprinkle of fresh cilantro and a few lime wedges for squeezing will brighten up the plate.
These beef quesadillas make a fantastic casual weeknight dinner or can be cut into smaller wedges for an appetizer platter.
Storage and Make-Ahead
Refrigeration: Cooked beef quesadillas or any leftover beef filling can be stored in an airtight container in the refrigerator for 3-4 days.
Freezing: For longer storage, both the assembled quesadillas (cooked or uncooked) and the beef filling freeze beautifully. Refer to the detailed ‘Making Ahead, Freezing, & Reheating’ section above for comprehensive instructions on how to properly freeze and store them.
Reheating Best Practices: To restore that delicious crispiness, I always recommend reheating leftover quesadillas in the oven or an air fryer. Pop back to the ‘Making Ahead, Freezing, & Reheating’ section for specific temperature and time guidance.
Conclusion
I truly hope you enjoy making and savoring these crispy skillet beef quesadillas as much as I do in my own kitchen. The unique crispy skillet cheese crust, combined with the vibrant homemade cilantro-lime crema, transforms a classic dish into something truly special. This recipe is designed to be achievable and delicious for cooks of all skill levels, offering a perfect blend of comfort and elevated flavor. I encourage you to try this recipe, perhaps experiment with other protein swaps like ground turkey or plant-based alternatives. For more delicious uses for ground beef, check out our classic ground beef chili recipe. Don’t forget to save or print this recipe, share it with your friends and family, and explore my other Tex-Mex recipes here on the blog!
FAQ
What are the best cheese combinations for beef quesadillas?
I recommend a blend of good melting cheeses such as cheddar, Monterey Jack, Pepper Jack, Chihuahua, or Oaxaca. Using a mix adds complexity to the flavor and ensures a perfect, gooey melt. For that signature crispy bottom crust, I especially love Oaxaca or Monterey Jack when sprinkled directly onto the hot skillet.
Can I substitute ground beef for another protein in this recipe?
Absolutely! This recipe is very versatile. You can easily substitute the ground beef with ground turkey, ground chicken, or even plant-based alternatives like Impossible® meat for a delicious variation.
What is the secret to getting truly crispy beef quesadillas?
My secret is the unique twist of placing a thin layer of cheese directly onto the hot, dry skillet before you lay down the tortilla. This creates a “frico” crust that makes the bottom of your quesadilla incredibly crispy. Also, ensure your skillet is preheated to medium-high heat, and press down on the quesadilla with a spatula during cooking for even browning.
How do I store and reheat leftover beef quesadillas?
You can store cooked quesadillas in an airtight container in the refrigerator for 3-4 days. For longer storage, both the filling and assembled quesadillas can be frozen for up to 3 months. To reheat and maintain crispiness, I recommend using an oven at 375°F (190°C) for 10-15 minutes or an air fryer at 350°F (175°C) for 5-8 minutes.
What are the essential toppings and sides to serve with beef quesadillas?
I love serving beef quesadillas with my homemade cilantro-lime crema, classic sour cream, fresh pico de gallo, and creamy guacamole. For sides, consider spicy smashed black beans or creamy refried black beans.
Why add refried beans and lime juice to the beef mixture?
Refried beans are essential because they act as a creamy binder, holding the beef filling together and preventing it from falling out, while also adding a wonderful texture and depth of flavor. A squeeze of fresh lime juice brightens the rich, savory flavors of the beef and cheese, adding a crucial acidic balance that prevents the dish from tasting heavy.
Can I use store-bought taco seasoning or make my own?
Both options work! Store-bought taco seasoning is convenient and readily available. However, if you want superior flavor control, I encourage you to make your own quick blend using cumin, oregano, chili powder, and smoked paprika.
What kind of ground beef should I use for quesadillas?
I recommend using 80/20 or even 90/10 lean ground beef. This fat content helps minimize excess grease, so you won’t need to drain the fat, and it ensures a flavorful yet not overly greasy filling for your beef quesadillas.

Crispy Skillet Beef Quesadillas
Ingredients
Equipment
Method
- If you are using more than one type of cheese, mix them together in a bowl now so they are ready for assembly.
- Melt the unsalted butter in a large skillet over medium-high heat.
- Add the finely chopped tomatoes, bell pepper, and white onion, along with the minced garlic and a pinch of salt and freshly cracked black pepper.
- Sauté these vegetables for 5-7 minutes, stirring occasionally, until they are fragrant and softened.
- Add the ground beef and taco seasoning to the skillet with the vegetables.
- Using a wooden spoon, break the beef into small crumbles. Continue to cook for about 5 minutes, stirring frequently, until the beef is browned and crumbled.
- Stir the refried beans into the beef and vegetable mixture until they are completely blended and the mixture is cohesive.
- Spoon the entire beef mixture into a large bowl and cover it with foil to keep it warm while you assemble the quesadillas.
- Wipe out your skillet if needed, then place it back over consistent medium-high heat.
- Once the skillet is hot, sprinkle a thin layer of shredded cheese (about 1/4 of the 1/2 cup allotted for each quesadilla, focusing on Oaxaca or Monterey Jack if you have them) directly onto the dry skillet.
- Immediately place one 10-inch flour tortilla on top of this melting cheese.
- Quickly sprinkle the remaining portion of the 1/2 cup of cheese across the surface of the tortilla.
- Spoon 1/2 cup of the warm beef mixture onto one half of the tortilla, spreading it evenly to cover the cheese on that side.
- Once the cheese on the empty half of the tortilla is melted and slightly bubbly, carefully fold that half over onto the beef mixture.
- Use a spatula to gently press down on the top of the folded tortilla to ensure even contact with the hot skillet. Cook for about 2 minutes, or until the bottom is beautifully browned and deep golden-brown and crispy.
- Carefully flip the quesadilla.
- Cook for another 2 minutes, pressing down again with the spatula, until the second side is also browned and crispy. The cheese inside should be perfectly melted and gooey.
- Transfer the quesadilla to a cutting board and allow it to cool for about 30 seconds. This brief rest helps the cheese set slightly and prevents the filling from spilling out.
- Use a pizza cutter or a sharp knife to cut it in half.
- Repeat this process with the remaining two tortillas, the rest of the cheese, and the remaining beef mixture.
- Serve your crispy beef quesadillas hot with a squeeze of fresh lime juice and a dollop of our homemade cilantro-lime crema, guacamole, or pico de gallo.