Skip to content
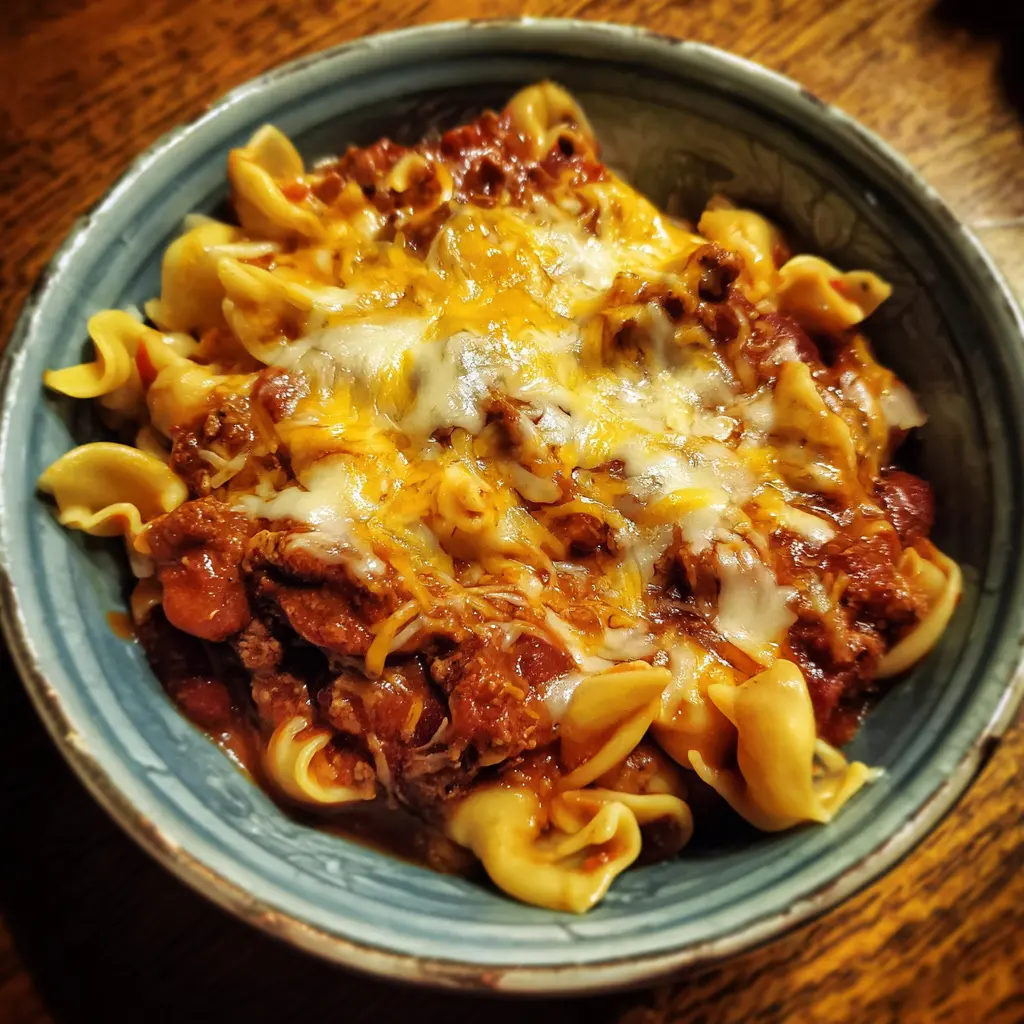
Transforming last night’s dinner into an entirely new, delicious meal is a culinary superpower. This leftover chili recipe breathes new life into your hearty chili, turning it into a comforting, cheesy chili mac in mere minutes. It’s the perfect solution for a busy weeknight or a cozy weekend lunch. Get ready to enjoy a simple yet incredibly satisfying dish that tastes like it took hours, but truly only takes minutes.
Why You’ll Love This Leftover Chili Recipe
This simple approach to using up chili offers many benefits:
- Quick & Easy: Ready in under 20 minutes, perfect for busy evenings.
- Waste Not, Want Not: Giving your delicious chili a second life helps in reducing food waste, which has significant environmental and economic benefits.
- Ultimate Comfort Food: Warm, hearty, and cheesy – pure comfort in a bowl.
- Family Favorite: A guaranteed crowd-pleaser that even picky eaters will love.
- Versatile: Easily customizable with different cheeses, pasta shapes, or toppings.
Ingredients
This fantastic leftover chili recipe requires just a few pantry staples. Using quality ingredients ensures the best flavor and texture for your chili mac creation.
- 1 cup dry elbow pasta (or other small pasta shape)
- 2 cups leftover chili (your favorite homemade or store-bought variety)
- 1/3 cup shredded cheese (cheddar, Monterey Jack, or a blend, or more to taste)
Notes and Substitutions
Feel free to customize this simple recipe. For pasta, ditalini, small shells, or rotini work beautifully if you don’t have elbows. The type of cheese is flexible; try sharp cheddar for a tangy kick, a Mexican blend for extra spice, or even mozzarella for a milder, stretchier texture. If your leftover chili is very thick, you might want to add a splash of water or broth during heating to reach your desired consistency. Don’t be afraid to experiment with adding a dash of hot sauce for extra heat or a pinch of smoked paprika for depth of flavor.
Equipment
You won’t need much specialized equipment for this straightforward leftover chili recipe.
- A large pot for cooking pasta
- A large skillet or saucepan
- A wooden spoon or spatula
- Measuring cups
Instructions
Creating this comforting chili mac from your leftover chili recipe is incredibly simple. Follow these steps for a perfect, hearty meal.
1. Cook Elbow Pasta According to Directions and Drain
Start by bringing a large pot of salted water to a rolling boil. Add your elbow pasta and cook according to the package instructions, usually about 7-9 minutes. You want the pasta to be al dente, meaning it’s cooked through but still has a slight bite. Al dente pasta holds up better when mixed with the chili. Once cooked, drain the pasta thoroughly in a colander. Do not rinse the pasta; the starch helps the chili cling to it. Set the drained pasta aside while you prepare the chili.
2. Add Cooked Pasta to a Skillet Together with Leftover Chili and Heat Through
Place a large skillet or saucepan over medium heat. Carefully scoop your two cups of leftover chili into the skillet. If your chili is particularly thick, you might add a tablespoon or two of water or beef broth to help it loosen up as it heats. Bring the chili to a gentle simmer, stirring occasionally to ensure even heating and prevent sticking. Once the chili is bubbling lightly around the edges, add the drained, cooked elbow pasta directly into the skillet with the hot chili. Stir everything together gently until the pasta is fully coated and thoroughly warmed through, typically 2-3 minutes. Make sure the heat is low enough to prevent the mixture from drying out or sticking to the bottom of the pan. This step is where your leftover chili recipe truly transforms.
3. Stir in Shredded Cheese Until Melted and Serve
Reduce the heat to low. Sprinkle the shredded cheese evenly over the chili and pasta mixture in the skillet. Stir continuously until the cheese is completely melted and creates a gooey, cohesive sauce that binds the pasta and chili together. This usually takes just about one minute. The residual heat from the chili and pasta will be sufficient to melt the cheese without overcooking it. Once the cheese is fully incorporated and beautifully melty, remove the skillet from the heat immediately. Serve your delicious chili mac hot and enjoy this quick and satisfying leftover chili recipe creation.
Pro Tips & Troubleshooting
To ensure your chili mac is perfect every time, keep these tips in mind.
- Don’t Overcook Pasta: Al dente pasta will hold its texture better in the chili. Mushy pasta can make the dish gloopy.
- Adjust Chili Consistency: If your leftover chili is very thick, add a splash of beef broth or water when reheating. This prevents it from drying out and helps it coat the pasta.
- Even Heating: Stir the chili and pasta regularly while heating to ensure everything is warmed through without burning.
- Troubleshooting Dry Chili Mac: If your mixture seems too dry, stir in a little more broth or even a tablespoon of cream cheese for added moisture and creaminess.
- Cheese Not Melting: Ensure the chili and pasta are hot enough when you add the cheese. If needed, briefly increase the heat to medium-low, stirring constantly, until the cheese melts.
Serving, Storage, and Variations
This easy chili mac is a meal in itself, but a few simple additions can make it even better.
- Serving Suggestions: Top with a dollop of sour cream, chopped fresh cilantro or green onions, or a sprinkle of extra shredded cheese. A side of cornbread or a crisp green salad makes for a well-rounded meal.
- Storage: Proper food storage is crucial to prevent bacterial growth; learn more about safe food handling practices from the FDA. Store any leftover chili mac in an airtight container in the refrigerator for up to 3 days.
- Reheating: Reheat gently in the microwave or on the stovetop over low heat, adding a splash of water or broth if it seems dry.
- Variations:
- Spicier: Add a pinch of cayenne pepper or a dash of your favorite hot sauce.
- Vegetable Boost: Stir in some canned corn, diced bell peppers, or black beans when heating the chili.
- Extra Protein: Top with crumbled cooked bacon or a fried egg.
- Smoky Flavor: A tiny bit of liquid smoke or smoked paprika can enhance the chili’s depth.
Nutrition Information
This leftover chili recipe provides a hearty, protein-packed meal. Please note that nutritional values are estimates and can vary significantly based on the specific ingredients, brand choices, and preparation methods of your original chili. This information is intended as a general guide.
| Nutrient | Amount (per serving) |
|---|---|
| Calories | 450-550 |
| Protein | 25-35g |
| Fat | 20-30g |
| Carbohydrates | 40-50g |
| Fiber | 5-8g |
Values are approximate and based on typical chili and cheese. Individual results may vary.
FAQ
Here are answers to common questions about making this fantastic leftover chili recipe.
- Q: Can I use any type of chili for this recipe?
- A: Absolutely! This recipe works best with hearty, meat-based chili, but vegetarian chili can also be transformed into a delicious chili mac.
- Q: What if my chili is frozen?
- A: Thaw your frozen chili completely in the refrigerator overnight or gently in the microwave before using it in this recipe. Ensure it’s fully thawed and heated before combining with pasta.
- Q: Can I prepare this dish ahead of time?
- A: While best served fresh, you can cook the pasta ahead of time and store it separately. Then, combine with chili and cheese just before serving for optimal texture.
- Q: My chili mac seems a bit bland, how can I fix it?
- A: A dash of hot sauce, a pinch of garlic powder, onion powder, or a little more salt and pepper can quickly liven up the flavors. A squeeze of lime juice can also brighten the taste.
Conclusion
This leftover chili recipe transforms what might have been a simple reheated meal into an exciting, comforting new dish. It’s incredibly quick to prepare, minimizes food waste, and delivers maximum flavor with minimal effort. Whether you’re looking for a speedy weeknight dinner or a cozy weekend treat, this chili mac is sure to hit the spot. Don’t let your delicious chili go to waste – give it the star treatment it deserves!