 Skip to content
 Get ready to create a truly special dessert this spring! These no-bake mini Easter cheesecakes offer the perfect blend of festive charm and effortless preparation. You will love how simple it is to whip up these individual treats, making your holiday entertaining stress-free. Prepare for a guaranteed crowd-pleaser that brings joy with every light, creamy bite.
Why You’ll Love These No-Bake Mini Easter Cheesecakes
You are going to adore making and serving these delightful no-bake mini Easter cheesecakes. They offer incredible convenience and a charming presentation.
- Effortless No-Bake Preparation: Skip the oven entirely! This recipe requires no baking, saving you time and heating up your kitchen.
- Make-Ahead Convenience: Prepare these cheesecakes days in advance, freeing up your Easter holiday for family and fun.
- Individual Portions: Each cheesecake is perfectly sized, simplifying serving and ensuring everyone gets their own charming treat.
- Charming Pastel Layers: Create beautiful, vibrant layers that are ideal for Easter celebrations and spring festivities.
- Light, Airy Mousse-Like Texture: Enjoy a creamy, soft filling that feels lighter than traditional baked cheesecakes.
Understanding No-Bake Cheesecakes
No-bake cheesecakes differ significantly from their baked counterparts. A traditional cheesecake relies on eggs and heat to set its dense, custard-like texture. In contrast, no-bake versions achieve their structure through a different mechanism.
Understanding the science behind no-bake desserts reveals how ingredients like gelatin contribute to their unique consistency. Gelatin plays a crucial role in stabilizing a no-bake cheesecake. It creates a sturdy yet tender framework, allowing the creamy filling to hold its shape without oven time. This process results in a distinct texture. You will find no-bake cheesecakes often have a soft, creamy, and mousse-like consistency. They feel much lighter and airier on the palate compared to the richer, denser baked varieties. This lighter feel makes them perfect for warm weather or as a refreshing finish to a hearty meal.
Ingredients for No-Bake Mini Easter Cheesecakes
Gathering your ingredients for these delightful no-bake mini Easter cheesecakes is simple. Make sure your cream cheese and heavy cream are at room temperature for the smoothest filling possible. This temperature helps everything combine beautifully without lumps.
- 6 oz shortbread cookies (approx. 12 round cookies)
- 0.5 oz unsalted butter (1 TBSP), melted
- 2 TBSP cold water
- 1 packet unflavored powdered gelatin (0.25 oz, or 2.5 tsp)
- 1 lb full-fat cream cheese, at room temperature
- 3.5 oz granulated sugar (½ cup)
- ½ tsp lemon juice
- 1 tsp vanilla bean paste (or vanilla extract)
- Pinch of salt
- 1 cup heavy cream, at room temperature
- Assorted gel food coloring (4 colors recommended)
- ½ cup whipped cream (for decorating)
- Candy eggs (for decorating)
- Sprinkles (for decorating)
Notes & Substitutions
You can easily adapt these ingredients to suit your preferences or what you have on hand.
- Shortbread Cookies: Graham crackers or vanilla wafers make excellent substitutes for the crust.
- Unflavored Gelatin: This is key for structure. If you omit it, plan to serve your cheesecakes in individual jars or cups.
- Full-Fat Cream Cheese: Always use full-fat cream cheese for the best texture and stability. Lower-fat options will not set correctly.
- Vanilla Bean Paste: Swap this for an equal amount of pure vanilla extract. You can also experiment with other extracts like almond or lemon.
Essential Equipment
Having the right tools makes preparing these cheesecakes a breeze.
- Jumbo Silicone Muffin Pan: This is essential for easily unmolding your individual cheesecakes.
- Food Processor: Use it to quickly turn cookies into fine crumbs for the crust.
- Stand or Hand Mixer: Achieve a smooth, creamy cheesecake filling with either of these.
- Tart Tamper: An optional tool that helps press crusts evenly into the cavities.
- Baking Sheet: Provides stability for the silicone pan when moving it to the freezer.
Step-by-Step Instructions
Creating your no-bake mini Easter cheesecakes involves simple steps. Follow these instructions for perfect results every time.
First, prepare the crust. Place a jumbo silicone muffin pan onto a baking sheet. Blitz your shortbread cookies in a food processor until they form fine crumbs. Alternatively, crush them in a plastic bag with a rolling pin. In a small mixing bowl, combine the cookie crumbs with the melted butter.
Next, fill the pan with the crust. Divide the shortbread crumbs evenly among the 6 cavities in the muffin pan. Press them firmly and compactly into the bottom of each cavity to form your cheesecake crust.
Now, hydrate the gelatin. Put the cold water into a small bowl and sprinkle the unflavored gelatin powder over the top. Whisk them together gently. Let the bowl sit undisturbed for 5 minutes, allowing the gelatin to fully hydrate and absorb the water.
Meanwhile, beat the cream cheese. Place the room temperature cream cheese into the bowl of a large stand mixer fitted with a paddle attachment. Beat it on medium speed until it becomes smooth, creamy, and completely free of lumps. A hand mixer works just as well.
Add the remaining ingredients to the cheesecake filling. Incorporate the granulated sugar, lemon juice, vanilla bean paste, and a pinch of salt. Mix until these ingredients are well combined, scraping down the bottom and sides of the bowl periodically. With the mixer running on low speed, gradually add the room temperature heavy cream. Continue mixing until the entire filling is smooth and thoroughly combined.
Heat the gelatin. Once your hydrated gelatin feels very firm, microwave it for 10-15 seconds. It should be fully melted, completely liquid, and warmer than room temperature but not hot. Stir the gelatin with a small whisk or spoon to ensure it is lump-free. Add the warm liquid gelatin to the room temperature cheesecake filling. Mix it in by hand using a whisk or spatula, scraping the sides and bottom of the bowl well to ensure even distribution. Remember, temperature affects the outcome of these no-bake mini Easter cheesecakes. If the gelatin is not warm enough, or the cheesecake mixture is too cold, the gelatin might begin to set prematurely, causing clumps.
Divide and color the cheesecake filling. Divide the smooth cheesecake mixture into 4 separate portions; each should be approximately 7 oz if you are measuring. Stir a single drop of your desired gel food coloring into each portion, mixing until the color is smooth and uniform.
Top the crust with the first layer of cheesecake. Take your first colored filling and divide it evenly among the 6 crust-filled cavities. A cookie scoop works fastest and easiest for this step. Spread it into a smooth, even layer using the back of a spoon. Immediately add a second color on top of the first.
Work quickly to finish the layers. Continue layering the cheesecake colors until all four colors have been added to each cavity. It is important to work swiftly during this step. This prevents the cheesecake colors from setting too much and becoming difficult to spread smoothly.
Freeze the cheesecakes. Smooth the tops of the layered cheesecakes. Transfer the baking sheet with the muffin pan to the freezer. Freeze for at least 2 hours until the cheesecakes feel very solid to the touch. Exact freezing time depends on your freezer’s temperature. If making these no-bake mini Easter cheesecakes in advance, wrap the outside of the mold tightly with plastic wrap to prevent freezer burn. Thaw them overnight in the refrigerator the day before serving.
Unmold the cheesecakes. To unmold, gently press from the bottom of a silicone cavity. Turn it upside-down, pushing the cheesecake out into your hand. Repeat this process until all cheesecakes are unmolded. Unmolded cheesecakes can be refrigerated for several days.
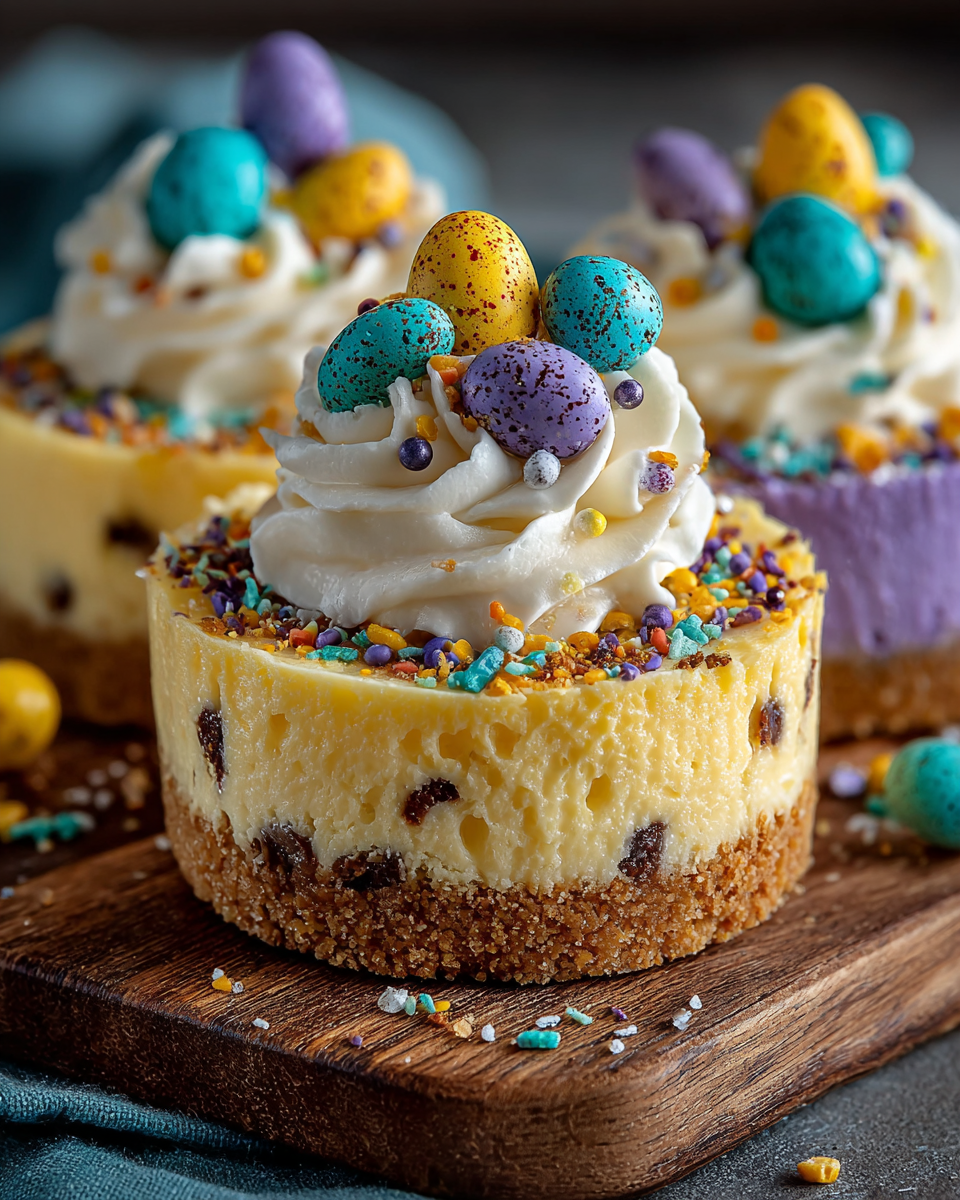
Defrost and decorate. Let the cheesecakes sit at room temperature for about 30 minutes to slightly soften before serving. Top each with a swirl of whipped cream, a pinch of festive sprinkles, and a few candy eggs. Serve them chilled but not frozen.
Pro Tips for Perfect No-Bake Mini Easter Cheesecakes
Achieve outstanding results with these helpful tips. These insights will ensure your no-bake mini Easter cheesecakes are flawless.
- Maintain Correct Gelatin Temperature: Ensure your melted gelatin is warm, not hot, to prevent it from seizing when added to the cold cream cheese mixture.
- Room Temperature Dairy: Always use room temperature cream cheese and heavy cream. This prevents lumps and creates a perfectly smooth, emulsified filling. Expert bakers confirm that using room temperature cream cheese and other dairy products is essential for achieving a smooth, lump-free cheesecake filling. For more information, read why room temperature ingredients ensure a silky cheesecake texture.
- Work Swiftly with Layers: Gelatin begins to set quickly, so layer your colored fillings without delay to ensure smooth transitions between colors.
- Adjust Colors: Add gel food coloring gradually, drop by drop, until you achieve your desired pastel vibrancy for Easter.
- Troubleshoot Filling Textures: If your filling seems too thick, gently warm it over a double boiler for a moment. If it’s too thin, ensure your gelatin was properly hydrated and melted.
- Use a Cookie Scoop: This optional tool helps create even, consistent layers for a beautiful presentation.
Serving, Storage, and Variations
These charming treats are incredibly versatile, allowing for customization and easy management.
Serving Suggestions
- Top individual no-bake mini Easter cheesecakes with swirls of whipped cream, vibrant sprinkles, or mini candy eggs.
- Serve them alongside fresh spring berries like strawberries or blueberries, or a simple fruit compote.
- Present them beautifully on festive doilies or elegant dessert stands for a special touch.
Storage Instructions
- Refrigerate well-wrapped cheesecakes for 4-5 days. Ensure they are covered tightly to prevent odor absorption.
- Freeze unmolded cheesecakes individually wrapped in plastic wrap, then place them in an airtight container for up to one month.
- Thaw frozen cheesecakes overnight in the refrigerator before serving for the best texture.
Flavor & Color Variations
- Experiment with different cookie crusts such as vanilla wafers, chocolate cookies, or even gingersnaps for a new twist.
- Add citrus zest (lemon, lime, or orange) or other extracts like almond, coconut, or peppermint to the filling for unique flavors.
- Customize the colors for other holidays or occasions, creating rainbow cheesecakes or themed layers.
Larger Cheesecake Option
- You can easily scale this recipe up to make one 8-inch or 9-inch cheesecake in a springform pan.
- For a larger cheesecake, chill it overnight in the refrigerator instead of freezing for several hours.
Nutrition Information
| Nutrient | Amount Per Serving |
|---|---|
| Calories | 380 kcal |
| Total Fat | 28g |
| Saturated Fat | 17g |
| Cholesterol | 95mg |
| Sodium | 200mg |
| Total Carbohydrates | 28g |
| Dietary Fiber | 0g |
| Total Sugars | 22g |
| Protein | 5g |
Frequently Asked Questions (FAQ)
Is gelatin essential for stability?
Yes, gelatin is crucial for these no-bake mini Easter cheesecakes to hold their individual shape. It provides the necessary structure, allowing the creamy filling to set firmly without baking.
Can I omit gelatin?
If you prefer to omit gelatin, you can still enjoy this recipe! Simply serve the cheesecake filling in individual jars or cups, as it will have a softer, pudding-like consistency.
Can I use flavored gelatin?
It is best to use unflavored gelatin for this recipe. Flavored gelatin would overpower the delicate cheesecake taste and introduce artificial colors you might not want.
Can I make these without a silicone pan?
You can use a lined muffin tin. Line each cavity with paper cupcake liners, which you can peel off before serving. This will still allow for individual portions.
How do I fix too thick or thin batter?
If your batter becomes too thick, gently warm it over a double boiler for a moment to loosen it. If it seems too thin, ensure your gelatin was properly hydrated and melted into the mixture.
Can these be made ahead of time?
Absolutely! You can prepare these cheesecakes up to 3-4 days in advance and store them in the refrigerator, or freeze them for up to a month. Thaw frozen ones overnight.
Conclusion
These delightful no-bake mini Easter cheesecakes offer a fantastic blend of ease, charm, and deliciousness, perfect for any spring gathering. Their individual portions, vibrant pastel layers, and creamy texture make them an unforgettable holiday treat. We hope you enjoy making this simple recipe and sharing these lovely cheesecakes with your loved ones. Have a happy and sweet Easter celebration!
Delightful No-Bake Mini Easter Cheesecakes
Ingredients
Equipment
Method
- First, prepare the crust. Place a jumbo silicone muffin pan onto a baking sheet. Blitz your shortbread cookies in a food processor until they form fine crumbs. Alternatively, crush them in a plastic bag with a rolling pin. In a small mixing bowl, combine the cookie crumbs with the melted butter.
- Next, fill the pan with the crust. Divide the shortbread crumbs evenly among the 6 cavities in the muffin pan. Press them firmly and compactly into the bottom of each cavity to form your cheesecake crust.
- Now, hydrate the gelatin. Put the cold water into a small bowl and sprinkle the unflavored gelatin powder over the top. Whisk them together gently. Let the bowl sit undisturbed for 5 minutes, allowing the gelatin to fully hydrate and absorb the water.
- Meanwhile, beat the cream cheese. Place the room temperature cream cheese into the bowl of a large stand mixer fitted with a paddle attachment. Beat it on medium speed until it becomes smooth, creamy, and completely free of lumps. A hand mixer works just as well.
- Add the remaining ingredients to the cheesecake filling. Incorporate the granulated sugar, lemon juice, vanilla bean paste, and a pinch of salt. Mix until these ingredients are well combined, scraping down the bottom and sides of the bowl periodically. With the mixer running on low speed, gradually add the room temperature heavy cream. Continue mixing until the entire filling is smooth and thoroughly combined.
- Heat the gelatin. Once your hydrated gelatin feels very firm, microwave it for 10-15 seconds. It should be fully melted, completely liquid, and warmer than room temperature but not hot. Stir the gelatin with a small whisk or spoon to ensure it is lump-free. Add the warm liquid gelatin to the room temperature cheesecake filling. Mix it in by hand using a whisk or spatula, scraping the sides and bottom of the bowl well to ensure even distribution. Remember, temperature affects the outcome of these no-bake mini Easter cheesecakes. If the gelatin is not warm enough, or the cheesecake mixture is too cold, the gelatin might begin to set prematurely, causing clumps.
- Divide and color the cheesecake filling. Divide the smooth cheesecake mixture into 4 separate portions; each should be approximately 7 oz if you are measuring. Stir a single drop of your desired gel food coloring into each portion, mixing until the color is smooth and uniform.
- Top the crust with the first layer of cheesecake. Take your first colored filling and divide it evenly among the 6 crust-filled cavities. A cookie scoop works fastest and easiest for this step. Spread it into a smooth, even layer using the back of a spoon. Immediately add a second color on top of the first.
- Work quickly to finish the layers. Continue layering the cheesecake colors until all four colors have been added to each cavity. It is important to work swiftly during this step. This prevents the cheesecake colors from setting too much and becoming difficult to spread smoothly.
- Freeze the cheesecakes. Smooth the tops of the layered cheesecakes. Transfer the baking sheet with the muffin pan to the freezer. Freeze for at least 2 hours until the cheesecakes feel very solid to the touch. Exact freezing time depends on your freezer’s temperature. If making these no-bake mini Easter cheesecakes in advance, wrap the outside of the mold tightly with plastic wrap to prevent freezer burn. Thaw them overnight in the refrigerator the day before serving.
- Unmold the cheesecakes. To unmold, gently press from the bottom of a silicone cavity. Turn it upside-down, pushing the cheesecake out into your hand. Repeat this process until all cheesecakes are unmolded. Unmolded cheesecakes can be refrigerated for several days.
- Defrost and decorate. Let the cheesecakes sit at room temperature for about 30 minutes to slightly soften before serving. Top each with a swirl of whipped cream, a pinch of festive sprinkles, and a few candy eggs. Serve them chilled but not frozen.


