 Skip to content
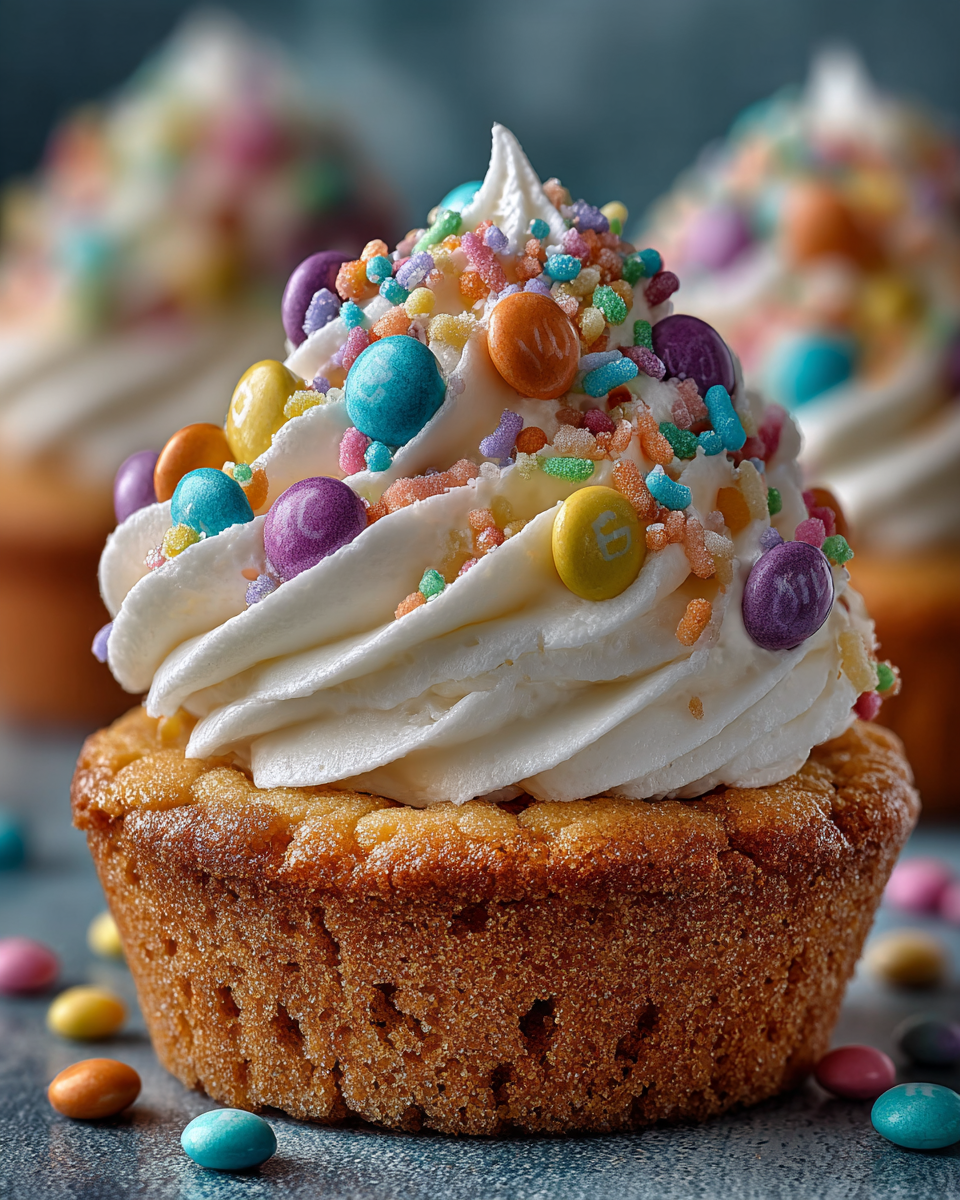
 Welcome the spring season with these adorable Easter bunny sugar cookie cups! This recipe offers a delightful, easy-to-make Easter treat perfect for any Easter celebration. With minimal ingredients and straightforward steps, even beginner bakers can create these charming cookie cups. They are sure to be a hit with family and friends.
Why You’ll Love Easter Bunny Sugar Cookie Cups
You will adore these Easter bunny sugar cookie cups for their simplicity and charm. This recipe calls for just four ingredients, making prep super quick. We use pre-made cookie dough, so you save loads of time in the kitchen. The adorable M&M bunny faces bring smiles to everyone. Each cup features a creamy white chocolate filling that is simply irresistible. This is a largely mess-free baking adventure, ideal for busy parents. These fun bunny cookie cups are perfect for getting the whole family involved in festive baking!
Ingredients
Creating these delightful Easter bunny sugar cookie cups requires just a few simple items. Gather these ingredients to get started on your festive baking project:
- 24 count pre-cut Sugar Cookie Dough: Store-bought dough makes this recipe incredibly easy and quick. Exploring the advantages of using store-bought cookie dough can highlight its convenience and effectiveness for quick baking projects.
- 1 cup White Candy Melts: These create the smooth, creamy filling for your cookie cups.
- 1/4 cup Heavy Cream: Combined with candy melts, this forms a luscious, ganache-like texture.
- 72 Pastel Blend M&M’s: Essential for crafting those adorable bunny ears and noses.
Notes & Substitutions
You can easily adapt this recipe to fit your preferences or what you have on hand. Feel free to use other pre-cut cookie dough types, such as snickerdoodle or chocolate chip, for a different base flavor. If white candy melts are unavailable, quality white chocolate chips or a chopped white chocolate bar will work, though they might require a slight adjustment in melting time. Experiment with different small candies like jelly beans or sprinkles to create various Easter-themed decorations. For a dairy-free option, use coconut cream (the thick part from a can of full-fat coconut milk) instead of heavy cream, ensuring it’s chilled.
Equipment
You will need a few basic kitchen tools to make these charming cookie cups.
- Mini muffin pan: This is essential for shaping your Easter bunny sugar cookie cups perfectly.
- Nonstick cooking spray: Use generously to prevent any sticking.
- Microwave-safe bowl: Ideal for safely melting the candy melts and cream.
- Spoon or spatula: For stirring your creamy filling until smooth.
- Piping bag or Ziploc bag: Makes filling the cookie cups neat and simple.
Instructions
Follow these easy steps to create your adorable Easter bunny sugar cookie cups. This beginner-friendly guide ensures perfect results every time.
Step 1: Prep Oven & Pan
Preheat your oven to 350 degrees Fahrenheit. Thoroughly spray a mini muffin pan with nonstick cooking spray. This step is crucial to prevent the cookie cups from sticking.
Step 2: Bake Cookie Cups
Place one pre-cut sugar cookie dough portion into each cavity of the prepared mini muffin pan. Bake for 13-17 minutes, or until the edges of the cookies turn a beautiful golden brown. Watch them closely to avoid overbaking.
Step 3: Shape Cookie Cups
Remove the mini muffin pan from the oven. Immediately, while the cookies are still warm and soft, use your thumb or the back of a small spoon to gently make an indentation in the middle of each cookie. This creates the cup shape for your filling.
Step 4: Sort M&M’s
While the cookies cool slightly, separate your pastel blend M&M’s by color. You will need two M&M’s for the ears and one for the nose per bunny. Sorting them now makes decoration much quicker.
Step 5: Make Creamy Filling
In a microwave-safe bowl, combine the white candy melts and heavy cream. Heat the mixture in 20-second intervals, stirring well after each interval, until the candy melts are fully melted and the mixture is smooth and creamy. Be very careful not to overheat the mixture, as this can cause the chocolate to seize.
Step 6: Fill Cookie Cups
Carefully transfer the melted candy mixture into a piping bag or a sturdy Ziploc bag with a corner snipped off. Pipe the creamy filling into each indentation of the baked cookie cups. Fill them almost to the top.
Step 7: Quick Freeze
Place the filled cookie cups in the freezer for 10 minutes. This quick chill helps the melted candy mixture to slightly set up. This small trick is key to preventing your M&M decorations from sinking into the filling later.
Step 8: Decorate Bunnies
Remove the cookie cups from the freezer. Immediately place two M&M’s for the ears and one M&M for the nose into each cookie cup. Gently nestle them into the slightly set white candy filling to form your cute bunny faces.
Step 9: Final Chill
Once all your Easter bunny sugar cookie cups are decorated, transfer the mini muffin pan to the refrigerator. Chill for about 1 hour, or until the centers are completely set. This ensures a firm, delicious treat.
Pro Tips & Troubleshooting
Achieving perfect Easter bunny sugar cookie cups is simple with a few helpful hints.
- Prevent M&M Sinking: The quick freeze after filling is crucial. It creates a slightly firm surface, preventing your M&M ears and noses from sinking into the soft filling. Don’t skip this step for perfect bunny cookie cups.
- Achieve Perfect Cookie Shape: Make your indentations immediately after removing the cookies from the oven. The cookies are most pliable when warm. Use your thumb or the rounded back of a measuring spoon.
- Melting Candy Melts: Always use short intervals and stir thoroughly. Overheating can make candy melts clumpy or seized. If it happens, add a tiny bit more heavy cream and stir vigorously to try and revive it. For comprehensive guidance, a professional chocolatier offers tips for melting candy melts and avoiding common issues like seizing.
- Cookie Sticking: Be generous with your nonstick cooking spray on the mini muffin pan. If cookies still stick, gently run a thin knife around the edges before attempting to remove them.
- Overbaking Prevention: Keep a close eye on the cookie edges. Once they are golden brown, they are done. Overbaking can make the cookie cups hard and less enjoyable.
Serving, Storage, and Variations
These delightful Easter bunny sugar cookie cups are as versatile as they are charming.
Serving Suggestions: Present your finished cookie cups on a festive platter. Add some colorful Easter grass or mini chocolate eggs for an extra touch. They are perfect for Easter brunches, dessert tables, or as a sweet gift.
Storage Tips: Store the cooled cookie cups in an airtight container at room temperature for up to 3 days, or in the refrigerator for up to 5 days. Layer them with parchment paper to prevent sticking.
Freezing Instructions: For longer storage, flash freeze the decorated cookie cups on a baking sheet until solid. Then, transfer them to a freezer-safe airtight container or bag. They will keep well for up to 1 month. Thaw in the refrigerator before serving.
Flavor Variations: Instead of white candy melts, try flavored candy melts like lemon or strawberry for a different twist. These add a burst of new flavor to your Easter cookie cups.
Decoration Variations: Get creative with other Easter themes. Use mini chocolate chips for eyes and pink sprinkles for cheeks. You could also pipe tiny white frosting tails on the back of each cookie cup for an added cute detail.
Cookie Base Alternatives: Explore other pre-made cookie dough options beyond sugar cookie. Snickerdoodle dough offers a cinnamon twist, while chocolate chip dough provides a classic chocolatey base.
Nutrition Information
| Nutrient | Amount Per Serving (approx.) |
|---|---|
| Calories | 150-180 |
| Total Fat | 8-10g |
| Saturated Fat | 5-7g |
| Cholesterol | 10-15mg |
| Sodium | 70-90mg |
| Total Carbs | 18-22g |
| Sugars | 12-15g |
| Protein | 1-2g |
FAQ
Q: Can I make these ahead of time?
A: Yes, you can absolutely make these Easter bunny sugar cookie cups a day or two in advance. Store them in an airtight container in the refrigerator until you are ready to serve.
Q: What if I don’t have a mini muffin pan?
A: You can use a regular muffin pan, but your cookie cups will be larger. Adjust baking time slightly longer and make sure to still create indentations right after baking.
Q: Can I use homemade sugar cookie dough?
A: Absolutely! If you prefer, use your favorite homemade sugar cookie dough recipe. Just be sure to roll it into small balls before placing them into the muffin pan.
Q: Why are my M&M’s sinking?
A: This usually happens if the filling isn’t slightly set before adding the M&M’s. Ensure you complete the quick 10-minute freezer chill step to prevent sinking.
Q: How long do these cookie cups last?
A: When stored in an airtight container, these delightful treats last for about 3 days at room temperature or up to 5 days in the refrigerator.
Q: Can I use chocolate chips instead of candy melts?
A: Yes, you can use white chocolate chips. However, candy melts are designed to melt more smoothly and set more firmly, which is ideal for the filling.
Conclusion
These Easter bunny sugar cookie cups are the ultimate easy and adorable treat for your spring celebrations. With minimal ingredients and simple steps, you can create a festive dessert that brings joy to everyone. They embody simplicity, beginner-friendliness, and time-saving convenience, making them perfect for busy parents and new bakers alike. Get ready to bake these charming bunny cookie cups and add a touch of sweetness to your Easter!
Easter Bunny Sugar Cookie Cups
Ingredients
Equipment
Method
- Preheat your oven to 350 degrees Fahrenheit. Thoroughly spray a mini muffin pan with nonstick cooking spray. This step is crucial to prevent the cookie cups from sticking.
- Place one pre-cut sugar cookie dough portion into each cavity of the prepared mini muffin pan. Bake for 13-17 minutes, or until the edges of the cookies turn a beautiful golden brown. Watch them closely to avoid overbaking.
- Remove the mini muffin pan from the oven. Immediately, while the cookies are still warm and soft, use your thumb or the back of a small spoon to gently make an indentation in the middle of each cookie. This creates the cup shape for your filling.
- While the cookies cool slightly, separate your pastel blend M&M's by color. You will need two M&M's for the ears and one for the nose per bunny. Sorting them now makes decoration much quicker.
- In a microwave-safe bowl, combine the white candy melts and heavy cream. Heat the mixture in 20-second intervals, stirring well after each interval, until the candy melts are fully melted and the mixture is smooth and creamy. Be very careful not to overheat the mixture, as this can cause the chocolate to seize.
- Carefully transfer the melted candy mixture into a piping bag or a sturdy Ziploc bag with a corner snipped off. Pipe the creamy filling into each indentation of the baked cookie cups. Fill them almost to the top.
- Place the filled cookie cups in the freezer for 10 minutes. This quick chill helps the melted candy mixture to slightly set up. This small trick is key to preventing your M&M decorations from sinking into the filling later.
- Remove the cookie cups from the freezer. Immediately place two M&M's for the ears and one M&M for the nose into each cookie cup. Gently nestle them into the slightly set white candy filling to form your cute bunny faces.
- Once all your Easter bunny sugar cookie cups are decorated, transfer the mini muffin pan to the refrigerator. Chill for about 1 hour, or until the centers are completely set. This ensures a firm, delicious treat.


