 Skip to content
 Bring joyful holiday cheer to your table with this delightful Santa Cake! This festive dessert combines tender, moist almond cake layers with smooth, easy-to-decorate buttercream frosting. You’ll create a charming edible Santa Claus that captures the spirit of Christmas. Get ready to bake a show-stopping centerpiece, and follow our step-by-step guide for a fun and approachable baking experience.
Why You’ll Love This Santa Cake
You will quickly discover why this Santa Cake becomes a holiday favorite.
- This cake makes a fun, festive centerpiece for any Christmas gathering.
- Enjoy delicious, moist almond cake layers bursting with delicate flavor.
- The smooth, easy-to-decorate buttercream simplifies the entire process.
- It is perfect for Christmas parties, spreading smiles and holiday cheer.
- Bake an impressive yet approachable DIY project that everyone will adore.
Ingredients

Ready to create your festive Santa Cake? Gather these ingredients for a truly special treat. We provide precise measurements for the best results, ensuring your almond cake layers and creamy buttercream are perfect every time.
For the White Almond Cake Layers
- 3 cups (375g) all-purpose flour
- 3 cups (600g) granulated sugar
- 2 ½ tsp (10g) baking powder
- 1 tsp (6g) fine salt
- 1 cup (226g) unsalted butter, room temperature
- 1 cup (235g) carton egg whites or 7 large egg whites, room temperature
- 1 ½ cups (380g) full-fat sour cream, room temperature
- 2 Tbsp (28g) vegetable or canola oil
- 2 tsp (8g) almond extract
- 1 tsp (4g) vanilla extract or vanilla bean paste
- Red and green gel food coloring
For the Almond Buttercream Frosting
- 2 cups (452g) unsalted butter, room temperature
- 2 tsp (8g) almond extract
- 1 tsp (4g) vanilla extract or vanilla bean paste
- 1 tsp (6g) fine salt
- 7 cups (904g or 2 lb bag) powdered sugar
- ⅓ cup (80g) heavy whipping cream, room temperature
- Red, ivory, and black gel food coloring
Notes & Substitutions
- All-purpose flour: Use a 1:1 gluten-free flour blend for a gluten-free option.
- Granulated sugar: Do not reduce the amount; it affects cake texture and moisture. Research into sugar’s role in cake baking highlights its impact on texture, color, and moisture retention.
- Unsalted butter: Substitute with salted butter and omit any added salt, or use vegan butter.
- Egg whites: Use 5 whole large eggs, flaxseed eggs, or a commercial egg replacer if preferred.
- Sour cream: Replace with full-fat plain yogurt, whole milk, or dairy-free alternatives like vegan sour cream.
- Almond extract: This is optional; you can replace it with additional vanilla extract for a different flavor.
- Heavy cream (for frosting): Whole milk or an alternative milk works well to adjust frosting consistency.
Equipment
Gather these essential tools before you begin baking your Santa Cake. Having them ready ensures a smooth and enjoyable process from start to finish.
- Serrated knife
- Spinning cake stand
- Electric hand mixer or stand mixer
- 8-inch greaseproof cake board
- Small offset spatula
- Thick bubble tea straw or wooden dowel
- 2 large piping bags
- 3 small piping bags
- 1 open star piping tip (e.g., Wilton 1M)
- 2 large round piping tips (e.g., Wilton 1A)
- 2 small round piping tips (e.g., Wilton 10)
Instructions
Follow these clear, step-by-step instructions to create your festive Santa Cake. We break down the process into manageable parts, ensuring success for even beginner bakers. Get ready to bake a delicious and adorable holiday centerpiece!
White Almond Cake Layers
- Preheat your oven to 325°F (160°C). Grease and flour two 8-inch round cake pans; line the bottoms with parchment paper.
- In a large bowl, whisk together the all-purpose flour, granulated sugar, baking powder, and fine salt.
- Add the room temperature unsalted butter to the dry ingredients. Use your hands or a pastry blender to cut the butter into the flour mixture until it resembles coarse, sandy crumbs.
- Pour in the room temperature egg whites and mix thoroughly until just combined.
- Stir in the sour cream, vegetable or canola oil, almond extract, and vanilla extract. Mix until the batter is smooth and well-incorporated.
- Scrape down the sides of the bowl with a spatula, then beat the batter on medium speed for about 30 seconds to incorporate air. Do not overmix.
- Divide about one-third of the batter into a separate bowl. Color one portion with red gel food coloring and the other portion with green gel food coloring until vibrant.
- Pour the colored batters into your prepared cake pans, distributing evenly. For perfectly even layers, weigh the batter in each pan.
- Bake for 35-40 minutes, or until a wooden toothpick inserted into the center comes out clean.
- Cool the cakes in their pans for 10-15 minutes, then invert them onto a wire rack to cool completely.
- Once completely cool, use a serrated knife to level the tops of the cake layers, creating flat surfaces. If using frozen layers, thaw them for 20 minutes before leveling.
Almond Buttercream Frosting
- While the cake layers cool, begin making the almond buttercream frosting.
- In a large bowl with an electric hand mixer or a stand mixer fitted with the paddle attachment, beat the room temperature unsalted butter on medium-high speed until it becomes very smooth and fluffy, about 3-5 minutes.
- Mix in the almond extract, vanilla extract, and fine salt until combined.
- Gradually add the powdered sugar, one cup at a time, alternating with small splashes of heavy whipping cream. Beat on low speed until combined after each addition, then increase to medium-high until light and fluffy.
- If the frosting is too thick, add more cream a teaspoon at a time. If it is too thin, add more powdered sugar until you reach a pipeable consistency.
- Cover the buttercream tightly with plastic wrap to prevent it from crusting. Do not color the frosting yet.
Assembling the Santa Cake
- Place an 8-inch greaseproof cake board on your spinning cake stand. Secure your first cooled and leveled cake layer to the board with a dollop of buttercream.
- Stack the remaining cake layers, spreading a generous, even layer of almond buttercream between each one.
- Insert a thick bubble tea straw or wooden dowel through the center of the stacked cakes for support if desired.
- Apply a thin, even crumb coat of uncolored buttercream all over the entire cake. This traps any loose crumbs.
- Smooth the crumb coat using a small offset spatula and a bench scraper.
- Chill the cake in the refrigerator for 15-20 minutes, or until the crumb coat is firm to the touch.
Coloring the Buttercream
- Scoop approximately 1 cup of the uncolored buttercream into a small bowl; this will be for white details.
- In another small bowl, color about ½ cup of frosting ivory using gel food coloring for Santa’s skin tone.
- Color ⅓ cup of frosting yellow for the belt buckle.
- Color ⅔ cup of frosting black for Santa’s belt, eyes, and boots.
- Color the largest remaining portion of frosting red. To achieve a deep, vibrant red, add a tiny drop of black or brown gel food coloring along with the red.
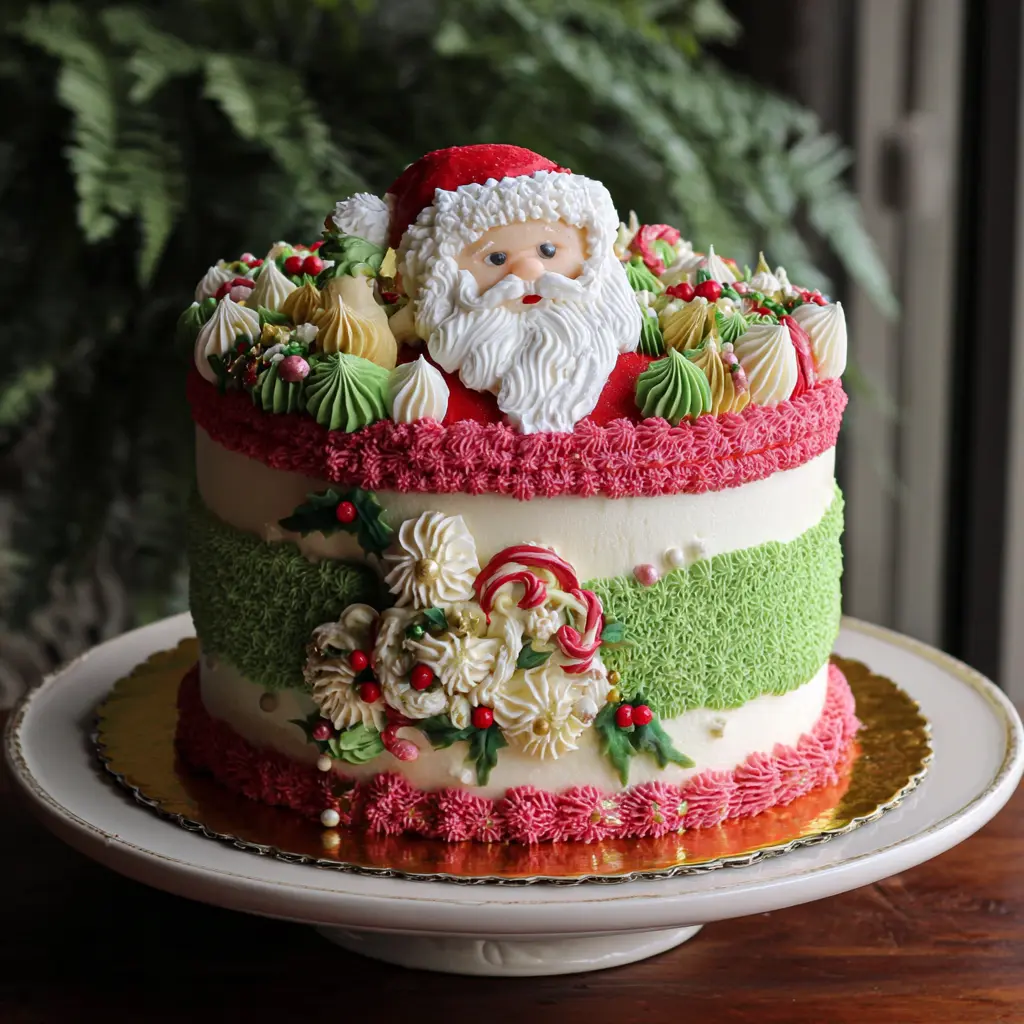
Decorating This Santa Cake
- Fit a large piping bag with a large round tip (Wilton 1A) and fill it with the red buttercream. Spread a smooth, even layer of red frosting around the sides of the cake.
- Switch to a small round piping tip (Wilton 10) for black frosting. Pipe a horizontal black line around the middle of the cake for Santa’s belt.
- Using yellow frosting in a small piping bag with a small round tip, pipe a square shape for the belt buckle in the center of the black belt.
- With black frosting and a small round tip, add two black semi-circles at the bottom front of the cake for Santa’s boots.
- Pipe two diagonal lines of red buttercream on the lower sides of the cake, extending from the belt line, to create Santa’s arms.
- Using the ivory frosting and a small round tip, pipe two small circles at the ends of the red arms for Santa’s hands.
- Cover the entire top surface of the cake with ivory (skin-tone) frosting, smoothing it evenly with an offset spatula.
- Switch to the red buttercream with the large round tip again. Pipe a large red triangle on top of the cake for Santa’s hat, leaving space for the brim.
- Extend an elongated red triangle from the hat, curving it slightly, to represent the end of Santa’s hat.
- Fill a large piping bag with white frosting and an open star piping tip (Wilton 1M). Pipe white swirls or starbursts for the hat’s fur brim and a large pom-pom at the end of the hat.
- Use black frosting with a small round tip to pipe two small circles for Santa’s eyes and a thin, curved line for his mouth.
- With the white frosting and open star tip, pipe generous swirls and dollops around Santa’s face to form his iconic beard and mustache.
- Finally, pipe a small, skin-tone circle (ivory frosting) above the white mustache for Santa’s nose. Your adorable Santa Cake is now complete!
Pro Tips & Troubleshooting
Achieve the best results for your Santa Cake by following these expert tips. They simplify the process and help you avoid common baking pitfalls, ensuring your cake is a success.
- Always use a kitchen scale for precise ingredient measurement; this guarantees consistent results.
- Ensure all cold ingredients, especially butter, egg whites, and sour cream, are at room temperature for smooth batter and frosting.
- Chill cake layers for 15-20 minutes before frosting; this makes handling easier and reduces crumbling.
- Achieve vibrant, rich colors for your buttercream by using high-quality gel food coloring.
- Take your time during decorating; patience yields the most intricate and beautiful designs on your Santa Cake.
- Wrap piping bags in a damp cloth or plastic wrap to prevent the buttercream from drying out and melting from hand warmth.
- Make red frosting ahead of time. The color often deepens and becomes richer overnight.
Serving, Storage, & Variations

This festive Santa Cake is perfect for holiday celebrations. Here’s how to serve it, store leftovers, and explore other creative uses for the recipe.
Serving
Slice this charming Santa Cake with a sharp, serrated knife for clean portions. Serve it as the centerpiece of your holiday dessert table. Pair it with hot cocoa or coffee for a truly festive treat.
Storage
- Frosted cake: Store the completely frosted cake airtight in the refrigerator for up to 1 week.
- Leftovers: Cover any cut sections tightly with plastic wrap to prevent drying out and retain moisture.
- Unfrosted cake layers: Wrap cooled layers tightly in plastic wrap and then foil. Freeze them for up to 3 months. Thaw in the refrigerator overnight before frosting.
- Leftover buttercream: Store airtight in the refrigerator for up to 1 month or in the freezer for up to 3 months. Thaw in the fridge and re-whip before use.
Variations
- Sheet cake: One batch of cake batter yields two 9×13-inch layers (bake for 35-40 minutes) or one tall 9×13-inch layer (bake for 45-55 minutes).
- For even baking of larger or taller cakes, consider using heating cores in the center. This helps ensure the middle cooks thoroughly without over-baking the edges.
Nutrition
Here’s a breakdown of the nutritional information for one serving of this delicious Santa Cake.
| Nutrient | Amount |
|---|---|
| Serving Size | 1 slice (1/24 of cake) |
| Calories | 550 kcal |
| Carbohydrates | 70g |
| Protein | 4g |
| Fat | 29g |
| Saturated Fat | 17g |
| Cholesterol | 75mg |
| Sodium | 288mg |
| Sugar | 57g |
| Unsaturated Fat | 10g |
Nutritional values are estimates and may vary based on specific ingredients and preparation methods.
Conclusion
You now have all the tools and steps to create an unforgettable homemade Santa Cake. This delightful dessert truly embodies the joy and spirit of the holiday season, making it a perfect centerpiece for your festive celebrations. We encourage you to try this fun and approachable recipe and share your beautiful creations. Happy baking, and may your holidays be filled with sweetness and cheer!
FAQ
Got questions about making your festive Santa Cake? We have concise answers to help you succeed!
What kind of cake is a Santa Cake?
This is typically a themed layer cake, decorated to resemble Santa Claus. Our recipe features moist white almond cake layers with smooth almond buttercream.
Can I make this Santa Cake in advance?
Yes, you can bake the cake layers up to 3 days ahead and store them tightly wrapped at room temperature. You can also freeze unfrosted layers for up to 3 months. Prepare the buttercream a few days in advance as well.
How do I get vibrant red buttercream?
Use high-quality gel food coloring, specifically super red or no-taste red. Adding a tiny drop of black or brown gel food coloring can also help deepen the red without making it dull.
What piping tips are essential for decorating Santa?
You will definitely need an open star tip for the beard and hat fur, and various round tips for details like the belt, eyes, nose, and hands on your Santa Cake.
Can I make this cake gluten-free or dairy-free?
Yes, you can. Substitute all-purpose flour with a 1:1 gluten-free flour blend. For dairy-free, use vegan butter, dairy-free sour cream alternatives, and plant-based heavy cream for the buttercream.
Easy & Adorable Santa Cake Recipe with Buttercream
Ingredients
Equipment
Method
- Preheat your oven to 325°F (160°C). Grease and flour two 8-inch round cake pans; line the bottoms with parchment paper.
- In a large bowl, whisk together flour, sugar, baking powder, and salt. Cut in butter until mixture resembles coarse crumbs.
- Add egg whites, sour cream, oil, almond extract, and vanilla. Mix until smooth and beat for 30 seconds.
- Divide one-third of the batter and color with red and green gel food coloring.
- Pour colored batters into prepared pans and bake for 35-40 minutes. Cool on a wire rack.
- Use a serrated knife to level cooled cake layers for stacking.
- Beat butter until fluffy. Add extracts and salt. Slowly mix in powdered sugar and cream until pipeable.
- Stack layers with buttercream. Insert dowel if needed. Apply crumb coat and chill.
- Divide and color portions of buttercream: white, ivory, red, yellow, and black.
- Pipe red around sides for Santa suit. Add black belt, yellow buckle, arms, hands, hat, beard, and face features. Use various tips for texture.


