 Skip to content
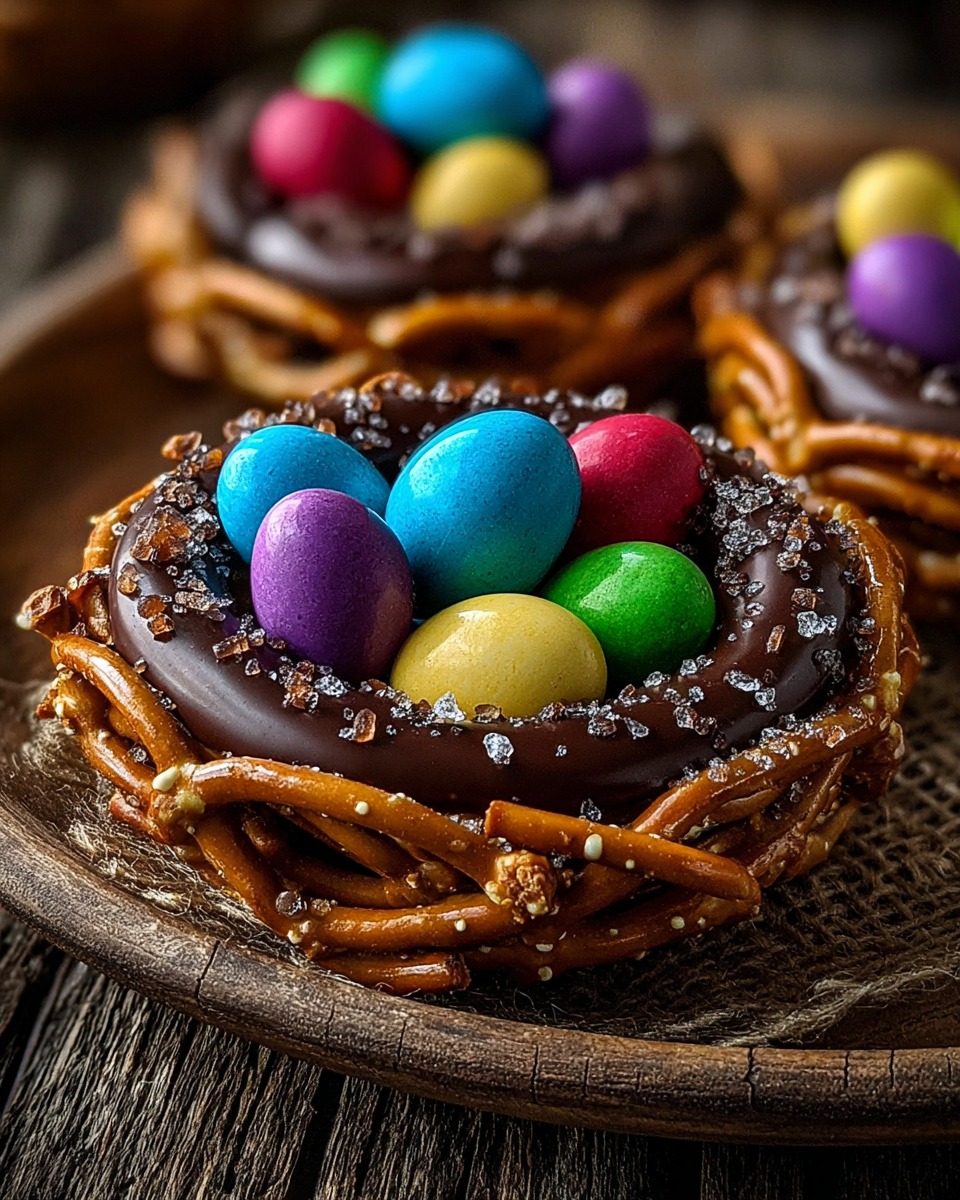
 Welcome to your new favorite Easter treat! These chocolate covered pretzel nests are incredibly easy to make, combining the perfect balance of salty and sweet. You’ll love the delightful crunch and rich chocolate flavor. They are perfect for your Easter celebrations and a fantastic, kid-friendly activity that even the littlest helpers can enjoy. Get ready for some simple, delicious fun!
Why You’ll Love These Chocolate Pretzel Nests
- Only Three Ingredients: You only need chocolate, pretzels, and your favorite mini eggs for these delightful chocolate covered pretzel nests.
- Beginner-Friendly: This recipe is perfect if you are new to baking or just starting out.
- Kid-Friendly Activity: Kids can easily help break pretzels and shape the nests, making it a fun family project.
- Irresistible Salty-Sweet Flavor: The combination of savory pretzels and sweet chocolate is truly addictive. The delightful interplay of sweet and salty flavors creates a unique sensory experience that food scientists attribute to the science behind the salty-sweet appeal and specific brain responses.
- Delightful Crunchy Texture: Each bite offers a satisfying crunch from the pretzels.
- Versatile Chocolate Options: Feel free to use dark, milk, or white chocolate based on your preference.
- Share Family Memories: Create new traditions with this simple recipe perfect for sharing.
Ingredients
Gather your simple ingredients to create these delightful chocolate covered pretzel nests. You’ll be amazed at how a few pantry staples transform into such a special treat. This recipe is designed for ease and maximum flavor!
- 200 g (7 ounces) dark chocolate (See Note 1)
- 80 g (3 ounces) pretzel sticks
- 1 tbsp oil or oil spray – optional (See Note 2)
- mini eggs or candy of your choice (See Note 3)
Notes & Substitutions
Note 1: Use good quality cooking chocolate for the best melting and setting results. Chocolate chips work well too.
Note 2: Narrow pretzel sticks are ideal as they break easily and mix well. Thicker pretzels might need a bit more breaking.
Note 3: Feel free to get creative with your candy filling! Jelly beans, Smarties, or even small gummy candies make great alternatives to mini eggs.
Equipment
You only need a few basic kitchen tools for these chocolate covered pretzel nests.
- Patty pan tins (optional, for shaping)
- Baking tray with parchment paper
- Heatproof bowl
- Saucepan (for double boiler method)
- Spatula or spoon
Instructions
Creating these chocolate covered pretzel nests is straightforward and fun. Follow these simple steps for a perfect batch every time.
Step 1: Prepare Molds and Melt Chocolate.
First, lightly brush or spray two patty pan tins with oil. This helps the nests release easily. Alternatively, line a baking tray with non-stick baking paper. Next, chop the dark chocolate into small, even pieces. Place the chopped chocolate into a heatproof bowl. Set this bowl over a saucepan of barely simmering water, ensuring the bowl does not touch the water and no water gets into the chocolate. Stir occasionally until the chocolate has almost melted. Remove the bowl from the heat and set it aside; the residual heat will melt any remaining chocolate, making it smooth and glossy. If you prefer, you can use a microwave. Place the chocolate in a microwave-safe bowl and heat in 30-second intervals, stirring thoroughly after each interval, until completely melted and smooth.
Step 2: Combine Pretzels and Chocolate.
Now, break the pretzel sticks into short lengths, about 2 cm (¾ inch) each. You can do this by hand for a rustic feel, or roughly chop them with a knife. Add all the broken pretzel pieces directly into the bowl with the melted chocolate. Using a spatula or spoon, stir the mixture well until every single pretzel piece is thoroughly coated in the rich, melted chocolate. Ensure there are no dry spots. This uniform coating is key for delicious chocolate covered pretzel nests.
Step 3: Shape the Nests.
Take about two teaspoons of the chocolate-pretzel mixture for each nest. Place these portions into the prepared patty pan cups or directly onto your parchment-lined baking tray. Use the back of your spoons to gently shape the mixture into small, round nests, pressing down slightly in the center to create an indentation for the candy eggs later. Don’t worry if they look a little rustic; that’s part of their charm!
Step 4: Chill to Set.
Carefully place the baking tray with your newly formed chocolate covered pretzel nests into the refrigerator. Let them chill for at least 15-20 minutes, or until the chocolate has completely solidified. This step is crucial for achieving that satisfying snap when you bite into them. Once firm, they are ready for the final touch.
Step 5: Decorate and Serve.
Once the chocolate has fully set, gently remove the nests from the patty pan tins or peel them off the parchment paper. Arrange your cooled chocolate covered pretzel nests on a festive platter. Fill the center of each nest with your chosen candy eggs or other small candies. They are now ready to be admired and enjoyed!
Pro Tips & Troubleshooting
- Quality Chocolate Matters: Always use high-quality chocolate for the best flavor and melting consistency in your chocolate covered pretzel nests. Understanding the proper chocolate melting techniques for melting chocolate, such as using a double boiler and avoiding water contact, is crucial for achieving a smooth, glossy finish without seizing.
- Water is the Enemy: When melting chocolate using a double boiler, absolutely prevent any water or steam from getting into the chocolate, as it will seize.
- Dry Equipment: Ensure all bowls and utensils are completely dry before they touch the chocolate to avoid seizing.
- Don’t Overheat: Monitor your chocolate closely during melting to prevent burning. Low and slow is always best.
- Pretzel Size: Break pretzels into roughly ¾-inch pieces for easier mixing and shaping into nests.
- Cool Slightly: Let the chocolate-pretzel mixture cool for a couple of minutes before shaping. This makes it less sticky and easier to mold.
- Embrace Imperfection: Don’t stress about perfect shapes; rustic chocolate covered pretzel nests look charming and homemade.
Serving, Storage & Variations
Serving Suggestions
These chocolate covered pretzel nests are a festive addition to any Easter dessert table. They make wonderful homemade gifts when packaged nicely or are perfect for parties and potlucks. Serve them chilled for the best crunchy texture and a refreshing bite.
Storage Instructions
Store your finished chocolate covered pretzel nests in an airtight container at room temperature, in a cool, dark place. If your kitchen is warm, or during summer months, refrigerate them to prevent melting. Layer the nests with baking paper to keep them from sticking together. For optimal freshness and crunch, enjoy them within two days, as pretzels can soften over time.
Variations
- Chocolate Choices: Experiment with white chocolate, milk chocolate, or a combination for different flavor profiles.
- Crunchy Alternatives: Replace pretzels with chow mein noodles, rice crispy cereal, or crushed potato chips for a different kind of crunch.
- Filling Fun: Use other small candies like jelly beans, M&M’s, or even small chocolate-covered nuts as your nest filling.
- Extra Sparkle: Add a sprinkle of edible glitter or colorful sprinkles over the nests before they set for extra festivity.
Nutrition Information
| Nutrient | Amount Per Nest (approx.) |
|---|---|
| Calories | 95 kcal |
| Total Fat | 5 g |
| Saturated Fat | 3 g |
| Cholesterol | 0 mg |
| Sodium | 70 mg |
| Total Carbs | 11 g |
| Dietary Fiber | 1 g |
| Total Sugars | 7 g |
| Protein | 1 g |
FAQ
Q: Can I make these in advance?
A: Yes, you can prepare these chocolate covered pretzel nests up to two days before serving. Keep in mind that the pretzels may soften slightly over time, but they will still be delicious.
Q: How should I store them?
A: Store them in an airtight container in a cool, dark place. If your kitchen is warm, it’s best to refrigerate them. Layer with parchment paper to prevent sticking.
Q: What’s the best way to melt chocolate?
A: The double boiler method offers excellent control and prevents burning. Chop your chocolate evenly for consistent melting. Always avoid any water contact.
Q: Can I use a microwave to melt chocolate?
A: Absolutely! Microwave chocolate in 30-second intervals. Be sure to stir frequently between each interval to prevent overheating and burning the chocolate.
Conclusion
You’ve just discovered how incredibly simple and satisfying it is to make these delightful chocolate covered pretzel nests. Their irresistible salty-sweet balance and delightful crunch make them a must-have for Easter or any spring celebration. This recipe proves that baking simple, delicious treats doesn’t have to be complicated. Give these a try this season; your family and friends will love them! Don’t forget to share your creations and tell us what you think in the comments below!
Easy Chocolate Pretzel Easter Nests
Ingredients
Equipment
Method
- First, lightly brush or spray two patty pan tins with oil. This helps the nests release easily. Alternatively, line a baking tray with non-stick baking paper. Next, chop the dark chocolate into small, even pieces. Place the chopped chocolate into a heatproof bowl. Set this bowl over a saucepan of barely simmering water, ensuring the bowl does not touch the water and no water gets into the chocolate. Stir occasionally until the chocolate has almost melted. Remove the bowl from the heat and set it aside; the residual heat will melt any remaining chocolate, making it smooth and glossy. If you prefer, you can use a microwave. Place the chocolate in a microwave-safe bowl and heat in 30-second intervals, stirring thoroughly after each interval, until completely melted and smooth.
- Now, break the pretzel sticks into short lengths, about 2 cm (¾ inch) each. You can do this by hand for a rustic feel, or roughly chop them with a knife. Add all the broken pretzel pieces directly into the bowl with the melted chocolate. Using a spatula or spoon, stir the mixture well until every single pretzel piece is thoroughly coated in the rich, melted chocolate. Ensure there are no dry spots. This uniform coating is key for delicious chocolate covered pretzel nests.
- Take about two teaspoons of the chocolate-pretzel mixture for each nest. Place these portions into the prepared patty pan cups or directly onto your parchment-lined baking tray. Use the back of your spoons to gently shape the mixture into small, round nests, pressing down slightly in the center to create an indentation for the candy eggs later. Don’t worry if they look a little rustic; that's part of their charm!
- Carefully place the baking tray with your newly formed chocolate covered pretzel nests into the refrigerator. Let them chill for at least 15-20 minutes, or until the chocolate has completely solidified. This step is crucial for achieving that satisfying snap when you bite into them. Once firm, they are ready for the final touch.
- Once the chocolate has fully set, gently remove the nests from the patty pan tins or peel them off the parchment paper. Arrange your cooled chocolate covered pretzel nests on a festive platter. Fill the center of each nest with your chosen candy eggs or other small candies. They are now ready to be admired and enjoyed!


