Skip to content
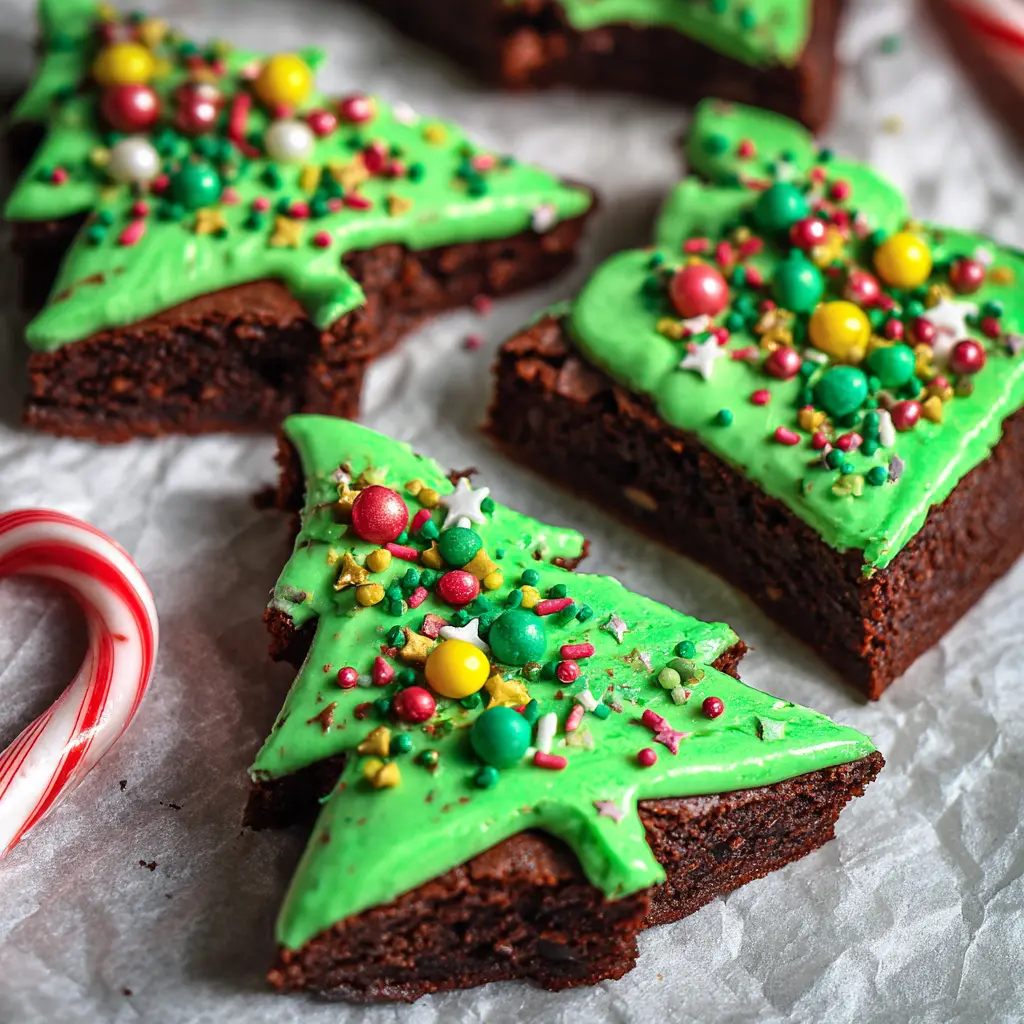
Brighten your holiday season with this incredibly simple and fun christmas tree brownies recipe! These festive treats are perfect for parties, gift-giving, or just a cozy night in. You only need a few ingredients to create adorable, delicious brownie trees that everyone will adore. Get ready to bake some holiday magic with this delightful dessert.
Why You’ll Love This Christmas Tree Brownies Recipe
Creating these festive brownie trees is a joyful experience for bakers of all skill levels. This christmas tree brownies recipe offers endless possibilities for customization and celebration. You’ll want to make them every year!
- Effortlessly Simple: Start with a box mix for a quick and easy base.
- Kid-Friendly: Involve the little ones in decorating these cute treats.
- Super Festive: They add a vibrant, whimsical touch to any holiday spread.
- Customizable: Change up sprinkles or icing colors to match any theme.
- Deliciously Fudgy: Enjoy the classic comfort of rich, chocolatey brownies.
Ingredients You’ll Need
Gather these simple items to create your adorable holiday brownie trees. This christmas tree brownies recipe uses pantry staples and a few fun decorative elements.
- 1 box Brownie Mix (standard 9×13 inch pan size): Use your favorite brand.
To achieve that desirable dense, rich texture, understanding the science of fudgy brownies can help you select the best mix or adjust your recipe.
Look for a fudgy variety for the best texture.
- Ingredients called for on brownie mix box: Typically eggs, oil, and water.
- 1 tub white vanilla icing (12-16 oz): Store-bought makes this recipe quick.
- Green food colouring: Gel food coloring gives a more vibrant color without thinning the icing.
- Small round sprinkles: Use red, white, or multi-colored for “ornaments.”
- Small star sprinkles: A must-have for the top of your brownie trees!
- Candy canes: Regular or mini size, unwrapped, for the tree trunks.
Notes & Substitutions
Feel free to adapt this recipe to your preferences. You can make homemade brownies from scratch if you prefer, or use a gluten-free brownie mix. For the icing, use your own homemade buttercream for a richer flavor. Experiment with different sprinkle shapes or even edible glitter for extra sparkle on your Christmas tree brownies.
Equipment
You don’t need fancy tools to make these delightful holiday treats. Just a few basic kitchen items will do the trick.
- 8″x8″ baking pan
- Aluminum foil
- Mixing bowl and spoon/spatula
- Sharp knife
- Cutting board
- Zip-top bag (or piping bag)
- Scissors
Instructions: Crafting Your Christmas Tree Brownies
Follow these straightforward steps to create festive and delicious holiday treats. This detailed christmas tree brownies recipe guides you through baking, cutting, and decorating.
-
Prepare the Pan: Line an 8″x8″ baking pan with aluminum foil, leaving an overhang on two sides to create “handles.” Spray the foil generously with cooking spray to prevent sticking. This makes it easy to lift the brownies out later.
-
Bake Brownies: Prepare the brownie mix according to the package directions. Pour the batter evenly into the prepared pan. Bake as directed on the box, usually around 25-30 minutes, until a toothpick inserted into the center comes out with moist crumbs.
-
Cool Completely: Allow the brownies to cool completely in the pan, on a wire rack, for approximately 1.5 hours. Do not rush this step; warm brownies are difficult to cut neatly.
-
Remove and Cut Triangles: Once fully cooled, use the foil overhangs to lift the brownie slab out of the pan and onto a cutting board. Cut the brownies into three equal rows. Then, cut each row into alternating diagonal triangles to form tree shapes, as shown in the example photo. Aim for 12 triangles.
-
Prepare Candy Cane Trunks: Unwrap the candy canes. Use a sharp knife to gently cut or break the candy canes into 1.5-inch long pieces. These will serve as the festive trunks for your brownie trees.
-
Add Trunks: Press the sharper, cut end of each candy cane piece into the bottom (the wider base) of each brownie triangle. Insert it about half an inch to ensure it’s secure.
-
Color the Icing: Spoon approximately half of the tub of white vanilla icing into a medium bowl. Add green food coloring a few drops at a time, mixing thoroughly after each addition, until you achieve your desired shade of vibrant green.
-
Prepare Piping Bag: Spoon the green icing into a large zip-top bag. Push the icing down to one corner. Seal the bag securely, pressing out any excess air.
-
Cut Piping Tip: Use sharp scissors to snip off a small corner of the zip-top bag, creating a tiny opening about 1/8 to 1/4 inch wide. This will be your makeshift piping bag.
-
Decorate Trees: Hold a brownie triangle by its candy cane trunk. Starting at the top point of the brownie tree, gently squeeze out the green icing in a curvy zigzag pattern as you work your way down to the base. Cover the entire surface, making it look like festive evergreen branches.
-
Add Sprinkles: Immediately after icing each tree, add your favorite small round sprinkles for “ornaments” while the icing is still wet. Place a small star sprinkle at the very top of each brownie tree for the perfect finishing touch.
-
Enjoy! Let the icing set slightly, then display your beautiful christmas tree brownies and serve them with holiday cheer!
Pro Tips & Troubleshooting
Achieve perfect Christmas tree brownies every time with these helpful hints.
- Cooling is Key: Fully cooling the brownies prevents crumbling when cutting. For extra firm brownies, chill them in the refrigerator for 30 minutes after cooling at room temperature.
- Sharp Knife for Clean Cuts: Use a very sharp, clean knife for precise cuts. Wipe the knife blade between cuts to avoid dragging crumbs and smudging.
- Even Icing Application: Practice piping on a piece of parchment paper first if you are new to using a piping bag. This helps achieve a consistent zigzag pattern.
- Food Coloring Intensity: Gel food coloring provides more intense color with less liquid, preventing the icing from becoming too thin. Add it gradually until you reach your desired shade of green.
Serving, Storage, and Variations
These delightful treats are perfect for any holiday gathering. Learn how to serve them best, store them, and even explore fun variations.
Serving:
This christmas tree brownies recipe yields 12 servings. Arrange them on a platter for a stunning display at your holiday party. They also make excellent edible gifts for friends and family; simply place them in decorative boxes or bags. Serve them alongside a glass of milk or a warm cup of cocoa.
Storage:
Store the decorated Christmas tree brownies in an airtight container at room temperature for up to 3-4 days. For longer storage, you can refrigerate them for up to a week. If stacking, place parchment paper between layers to prevent the icing from sticking or smudging.
Variations:
- Flavor Fun: Use peppermint extract in your green icing for a festive mint-chocolate twist.
- Custom Colors: Instead of green, use white icing for a “snowy” tree look, or different colors for a whimsical forest.
- Topping Alternatives: Decorate with mini chocolate chips, crushed peppermints, or shredded coconut for a snowy effect. Edible glitter adds extra sparkle.
- Gourmet Brownies: Elevate your trees by adding chocolate chips, nuts, or peppermint pieces directly into the brownie batter before baking.
Nutrition Information
This nutrition information is an estimate based on using a standard boxed brownie mix and store-bought icing. Actual values may vary depending on specific brands and modifications.
| Nutrients | Per Serving (estimated) |
|---|---|
| Calories | 250-350 |
| Total Fat | 10-15g |
| Saturated Fat | 3-5g |
| Cholesterol | 15-25mg |
| Sodium | 150-250mg |
| Total Carbohydrates | 40-55g |
| Sugars | 30-45g |
| Protein | 2-4g |
Disclaimer: This is an estimated nutritional breakdown. Please consult specific product labels for accurate information.
Frequently Asked Questions
Find answers to common questions about making this delightful christmas tree brownies recipe.
Can I make the brownies ahead of time?
Absolutely! Bake the brownies up to 2 days in advance, cool them completely, and store them tightly covered at room temperature. Decorate them just before serving.
What if I don’t have an 8×8 inch pan?
You can use a 9×9 inch pan, but the brownies will be slightly thinner. You may need to adjust the baking time slightly and will still yield around 12 trees.
Can I use homemade brownie batter instead of a mix?
Yes, feel free to use your favorite homemade brownie recipe! Ensure it’s for an 8×8 or 9×9 inch pan to get the right thickness for cutting.
How do I get clean cuts for the trees?
Ensure your brownies are completely chilled. Use a very sharp knife and wipe the blade clean with a damp cloth after each cut to prevent messy edges.
Conclusion
This christmas tree brownies recipe offers a delightful and incredibly simple way to bring holiday cheer to your kitchen. With minimal effort, you can transform ordinary brownies into whimsical, festive treats perfect for any celebration. Gather your ingredients, get creative with your decorations, and enjoy the process of making these adorable edible trees. They are sure to be a hit with family and friends, creating sweet memories that last all season long.