Skip to content
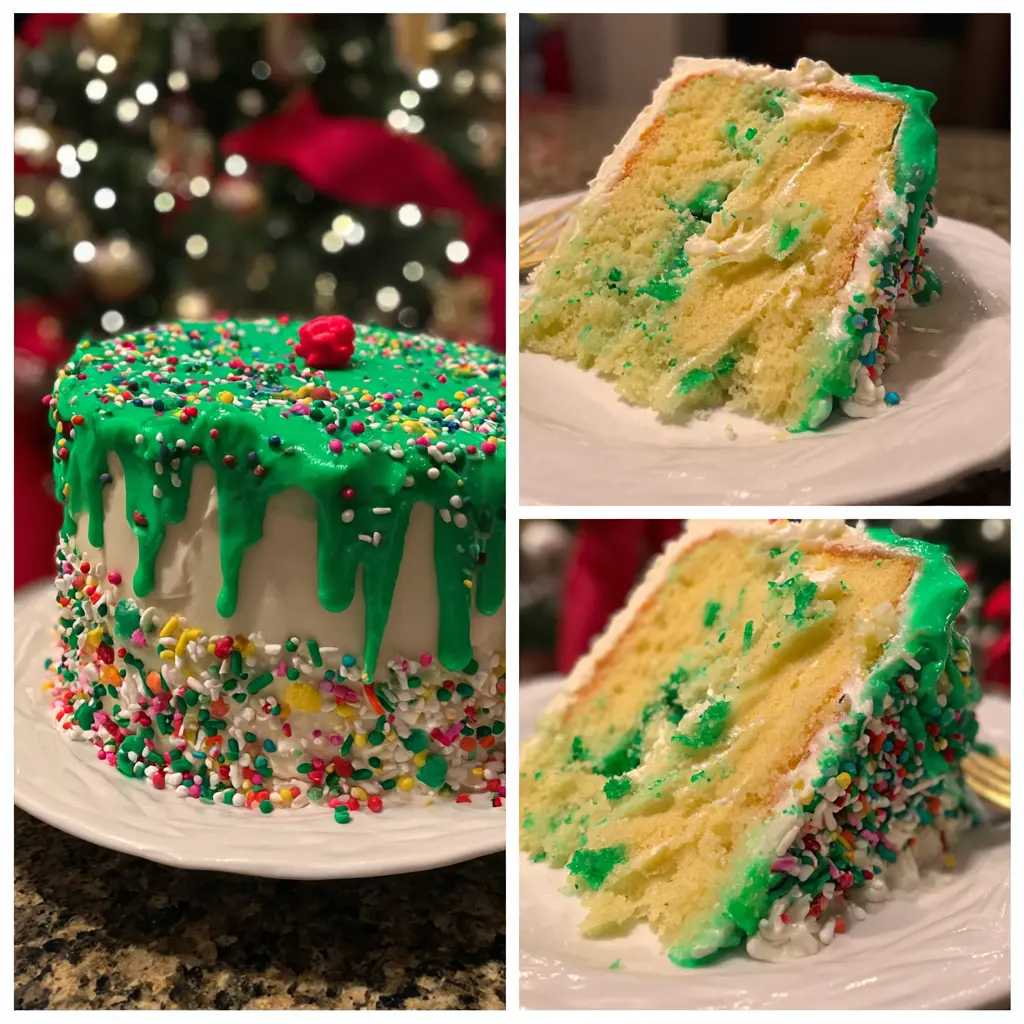
This nostalgic christmas tree cake recipe brings the magic of a beloved holiday treat right into your kitchen. Imagine soft, tender cake layers filled with a creamy marshmallow frosting, all covered in a delightful white candy coating. Perfect for festive gatherings, these cute tree-shaped cakes are simpler to make than you might think. Get ready to bake some joyous holiday cheer and impress everyone with this homemade classic christmas tree cake recipe.
Why You’ll Love This Christmas Tree Cake Recipe
Discover why this delightful holiday cake will become a treasured part of your festive baking tradition:
- Nostalgic Appeal: This recipe perfectly captures the classic flavors and fun look of everyone’s favorite childhood festive snack, the Christmas tree cake. To learn more about the origins of this beloved holiday treat, you can explore the history of Little Debbie Christmas Tree Cakes.
- Festive Fun: The process of cutting out and decorating these charming tree-shaped treats is a joyful activity for all ages.
- Make-Ahead Friendly: You can prepare the cake and frosting in advance, chilling it before the final decoration steps.
- Customizable Decor: Easily change the sprinkle colors or drizzle patterns to match your own unique holiday theme or party.
- Perfect for Gifting: Individually wrapped, these homemade delights make charming and thoughtful edible gifts for friends and family members.
Ingredients for Your Festive Christmas Tree Cakes
Crafting this delightful christmas tree cake recipe requires a few key components for both the moist cake, the creamy filling, and the festive decoration. Ensure all cold ingredients are at room temperature for the best results.
For the Cake:
- 1 1/4 cups all-purpose flour
- 1 tsp. baking powder
- 1/4 tsp. salt
- 1/2 cup unsalted butter, room temperature
- 1 cup sugar
- 2 eggs, room temperature
- 2 1/2 tsp. vanilla extract
- 1/2 cup buttermilk, room temperature
For the Marshmallow Filling:
- 1 cup unsalted butter, room temperature
- 1 cup Marshmallow Fluff
- 3 cups confectioner’s sugar
- 2 tsp. vanilla extract
For the Candy Coating & Decoration:
- 2 1/2 cups white candy melts
- 3 Tbsp. coconut oil
- 1/2 cup confectioner’s sugar
- 1-2 tsp. water (more if needed)
- 1 Tbsp. green sugar sprinkles
- 1-2 drops red food dye
Notes & Substitutions: For optimal results, ensure butter, eggs, and buttermilk are at room temperature. This helps create a smooth batter and a light, airy filling. If you don’t have buttermilk, combine 1/2 cup milk with 1/2 tablespoon lemon juice or white vinegar and let it sit for 5 minutes.
Equipment You’ll Need
Gathering your tools before you begin simplifies the baking process.
- Two 1/4 cookie sheet pans (or one 1/2 sheet pan)
- Parchment paper
- Electric mixer (handheld or stand mixer with paddle attachment)
- Mixing bowls
- Offset spatula
- Tree cookie cutter
- Piping bag
- Microwave-safe bowl (for candy melts)
- Two forks (for dipping the cakes)
Instructions: Crafting Your Own Christmas Tree Cakes
Making this christmas tree cake recipe is a rewarding experience, leading to truly delicious and festive treats. Follow these detailed steps carefully for the best possible outcome.
Prepare the Cake Layers:
- Preheat your oven to 350°F (175°C). Line two 1/4 cookie sheet pans with parchment paper and lightly grease them with non-stick spray. If you are using one standard 1/2 sheet pan, prepare it similarly.
- In a small bowl, whisk together the all-purpose flour, baking powder, and salt until well combined. Set this dry mixture aside.
- In a separate, larger bowl, use an electric mixer to beat the room temperature unsalted butter and granulated sugar until the mixture is light and fluffy. This should take about 3-5 minutes, and the mixture will lighten significantly in color.
- Add the eggs one at a time, mixing thoroughly after each addition until just incorporated. Stir in the vanilla extract.
- Beginning and ending with the dry ingredients, alternately add the dry mixture and the buttermilk to the wet mixture. Mix a little bit between each addition, being careful not to overmix the batter. Use a silicone spatula to gently ensure that everything is combined nice and evenly from the bottom of the bowl.
- Evenly distribute the prepared batter onto the lined cookie sheets. Use an offset spatula to spread the batter thinly and smoothly to the edges of each pan.
- Bake for 10-12 minutes, or until the cake is set and springs back slightly when touched. The edges should be just golden brown, and the cake should not appear jiggly.
- Let the cake layers sit in the pans for about 5 minutes before carefully flipping them out onto fresh sheets of parchment paper. Allow the cakes to cool completely at room temperature. If you used one 1/2 cookie sheet, cut it in half crosswise (the short way) to create two equal halves.
Make the Marshmallow Filling:
- While the cake layers cool, prepare the creamy marshmallow filling. In a stand mixer fitted with the paddle attachment, or using an electric hand mixer, whisk together the room temperature unsalted butter and Marshmallow Fluff. Mix until there are no visible lumps of butter and the mixture is smooth. Be sure to scrape down the sides of the bowl frequently as you mix.
- Slowly add in the confectioner’s sugar, one cup at a time, mixing until everything is nice and evenly combined and there are no lumps. Stir in the vanilla extract until the filling is perfectly smooth.
Assemble and Chill the Cake:
- Place one cooled cake half onto a cookie sheet that has been lined with parchment paper. This will greatly assist you when it’s time to move the cake to the freezer.
- Scoop the marshmallow filling generously onto this first half of the cake. Use an offset spatula to spread the frosting out evenly all the way to the edges.
- Carefully place the other half of the cooled cake on top of the frosted layer. The layers should be assembled as cake, frosting, then cake.
- Transfer this assembled cake to the freezer and allow it to chill for at least one hour. This firming step is crucial.
Cut and Re-Chill the Tree Shapes:
- After the cake has chilled for at least one hour, remove it from the freezer. Use a tree-shaped cookie cutter to cut out as many tree shapes as you can from the chilled cake slab. You should typically be able to get around 8 individual tree cakes.
- Place the cut trees back onto a clean cookie sheet lined with parchment paper. Return them to the freezer and allow them to chill again for at least 2 hours. This extended chilling step is essential; it ensures that the cakes will be firm enough not to fall apart when you coat them later on. Use the cake scraps as a tasty snack or combine them with extra frosting to make a delicious cake pop mixture.
Decorate Your Christmas Trees:
- Once the cakes have chilled sufficiently, prepare the red glaze drizzle. Combine the 1/2 cup confectioner’s sugar, 1-2 tsp. water (add more if needed, a drop at a time, to reach desired consistency), and 1-2 drops of red food dye in a small bowl. Stir until this mixture is smooth and the perfect shade of festive red. Transfer this red glaze into a piping bag fitted with a small, round tip, or simply snip a tiny corner off a Ziploc bag. Set this aside.
- In a microwave-safe bowl, melt the white candy melts and coconut oil together. Heat in 30-second intervals, stirring thoroughly between each interval, until the candy melts are completely smooth and fluid.
- One at a time, gently drop each frozen cake tree into the melted candy coating. Use two forks to carefully turn the tree, ensuring it is evenly coated on all sides. Lift the tree out with the forks, allowing any excess candy melts to drip off.
- Place the coated tree onto a clean cookie sheet lined with parchment paper. Allow the candy melts to set on the trees for approximately 30-45 seconds. Then, quickly sprinkle on the green sugar sprinkles. It’s important to do this while the candy coating is still slightly wet; once the candy melts completely set, the green sprinkles won’t adhere properly.
- Finally, use the prepared red icing in the piping bag to pipe the nostalgic, iconic zigzag lines of red on top of each festive christmas tree cake.
- Enjoy your homemade holiday treats!
Pro Tips & Troubleshooting for Perfect Tree Cakes
Achieve success with your seasonal cake creation using these helpful hints:
- Room Temperature Ingredients: Always ensure butter, eggs, and buttermilk are at room temperature. This is vital for a smooth, emulsified batter and a light, creamy frosting.
- Avoid Overmixing: Overmixing the cake batter develops gluten, which can lead to a dense, tough cake. Mix only until the ingredients are just combined.
- Crucial Chill Time: Do not skip or shorten the freezing steps. The cakes must be very firm for clean cutting and successful dipping without breaking.
- Working with Candy Melts: Once melted, candy coating begins to set quickly. Work efficiently, dipping cakes one by one and sprinkling immediately. If the melts become too thick, reheat them briefly in the microwave.
Serving, Storage & Variations
These delightful christmas tree cake recipe treats are perfect for sharing the holiday spirit.
Serving:
Serve these nostalgic christmas tree cakes chilled or at room temperature for the best flavor and texture. They are ideal for holiday parties, festive gatherings, school events, or simply as a special homemade treat for your family. Arrange them on a platter for an impressive display.
Storage:
For optimal freshness and safety, it’s always wise to consult food safety guidelines for storing baked products. Store any leftover Copycat Little Debbie Christmas Tree Cakes in an airtight container at room temperature for up to 3 days. For slightly longer preservation, you can refrigerate them for up to 5 days. If you wish to keep them longer, freeze individual cakes wrapped tightly in plastic wrap for up to 1 month. Thaw them gently in the refrigerator before enjoying.
Variations:
- Flavor Boost: Add a touch of almond extract or peppermint extract to the cake batter or marshmallow filling for an interesting twist.
- Chocolate Trees: For chocolate lovers, use chocolate candy melts instead of white for a rich, dark coating.
- Different Sprinkles: Experiment with various holiday sprinkles, edible glitter, or silver nonpareils for unique decorations.
Nutrition Information
Each serving of this homemade christmas tree cake recipe offers a sweet, satisfying treat that is perfect for holiday indulgence. Nutritional information can vary widely based on exact ingredient brands, preparation methods, and precise portion sizes. The table below provides an approximate value per single serving.
| Nutrition Information (Estimated Per Serving) |
|---|
| Calories: 450-500 |
| Total Fat: 25-30g |
| Saturated Fat: 15-20g |
| Cholesterol: 80-90mg |
| Sodium: 120-150mg |
| Total Carbohydrates: 55-65g |
| Dietary Fiber: 0-1g |
| Total Sugars: 45-55g |
| Protein: 4-6g |
Frequently Asked Questions about this Christmas Tree Cake Recipe
Here are answers to some common questions about making these charming holiday cakes:
- Can I make these ahead of time? Absolutely! You can prepare the cake layers and marshmallow filling, assemble the cake, and chill it up to 2 days in advance. The cut tree shapes can be frozen for several weeks before the final dipping and decorating steps.
- Why did my candy coating seize or become lumpy? Candy melts can seize if they come into contact with even a tiny amount of moisture or if they are overheated. Ensure all your bowls and utensils are completely dry, and melt the candy gently in short, controlled intervals, stirring frequently.
- What if I don’t have a tree cookie cutter? No problem! You can simply cut the assembled cake into festive squares or rectangles instead. Decorate them with the red drizzle and green sprinkles; the vibrant holiday colors will still evoke plenty of cheer.
- Can I use regular buttercream frosting instead of marshmallow fluff? While you could use a thick buttercream, the marshmallow fluff frosting is key to achieving the signature taste and texture of the original treats. The result wouldn’t be quite the same as this classic christmas tree cake recipe.
Conclusion
This homemade christmas tree cake recipe is truly more than just a dessert; it’s a delightful trip down memory lane, bringing a beloved holiday tradition to life. You’ll adore recreating the iconic flavor and whimsical design of this festive favorite right in your own kitchen. Gathering friends and family to enjoy these charming treats will surely create new, cherished holiday memories for years to come. With clear, simple steps and a little patience, anyone can master these heartwarming holiday cakes. Bake a batch and spread some sweet, nostalgic joy this season!