 Skip to content
 Discover a delightful, hassle-free Easter treat that brings smiles to every face. This recipe for Easter bunny bark transforms simple ingredients into charming, festive delights. Perfect for busy parents and beginners, homemade candy bark adds a touch of magic to your holiday celebrations. Get ready to create adorable, delicious chocolate bunnies with minimal effort!
Why You’ll Love This Easter Bunny Bark
This festive treat quickly becomes a favorite for many reasons:
- Extremely quick to prepare: You can make a batch in just minutes, perfect for last-minute needs.
- Requires minimal ingredients: Only a few simple items create these adorable pieces of Easter bunny bark.
- Fun and engaging for all ages: Kids love helping to place the candies and watch the bark set.
- Perfectly customizable for any occasion: Easily change colors and candies to suit any holiday or party theme.
- Makes an adorable edible gift: Package these charming bunnies for friends, teachers, or neighbors.
- Adds a vibrant touch to your Easter spread: Their bright colors and cute shapes are sure to impress.
Ingredients
Gather these simple ingredients to create your charming Easter bunny bark:
- 1 Easter bunny silicone pan (yields 24 pieces)
- Disposable piping bag
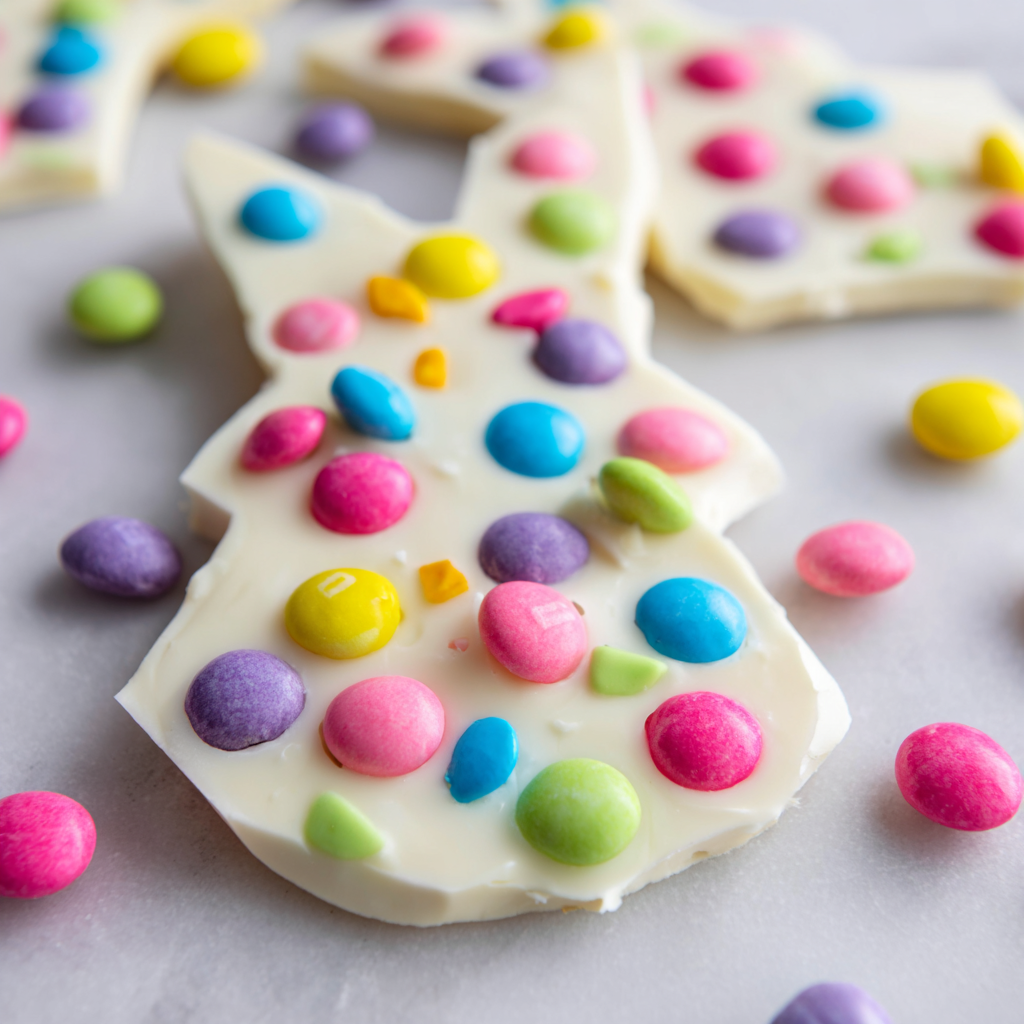
- 120 pastel colored M&Ms (24 each pink, blue, green, yellow, and purple)
- 2 cups bright white candy melting wafers
Notes & Substitutions
You have flexibility with your ingredients. Consider using dark or milk chocolate candy melts for a richer flavor profile. For an extra twist, add a few drops of oil-based flavorings like peppermint or lemon oil to the melted wafers. Never use water-based extracts, as they will cause the candy melts to seize and become unusable. Understanding the science behind this common issue can prevent kitchen mishaps, as explained in this article on why chocolate seizes when exposed to water. Feel free to swap out M&M’s for other festive Easter candies, such as mini chocolate eggs, pastel sprinkles, or even small jelly beans.
Equipment
You won’t need much to whip up this charming Easter bunny bark:
- Silicone bunny pan (or similar Easter-themed mold)
- Disposable piping bags (or sturdy Ziploc bags)
- Microwave-safe bowl (for melting wafers if not using a bag)
- Baking sheet (optional, for supporting the silicone mold)
Instructions
Creating this Easter bunny bark is incredibly straightforward. Follow these steps for perfect results:
- Prepare your workspace: Gather all ingredients and equipment before you begin. Place your silicone bunny pan on a flat surface or a baking sheet for stability.
- Melt the candy wafers: Add 1 cup of bright white candy melting wafers to a disposable piping bag. Microwave at 50% power in 30-second intervals, kneading the bag between each, until completely melted and smooth. Be careful not to overheat the candy.
- Arrange M&M’s in molds: Place one of each color pastel M&M into each cavity of your bunny silicone pan. Don’t worry about the orientation; some will lay flat, others may be on their sides. This adds to the homemade charm of your Easter bunny bark.
- Fill the piping bag: Once melted, ensure the candy wafers are smooth and lump-free.
- Pour the candy bark: Snip a small tip off the piping bag. Pipe the bright white candy melts into each bunny cavity, just barely covering the M&Ms. Aim for an even, thin layer.
- Tap and set: Gently tap the pan on your counter a few times. This helps to evenly distribute the candy coating and release any trapped air bubbles, ensuring a smooth finish.
- Harden and unmold: Allow the candy bark to harden completely at room temperature for about 15-20 minutes, or refrigerate for 5-10 minutes to speed up the process. Once firm, gently pop each Easter bunny bark piece out of the silicone mold.
- Repeat the process: If you have more M&M’s or need more bark, repeat the melting and pouring steps with additional candy melts and M&M’s until all ingredients are used or you have enough Easter bunny bark pieces. This recipe yields 24 pieces.
Pro Tips for Perfect Easter Bunny Bark
Achieve flawless results with these helpful pointers:
- Proper melting technique: Always melt candy wafers at 50% power in short bursts. Overheating can cause the candy to become thick, clumpy, or scorched.
- Even M&M distribution: After placing M&M’s, gently nudge them with a toothpick or the back of a small spoon to ensure they’re spread out before pouring.
- Achieving perfect thickness: Avoid overfilling the molds. A thin layer of candy melt is enough to cover the M&M’s and creates a delicate, snappy bark.
- Troubleshooting soft bark: If your Easter bark bunnies are soft, they may need more time to cool completely. Ensure your room temperature isn’t too warm, or chill them in the refrigerator until firm.
- Clean edges: For neat shapes, make sure the candy is fully hardened before attempting to unmold. Flexing the silicone mold gently helps release the bark without breaking.
Serving, Storage, and Variations
This charming Easter bunny bark is perfect for many occasions.
Serving Suggestions: Arrange your vibrant bark pieces on a festive platter as a standalone treat. They also make a delightful addition to an Easter dessert board alongside cookies, fruit, and other confections.
Storage Recommendations: Store your hardened Easter bunny bark in an airtight container at room temperature. Keep it away from direct sunlight or heat sources to prevent melting.
Shelf Life: Properly stored, your homemade candy bark remains fresh and delicious for up to 2-3 weeks.
Gifting Ideas: Individually package the cute Easter bunny chocolate bark in small cellophane treat bags tied with a ribbon. These make thoughtful gifts for teachers, neighbors, or party favors.
Fun Variations: Get creative with different colored candy melts, such as pastel pink, blue, or yellow, for even more vibrant Easter bunny bark. You can also experiment with various sprinkles, adding them directly to the molds before pouring the candy melts.
Other Candy Mix-Ins: Consider incorporating other fun mix-ins like chopped nuts, mini marshmallows, crushed pretzels for a salty crunch, or small pieces of dried fruit.
Nutrition Information
| Nutrient | Amount |
|---|---|
| Calories | 80 kcal |
| Carbohydrates | 8g |
| Fat | 4g |
| Saturated Fat | 2g |
| Cholesterol | 3mg |
| Sodium | 13mg |
| Potassium | 42mg |
| Sugar | 8g |
| Vitamin A | 5IU |
| Vitamin C | 0.1mg |
| Calcium | 30mg |
| Iron | 0mg |
Frequently Asked Questions
Where can I find a silicone bunny pan?
You can typically find silicone bunny pans at craft stores like Michaels or Hobby Lobby, home goods stores, or online retailers such as Amazon, especially during the spring season. Look for molds designed for candy or chocolate making.
What are bright white candy melting wafers?
Bright white candy melting wafers are confectionery coatings designed to melt smoothly and harden quickly without tempering. Popular brands include Wilton Candy Melts or Ghirardelli Melting Wafers, available at most grocery stores, craft stores, or online.
Can I use regular chocolate chips instead of candy melts?
Regular chocolate chips can be used, but they require tempering to set properly with a shiny, snap-like finish. Candy melts are formulated to melt and harden without this extra step, making them much easier for beginner-friendly projects like Easter bunny bark. For those interested in working with traditional chocolate, understanding the process of tempering is key to achieving a professional finish; learn more about the science and techniques of chocolate tempering.
How long does Easter Bunny Bark last?
When stored in an airtight container at room temperature, your Easter bunny bark can remain fresh for 2-3 weeks. Keeping it away from heat and humidity helps maintain its quality.
Can I add other toppings?
Absolutely! Feel free to add various toppings. Crushed cookies, mini chocolate chips, sprinkles, or even a drizzle of contrasting colored candy melts can make your bark even more exciting.
Conclusion
Making Easter bunny bark is truly one of the simplest and most rewarding ways to celebrate the spring season. This easy recipe allows anyone, from busy parents to baking beginners, to create delightful, custom treats in no time. We encourage you to try this festive recipe and share the joy of homemade candy with your loved ones. Happy Easter, and happy making!
Easy Easter Bunny Bark
Ingredients
Equipment
Method
- Gather all ingredients and equipment before you begin. Place your silicone bunny pan on a flat surface or a baking sheet for stability.
- Add 1 cup of bright white candy melting wafers to a disposable piping bag. Microwave at 50% power in 30-second intervals, kneading the bag between each, until completely melted and smooth. Be careful not to overheat the candy.
- Place one of each color pastel M&M into each cavity of your bunny silicone pan. Don't worry about the orientation; some will lay flat, others may be on their sides, adding to the homemade charm.
- Once melted, ensure the candy wafers are smooth and lump-free.
- Snip a small tip off the piping bag. Pipe the bright white candy melts into each bunny cavity, just barely covering the M&Ms. Aim for an even, thin layer.
- Gently tap the pan on your counter a few times. This helps to evenly distribute the candy coating and release any trapped air bubbles, ensuring a smooth finish.
- Allow the candy bark to harden completely at room temperature for about 15-20 minutes, or refrigerate for 5-10 minutes to speed up the process. Once firm, gently pop each Easter bunny bark piece out of the silicone mold.
- If you have more M&M's or need more bark, repeat the melting and pouring steps with additional candy melts and M&M's until all ingredients are used or you have enough Easter bunny bark pieces.


