 Skip to content
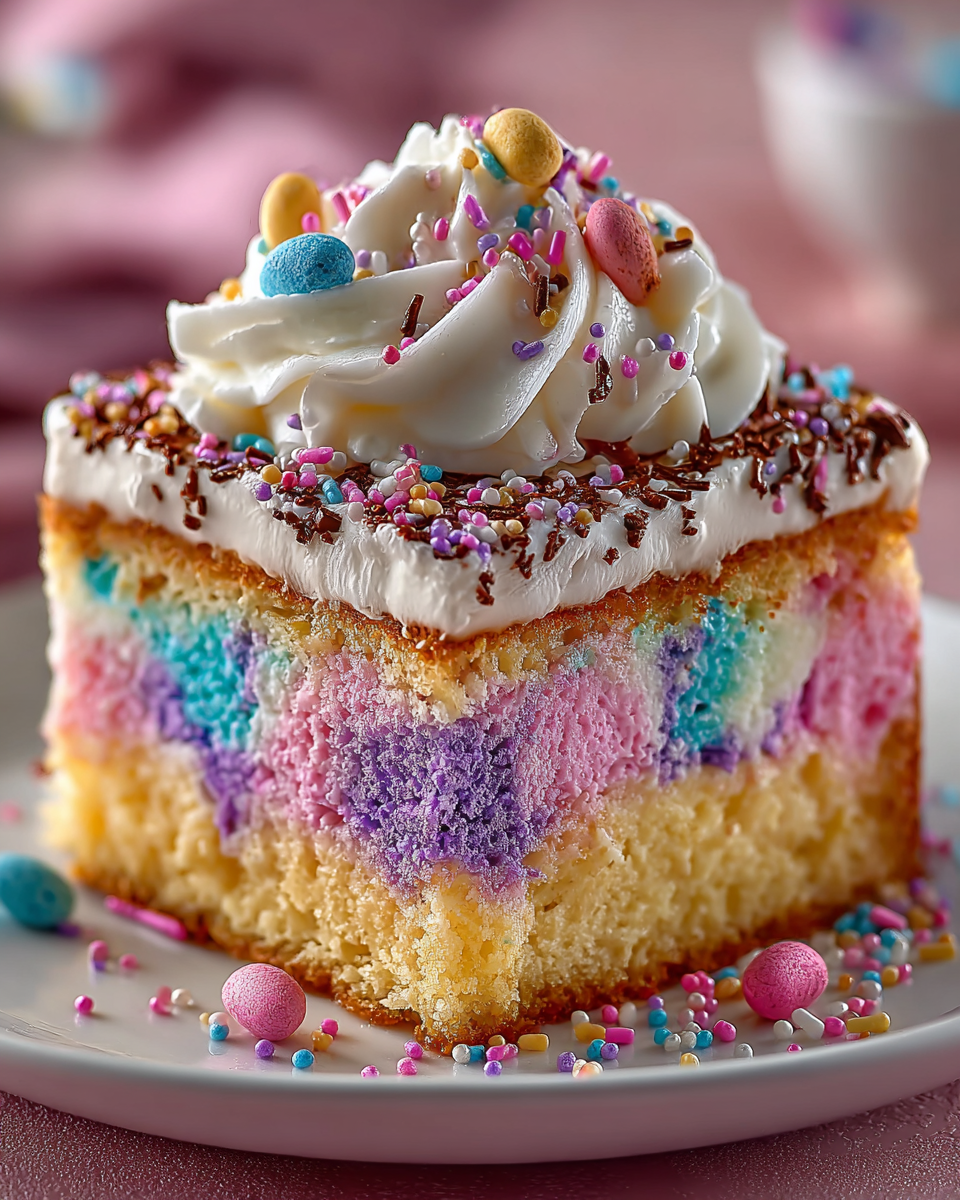
 Celebrate spring with a dessert as vibrant and joyful as the season itself! This easy Easter poke cake is the perfect festive treat. It boasts stunning pastel colors, moist cake layers, and a creamy pudding topping. You’ll love how simple ingredients transform into a spectacular dessert with minimal effort. Get ready to impress your family and friends with this quick and beautiful bake!
Why You’ll Love This Easy Easter Poke Cake
This recipe makes baking a breeze, even for beginners. Here’s why you’ll adore making this easy Easter poke cake:
- Beginner-Friendly: Uses convenient cake mix, making the process straightforward for any skill level.
- Festive & Beautiful: Its vibrant pastel swirls and creamy topping make it a showstopper on any Easter table.
- Time-Saving: Quick to prepare and assemble, perfect for busy schedules during holiday planning.
- Deliciously Moist: The pudding seeps into the cake, ensuring every bite is incredibly tender and flavorful.
- Crowd-Pleaser: A sweet, colorful dessert that delights both kids and adults alike.
Ingredients
Gather these simple items to create your delightful easy Easter poke cake:
- 15.25 ounce package of white cake mix
- 3 large eggs (or egg whites, see notes below)
- 1/2 cup vegetable oil
- 3 cups milk (divided)
- Gel food coloring (in 3-4 colors; we used pink, purple, and blue)
- 3.4 ounces instant vanilla pudding mix
- 8 ounces Cool Whip (or frozen whipped topping, thawed)
- Sprinkles or Easter candy (for garnish)
Notes & Substitutions
You can use three whole large eggs for a richer cake, or use only egg whites if the cake mix box specifies it for a whiter cake. Feel free to experiment with pudding flavors; instant chocolate, banana, or cheesecake pudding would also be tasty. If you prefer homemade, use stabilized whipped cream instead of Cool Whip. Adjust food coloring to any pastel shades you desire for your unique celebration theme.
Equipment
You won’t need many specialized tools for this recipe. Just grab these kitchen essentials:
- 9×13 glass baking dish
- Mixing bowls
- Hand mixer or whisk
- Measuring cups and spoons
- Wooden spoon or dowel (for poking)
- Offset icing spatula (optional, for spreading)
Instructions
Creating this colorful easy Easter poke cake is a joyful and simple process. Follow these steps for a perfect result:
Prepare the Cake Batter
Preheat your oven to 350°F. Spray a 9×13 glass baking dish with nonstick baking spray and set it aside. In a large mixing bowl, beat together the cake mix, eggs, vegetable oil, and 1 cup of milk until just combined. Be careful not to overmix. Divide the cake batter evenly into three separate bowls. Tint each bowl of cake batter with gel food coloring, adding a drop or two at a time until you achieve your desired pastel shades. Use an ice cream scoop or large cookie dough scoop to drop large spoonfuls of the colored batter throughout the prepared baking dish, rotating the colors as you go. Gently swirl the colors slightly with a knife; avoid over-swirling to prevent muddy colors.
Bake the Cake
Bake the cake for 25-30 minutes, or until the center is set and a toothpick inserted into the middle comes out with only a few moist crumbs. Transfer the baked cake to a wire rack and allow it to cool completely before proceeding. This step is crucial for the pudding to set correctly.
Prepare Pudding Layer
Once the cake has cooled thoroughly, use the round handle of a wooden spoon or a wooden dowel to poke holes evenly all over the cake. Aim to poke holes about two-thirds of the way down into the cake, spacing them roughly 3/4 to 1 inch apart. In a separate bowl, whisk together the instant pudding mix with the remaining 2 cups of milk. Whisk for 1-2 minutes until the mixture is fully combined and just beginning to thicken. Promptly pour the pudding mixture over the poked cake and gently spread it across the top, ensuring it seeps into all the holes. Place the cake in the refrigerator for at least 30 minutes to allow the pudding to fully set. Discover more about how instant pudding achieves its creamy, set texture so quickly. the science behind instant pudding
Decorate and Serve
Once the pudding layer is firm, spread the thawed Cool Whip evenly over the top of the cake. Garnish generously with festive sprinkles, mini chocolate eggs, or your favorite Easter candy. For the best taste and texture, serve your chilled easy Easter poke cake directly from the refrigerator.
Pro Tips & Troubleshooting
Achieving a perfect easy Easter poke cake is simple with a few smart techniques. First, avoid overmixing your cake batter; mix only until the ingredients are just combined for a tender crumb. Understanding the chemistry of ingredients is crucial for achieving the perfect texture. why overmixing cake batter matters in baking When swirling colors, use a light touch to keep your pastel hues distinct and vibrant, preventing them from blending into a muddy mess. Use a consistent-sized dowel or spoon handle to poke holes for uniform pudding distribution. Always ensure the cake is completely cool before poking and pouring the pudding; a warm cake can melt the pudding, making it runny. If your pudding seems too thin, ensure you used instant pudding mix and whisked it sufficiently to activate the thickening agents.
Serving, Storage & Variations
This versatile dessert is perfect for any spring occasion.
Serving Suggestions
Present your easy Easter poke cake on a vibrant platter to highlight its festive colors. It makes an ideal dessert after Easter dinner or as a standout dish at a spring potluck or brunch. Top it with various Easter candies like jelly beans, pastel M&M’s, or shredded coconut for an extra touch of seasonal cheer.
Storage Instructions
Cover any leftover poke cake tightly with plastic wrap or aluminum foil. Store it in the refrigerator for up to 5 days. For longer storage, you can freeze the cake without the Cool Whip topping for up to 3 months. Wrap it well in plastic wrap and then foil to prevent freezer burn, then thaw in the refrigerator before adding the fresh topping.
Flavor/Color Variations
Unleash your creativity with this easy Easter poke cake! Try using other cake mix flavors like lemon or strawberry for a different base. Explore alternate pudding flavors such as chocolate, coconut cream, or banana to change the dessert’s profile. You can also customize the food coloring to match any holiday or party theme beyond Easter. Add a layer of sliced fresh fruit or toasted coconut flakes under the whipped topping for extra texture and flavor.
Nutrition Information
| Nutrient | Amount Per Serving |
|---|---|
| Calories | 310 kcal |
| Carbohydrates | 45g |
| Protein | 3g |
| Fat | 14g |
| Saturated Fat | 4g |
| Unsaturated Fat | 9g |
| Trans Fat | 0g |
| Cholesterol | 20mg |
| Sodium | 320mg |
| Fiber | 0g |
| Sugar | 32g |
FAQ
Q: How do I store Easter poke cake?
A: Refrigerate your covered cake tightly for up to 5 days. You can freeze it without the whipped topping for up to 3 months, ensuring it’s well-wrapped.
Q: Can I make poke cake in advance?
A: Absolutely! This easy Easter poke cake can be prepared 1-2 days ahead of time. Store it covered in the refrigerator, adding the final garnishes just before serving.
Q: Why is my poke cake pudding not firm?
A: Ensure you used instant pudding mix, not cook-and-serve. Also, make sure you whisked it thoroughly for the recommended time to allow it to activate and thicken properly.
Q: Can I use homemade whipped cream?
A: Yes, for an even richer taste and texture, feel free to use freshly made sweetened whipped cream instead of Cool Whip.
Conclusion
This easy Easter poke cake is a true springtime delight, combining stunning pastel colors with a wonderfully moist and flavorful cake. It’s incredibly simple to prepare, making it the perfect stress-free dessert for any beginner or busy parent. Bring joy and festivity to your Easter table with this beautiful, crowd-pleasing treat. We hope you and your loved ones enjoy every delightful slice of this celebratory dessert!
Easy Easter Poke Cake
Ingredients
Equipment
Method
- Preheat your oven to 350°F. Spray a 9x13 glass baking dish with nonstick baking spray and set it aside.
- In a large mixing bowl, beat together the cake mix, eggs, vegetable oil, and 1 cup of milk until just combined. Be careful not to overmix.
- Divide the cake batter evenly into three separate bowls. Tint each bowl of cake batter with gel food coloring, adding a drop or two at a time until you achieve your desired pastel shades.
- Use an ice cream scoop or large cookie dough scoop to drop large spoonfuls of the colored batter throughout the prepared baking dish, rotating the colors as you go. Gently swirl the colors slightly with a knife; avoid over-swirling to prevent muddy colors.
- Bake the cake for 25-30 minutes, or until the center is set and a toothpick inserted into the middle comes out with only a few moist crumbs.
- Transfer the baked cake to a wire rack and allow it to cool completely before proceeding. This step is crucial for the pudding to set correctly.
- Once the cake has cooled thoroughly, use the round handle of a wooden spoon or a wooden dowel to poke holes evenly all over the cake. Aim to poke holes about two-thirds of the way down into the cake, spacing them roughly 3/4 to 1 inch apart.
- In a separate bowl, whisk together the instant pudding mix with the remaining 2 cups of milk. Whisk for 1-2 minutes until the mixture is fully combined and just beginning to thicken.
- Promptly pour the pudding mixture over the poked cake and gently spread it across the top, ensuring it seeps into all the holes. Place the cake in the refrigerator for at least 30 minutes to allow the pudding to fully set.
- Once the pudding layer is firm, spread the thawed Cool Whip evenly over the top of the cake.
- Garnish generously with festive sprinkles, mini chocolate eggs, or your favorite Easter candy.
- For the best taste and texture, serve your chilled easy Easter poke cake directly from the refrigerator.


