Skip to content
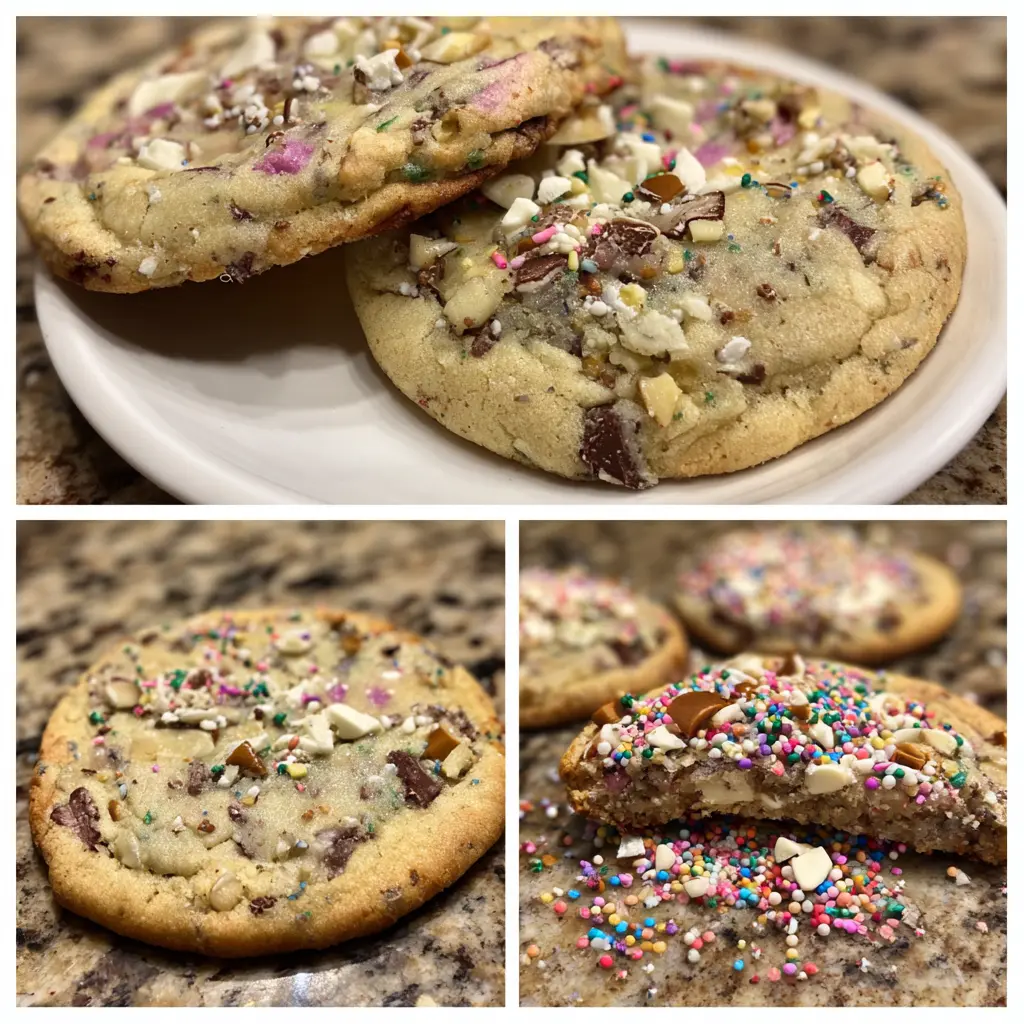
Discover the ultimate icebox cookie recipe that brings together simplicity and deliciousness in every bite. These delightful cookies are perfect for make-ahead baking, letting you enjoy fresh-baked treats with minimal effort on demand. With their crisp edges and tender centers, they are an absolute favorite for any occasion or a casual sweet craving. This method ensures perfectly portioned, ready-to-bake dough at your fingertips, making it a staple in your kitchen.
Why You’ll Love This Icebox Cookie Recipe
This classic icebox cookie recipe is a true game-changer for home bakers. You will quickly discover why it becomes a go-to in your repertoire.
- Effortless Preparation: Most of the work is done upfront, allowing you to simply slice and bake later. This makes spontaneous cookie cravings incredibly easy to satisfy.
- Perfect for Meal Prep: Prepare a few logs of dough and store them in the fridge or freezer. You will always have fresh cookies ready for guests or a quick snack.
- Customizable Flavors: Easily adapt the base dough with various add-ins like nuts, chocolate, or sprinkles to create unique variations. Each batch can be a new adventure.
- Delicious Texture: Enjoy cookies with beautifully crisp edges and wonderfully tender, chewy centers. They offer a satisfying contrast in every bite.
- Kid-Friendly Fun: Involve children in rolling the dough logs in sprinkles or decorating the baked cookies. It is a fantastic activity for all ages.
Ingredients
Gather these simple ingredients for your delicious icebox cookie recipe. Using high-quality components ensures the best flavor and texture in your finished cookies. Make sure your butter is truly softened for easy creaming.
- 1 cup unsalted butter, softened
- 1 ½ cups granulated sugar
- 1 large egg, room temperature preferred
- 1 teaspoon vanilla extract
- 2 ½ cups all-purpose flour
- 1 teaspoon baking powder
- ¾ teaspoon salt
- Optional add-ins: sprinkles, nonpareils, chopped nuts, chopped chocolate (adjust quantities to taste, usually ½ to 1 cup total)
Notes & Substitutions: For the butter, unsalted is best as it allows you to control the salt content. If using salted butter, reduce the added salt to ½ teaspoon. Ensure your egg is at room temperature; it emulsifies better with the butter and sugar for a smoother dough. Feel free to experiment with different extracts, like almond or lemon, in place of or in addition to vanilla. Gluten-free all-purpose flour blends often work well as a substitute, but test a small batch first.
Equipment
You won’t need much specialized equipment for this straightforward cookie recipe.
- Electric stand mixer or hand mixer
- Large mixing bowls
- Rubber spatula
- Plastic wrap
- Parchment paper
- Baking sheets
- Sharp knife
Instructions
Follow these detailed steps to create your perfect icebox cookie recipe dough, ready for chilling and baking. This process ensures your cookies turn out beautifully every time. The chilling step is crucial for both flavor and sliceability.
- Cream Wet Ingredients: In a large mixing bowl, using an electric stand mixer or hand mixer, cream together the softened butter and granulated sugar until light and fluffy. This usually takes about 3–5 minutes on medium speed. Add the room temperature egg and vanilla extract, mixing until just combined. Pause to scrape down the sides and bottom of the bowl with a spatula, ensuring all ingredients are thoroughly incorporated. This step creates the creamy base for your perfect icebox cookies.
- Combine Dry Ingredients: In a separate, medium-sized bowl, whisk together the all-purpose flour, baking powder, and salt. Whisking ensures these dry ingredients are evenly distributed, which is important for uniform cookie texture.
- Mix Dough: With the mixer on low speed, gradually add the dry ingredient mixture to the butter mixture, about a third at a time. Mix until just combined, being careful not to overmix the dough. Overmixing can develop the gluten too much, leading to tough cookies. Be sure to pause and scrape the sides and bottom of the bowl as needed to fully incorporate all the flour.
- Add Optional Mix-ins: If you are incorporating any optional add-ins like sprinkles, chopped nuts, or chocolate, gently fold them into the dough here. Do this by hand with a spatula to prevent crushing delicate items like sprinkles or overmixing the dough. Distribute them evenly throughout the dough.
- Form Dough Logs: Divide the dough into two equal halves. Lightly flour your hands to prevent sticking. Form each half into a log, aiming for a diameter of about 1 ½” – 2”. The size will determine the final cookie diameter. If you plan to roll them in sprinkles (as seen in many classic icebox cookie recipes), pour several tablespoons of nonpareils or other small sprinkles into a pie plate or shallow dish. Roll the dough logs through the sprinkles until the entire exterior is completely covered.
- Chill Dough: Tightly wrap each dough log in plastic wrap. To prevent the dough from getting a severely flat edge on one side while chilling, you can place it on a plush folded hand towel or a paper towel roll section. Refrigerate the dough for a minimum of 4 hours, though preferably overnight for the best results. The dough can chill for up to one week, making this a truly convenient make-ahead recipe. Proper chilling allows the flavors to meld and the dough to firm up, making it easy to slice.
- Preheat Oven & Prepare Baking Sheets: When you are ready to bake, preheat your oven to 350°F (175°C). Line several baking sheets with parchment paper; this prevents sticking and makes cleanup easy.
- Slice and Bake: Remove one dough log from the refrigerator. Using a sharp knife, slice the dough into ¼” thick rounds. Consistent thickness ensures even baking. Transfer the sliced cookies to the prepared baking sheets, spacing them at least 2 inches apart to allow for spreading.
- Bake Cookies: Bake on 350°F for 10-12 minutes, or until the edges are just beginning to turn a light golden brown. The centers should still look slightly soft. Do not overbake, as they will continue to firm up as they cool.
- Cool: Let the cookies cool on the baking sheet for 5 minutes before transferring them to a wire rack to cool completely.
Enjoy your freshly baked icebox cookies!
Pro Tips & Troubleshooting
Achieving perfect icebox cookies is simple with a few smart techniques. These tips will help you master this delightful icebox cookie recipe every time.
- Consistent Slicing: Use a sharp, thin knife for uniform slices. This ensures your cookies bake evenly and have a consistent appearance.
- Prevent Flat Edges: As mentioned in the instructions, placing the dough logs on a folded towel or an empty paper towel tube while chilling helps maintain their round shape. Rotate them occasionally if chilling for a very long time.
- Don’t Overmix: Overmixing the dough develops gluten, leading to tougher cookies. Mix just until the ingredients are combined.
- Cold Dough is Key: The longer the dough chills, the firmer it becomes, which makes it much easier to slice cleanly. Cold dough also prevents excessive spreading during baking, maintaining the cookie’s shape. For more on the science behind this, King Arthur Baking explains how chilling cookie dough improves texture and prevents spreading.
- Troubleshooting Spreading: If your cookies spread too much, your butter might have been too soft or your oven temperature is off. Ensure your dough is well chilled and consider checking your oven with a thermometer.
Serving, Storage, and Variations
This versatile icebox cookie recipe yields approximately 30-36 cookies, perfect for sharing or enjoying over several days.
Serving: These cookies are delightful on their own, paired with a glass of milk, or alongside a cup of coffee or tea. They are excellent for parties, potlucks, or as a thoughtful homemade gift. For an extra touch, you can drizzle cooled cookies with melted chocolate or a simple glaze.
Storage:
- Dough: Unbaked dough logs wrapped tightly in plastic wrap will keep in the refrigerator for up to 1 week. For longer storage, freeze the dough logs for up to 3 months. Thaw frozen dough in the refrigerator overnight before slicing and baking.
- Baked Cookies: Store baked and cooled cookies in an airtight container at room temperature for up to 5 days. For longer freshness, you can freeze baked cookies for up to 3 months. Thaw at room temperature before serving. For comprehensive guidelines on safe food handling and maximizing the freshness of homemade baked goods, refer to these food safety recommendations for storing baked products.
Variations:
- Chocolate Chip: Fold in ½ to ¾ cup mini chocolate chips or finely chopped chocolate.
- Nutty: Add ½ cup finely chopped pecans, walnuts, or almonds to the dough. Toast nuts beforehand for deeper flavor.
- Citrus Zest: Include 1-2 teaspoons of finely grated lemon or orange zest for a bright, refreshing flavor.
- Spice Cookies: Add 1 teaspoon ground cinnamon, ½ teaspoon ground ginger, and ¼ teaspoon ground cloves to the dry ingredients for a spiced twist.
- Marbled Cookies: Divide the dough in half. Mix cocoa powder into one half, then gently twist the two doughs together before forming logs for a beautiful marbled effect.
Nutrition Information
Here is an estimated nutritional breakdown for one serving of this icebox cookie recipe. Values may vary based on exact ingredients and portion sizes.
| Nutrients | Per Serving (1 cookie) |
|---|---|
| Calories | 110 kcal |
| Total Fat | 6g |
| Saturated Fat | 3.5g |
| Cholesterol | 20mg |
| Sodium | 75mg |
| Total Carbohydrates | 14g |
| Dietary Fiber | 0.5g |
| Total Sugars | 9g |
| Protein | 1g |
Note: These are approximate values. Optional add-ins will alter the nutritional content.
Frequently Asked Questions
Q: Can I freeze the unbaked icebox cookie recipe dough?
A: Absolutely! Wrap the dough logs tightly in plastic wrap and then in foil. Freeze for up to three months; thaw in the refrigerator overnight before slicing and baking.
Q: How do I prevent my cookies from spreading too thin?
A: Ensure your dough is thoroughly chilled for at least 4 hours, preferably overnight. Also, make sure your oven temperature is accurate and avoid using butter that is too soft initially.
Q: Can I make these cookies with gluten-free flour?
A: Many gluten-free all-purpose flour blends work well as a 1:1 substitute. However, results can vary, so it is best to test a small batch first.
Q: What is the best way to slice the chilled dough?
A: Use a very sharp, thin knife. If the dough is extremely firm, let it sit at room temperature for 5-10 minutes to soften just enough for easier slicing, but keep it cold.
Q: How long do these cookies stay fresh?
A: Baked cookies stored in an airtight container at room temperature will stay fresh for up to 5 days. You can also freeze them for up to 3 months.
Conclusion
This icebox cookie recipe offers a truly fantastic way to enjoy homemade cookies with maximum convenience and minimal fuss. The ability to prepare the dough in advance and bake fresh cookies on demand makes it a perfect addition to any home baker’s collection. Whether you stick to the classic version or experiment with exciting variations, you are guaranteed a delightful treat. Get ready to impress your family and friends with these perfectly crisp, tender, and incredibly delicious cookies any day of the week!