 Skip to content
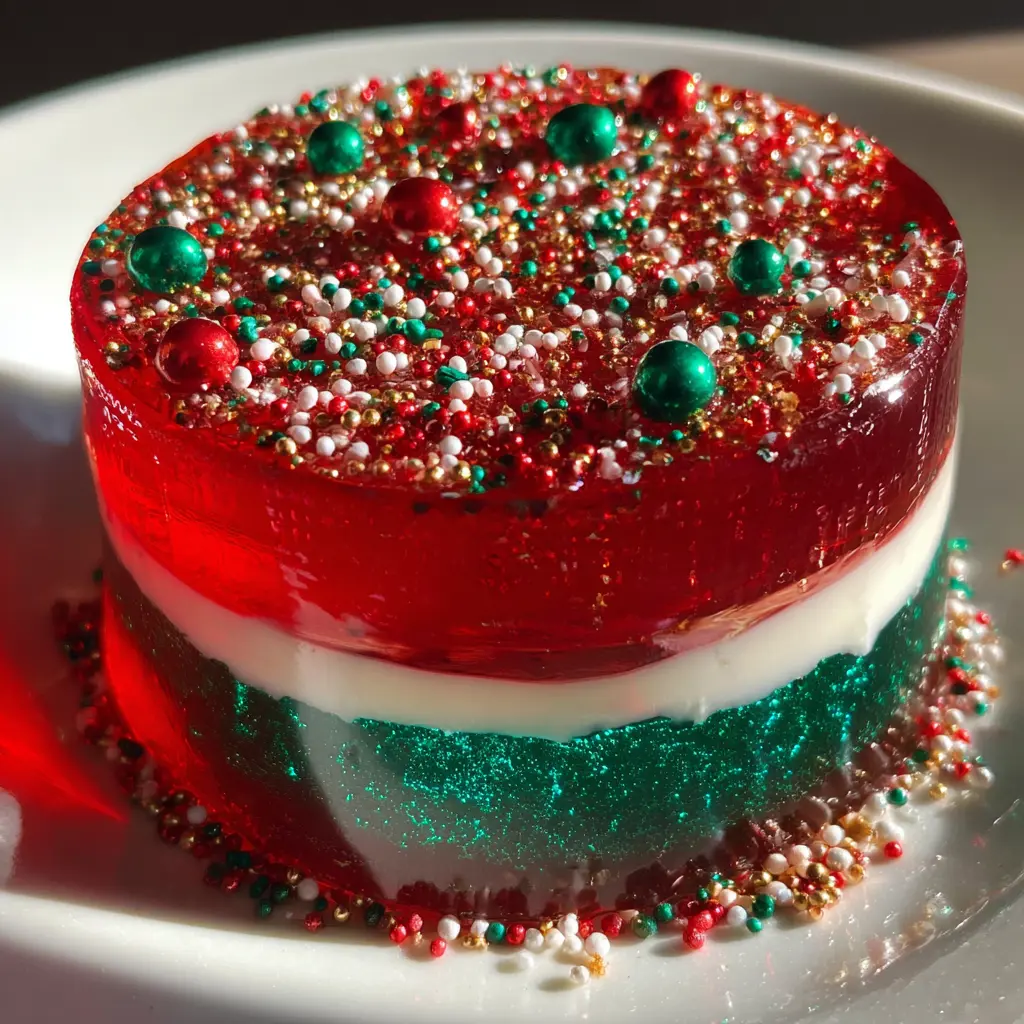
Bring a splash of holiday cheer to your table with this delightful christmas jello recipe! This classic layered Jell-O dessert showcases vibrant red and green layers, beautifully separated by a creamy, tangy sour cream stripe. It’s a nostalgic treat that embodies the festive spirit of the season. Prepare for a charming, wobbly showstopper that everyone will love!
Why You’ll Love This Christmas Jello Recipe
- Stunning Visual Appeal: Its bright red and green layers instantly create a festive, eye-catching presentation perfect for holiday gatherings.
- Deliciously Creamy Texture: The sour cream layers add a wonderful tang and smoothness, perfectly balancing the sweetness of the fruit Jell-O.
- Perfect Festive Holiday Treat: This wobbly dessert truly captures the fun and joy of Christmas, making it a beloved tradition for many.
- Easy Make-Ahead Convenience: You can prepare this layered Jell-O days in advance, freeing up your time on busy holiday party days.
- Kid-Friendly, Adult-Approved: Both children and grown-ups adore this fun, flavorful dessert, making it a hit for any family celebration.
Ingredients
Gather these simple ingredients to create your beautiful Christmas Jell-O recipe:
- Red Jell-O: One (6-ounce) package (raspberry or strawberry works wonderfully).
- Green Jell-O: One (6-ounce) package (lime is a classic choice).
- Sour Cream: 2 cups, full-fat recommended for the best creamy texture.
- Boiling Water: 4 cups, divided as needed for Jell-O preparation.
Notes & Substitutions
Feel free to customize your holiday gelatin dessert. Explore other red or green Jell-O flavor variations like cherry or green apple. For an extra rich and slightly sweeter creamy layer, substitute cream cheese for sour cream. You can also opt for sugar-free Jell-O to reduce the sugar content without sacrificing flavor. Finish your festive treat with a dollop of whipped cream, fresh berries, or a sprinkle of edible glitter for extra holiday sparkle.
Equipment
You won’t need many specialized tools for this festive dessert.
- Bundt pan or Jell-O mold: A 10-12 cup capacity works best.
- Large mixing bowls: At least two for preparing different Jell-O colors.
- Whisk or spoon: For dissolving gelatin and mixing.
- Measuring cups: For accurate liquid and ingredient portions.
- Non-stick cooking spray: To ensure easy unmolding.
- Baking sheet: For providing a level surface during chilling.
Instructions
Creating this layered Christmas Jell-O recipe requires a little patience but promises a showstopping result. Follow these steps carefully for perfect layers.
Prepare Mold
Lightly spray your Bundt pan or Jell-O mold with non-stick cooking spray. Blot any excess with a paper towel. This step helps with easy unmolding later. Place the prepared mold on a level baking sheet; this ensures even layers during chilling.
Making the Green Layers
First, dissolve the entire 6-ounce package of green Jell-O in 2 cups of boiling water in a large mixing bowl. Whisk until the gelatin completely dissolves, about 2 minutes. Let it cool to room temperature, which takes about 15-20 minutes. Pour half of the cooled green Jell-O mixture (about 1 cup) into the prepared mold. Refrigerate this first green layer until it is just set but still slightly sticky to the touch, approximately 30-45 minutes. Do not let it become too firm.
While the first green layer chills, prepare the creamy green layer. To the remaining 1 cup of green Jell-O, add 1 cup of sour cream. Whisk until thoroughly combined and smooth. Ensure there are no sour cream lumps. Leave this creamy green mixture at room temperature until the first green layer is ready. Gently spoon the creamy green layer over the set plain green layer. Refrigerate until this creamy layer is set, usually another 30-45 minutes.
Making the Red Layers
Next, dissolve the entire 6-ounce package of red Jell-O in 2 cups of boiling water in another large mixing bowl. Whisk until the gelatin completely dissolves. Allow this mixture to cool to room temperature for 15-20 minutes. Pour half of the cooled red Jell-O mixture (about 1 cup) into a separate bowl and set it aside for the plain red layer.
To the remaining 1 cup of red Jell-O, add 1 cup of sour cream. Whisk until smooth and fully incorporated. Keep this creamy red mixture at room temperature until it’s time to layer.
Assembling the Jell-O Mold
Once the creamy green layer sets, gently spoon the reserved plain red Jell-O (about 1 cup) over it. Be careful not to disturb the previous layer. Refrigerate until this plain red layer sets, about 30-45 minutes. Finally, gently spoon the creamy red Jell-O over the set plain red layer. This completes your beautiful Christmas Jell-O recipe layers.
Final Chill
Refrigerate the assembled Jell-O mold for several hours, or ideally, overnight. A long, thorough chill ensures all layers are firm and will hold their shape beautifully when unmolded.
Unmolding Tips
When your layered Jell-O is thoroughly chilled, run a thin knife carefully around the outer edges of the mold to loosen the Jell-O from the sides. Briefly dip the bottom of the mold into a large bowl of warm (not hot) water for about 10-15 seconds. This helps release the gelatin. Place your serving plate inverted over the mold, then quickly and confidently flip the mold and plate together. Gently lift the mold away, allowing the beautiful festive Jell-O to slide out onto the platter. Garnish as desired.
Pro Tips & Troubleshooting
Achieving perfect layers in your holiday gelatin dessert is all about timing and technique. Ensuring each Jell-O layer is partially set, like thick pudding, before adding the next, prevents mixing and creates clean lines, as detailed in various guides for perfectly layered Jell-O. Always allow each Jell-O mixture to cool to room temperature before layering; hot liquid will melt previous layers. Use a level surface for chilling your mold, such as a baking sheet, to ensure even thickness for each stripe. Avoid over-chilling layers, as this can make subsequent layers difficult to adhere properly, leading to separation. Patience is key for clear, defined lines in your festive Jell-O.
Common Mistakes to Avoid
- Pouring hot Jell-O onto set layers: This will melt and mix your beautiful stripes. Always cool Jell-O completely.
- Not enough chilling time per layer: Rushing the chill means layers won’t set properly and will blend.
- Forgetting non-stick spray in the mold: This can make unmolding a nightmare, potentially ruining your hard work.
- Rushing the unmolding process: Be gentle and take your time; a little warm water is your friend here.
Serving, Storage, & Variations
This vibrant Christmas Jell-O recipe is perfect for any holiday gathering.
Serving Suggestions: Serve slices of this colorful gelatin dessert as a light and refreshing treat after a heavy holiday meal. It makes a beautiful centerpiece on a dessert buffet or a delightful addition to a potluck. Pair it with a dollop of whipped cream or fresh mint for an elegant touch.
Storage Instructions: Store any leftover Jell-O tightly covered with plastic wrap in the refrigerator. It will stay fresh and firm for up to 3-4 days.
Flavor & Color Variations:
- Experiment with other Jell-O colors and flavors to create different seasonal versions. Think red, white, and blue for patriotic holidays, or orange and black for Halloween.
- You can also add fruit or mini marshmallows to the plain Jell-O layers once they are slightly set. Just ensure the fruit doesn’t contain enzymes that prevent Jell-O from setting (like fresh pineapple).
- For a boozy adult version, you can add a small amount of clear alcohol (like vodka) to the Jell-O layers once they’ve cooled.
Nutrition
While this layered Christmas Jell-O is a delightful and festive holiday treat, it is meant for special occasions rather than everyday consumption. It contains calories primarily from sugar and some fat from the sour cream. Enjoy it in moderation as part of your holiday celebrations.
| Nutrition Facts (Approximate per serving) | |
|---|---|
| Calories | 250 |
| Total Fat | 10g |
| Saturated Fat | 6g |
| Cholesterol | 20mg |
| Sodium | 100mg |
| Total Carbohydrates | 35g |
| Sugars | 30g |
| Protein | 5g |
Note: Nutrition facts are estimates and vary based on ingredients and portion size.
FAQ
- How long does Christmas Jell-O need to set? Each layer typically needs 30-45 minutes to set, but the final, full mold requires 4-6 hours or, ideally, overnight chilling.
- Can I make this recipe sugar-free? Yes, absolutely! Use sugar-free Jell-O for all layers to create a lighter version of this festive dessert.
- Why are my Jell-O layers separating or mixing? Layers separate if they were too firm when the next layer was added. Layers mix if the added Jell-O was too warm or if the previous layer wasn’t set enough.
- What is the best way to unmold layered Jell-O? Run a knife around the edges, briefly dip the bottom in warm water (10-15 seconds), then invert onto a serving plate.
- Can I add fruit to this Christmas Jell-O? Yes, you can add canned or frozen fruit (thawed) to the plain Jell-O layers after they’ve chilled for 15-20 minutes, ensuring it’s not fresh pineapple or kiwi.
Conclusion
This easy layered Christmas Jell-O recipe is more than just a dessert; it’s a vibrant symbol of holiday joy and a wonderful way to create lasting family memories. Its beautiful colors and creamy-sweet taste truly capture the spirit of the season. Embrace the simplicity and fun of making this festive treat. We invite you to make this delightful Jell-O a cherished part of your holiday traditions. Happy holidays and happy Jell-O making!


