 Skip to content
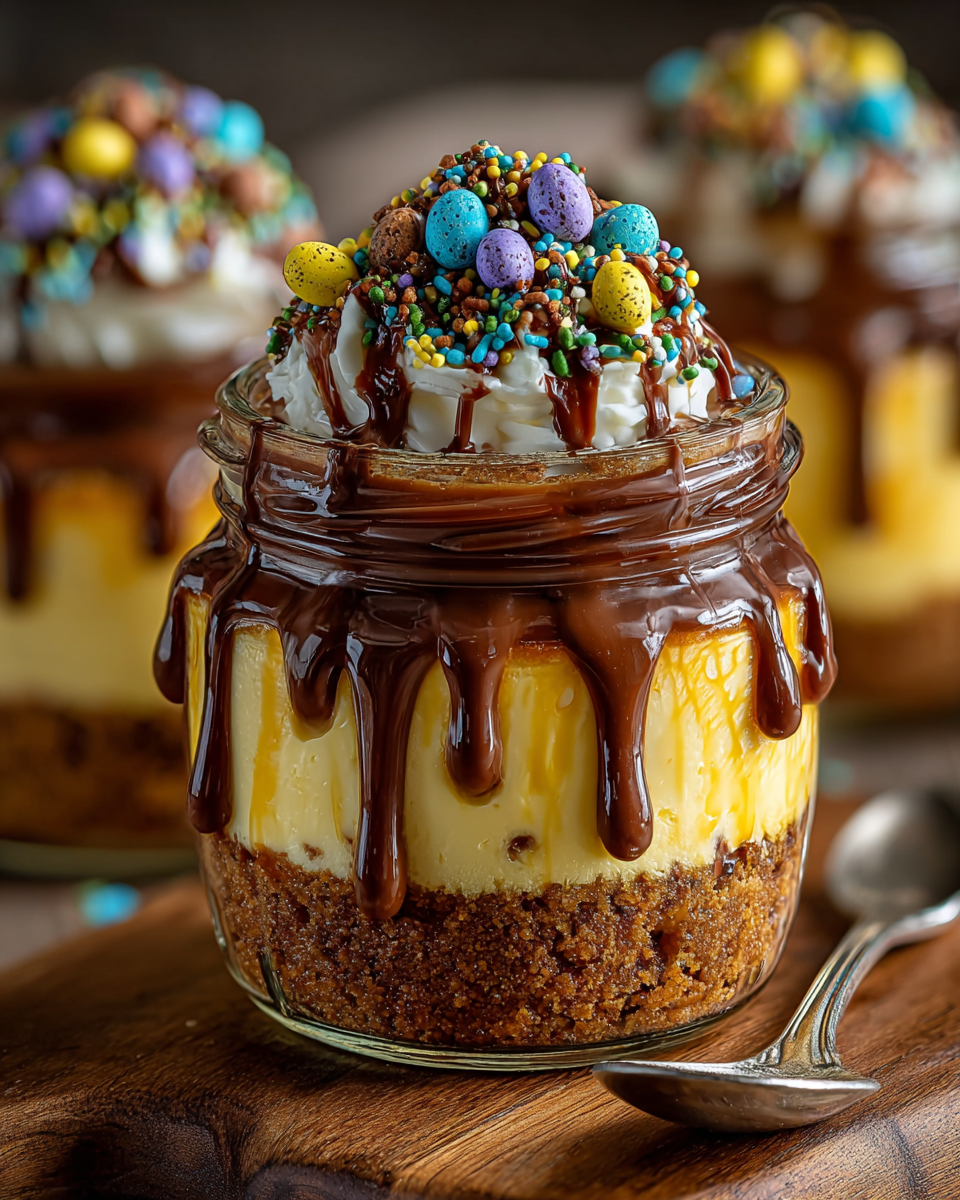
 Welcome to a delightful Easter treat that’s as simple to make as it is delicious to eat! These no-bake Easter egg cheesecake jars are the perfect blend of creamy cheesecake, crunchy cookie crust, and festive mini chocolate eggs. They offer individual servings, making them ideal for spring gatherings and holiday parties. Get ready to impress your guests with minimal effort and maximum charm this Easter season. These beautiful jars bring smiles to everyone!
Why You’ll Love These Easter Egg Cheesecake Jars
- Simple Ingredients: You’ll find everything you need for these delightful Easter egg cheesecake jars right in your pantry or at your local grocery store. No specialty items required.
- Effortlessly Easy & No-Bake: Forget the oven! This recipe requires minimal prep and no baking, making it perfect for beginners and busy parents alike.
- Perfect for Easter Celebrations: Bright, colorful, and loaded with festive mini eggs, these jars embody the spirit of Easter in every sweet bite.
- Adorable Individual Servings: Each cheesecake comes in its own jar, offering a convenient, hygienic, and perfectly portioned dessert for any party or family meal.
- Make-Ahead Friendly: Prepare these charming Easter egg cheesecake jars up to two days in advance. This saves you valuable time on the day of your celebration.
Ingredients You’ll Need
Here are the simple ingredients required to create your delicious Easter egg cheesecake jars:
For the Crust:
- 1 cup graham cracker crumbs
- 2 tablespoons salted butter, melted
- 1 tablespoon granulated white sugar
For the Cheesecake Filling:
- 8 ounces cream cheese, softened to room temperature
- 1/4 cup granulated white sugar
- 1 teaspoon vanilla extract
- 1 cup heavy whipping cream
- 3/4 cup Cadbury mini eggs, coarsely crushed or chopped
For the Chocolate Ganache:
- 1/3 cup heavy whipping cream
- 3/4 cup chopped milk chocolate (about 100 grams)
For Serving (Optional):
- Whipped cream
- Whole Cadbury mini eggs
Notes & Substitutions
- Graham Crackers: Feel free to swap graham cracker crumbs for crushed Oreo cookies, Nilla wafers, or Biscoff biscuits. Each offers a unique flavor profile.
- Gluten-Free: Easily make these treats gluten-free by using your favorite brand of gluten-free cookie crumbs for the crust.
- Cream Cheese: Always ensure your cream cheese is at room temperature. This is crucial for achieving a smooth, lump-free cheesecake filling. Understanding the chemistry of ingredients is key to achieving the desired texture in your cheesecake, as explained by Food Republic on the importance of room temperature cream cheese.
- Mini Eggs: While Cadbury mini eggs are classic, any candy-coated chocolate eggs or even regular chocolate chips will work wonderfully.
- Chocolate: We recommend milk chocolate for the ganache as it offers a sweet, mellow flavor that pairs perfectly with the cheesecake. Dark chocolate provides a richer alternative.
Essential Equipment
Gathering your equipment before you start makes the process smooth and enjoyable. You will need:
- 12 small glass jars (125ml / 4 oz capacity)
- Two large mixing bowls for the filling and crust
- Standard measuring cups and spoons
- An electric handheld mixer for whipping the cream cheese and heavy cream
- A silicone spatula for folding and scraping bowls
- A small saucepan or a microwave-safe bowl for the ganache
How to Make No-Bake Easter Egg Cheesecake Jars
Creating these delightful Easter egg cheesecake jars is incredibly simple. Follow these steps for a perfect springtime dessert.
Prepare the Crust
- In a medium mixing bowl, combine the graham cracker crumbs, melted salted butter, and granulated white sugar.
- Mix these ingredients together thoroughly until the mixture is well combined and has a crumbly, sandy texture.
- Divide the crumb mixture evenly among your 12 small glass jars. You can use a spoon for this.
- Using the back of a spoon or your fingertips, press the mixture firmly into the bottom of each jar. This creates a compact and even crust layer.
- Place the jars into the refrigerator to chill while you prepare the cheesecake filling. This helps the crust set firmly.
Make the Cheesecake Filling
- In a large mixing bowl, using an electric handheld mixer, beat the softened cream cheese, the 1/4 cup of granulated white sugar, and the vanilla extract.
- Whip this mixture on medium speed until it becomes light, fluffy, and completely smooth, with no lumps remaining.
- Gradually add the 1 cup of cold heavy whipping cream to the cream cheese mixture. Start on low speed to prevent splattering.
- Increase the mixer speed to medium-high and continue beating until soft peaks form. The mixture should be thick and hold its shape. Laura’s Bake Lab details the science behind whipping cream to soft peaks, transforming liquid cream into a light, airy texture.
- Gently fold in the coarsely crushed Cadbury mini eggs using your silicone spatula. Be careful not to overmix, as this can cause the colors to bleed.
- Scoop the creamy cheesecake filling evenly over the prepared crusts in each of your chilled jars.
- Use a small spoon or the back of your spatula to smooth the tops of the cheesecake filling layers.
- Return the filled jars to the refrigerator to chill while you prepare the ganache.
Create the Chocolate Ganache
- Pour the 1/3 cup of heavy whipping cream into a small saucepan and heat it over medium heat until it just begins to scald around the edges. Do not let it boil vigorously. Alternatively, heat it in a microwave-safe bowl until very hot.
- Place the chopped milk chocolate into a separate heatproof bowl.
- Pour the hot heavy cream directly over the chopped chocolate.
- Let the mixture sit undisturbed for approximately 2 minutes. This allows the heat from the cream to melt the chocolate evenly.
- After 2 minutes, whisk the mixture gently but thoroughly until it becomes completely smooth, glossy, and uniform in color.
- Allow the chocolate ganache to cool slightly at room temperature for about 10 minutes. This prevents it from melting the cheesecake layer.
- Carefully pour the cooled ganache evenly over the cheesecake layer in each of the jars.
- Place the finished Easter egg cheesecake jars back into the refrigerator for a minimum of 1-2 hours to allow the cheesecake and ganache layers to set completely. Longer chilling time is always better for optimal firmness.
Pro Tips & Troubleshooting for Perfect Cheesecake Jars
- Room Temperature Cream Cheese: This is absolutely essential for a smooth, lump-free cheesecake filling. Take it out at least an hour before you start.
- Avoid Overmixing Mini Eggs: Fold the crushed mini eggs in gently to prevent their vibrant colors from bleeding excessively into the white cheesecake mixture.
- Proper Chilling Time: Don’t rush it! Adequate chilling time is crucial for both the cheesecake and the ganache to set firmly, creating distinct layers and a stable dessert.
- Crushing Mini Eggs: For uniform pieces, place mini eggs in a Ziploc bag and gently crush them with a rolling pin. A food processor works quickly for finer crumbs.
- Smooth Ganache: Ensure your heavy cream is hot enough to melt the chocolate completely. Whisk thoroughly but without incorporating too much air for a perfectly smooth, shiny finish.
- Garnish Just Before Serving: For the freshest and prettiest presentation, add whipped cream, whole mini eggs, or other garnishes right before you serve your Easter egg cheesecake jars.
Serving, Storage & Creative Variations
These delightful individual desserts are perfect for any Easter celebration. Here’s how to best enjoy them.
Serving Suggestions
- Top each jar with a generous swirl of freshly whipped cream just before serving for an extra decadent touch.
- Decorate with a few whole Cadbury mini eggs or a sprinkle of chocolate shavings to enhance their festive look.
- Provide small spoons with each jar, making them easy for guests to enjoy at parties or family meals. The charming presentation will be a hit.
Storage Instructions
- To keep your Easter egg cheesecake jars fresh, cover them tightly with their lids or plastic wrap.
- Store them in the refrigerator for up to 4 days.
- For the best taste and texture, try to enjoy these delicious treats within the first 2 days of making them. The crust stays crispest.
Variations
- Crust Options: Experiment with different cookie crumbs for the crust, such as crushed Oreo cookies, Biscoff biscuits, or even ginger snaps for a spicy twist.
- Candy Mix-ins: Instead of Cadbury mini eggs, try other festive Easter candies, chocolate chips, or chopped candy bars folded into the filling.
- Fruit Swirl: Add a vibrant layer of homemade raspberry or strawberry compote over the cheesecake filling before adding the ganache for a fruity surprise.
- Citrus Zest: Brighten the cheesecake filling with the fresh zest of lemon or orange. This adds a delightful tangy note that cuts through the richness.
- Chocolate Drizzle: After the ganache sets, drizzle white chocolate or dark chocolate over the top for an elegant finish.
Nutrition Information
| Nutrient | Amount Per Serving (approx.) |
|---|---|
| Calories | 350 |
| Carbohydrates | 35g |
| Protein | 4g |
| Fat | 22g |
| Saturated Fat | 13g |
| Cholesterol | 60mg |
| Sodium | 150mg |
| Fiber | 1g |
| Sugars | 28g |
Frequently Asked Questions (FAQ)
- Can I make these gluten-free? Absolutely! Simply substitute the graham cracker crumbs with your favorite brand of gluten-free cookie crumbs for the crust.
- How long do no-bake cheesecakes last? These delightful Easter egg cheesecake jars will stay fresh and delicious for up to 4 days when stored properly in the refrigerator.
- What can I use instead of graham crackers for the crust? Crushed Oreo cookies, vanilla wafers, or even shortbread biscuits are fantastic alternatives that add unique flavors.
- Can I double this recipe? Yes, you can easily double all the ingredients to make 24 charming cheesecake jars for a larger gathering. Ensure you have enough jars.
- Can I freeze Easter egg cheesecake jars? You can freeze the crust and filling layers (without the ganache) for up to 1 month. Thaw in the refrigerator overnight, then add fresh ganache and toppings before serving.
Conclusion
These no-bake Easter egg cheesecake jars are truly the ultimate stress-free dessert for any spring celebration. Their simplicity, festive charm, and individual portions make them an absolute winner for busy parents and beginner bakers alike. Get ready to delight your family and friends with this adorable, creamy, and undeniably delicious treat. We encourage you to try this recipe for your next Easter gathering! Share your beautiful creations and leave a review; we’d love to hear from you.
Easy No-Bake Easter Egg Cheesecake Jars
Ingredients
Equipment
Method
- In a medium mixing bowl, combine the graham cracker crumbs, melted salted butter, and granulated white sugar.
- Mix these ingredients together thoroughly until the mixture is well combined and has a crumbly, sandy texture.
- Divide the crumb mixture evenly among your 12 small glass jars. You can use a spoon for this.
- Using the back of a spoon or your fingertips, press the mixture firmly into the bottom of each jar. This creates a compact and even crust layer.
- Place the jars into the refrigerator to chill while you prepare the cheesecake filling. This helps the crust set firmly.
- In a large mixing bowl, using an electric handheld mixer, beat the softened cream cheese, the 1/4 cup of granulated white sugar, and the vanilla extract.
- Whip this mixture on medium speed until it becomes light, fluffy, and completely smooth, with no lumps remaining.
- Gradually add the 1 cup of cold heavy whipping cream to the cream cheese mixture. Start on low speed to prevent splattering.
- Increase the mixer speed to medium-high and continue beating until soft peaks form. The mixture should be thick and hold its shape.
- Gently fold in the coarsely crushed Cadbury mini eggs using your silicone spatula. Be careful not to overmix, as this can cause the colors to bleed.
- Scoop the creamy cheesecake filling evenly over the prepared crusts in each of your chilled jars.
- Use a small spoon or the back of your spatula to smooth the tops of the cheesecake filling layers.
- Return the filled jars to the refrigerator to chill while you prepare the ganache.
- Pour the 1/3 cup of heavy whipping cream into a small saucepan and heat it over medium heat until it just begins to scald around the edges. Do not let it boil vigorously. Alternatively, heat it in a microwave-safe bowl until very hot.
- Place the chopped milk chocolate into a separate heatproof bowl.
- Pour the hot heavy cream directly over the chopped chocolate.
- Let the mixture sit undisturbed for approximately 2 minutes. This allows the heat from the cream to melt the chocolate evenly.
- After 2 minutes, whisk the mixture gently but thoroughly until it becomes completely smooth, glossy, and uniform in color.
- Allow the chocolate ganache to cool slightly at room temperature for about 10 minutes. This prevents it from melting the cheesecake layer.
- Carefully pour the cooled ganache evenly over the cheesecake layer in each of the jars.
- Place the finished Easter egg cheesecake jars back into the refrigerator for a minimum of 1-2 hours to allow the cheesecake and ganache layers to set completely. Longer chilling time is always better for optimal firmness.


