 Skip to content
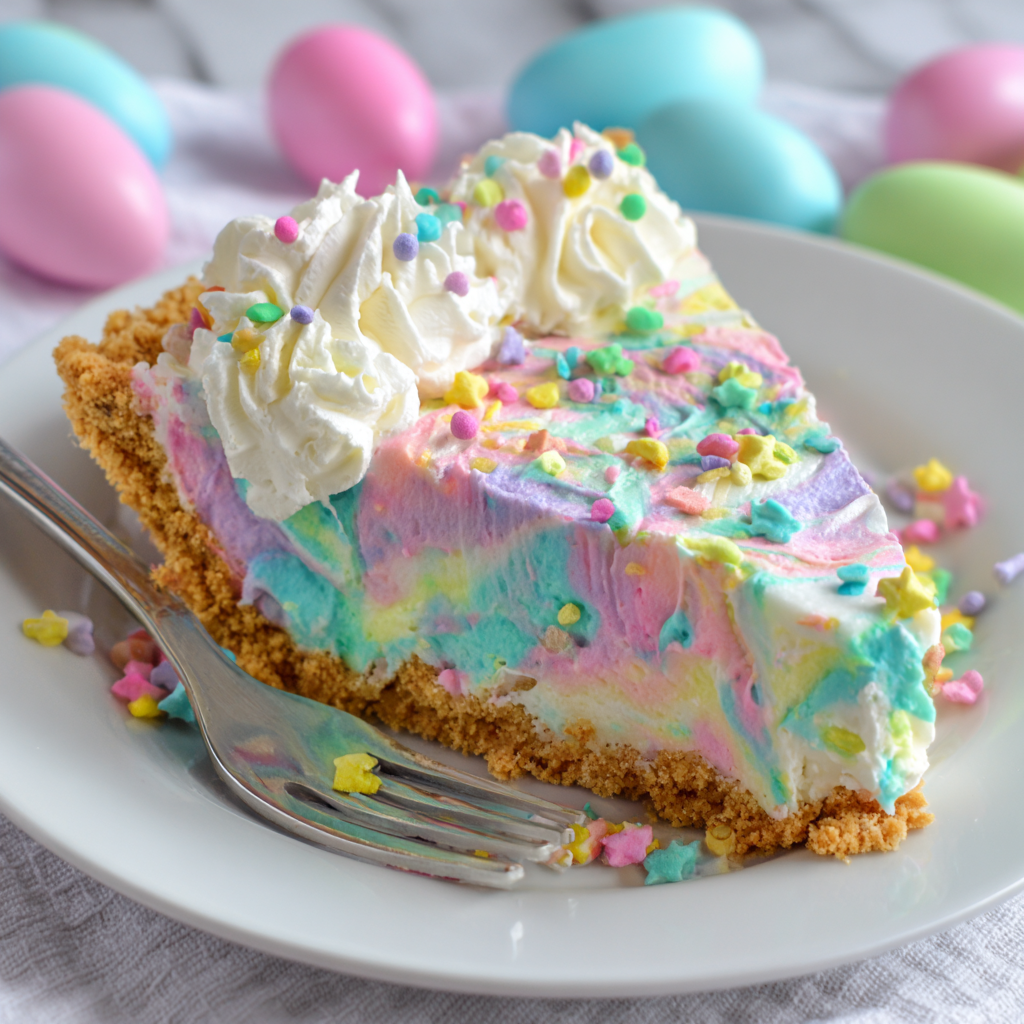
 Get ready to dazzle your Easter guests with this stunning Easter swirl pie (no-bake pastel)! This vibrant, creamy dessert is the perfect festive treat for the holiday. It’s incredibly simple to prepare, requires no oven, and delivers impressive results with its beautiful pastel swirls. Dive in to discover how easy it is to create this delightful, show-stopping dessert that will make your Easter celebration extra special.
Why You’ll Love This No-Bake Pastel Easter Swirl Pie
This delightful Easter swirl pie (no-bake pastel) is packed with reasons to become your new holiday favorite. You’ll find yourself returning to this recipe year after year for its ease and charm.
- No Oven Required: Perfect for freeing up oven space during busy holiday cooking.
- Make Ahead Magic: Prepare it days in advance, allowing flavors to meld beautifully.
- Visually Stunning: The vibrant pastel swirls make it an instant crowd-pleaser and centerpiece.
- Effortlessly Customizable: Adjust the colors to match your Easter theme or personal preference.
- Rich & Creamy: Enjoy a satisfying, melt-in-your-mouth texture with every delicious bite.
Ingredients
Gather these simple ingredients to create your beautiful Easter swirl pie (no-bake pastel). This recipe uses readily available items for a fuss-free baking experience, perfect for beginners.
For the Graham Cracker Crust:
- Graham cracker crumbs: 1 ½ cups (from about 12 full sheets)
- Unsalted butter: 7 tablespoons, melted and cooled
- Granulated sugar: ¼ cup
- Brown sugar: 1 tablespoon, packed
- Sea salt: ¼ teaspoon
For the Cheesecake Filling:
- Cream cheese: 12 ounces (1 ½ bricks), softened
- Sweetened condensed milk: 20 ounces (one 14-ounce can plus a 6-ounce can)
- Lemon juice: ½ cup
- Vanilla extract: 1 teaspoon
- Food coloring: Assorted pastel colors (pink, blue, yellow, green)
For Decoration (Optional):
- Cool Whip: Thawed whipped topping
- Sprinkles: Festive, colorful
Notes & Substitutions
You can easily adapt this recipe to your pantry or dietary needs. These simple swaps ensure your Easter swirl pie (no-bake pastel) turns out perfectly every time.
- Graham crackers: Feel free to use other cookie crumbs like Oreos for a chocolate crust, Nilla Wafers for a vanilla base, or even gluten-free cookies.
- Butter: If using salted butter, simply omit the ¼ teaspoon of added sea salt from the crust recipe.
- Cream cheese: For the best, creamiest texture and flavor, always opt for full-fat cream cheese in this no-bake pie.
- Lemon juice: Both freshly squeezed and good-quality bottled lemon juice work wonderfully to provide that essential tang.
- Food coloring: Gel food colorings are highly recommended as they offer more vibrant pastel shades without thinning the filling. For guidance on achieving vibrant and stable colors in your desserts, explore the advantages of different food coloring types.
- Cool Whip: Substitute with homemade whipped cream for a richer, less sweet topping.
Equipment
Having the right tools makes creating this Easter swirl pie (no-bake pastel) even simpler. These items are common kitchen staples, ensuring an easy preparation process.
- 10-inch pie plate
- Food processor or Ziploc bag with a rolling pin
- Large mixing bowl
- Electric hand mixer
- Small mixing bowls (4)
- Rubber spatula
- Sharp knife or skewer
- Piping bag (optional, for decorating)
Instructions
Creating this delightful Easter swirl pie (no-bake pastel) is a straightforward process, designed for simplicity and delicious results. Follow these steps for a beautiful, creamy dessert.
Make the Graham Cracker Crust
First, prepare your sturdy and flavorful base for the pie. This no-bake crust comes together quickly and easily.
- Begin by finely crushing the graham crackers. You can achieve this using a food processor for a fine crumb, or place them in a sturdy Ziploc bag and crush them with a rolling pin.
- In a medium bowl, combine the graham cracker crumbs with the melted and cooled unsalted butter, granulated sugar, brown sugar, and sea salt. Mix everything thoroughly until the crumbs are evenly moistened and resemble wet sand.
- Transfer the mixture into your 10-inch pie plate. Use the back of a spoon or your clean fingers to firmly press the crumb mixture evenly across the bottom and up the sides of the pie plate. Create a defined edge.
- Place the prepared crust in the refrigerator for at least 1 hour. This chilling time helps the crust firm up and set, preventing it from crumbling when sliced.
Prepare the No-Bake Cheesecake Filling
Next, create the rich and tangy cheesecake filling that forms the heart of this delicious pie. This part of the Easter swirl pie (no-bake pastel) recipe is surprisingly quick.
- In a large mixing bowl, use an electric hand mixer to beat the softened cream cheese. Beat on medium speed for about 2-3 minutes until it is light, fluffy, and completely smooth, with no lumps remaining.
- Pour in the sweetened condensed milk. Continue to beat the mixture on medium speed until it is well combined and smooth, scraping down the sides of the bowl as needed. This usually takes another 1-2 minutes.
- Slowly add the lemon juice to the cream cheese mixture while the mixer is running on low speed. Once added, increase the speed to medium-high and beat for 3-5 minutes. The mixture will visibly thicken as the lemon juice reacts with the dairy, creating a firm, cheesecake-like consistency.
- Finally, stir in the vanilla extract. Mix gently with the electric mixer or a rubber spatula until the vanilla is just combined into the thick filling. Do not overmix at this stage.
Create the Pastel Swirl Effect
Now for the fun part: adding the beautiful colors that make this an Easter swirl pie (no-bake pastel)! This technique is simpler than it looks.
- Take approximately 3/4 cup of the prepared white cheesecake filling and divide it evenly among four small separate mixing bowls. Leave the majority of the white filling in the large bowl.
- Add 1-3 drops of your desired pastel food coloring to each of the small bowls. Use different colors for each bowl, such as pink, blue, yellow, and green. Gently stir each colored portion with a small spoon or spatula until the color is evenly distributed. Be careful not to overmix, which can dull the color.
- Remove the chilled graham cracker crust from the refrigerator. Begin to dollop spoonfuls of the remaining white filling randomly into the crust.
- Next, dollop spoonfuls of each of the colored fillings in between the white dollops. Continue alternating white and colored filling until all of it is in the pie crust. Don’t worry about perfection; randomness creates the best swirl.
- Using a sharp knife or a skewer, gently drag it through the dolloped filling in a swirling motion. Make a few passes across the pie to create beautiful, flowing pastel swirls. Avoid overworking it, as too much swirling will blend the colors too much.
Chill and Serve Your Easter Swirl Pie
The final steps involve chilling and presenting your gorgeous dessert. Proper chilling is key for a perfect slice of this Easter swirl pie (no-bake pastel).
- Once the swirls are to your liking, carefully place the pie in the refrigerator. It needs to chill for a minimum of 8 hours, but preferably overnight. This extended chilling time is crucial for the cheesecake filling to set completely and achieve its firm, sliceable texture.
- When ready to serve, take the pie out of the refrigerator. If desired, you can decorate the top with piped Cool Whip or homemade whipped cream. Then, scatter festive, colorful sprinkles over the whipped topping for an extra celebratory touch.
- To get clean, neat slices, dip a sharp knife into warm water before each cut. Wipe the blade clean between slices to prevent color transfer and ensure every piece looks beautiful. Enjoy your stunning Easter swirl pie (no-bake pastel)!
Pro Tips & Troubleshooting
Ensure your Easter swirl pie (no-bake pastel) turns out perfectly with these helpful hints. These tips address common issues and help you achieve the best results.
- Perfect Swirls: For distinct pastel swirls, avoid overmixing the colors once dolloped into the crust. A few gentle passes with your knife or skewer are all you need.
- Smooth Filling: Always ensure your cream cheese is at room temperature. Cold cream cheese will result in a lumpy filling, no matter how much you beat it. Understanding the role of ingredient temperature is crucial for achieving the desired creamy consistency in no-bake desserts.
- Clean Slices: Dip your sharp knife in hot water and wipe it clean between each slice. This creates smooth, pristine cuts, showcasing your beautiful pastel layers.
- Color Intensity: Add food coloring drop by drop, stirring after each addition. It’s easier to add more color than to lighten an overly dark pastel shade.
- Setting Time: Do not rush the chilling process. An adequately chilled pie will have a firm, sliceable texture, while a pie chilled too briefly will be soft and runny.
Serving, Storage & Variations
This versatile Easter swirl pie (no-bake pastel) offers many ways to enjoy and customize it. Here are some ideas for serving, storing, and adapting this festive dessert.
Serving Suggestions
Elevate your dessert presentation with these simple garnishes. Your delicious Easter swirl pie (no-bake pastel) deserves a beautiful finish.
- Garnish individual slices with fresh berries like raspberries or blueberries for a pop of freshness.
- Add a sprinkle of white chocolate shavings or mini chocolate chips for extra indulgence.
- Pair a slice with a warm cup of coffee, a soothing herbal tea, or a light dessert wine after your holiday meal.
- Serve it as the grand finale to your traditional Easter brunch or dinner spread.
Storage Instructions
Proper storage helps maintain the freshness and texture of your delightful pie. This Easter swirl pie (no-bake pastel) keeps well in the refrigerator.
- Refrigerate: Store any leftover pie in an airtight container or tightly covered with plastic wrap in the refrigerator for up to 3 days.
- Freeze: For longer storage, wrap individual slices or the whole pie tightly in plastic wrap, then in aluminum foil. It can be frozen for up to 2 months. Thaw in the refrigerator before serving.
Variations
Get creative with your Easter swirl pie (no-bake pastel) by trying these fun modifications. Personalize your dessert for any occasion!
- Crust: Experiment with an Oreo crust for a rich chocolate flavor, a vanilla wafer crust for a sweeter note, or even a pretzel crust for a salty-sweet contrast.
- Flavor: Enhance the cheesecake filling with different zest, like lime or orange zest, for a brighter citrus kick. You can also add almond or coconut extract for a unique twist.
- Holiday: Easily adapt this recipe for other holidays. Use red and green for Christmas, red and blue for patriotic celebrations, or fall colors for Thanksgiving.
Nutrition Information
| Nutrient | Amount |
|---|---|
| Calories | 700 kcal |
| Carbohydrates | 75g |
| Protein | 11g |
| Fat | 41g |
| Saturated Fat | 24g |
| Trans Fat | 0.5g |
| Cholesterol | 114mg |
| Sodium | 631mg |
| Fiber | 1g |
| Sugar | 54g |
| Polyunsaturated Fat | 2g |
| Monounsaturated Fat | 11g |
| Potassium | 378mg |
| Vitamin A | 1348IU |
| Vitamin C | 1mg |
| Calcium | 285mg |
| Iron | 1mg |
FAQ
Q: Can I use a springform pan for this pie?
A: Yes, a springform pan works wonderfully for this recipe. It allows for easier removal and helps create perfectly neat, tall slices of your no-bake pie.
Q: Why are my pastel colors turning out dark?
A: You might be adding too much food coloring at once. For true pastel shades, add food coloring gradually, starting with just 1-2 drops at a time, until you reach your desired light hue.
Q: My cheesecake filling is lumpy, what went wrong?
A: The most common reason for a lumpy filling is cold cream cheese. Ensure your cream cheese is at room temperature before beating it, allowing it to become smooth and fluffy.
Q: Can I use homemade whipped cream instead of Cool Whip?
A: Absolutely! Homemade whipped cream is a delicious substitute. Just make sure it’s whipped to a stiff peak consistency so it holds its shape on top of the pie.
Q: How long does this no-bake pie need to set?
A: For the best results and a firm, sliceable texture, your Easter swirl pie (no-bake pastel) needs to set for at least 8 hours in the refrigerator, or even better, overnight.
Conclusion
This Easter swirl pie (no-bake pastel) truly is the perfect blend of simplicity and show-stopping beauty for your holiday table. Its creamy texture, vibrant colors, and no-bake convenience make it a stress-free dessert that impresses every time. We hope you enjoy creating and sharing this delightful treat with your loved ones this Easter. Don’t forget to rate this recipe and share your comments below – we love hearing about your kitchen successes!
Easy No-Bake Pastel Easter Swirl Pie
Ingredients
Equipment
Method
- Begin by finely crushing the graham crackers. You can achieve this using a food processor for a fine crumb, or place them in a sturdy Ziploc bag and crush them with a rolling pin.
- In a medium bowl, combine the graham cracker crumbs with the melted and cooled unsalted butter, granulated sugar, brown sugar, and sea salt. Mix everything thoroughly until the crumbs are evenly moistened and resemble wet sand.
- Transfer the mixture into your 10-inch pie plate. Use the back of a spoon or your clean fingers to firmly press the crumb mixture evenly across the bottom and up the sides of the pie plate. Create a defined edge.
- Place the prepared crust in the refrigerator for at least 1 hour. This chilling time helps the crust firm up and set, preventing it from crumbling when sliced.
- In a large mixing bowl, use an electric hand mixer to beat the softened cream cheese. Beat on medium speed for about 2-3 minutes until it is light, fluffy, and completely smooth, with no lumps remaining.
- Pour in the sweetened condensed milk. Continue to beat the mixture on medium speed until it is well combined and smooth, scraping down the sides of the bowl as needed. This usually takes another 1-2 minutes.
- Slowly add the lemon juice to the cream cheese mixture while the mixer is running on low speed. Once added, increase the speed to medium-high and beat for 3-5 minutes. The mixture will visibly thicken as the lemon juice reacts with the dairy, creating a firm, cheesecake-like consistency.
- Finally, stir in the vanilla extract. Mix gently with the electric mixer or a rubber spatula until the vanilla is just combined into the thick filling. Do not overmix at this stage.
- Take approximately 3/4 cup of the prepared white cheesecake filling and divide it evenly among four small separate mixing bowls. Leave the majority of the white filling in the large bowl.
- Add 1-3 drops of your desired pastel food coloring to each of the small bowls. Use different colors for each bowl, such as pink, blue, yellow, and green. Gently stir each colored portion with a small spoon or spatula until the color is evenly distributed. Be careful not to overmix, which can dull the color.
- Remove the chilled graham cracker crust from the refrigerator. Begin to dollop spoonfuls of the remaining white filling randomly into the crust.
- Next, dollop spoonfuls of each of the colored fillings in between the white dollops. Continue alternating white and colored filling until all of it is in the pie crust. Don't worry about perfection; randomness creates the best swirl.
- Using a sharp knife or a skewer, gently drag it through the dolloped filling in a swirling motion. Make a few passes across the pie to create beautiful, flowing pastel swirls. Avoid overworking it, as too much swirling will blend the colors too much.
- Once the swirls are to your liking, carefully place the pie in the refrigerator. It needs to chill for a minimum of 8 hours, but preferably overnight. This extended chilling time is crucial for the cheesecake filling to set completely and achieve its firm, sliceable texture.
- When ready to serve, take the pie out of the refrigerator. If desired, you can decorate the top with piped Cool Whip or homemade whipped cream. Then, scatter festive, colorful sprinkles over the whipped topping for an extra celebratory touch.
- To get clean, neat slices, dip a sharp knife into warm water before each cut. Wipe the blade clean between slices to prevent color transfer and ensure every piece looks beautiful.


