 Skip to content
 Introduction
Easter is such a joyful time, and for me, that joy often translates into baking something sweet and festive in my kitchen. While elaborate desserts have their place, sometimes the simplest treats bring the biggest smiles. That is exactly what these Easter Egg Brownie Bites deliver. They are the ultimate spring dessert, combining the ease of a box mix with a truly gourmet secret. Get ready to learn how to transform ordinary into extraordinary, creating surprisingly fudgy and rich brownie bites perfect for any spring gathering.
Why You’ll Love These Easter Egg Brownie Bites (Our Secret Twist!)
You might be wondering how a simple box brownie mix can become something truly special. The secret to these incredibly fudgy Easter Egg Brownie Bites lies in one magical swap: browned butter. This isn’t just a minor tweak; it’s a game-changer!
The scientific logic behind it is fascinating. When you brown butter, you initiate the Maillard reaction. This process caramelizes the milk solids in the butter, creating new aromatic compounds that introduce nutty, toffee-like, and deeply rich flavors. These complex notes are simply not present when you use plain vegetable oil.
The result is a brownie that tastes like it was made entirely from scratch, boasting a profound depth of chocolate flavor and an irresistibly fudgy texture. For another delightful treat, consider making these fudgy mint Oreo brownies. The crunchy mini candy-coated chocolate eggs provide the perfect textural contrast, making every bite a delight. Beyond the incredible flavor, these Mini Egg Brownies are still incredibly easy to make, wonderfully festive for holiday baking, and a fantastic family-friendly activity.
Ingredients Needed
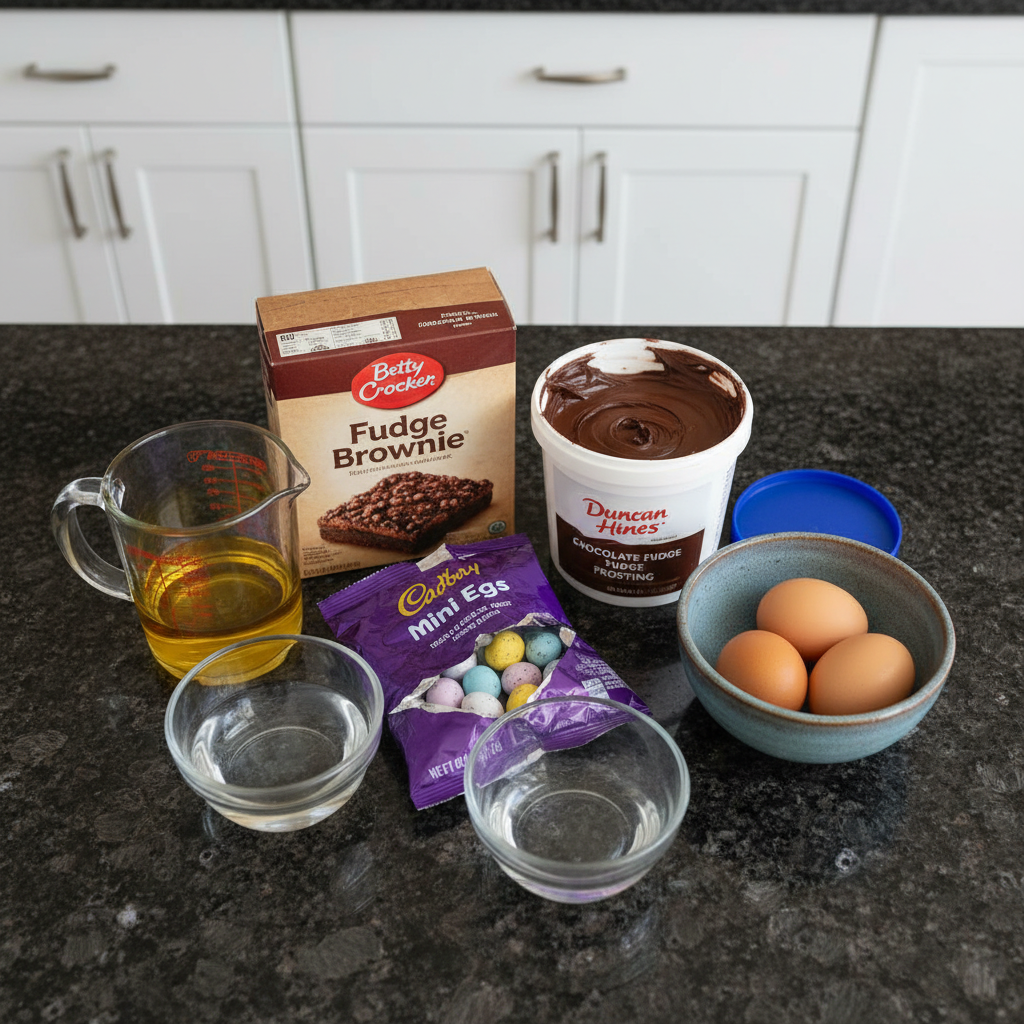
I love how simple the ingredient list is for these gourmet-tasting Fudgy Brownies.
- 1 box Betty Crocker™ Fudge Brownie Mix
- 2 eggs
- 1/2 cup vegetable oil
- 2 tablespoons water
- 1 bag (9 oz) mini candy-coated chocolate eggs
Ingredient Notes & Substitutions
For the best results with your Easter Egg Brownies, choosing a high-quality fudge brownie mix, such as the Betty Crocker Fudge Brownie Mix, provides an excellent foundation.
The star of our show, the mini candy-coated chocolate eggs, truly shines here. I highly recommend specific brands like Cadbury Mini Eggs for their iconic crunch and delightful flavor. If you are looking for alternatives, other mini chocolate candies or even M&M’s can work beautifully, allowing you to adapt these rich chocolate brownies for different holidays or everyday treats.
Now, for the browned butter. This is truly our secret weapon. Replacing the vegetable oil with browned butter infuses the brownie bites with a rich chocolate flavor and a wonderful nutty depth. To brown butter, simply melt unsalted butter in a light-colored saucepan over medium heat, stirring constantly until it turns amber and small, fragrant brown flecks appear at the bottom. This transformation is the Maillard reaction in action. While the original recipe calls for vegetable oil, our unique twist elevates these homemade brownie mix treats significantly. If you need a dairy-free option, a neutral oil can be used, but it won’t give you that distinctive browned butter flavor. Try our delicious brown butter chocolate chip cookies next!
How to Make Elevated Easter Egg Brownie Bites
Making these Easter Egg Brownie Bites is a straightforward and fun process. I’ll guide you through each step to ensure your Fudgy Brownies turn out perfectly.
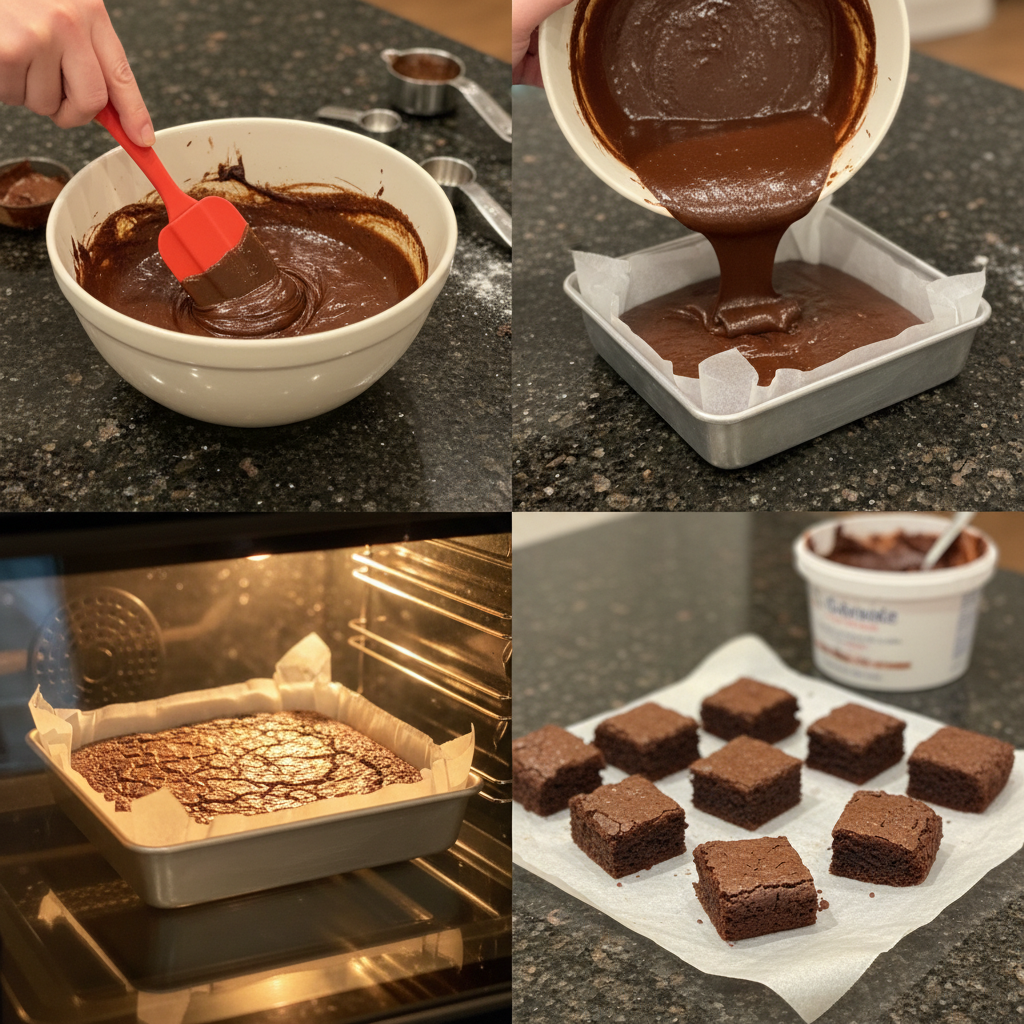
1. Prep Your Pan & Oven
First, preheat your oven to 350°F. Line a 9-inch square pan with cooking parchment paper. This expert tip helps you effortlessly lift the entire batch of rich chocolate brownies out once they are cooled, making cleanup incredibly easy. Ensure the parchment paper hangs over the sides of the baking pan to create convenient handles.
2. Crush the Mini Eggs
Next, place your mini candy-coated chocolate eggs in a resealable food-storage plastic bag. Seal it well. Now, crush them into smaller pieces. You can use a rolling pin, the bottom of a heavy glass, or even a meat mallet. Aim for a mix of fine crumbs and some larger pieces; this variation in texture adds wonderful crunch to your Mini Egg Brownies.
3. Prepare the Browned Butter (The Twist!)
This is where the magic happens! Melt the butter in a light-colored saucepan over medium heat. Keep stirring constantly. The butter will foam, then eventually turn an amber color, and you will see small, fragrant brown flecks at the bottom. You will notice a distinct nutty aroma filling your kitchen. This is the Maillard reaction creating incredible depth of flavor. Once it’s beautifully browned, remove it from the heat and let it cool slightly before adding it to your brownie mix.
4. Mix the Brownie Batter
In a medium-sized mixing bowl, combine the Betty Crocker Fudge Brownie Mix, eggs, the slightly cooled browned butter (instead of the vegetable oil), and water. Stir until the ingredients are just blended. It is crucial to avoid overmixing brownie batter, as this develops gluten development and can lead to a tougher, more cakey texture instead of that desired fudgy texture. Your batter should look rich and glossy.
5. Fold in Crushed Eggs
Gently fold in about half of your crushed mini candy-coated chocolate eggs into the batter. This step ensures that every bite of your brownie bite has that delightful crunch distributed throughout.
6. Spread and Top
Spread the brownie batter evenly into your prepared 9-inch square pan. Then, evenly sprinkle the remaining half of the crushed mini eggs over the top. Gently press them down so they adhere to the batter. This creates a beautiful, crunchy topping that is both appealing and delicious.
7. Bake to Perfection
Bake your brownie bites for approximately 35 minutes. To check for doneness, insert a toothpick 2 inches from the side of the pan. It should come out with moist crumbs attached, not wet batter. The center should look set but still slightly gooey. This is a key visual cue for doneness. Avoid baking until the toothpick comes out completely clean, as this will result in dry brownies.
8. Cooling is Key
One of the most common mistakes is cutting warm brownies. While tempting, it leads to messy, crumbly pieces. Let the brownies cool in the pan for a few minutes. Then, using the parchment paper handles, carefully lift the entire batch out onto a wire rack to cool completely. This complete cooling is absolutely essential for achieving clean, neat cuts and that optimal fudgy texture.
9. Cut and Serve
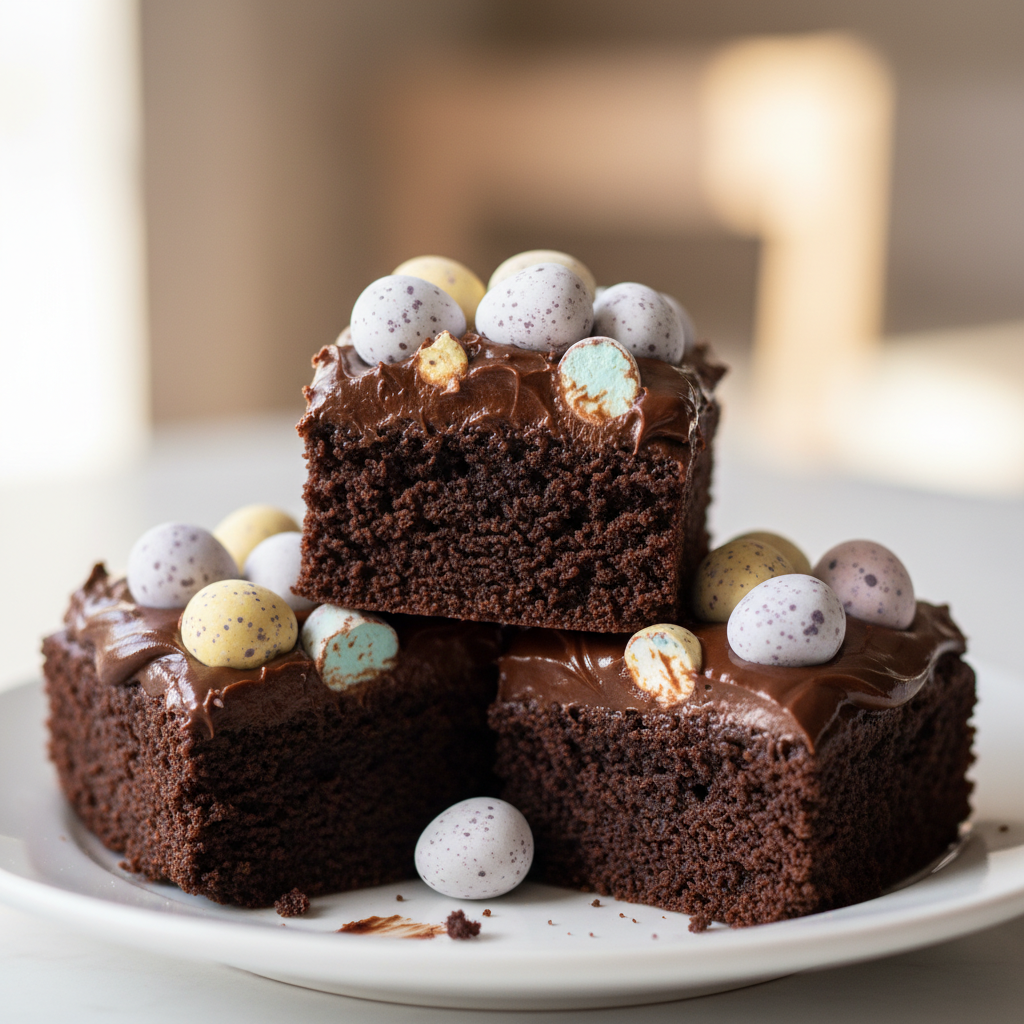
Once your Easter Egg Brownie Bites are completely cool, use a sharp knife (or a plastic knife for extra clean cuts, an expert tip from my kitchen) to cut them into 9 perfect squares. Admire the fudgy squares dotted with colorful mini eggs.
Achieving the Perfect Fudgy Texture & Troubleshooting
My goal is always to achieve that dreamy, fudgy texture in my brownies, and these Easter Egg Brownie Bites are no exception.
Brownies can generally be divided into two camps: fudgy or cakey. Fudgy brownies, like these, typically have a higher fat-to-flour ratio and a denser crumb. If you love a rich and decadent treat, you might also enjoy our recipe for fudgy green velvet brownies. Cakey brownies, on the other hand, have more flour and less fat, along with a lighter, airier texture. Our recipe specifically aims for that rich, fudgy texture, which is wonderfully enhanced by the browned butter.
Avoiding overmixing brownie batter is paramount for fudgy brownies. I always advise stirring only until the ingredients are just combined. Overmixing develops gluten development, leading to a tougher, less desirable cakey texture. You want a glossy, thick batter, not an aerated one.
For visual cues for doneness, the toothpick test is reliable. When a toothpick inserted 2 inches from the side comes out with moist crumbs (not wet batter), your brownies are perfect. Also, look for the edges pulling away slightly from the pan and the center appearing set but still a little soft when gently jiggled. Trust your instincts and these cues over strict adherence to time.
If you encounter troubleshooting common issues:
- Dry Edges/Cakey Texture: This is usually a sign of overbaking or overmixing. Try reducing your bake time slightly next time or being more gentle with your stirring.
- Raw Centers: This might mean your brownies needed a bit more time in the oven. Also, remember that a glass or ceramic pan might require a few extra minutes compared to a metal baking pan.
- Uneven Baking: If your oven has hot spots, rotating the pan halfway through the baking process can help ensure even results.
Pro Tips & Common Mistakes to Avoid
I have learned a few tricks over the years to ensure my brownies are always stellar. Here are my best pro tips and common mistakes to sidestep for perfect Easter Egg Brownie Bites.
Pro Tips for Brownie Perfection
- Embrace the Browned Butter: This simple swap is truly the single most impactful tip for elevating the flavor of your chocolate brownies. Pay close attention to the color and nutty aroma of the browning butter; these are your indicators for perfection.
- Don’t Overmix: I cannot stress this enough for achieving that desirable fudgy texture. Stir only until the dry ingredients are just incorporated into the wet to avoid toughness.
- The Parchment Paper Advantage: Using cooking parchment paper not only ensures easy removal of your Fudgy Brownies but also makes cleanup an absolute breeze. Always let it hang over the sides of the 9-inch square pan for easy lifting.
- Cool Completely: Patience is a virtue here! Allowing your Brownie Bites to cool fully before cutting is essential for clean slices and optimal fudginess.
- Cutting Techniques: For super clean slices, try using a sharp knife dipped in hot water and wiped clean between each cut. Alternatively, a plastic knife works surprisingly well, especially if your brownies are still slightly warm.
- Pan Material Matters: While metal pans are generally recommended for even baking, if you are using a glass or ceramic pan, you might need to adjust your bake times slightly.
Common Mistakes to Avoid
- Overbaking: This is the most common culprit for dry, cakey brownies. Always refer back to the visual cues for doneness rather than relying solely on the timer.
- Cutting Warm Brownies: This almost always leads to crumbly, messy pieces. Give them the time they need to set up beautifully.
- Not Crushing Eggs Enough (or Too Much): Aim for a mix of textures. If the pieces are too large, they can be hard to cut through; too fine, and you lose some of that satisfying crunch.
- Skipping the Browned Butter: Missing out on this unique twist means you’re missing out on the superior, complex flavor profile that truly elevates these Easter Egg Brownies.
Serving & Storage
Once your Easter Egg Brownie Bites are cooled and cut, it is time to enjoy them!
Creative Serving Ideas
Beyond simply cutting them into squares, consider plating individual brownie bites with a dollop of freshly whipped cream or a scoop of creamy vanilla bean ice cream. A dusting of powdered sugar, a delicate drizzle of chocolate ganache swirl, or a few extra mini chocolate eggs on top can truly enhance their presentation. These Mini Egg Brownies are perfect for Easter dessert, spring treats, or any family gathering. For pairings, I find that a rich cup of coffee, a cold glass of milk, or a light berry compote provides a lovely balance to the richness of the chocolate.
Storage and Make-Ahead Tips
To maintain the freshness and fudgy texture of your brownie bites, store them at room temperature in an airtight container for up to 3-4 days. If you are stacking them, separating the layers with parchment paper will prevent sticking.
For longer freshness, up to a week, store them in an airtight container in the refrigerator. I find that chilling these rich chocolate brownies can actually make them even fudgier and easier to cut.
These are also an excellent make-ahead dessert. If you are preparing for a busy holiday, consider freezing brownies. Wrap individual cooled brownie bites tightly in plastic wrap, then place them in a freezer-safe bag or container for up to 2-3 months. Thaw them at room temperature or gently warm them for a fresh-baked experience.
Conclusion
And there you have it—a recipe that effortlessly combines the convenience of a box mix with the gourmet taste of browned butter, resulting in truly delicious and festive Easter Egg Brownie Bites. This unique twist transforms simple chocolate brownies into a sophisticated spring treat. This recipe is approachable for all skill levels, ensuring that anyone can achieve delightfully fudgy and rich results. For another delightful twist on a classic, don’t miss our cheesecake brownies. I encourage you to try this recipe, experiment with different mini candy eggs, and share your beautiful creations with friends and family. Bookmark this recipe for your next spring celebration or simply when you are craving an elevated chocolate indulgence!
FAQ
Q: What does the cooking parchment paper do for this recipe?
A: Cooking parchment paper is a game-changer! It prevents your brownies from sticking to the pan, makes it incredibly easy to lift the entire batch out in one piece, and simplifies cleanup significantly.
Q: How do I cut my brownies cleanly?
A: The key to clean cuts is patience. Allow your brownie bites to cool completely before slicing. For extra clean cuts, use a sharp knife and wipe it clean between each cut, or try a plastic knife, which glides through fudgy brownies beautifully.
Q: How to store Easter Egg Brownie Bites for freshness?
A: You can store these Easter Egg Brownie Bites at room temperature in an airtight container for 3-4 days. For longer freshness, refrigerate them for up to a week. For extended storage, wrap individual brownie bites tightly and freeze for up to 2-3 months.
Q: Can I substitute other candies or ingredients in these brownies?
A: Absolutely! While I love Cadbury Mini Eggs for their classic crunch, you can certainly use other mini chocolate eggs or small, candy-coated chocolates for different holidays or occasions. Regarding the unique twist, while you could technically use regular vegetable oil for a dairy-free version, it would not provide the same depth of flavor as the browned butter.
Q: What’s the secret to perfectly fudgy brownies?
A: The two main secrets to perfectly fudgy brownies are our unique twist of browned butter for unparalleled richness and flavor, and avoiding overmixing the brownie batter. Overmixing can lead to gluten development, resulting in a cakey texture instead of that coveted fudgy chewiness. Also, be careful not to overbake them!
Q: How do I know when my brownies are done baking?
A: To check for doneness, insert a toothpick 2 inches from the side of the pan. It should come out with moist crumbs, not wet batter. Other visual cues for doneness include the edges of the brownies pulling away slightly from the pan and the center looking set but still slightly soft when gently jiggled.
Q: Why are my brownies dry?
A: The most common reason brownies turn out dry is overbaking. Every oven is a little different, so always rely on the visual cues for doneness rather than just the timer. Overmixing the batter can also contribute to a less fudgy, drier texture.
Q: What are the best brands of mini chocolate eggs for baking?
A: I highly recommend Cadbury Mini Eggs for their classic crunch and delicious flavor. However, any good quality mini candy-coated chocolate eggs will work wonderfully in this recipe, so feel free to use your personal favorite!
Elevated Easter Egg Brownie Bites: Fudgy with Browned Butter Twist
Ingredients
Equipment
Method
- First, preheat your oven to 350°F (175°C).
- Line a 9-inch square pan with cooking parchment paper, ensuring the paper hangs over the sides to create convenient handles.
- Next, place your mini candy-coated chocolate eggs in a resealable food-storage plastic bag and seal it well.
- Crush them into smaller pieces using a rolling pin, the bottom of a heavy glass, or a meat mallet. Aim for a mix of fine crumbs and some larger pieces for varied texture.
- Melt the unsalted butter in a light-colored saucepan over medium heat, stirring constantly.
- Continue stirring until the butter foams, then turns an amber color, and small, fragrant brown flecks appear at the bottom. You will notice a distinct nutty aroma filling your kitchen. This is the Maillard reaction in action.
- Once beautifully browned, remove from the heat and let it cool slightly.
- In a medium-sized mixing bowl, combine the Betty Crocker Fudge Brownie Mix, eggs, the slightly cooled browned butter (instead of vegetable oil), and water.
- Stir until the ingredients are just blended, being careful to avoid overmixing, which can lead to a tougher, more cakey texture. Your batter should look rich and glossy.
- Gently fold in about half of your crushed mini candy-coated chocolate eggs into the batter, ensuring even distribution.
- Spread the brownie batter evenly into your prepared 9-inch square pan.
- Evenly sprinkle the remaining half of the crushed mini eggs over the top and gently press them down so they adhere to the batter.
- Bake your brownie bites for approximately 35 minutes.
- To check for doneness, insert a toothpick 2 inches from the side of the pan; it should come out with moist crumbs attached, not wet batter. The center should look set but still slightly gooey. Avoid baking until the toothpick comes out completely clean to prevent dry brownies.
- Let the brownies cool in the pan for a few minutes.
- Then, using the parchment paper handles, carefully lift the entire batch out onto a wire rack to cool completely. Complete cooling is essential for achieving clean cuts and an optimal fudgy texture.
- Once your Easter Egg Brownie Bites are completely cool, use a sharp knife (or a plastic knife for extra clean cuts) to cut them into 9 perfect squares.


