Skip to content
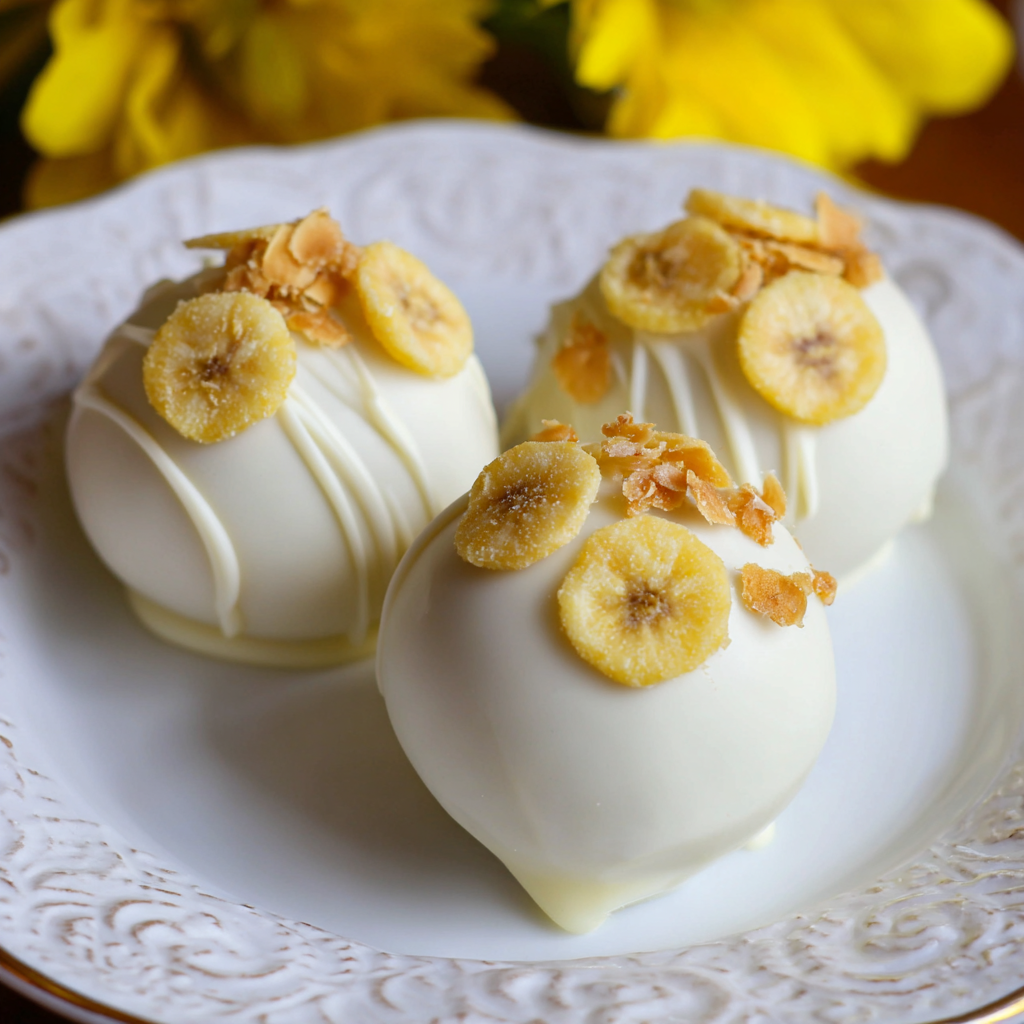
 Remember that comforting taste of classic banana pudding? Now imagine all that delightful flavor packed into a charming, bite-sized treat! These Banana Pudding Easter Truffles are your new favorite no-bake dessert for spring. They bring the iconic taste of the South to your holiday table in an incredibly easy and festive form. Perfect for busy parents and beginners, these truffles are simple to make and guarantee smiles all around. Get ready for a stress-free, deliciously fun Easter treat that everyone will adore making and eating!
Why You’ll Love These Banana Pudding Easter Truffles
You will adore making these delightful Banana Pudding Easter Truffles for your next spring gathering!
- Celebrate Easter with Ease: Enjoy a stress-free holiday dessert without needing to turn on your oven.
- Delicious, Classic Banana Flavor: Relish the beloved, comforting taste of traditional banana pudding in every creamy, sweet bite.
- Perfect No-Bake Dessert: Ideal for warm weather or when you simply prefer a chilled, effortlessly elegant treat.
- Quick and Simple to Make: These truffles come together surprisingly fast, perfect for busy schedules and novice bakers.
- Crowd-Pleasing, Bite-Sized Treats: Their charming individual size and familiar flavor make them a universally loved dessert.
- Fun and Festive Decorations: Easily customize your truffles with vibrant toppings to perfectly match your Easter theme.
Ingredients
To craft these wonderful Banana Pudding Easter Truffles, you will need just a few simple, accessible ingredients. Ensuring your cream cheese is properly softened and your bananas are perfectly ripe will significantly improve the final texture and flavor.
- 11 ounces vanilla wafers, finely crushed
- 8 ounces cream cheese, softened to room temperature
- 2 ripe bananas, thoroughly mashed
- 8 ounces white chocolate, for melting
- 20 banana chips, for a decorative garnish
Notes & Substitutions
- Banana Ripeness: Use firm, ripe bananas (yellow with brown spots). Overripe ones make the mixture too wet; underripe ones lack the essential sweetness. Understanding the varying compositions of bananas at different stages of ripeness is crucial for achieving the desired texture and sweetness in recipes, as detailed in research on the effects of banana ripeness on culinary applications.
- Wafer Alternatives: Golden Oreos or graham crackers can substitute vanilla wafers, offering a unique base flavor. These are great for variety.
- Chocolate Choice: For the best melting and setting, use white melting wafers or almond bark. These give a smoother, more professional coating.
- Garnish Ideas: Toasted coconut flakes, finely chopped pecans, or even a sprinkle of cinnamon are great alternative toppings for visual appeal.
- Flavor Boost: Add a tiny splash of rum extract or banana extract to the truffle mixture for an intensified and more complex flavor profile.
Equipment
Gathering your tools makes the process smoother. You will need:
- A food processor for crushing wafers into fine crumbs.
- A small cookie scoop (1.5 tablespoons) or spoon for shaping uniform balls.
- A parchment-lined baking sheet to prevent truffles from sticking.
- A microwave-safe bowl or double boiler for melting chocolate gently.
- A fork or toothpick for easy and clean dipping.
Instructions
Let’s make these delightful Banana Pudding Easter Truffles! This simple, step-by-step guide will help you create perfect, delicious treats for any upcoming spring celebration.
- Prepare the Wafer Crumbs: Begin by placing the vanilla wafers into your food processor. Pulse them repeatedly until they are processed into very fine, uniform crumbs. Ensure no large pieces remain.
- Add Wet Ingredients: Now, add the softened cream cheese and the thoroughly mashed ripe bananas to the food processor bowl with the wafer crumbs.
- Form the Truffle Mixture: Pulse the ingredients together again. Continue processing until a thick, cohesive, and stiff batter forms. The mixture should easily hold its shape and not be sticky.
- Shape the Truffles: Using a small cookie scoop, measuring about 1.5 inches in diameter, scoop out uniform portions of the truffle batter. Roll each portion gently between your palms to create perfectly round balls.
- Initial Chill: Arrange all the shaped truffle balls on your parchment-lined baking sheet, leaving a little space between each. Place the sheet in the freezer for approximately 10-15 minutes. This crucial step firms them up, making dipping much easier.
- Melt the White Chocolate: While your truffles are chilling, prepare your white chocolate. Gently melt it using either a double boiler on the stovetop, stirring constantly until smooth, or in a microwave-safe bowl. Microwave in 30-second bursts, stirring well after each, until completely smooth and fluid. For flawless results when coating your truffles, mastering the technique for melting white chocolate is essential to prevent burning or clumping, as detailed in various tips for melting white chocolate.
- Dip and Coat: Once the truffles are firm, remove them from the freezer. Using a fork or toothpick, carefully dip each truffle into the melted white chocolate, ready to transform them into delicious Banana Pudding Easter Truffles. Allow excess chocolate to drip before placing the coated truffle back onto the parchment paper.
- Add Garnish: Work quickly! While the chocolate coating is still wet and pliable, gently press one banana chip onto the top of each dipped truffle. This adds a lovely crunch and visual appeal to each treat.
- Final Set and Serve: Return the entire baking sheet with the dipped and garnished truffles to the refrigerator. Chill for at least 30 minutes, or until the white chocolate coating is completely set and firm to the touch. Serve your amazing Banana Pudding Easter Truffles chilled and enjoy every single bite!
Pro Tips & Troubleshooting
Achieve perfect Banana Pudding Easter Truffles every time with these helpful tips.
- Banana Selection: Use firm, ripe bananas (yellow with brown spots). Overripe ones make the mixture too wet, underripe lack essential sweetness and flavor.
- Mixture Too Soft? If your truffle mixture is too sticky to roll, chill it in the refrigerator for 20-30 minutes. This firms it up for easier shaping.
- Avoid Over-Freezing: Freeze truffles just enough to firm them (10-15 minutes). If too cold, the chocolate coating can crack upon thawing.
- Keep Chocolate Warm: Maintain a consistently warm, fluid chocolate for smooth dipping. Gently rewarm if it begins to thicken.
- Fixing Cracks: If chocolate cracks, simply re-dip the truffle quickly to create a new, smooth layer for a perfect finish.
- Softened Cream Cheese: Ensure cream cheese is at room temperature. This helps it blend smoothly without lumps for a perfect texture.
Serving, Storage, & Variations
Serving Suggestions
Arrange your delicious Banana Pudding Easter Truffles on an Easter platter for a beautiful display. They are perfect for spring gatherings, brunches, or simply enjoyed with coffee or milk. Package them in small decorative boxes for charming homemade gifts everyone will love.
Storage Instructions
Store these truffles in an airtight container in the refrigerator for up to 2-3 days. Freezing for longer storage is an option, though it may cause the chocolate coating to crack slightly upon thawing. Always keep them chilled until just before serving.
Flavor & Decoration Variations
Customize your truffles! Dip them in milk or dark chocolate for a different flavor profile. Drizzle contrasting melted chocolate over the set truffles. For a festive touch, add pastel sprinkles, crushed freeze-dried raspberries, or miniature candy eggs before the chocolate sets.
Nutrition Information
| Nutrient | Amount |
|---|---|
| Calories | Approx. 130 |
| Total Fat | Approx. 8g |
| Carbohydrates | Approx. 14g |
| Protein | Approx. 2g |
| Sugars | Approx. 10g |
FAQ
Q: Q: Can I use frozen bananas?
A: A: Thaw frozen bananas completely and drain excess liquid. This prevents a watery truffle mixture.
Q: Q: How far in advance can I make them?
A: A: You can prepare these delightful Banana Pudding Easter Truffles up to 2-3 days ahead. Store them in an airtight container in the refrigerator.
Q: Q: Why did my chocolate crack?
A: A: Chocolate cracks if truffles are too cold or the chocolate is too thick. Ensure truffles are just firm, not frozen, and chocolate is smooth.
Q: Q: Are these truffles gluten-free?
A: A: No, the vanilla wafers make them not gluten-free. Use certified gluten-free wafers for a GF version.
Q: Q: What if my mixture is too sticky?
A: A: If too soft, chill the mixture in the refrigerator for 20-30 minutes. This firms it up, making rolling much easier.
Conclusion
These easy, no-bake Banana Pudding Easter Truffles are truly a celebration in every single bite! They offer a delightful blend of classic banana flavor and charming festive appeal, making them an ideal dessert for your Easter feast or any spring gathering. Simple to prepare and guaranteed to impress even your pickiest eaters, you will absolutely love adding this versatile recipe to your holiday traditions. Try them today, and don’t forget to share your wonderful creations and feedback with us. Happy Easter baking!
Festive No-Bake Banana Pudding Easter Truffles
Ingredients
Equipment
Method
- Prepare the Wafer Crumbs: Place the vanilla wafers into your food processor. Pulse them repeatedly until they are processed into very fine, uniform crumbs, ensuring no large pieces remain.
- Add Wet Ingredients: Add the softened cream cheese and the thoroughly mashed ripe bananas to the food processor bowl with the wafer crumbs.
- Form the Truffle Mixture: Pulse the ingredients together until a thick, cohesive, and stiff batter forms that easily holds its shape and is not sticky.
- Shape the Truffles: Using a small cookie scoop (about 1.5 inches in diameter), scoop out uniform portions of the truffle batter. Roll each portion gently between your palms to create perfectly round balls.
- Initial Chill: Arrange all the shaped truffle balls on your parchment-lined baking sheet, leaving a little space between each. Place the sheet in the freezer for approximately 10-15 minutes to firm them up for easier dipping.
- Melt the White Chocolate: While the truffles chill, prepare the white chocolate. Gently melt it using either a double boiler on the stovetop, stirring constantly, or in a microwave-safe bowl in 30-second bursts, stirring well after each, until completely smooth and fluid.
- Dip and Coat: Once the truffles are firm, remove them from the freezer. Using a fork or toothpick, carefully dip each truffle into the melted white chocolate. Allow excess chocolate to drip before placing the coated truffle back onto the parchment paper.
- Add Garnish: Work quickly while the chocolate coating is still wet. Gently press one banana chip onto the top of each dipped truffle for crunch and visual appeal.
- Final Set and Serve: Return the entire baking sheet with the dipped and garnished truffles to the refrigerator. Chill for at least 30 minutes, or until the white chocolate coating is completely set and firm to the touch. Serve chilled.