 Skip to content
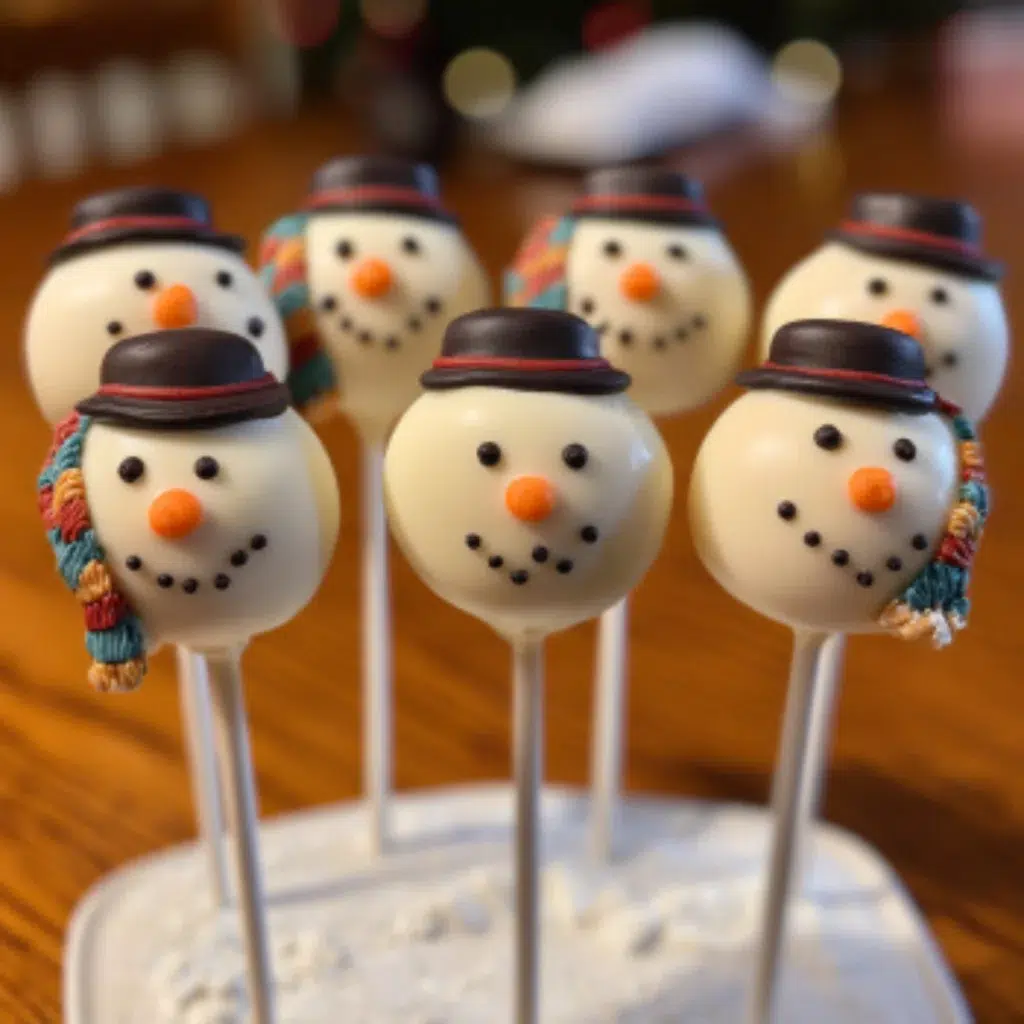
 Welcome to the delightful world of festive Snowman Cake Pops! These charming little treats are more than just a dessert; they’re the perfect edible craft for the holiday season. Get ready to dive into a recipe that’s incredibly easy, super fun, and utterly delicious to make. Prepare to spread some winter cheer and sweet smiles with every perfectly crafted bite.
Why You’ll Love These Snowman Cake Pops
Creating these Snowman Cake Pops is an absolute joy, and here’s why you’ll adore making them:
- You get to create cute, edible snowman characters that will truly melt hearts.
- This recipe offers an engaging activity, perfect for families to enjoy together during the holidays.
- We use simple, accessible ingredients, yet the final results are always incredibly impressive.
- They are easily customizable, making them ideal for any winter celebration, party, or gift.
- These delightful snowman treats are guaranteed to bring immense joy to all ages, from kids to adults.
Ingredients
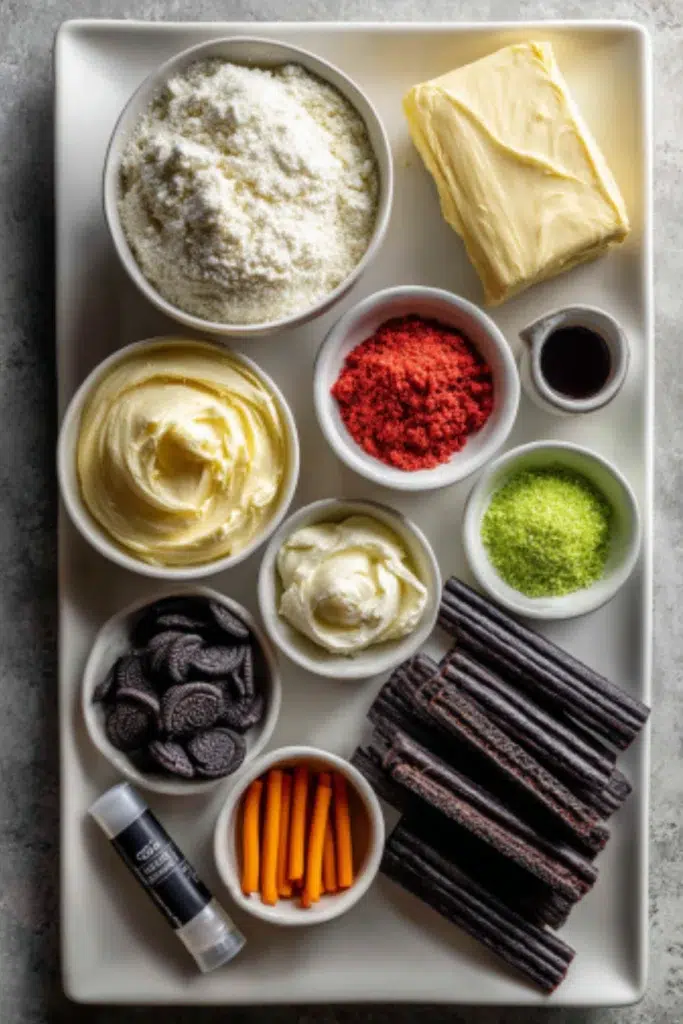
Crafting these delightful Snowman Cake Pops starts with a few simple ingredients you likely already have or can easily find at your local grocery store. Get ready to transform everyday items into adorable winter wonders!
- 1 – 15 oz box of cake mix (any flavor)
- ½ Cup of frosting (vanilla or white)
- 1 ½ – 2 cups of vanilla melting chocolate wafers
- 24 pk Lollipop sticks
- Black, red, and green fondant
- Black and orange writing gel
Notes & Substitutions
- Cake mix: Feel free to use any of your favorite boxed cake mix flavors. Chocolate, vanilla, or even red velvet will work wonderfully as the base for your cake pops.
- Frosting: Adjust the amount of frosting based on your cake mix and desired consistency. You want the mixture to be moldable, not too wet or too dry.
- Melting chocolate: If you can’t find vanilla melting wafers, white chocolate chips or any brand of white candy melts work perfectly as a substitute for coating your snowman cake pops.
- Fondant: Don’t want to work with fondant? You can easily use edible food markers directly on the set chocolate or pipe details with royal icing for similar festive results. For those exploring alternatives to fondant, royal icing is a popular choice for cake pop decorations due to its ability to dry hard and provide fine details.
- Writing gel: For facial details and buttons, try using small candy eyes, colorful sprinkles, or mini chocolate chips if writing gel isn’t available.
Equipment
You won’t need any fancy gadgets to make these charming Snowman Cake Pops. Most of these items are kitchen staples, making this a truly beginner-friendly baking project.
- Large mixing bowl
- Baking sheets
- Parchment paper
- Microwave-safe bowls
- Rolling pin
- Sharp knife or small cookie cutters
- Styrofoam block or mugs with rice (for holding cake pops upright)
Instructions
Please read all instructions before starting to ensure a smooth and fun baking process for your adorable Snowman Cake Pops. This recipe yields approximately 20-24 cake pops.
- Prepare the Cake: Prepare and bake your chosen cake mix according to the package directions. Once baked, remove the cake from the pan and let it cool completely on a wire rack. This is crucial for the best cake pop texture.
- Crumble the Cake: Once the cake is entirely cooled, transfer it to a large mixing bowl. Use your hands to finely crumble the cake into tiny, even pieces. There should be no large lumps remaining.
- Mix with Frosting: Add ½ cup of frosting to the crumbled cake. Mix well with your hands until the mixture comes together and you can easily form a ball. The consistency should be malleable but firm enough to hold its shape.
- Form Cake Balls: Roll out 1 ½-inch sized balls from your cake mixture. Depending on their exact size, you should be able to make 20-24 small cake balls. Avoid making them too large, as they may become too heavy and fall off the sticks.
- Chill Cake Balls: Place the cake balls on baking sheets lined with parchment paper. Freeze them for 1-2 hours. This chilling step is essential for the Snowman Cake Pops to stay securely on their sticks and prevent cracking during dipping.
- Melt Initial Chocolate: In a microwave-safe bowl, melt ½ cup of the vanilla white candy melts. Heat in 10-second intervals for about 3-5 times, stirring well in between each interval until the chocolate is smooth and fully melted.
- Attach Lollipop Sticks: Dip one end of a lollipop stick into the melted chocolate. Then, insert the chocolate-dipped end about halfway into a chilled cake ball. The melted chocolate acts like glue to secure the stick. Return them to the freezer for a few minutes to set.
- Melt Remaining Chocolate: Once the cake pops are ready, melt the rest of the vanilla candy melts in a microwave-safe bowl. Again, use 10-second intervals, stirring 4-5 times until smooth. For a thinner coating, you can add 1 tablespoon of coconut oil to help thin out the vanilla melts if needed.
- Dip Cake Pops: Dip each cake pop into the melted chocolate, ensuring it’s completely coated. Gently tap off any excess chocolate. Allow the coating to firm up by placing the cake pops upright. Stick the ends of the lollipop sticks into a sturdy styrofoam block, or use a few mugs filled with rice; this works really well for stability. Note: If you plan for your snowmen to wear hats, gently apply them while the candy melts are still slightly wet and sticky.
- Prepare Fondant Decorations: While your cake pops are hardening, roll out your black, red, and green fondant with a rolling pin. Use a sharp knife or small cookie cutters to cut out festive shapes like scarves, bowties, hats, or any other decorations you wish for your snowman cake pops.
- Attach Fondant: Once the chocolate coating on your Snowman Cake Pops has firmed up, carefully attach the fondant scarves and bowties. For better adhesion, use a tiny drop of water brushed on with your finger where the fondant needs to stick, especially where it overlaps when wrapping it around the cake pop. You can also use additional fondant to create a “neck” where the bowtie and scarf are placed.
- Add Facial Features: Lastly, take the black and orange writing gel to pipe on the charming details. Create their coal eyes, carrot nose, happy smile, and cute little buttons down their front.
Prep time: 30 minutes
Cook time: 2 minutes (for chocolate melting)
Pro Tips & Troubleshooting
Making perfect Snowman Cake Pops is easy with a few simple tricks up your sleeve. These tips will help you achieve impressive results every time.
- Cool Cake Completely: Always ensure your baked cake is completely cool before crumbling. Warm cake will lead to a greasy, dense mixture.
- Adjust Frosting Quantity: Start with the recommended frosting amount and add more gradually. You want a consistency that’s moldable but not sticky or overly wet for the best snowman treats.
- Chill Cake Balls Thoroughly: Properly chilling the cake balls is vital. This prevents them from cracking or falling off the stick when dipped into warm chocolate. Many cake pop experts highlight the importance of chilling cake balls to ensure they remain firm and prevent issues during the dipping process.
- Thin Melting Chocolate: If your melting chocolate feels too thick for a smooth coat, add a teaspoon of coconut oil or vegetable shortening at a time until it reaches the desired consistency.
- Time Decorations Right: Apply fondant decorations or sprinkles before the chocolate coating fully hardens. This allows them to stick naturally without needing extra adhesive.
- Use a Sturdy Holder: A styrofoam block or mugs filled with rice are excellent for holding the cake pops upright. This prevents smudges and ensures even drying.
- Avoid Oversizing: Don’t make the cake balls too large. Larger balls are heavier and more prone to falling off the lollipop sticks.
Serving, Storage & Variations
These delightful Snowman Cake Pops are perfect for any winter gathering. Here’s how to enjoy them best and keep them fresh.
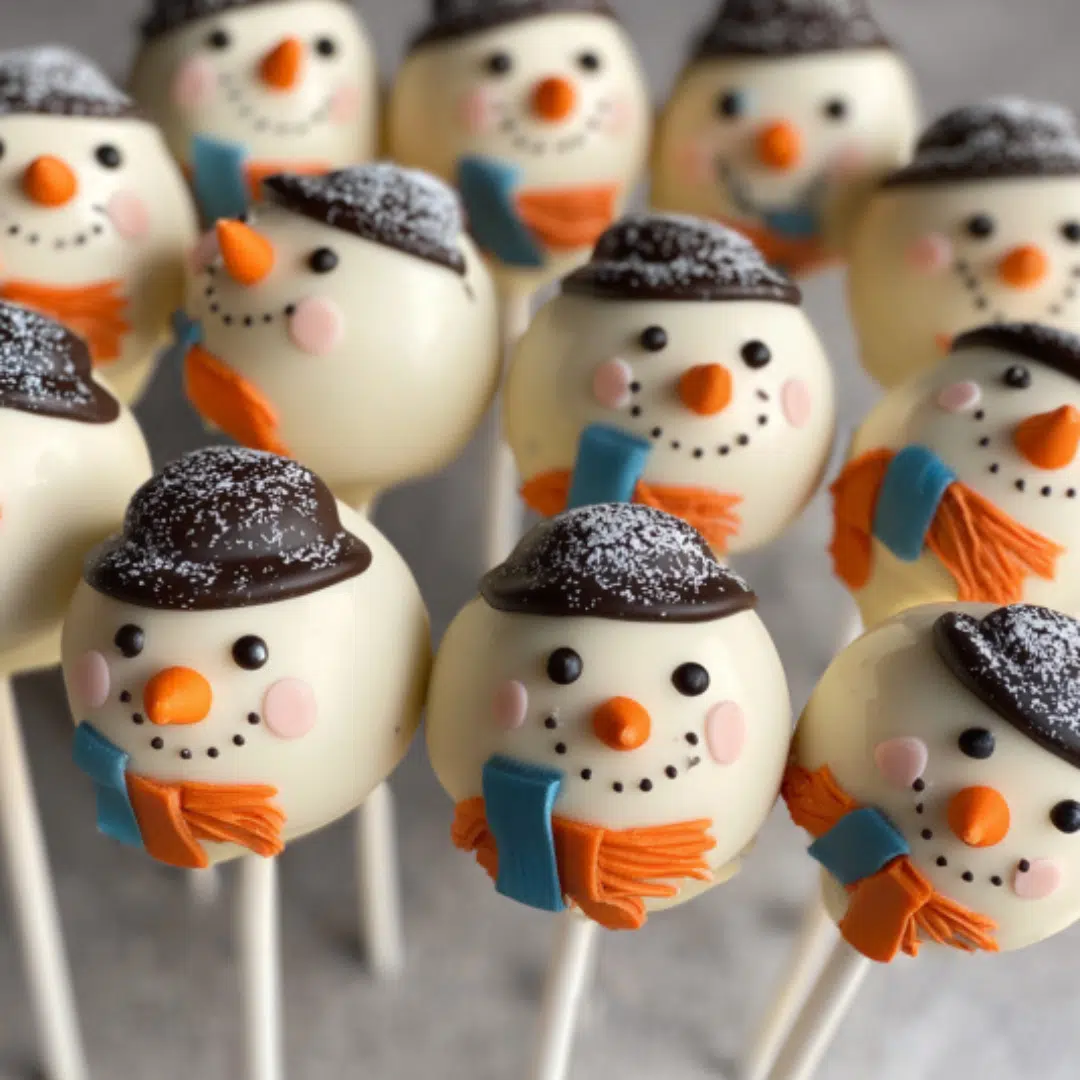
- Serving: Arrange your finished Snowman Cake Pops upright on platters or in small jars filled with sugar. They make a fantastic centerpiece for holiday parties, school events, or as charming gifts.
- Storage: Store undecorated or fully decorated cake pops in an airtight container at room temperature for up to 3-4 days.
- Refrigeration: For extended freshness, especially in warmer climates, refrigerate them for up to 1 week. Let them come to room temperature for about 15-20 minutes before serving for optimal taste and texture.
- Variations:
- Different colors: Get creative with your fondant and writing gel. Use various colors for scarves, hats, or even brightly colored buttons.
- Sprinkles: Before the chocolate sets, roll the dipped cake pops in festive sprinkles for extra sparkle and texture.
- Coconut flakes: For a truly snowy effect, roll the still-wet chocolate-coated cake pops in shredded coconut flakes.
- Hot chocolate bombs: For an extra treat, hollow out the cake balls slightly and fill them with hot chocolate mix and mini marshmallows before coating to create melting snowmen.
Nutrition
Here’s an estimated nutritional breakdown for one of our delicious Snowman Cake Pops. Please remember that these values are estimates and can vary based on specific brands and ingredient choices.
| Nutrient | Value (per 1 cake pop) |
|---|---|
| Calories | 180 kcal |
| Carbohydrates | 25 g |
| Protein | 1 g |
| Fat | 8 g |
| Saturated Fat | 5 g |
| Cholesterol | 10 mg |
| Sodium | 100 mg |
| Fiber | 0.5 g |
| Sugar | 20 g |
Disclaimer: Nutritional information is an estimate based on average ingredient values and serving sizes. Actual values may vary.
Conclusion
Making these charming Snowman Cake Pops is more than just baking; it’s an enjoyable experience that brings warmth and creativity to your holiday season. These adorable, delicious treats are perfect for sharing with loved ones or simply enjoying yourself. Don’t be afraid to experiment with your decorations and let your imagination run wild. We can’t wait to see your unique Snowman Cake Pops creations! Happy baking and happy holidays!
FAQ
Got questions about making these adorable Snowman Cake Pops? We’ve got answers to help you succeed in your baking adventure.
Can I use homemade cake and frosting instead of boxed?
Yes, absolutely! Just ensure your homemade cake is finely crumbled and your frosting has a thick, moldable consistency similar to store-bought frosting.
How long do Snowman Cake Pops typically last?
When stored in an airtight container, they can last up to 3-4 days at room temperature or up to 1 week if refrigerated, maintaining their fresh taste.
Is it possible to freeze the cake pops for later?
Yes, you can freeze undecorated cake pops for up to 1 month. Thaw them in the refrigerator before decorating and serving.
What should I do if my melting chocolate is too thick?
If your chocolate is too thick for a smooth dip, add a small amount (about 1 teaspoon) of coconut oil or vegetable shortening and stir until it thins out.
Do I have to use fondant for the decorations?
No, fondant is optional. You can easily use candy melts piped with a piping bag, royal icing, or edible food markers for all your decorative details on these festive treats.
Festive Snowman Cake Pops
Ingredients
Equipment
Method
- Prepare and bake the cake according to box instructions. Cool completely on a wire rack.
- Crumble the cooled cake into a large mixing bowl until fine crumbs form with no lumps.
- Mix in ½ cup frosting until the mixture is moldable and holds its shape well.
- Form small 1 ½-inch balls and place them on a parchment-lined baking sheet.
- Freeze cake balls for 1–2 hours until firm.
- Melt ½ cup vanilla melts in the microwave using 10-second intervals until smooth.
- Dip one end of each lollipop stick into melted chocolate, then insert halfway into a chilled cake ball.
- Chill again briefly to secure sticks.
- Melt remaining chocolate and dip each cake pop to coat. Tap off excess and stand upright to dry.
- Roll out fondant and cut shapes for scarves, hats, and buttons.
- Attach fondant pieces to dried cake pops using a damp brush or gentle pressure.
- Use writing gels to draw coal eyes, carrot noses, smiles, and buttons.


