Skip to content
 There’s nothing quite like a hearty bowl of chili to bring comfort, especially after a long day. But who has hours to simmer a pot on the stovetop on a busy weeknight? That’s where my go-to Instant Pot White Chicken Chili comes in! This isn’t just another quick, dump-and-go recipe; I’ve got a special secret to unlock incredibly deep, complex flavors in record time. Get ready to master your Instant Pot and create an easy, creamy, and perfectly spiced chili that will become an instant family favorite.
Why You’ll Love This Recipe
I know what you’re thinking: another Instant Pot chili recipe. But trust me, this one is different. My unique approach ensures unrivaled flavor depth, making it stand out from the crowd.
The Unique Flavor Secret: Blooming the Spices. The magic in this Instant Pot White Chicken Chili begins before the pressure even builds. My secret? I bloom the dry spices—cumin, chili powder, and garlic powder—in a small amount of oil using the Instant Pot’s ‘Saute’ function. This crucial step, lasting just 30-60 seconds, intensifies their flavor and aroma by releasing fat-soluble compounds. It’s a game-changer, moving beyond bland to a truly robust, complex chili. To learn more about this technique, check out this article on the benefits of blooming spices. Immediately after, sautéing the diced onion builds an even deeper flavor base through the Maillard reaction and helps deglaze the pot, significantly reducing any risk of a ‘Burn’ error.
Unrivaled Flavor Depth. Thanks to that unique spice-blooming technique, this isn’t just easy chili; it’s exceptionally flavorful. Every spoonful of this creamy white chicken chili is packed with rich, aromatic notes that will surprise and delight you.
Quick & Convenient. As a busy home cook, I rely on my Instant Pot. This is a true one-pot meal that comes together quickly, making it absolutely perfect for those hectic weeknights when you crave something satisfying without the fuss.
Family-Friendly & Customizable. This recipe is incredibly versatile. It appeals to a wide range of palates, and it’s super easy to adjust the spice level or cater to various dietary needs, making it a wonderful kid-friendly healthy dinner.
Meal Prep Dream. This Instant Pot White Chicken Chili is a fantastic recipe for making ahead. It stores beautifully, and the flavors often deepen overnight, making it an ideal choice for your weekly meal prep or as a convenient freezer meal.
Ingredients Needed

Gathering your ingredients is the first step to making this delicious chili. Here’s exactly what you’ll need for this flavorful Instant Pot White Chicken Chili:
- 1 small onion (diced)
- 2 x 15 oz cans cannellini, white or great Northern beans ( drained and rinsed)
- 2 cups corn (fresh or frozen)
- 1 cup chicken broth (low sodium)
- 4 ounces can diced green chilies
- 1 teaspoon cumin
- 2 teaspoons chili powder
- 1 teaspoon garlic powder
- 3/4 teaspoon salt
- Ground black pepper (to taste)
- 1 pound or 2 large chicken breasts (boneless and skinless)
- Small bunch of cilantro (finely chopped)
- 1/2 cup Greek yogurt (2%+ (or sour cream))
- 2 ounces cream cheese
- 1 lime (juice of)
- Tortilla chips, avocado, more yogurt, limes (for serving)
Ingredient Notes & Substitutions
I often get questions about how to tweak recipes, so here are some of my best tips for the ingredients in this Instant Pot White Chicken Chili:
- Chicken Options: While I love boneless skinless chicken breasts for this chili, you can easily use boneless skinless chicken thighs (the cook time remains the same). If you have leftover shredded chicken or a rotisserie chicken, you can reduce the pressure cook time to just 10 minutes, as the chicken only needs to heat through. For ground chicken, sauté it on the ‘Saute’ function before adding the other ingredients.
- White Beans: Cannellini beans are wonderfully creamy, while great Northern beans offer a slightly firmer texture. Navy beans are also a good choice. All will contribute to the rich body of the chili. If you prefer using unsoaked dried beans, you can use 1 cup dried white beans with 2 cups of broth, pressure cooking for about 35 minutes.
- Broth: A good quality, low-sodium chicken broth is key to building a flavorful base without over-salting. Look for brands with robust chicken flavor. You can also use bouillon dissolved in water.
- Corn: Fresh corn adds a lovely sweetness, but frozen corn works perfectly and doesn’t even need thawing. Drained canned corn is also a convenient option.
- Creaminess & Dairy-Free: Greek yogurt (2% or full-fat) and cream cheese are what give this chili its luxurious, creamy texture. For a lighter version, you can omit the cream cheese. For a dairy-free option, mash about 1 cup of the cooked white beans against the side of the pot with a fork, using the chili liquid to create a natural creaminess. You can also find dairy-free sour cream or cream cheese alternatives. Remember, dairy can scorch under pressure, so always add it *after* pressure cooking for the best results.
- Spices: Using fresh spices makes a huge difference in any recipe, but especially in this one since we’re blooming them. Check your spice rack to ensure your cumin, chili powder, and garlic powder aren’t past their prime for optimal flavor.

How to Make Instant Pot White Chicken Chili
Let’s get cooking! Follow these steps to create the most flavorful Instant Pot White Chicken Chili:
Step 1: Bloom the Spices & Sauté Aromatics.
First, add a small amount of oil to your Instant Pot. Select the ‘Saute’ function. Add the cumin, chili powder, and garlic powder. Bloom for 30-60 seconds, stirring constantly, until the spices become incredibly fragrant and aromatic. This is my unique twist for a deeply flavorful chili! Immediately add the diced onion and continue to sauté until it’s softened and lightly golden, building a fantastic flavor base. The browning of the onions is an example of the Maillard reaction, which creates hundreds of different flavor compounds. If any bits stick to the bottom, deglaze the pot with a splash of broth to prevent sticking and a ‘Burn’ error.
Step 2: Layer Remaining Ingredients.
Now, add the drained and rinsed beans, corn, chicken broth, diced green chilies, salt, and pepper to the pot. Gently lay the boneless, skinless chicken breasts on top of the other ingredients. This is crucial: Do not stir the ingredients after adding them, as this helps prevent a ‘Burn’ notice by keeping the thinner liquids at the bottom.
Step 3: Pressure Cook to Perfection.
Close the lid of your Instant Pot and ensure the pressure vent is set to Sealing. Select the Pressure Cook (or Manual) setting on High. Set the cook time for 20 minutes. This timing works perfectly for both fresh and frozen chicken breasts.
Step 4: Natural Release for Tenderness.
Once cooking is complete, allow the pressure to naturally release (NPR) for 10 minutes. This is important as it prevents the hot liquid from splattering when you open the pot and allows the chicken breasts to become extra tender and reabsorb all their delicious juices. After 10 minutes, perform a Quick Release (QPR) by turning the pressure valve to the Venting position.
Step 5: Shred & Finish with Creaminess.
Carefully open the lid. Remove the cooked chicken breasts from the pot and easily shred them using two forks. Return the shredded chicken to the pot. Now, stir in the fresh cilantro, Greek yogurt (or sour cream), cream cheese, and lime juice until everything is well combined and the chili is wonderfully creamy. You’ll notice the vibrant aroma developing beautifully.
Step 6: Serve Hot.
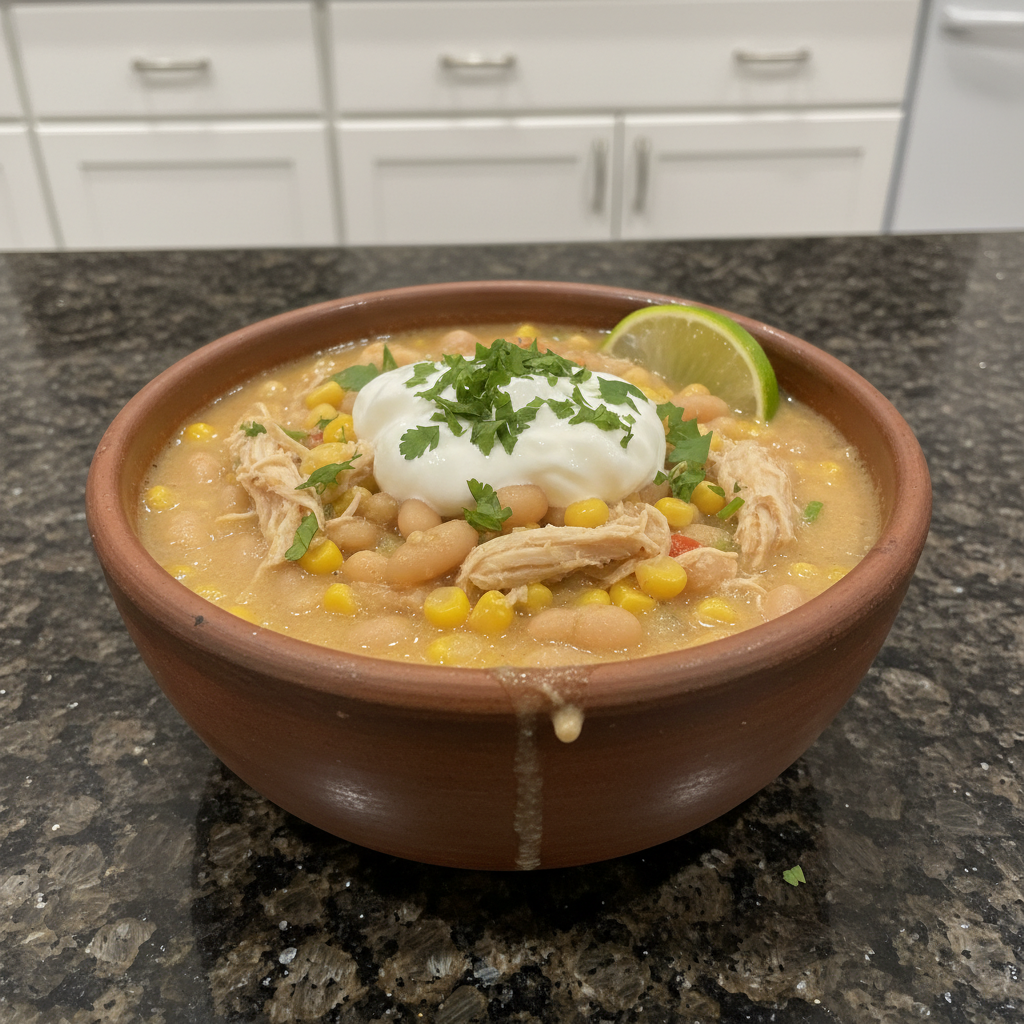
Ladle the hot chili into bowls. The inviting aroma and hearty appearance are truly something to behold. Now, let’s talk about those delicious serving ideas!
Mastering Your Instant Pot: Preventing & Fixing Common Chili Issues
The Instant Pot is a fantastic tool, but like any appliance, it has its quirks. Understanding how to prevent and fix common issues will make you a pressure cooking pro, especially with dishes like Instant Pot White Chicken Chili.
Preventing the Dreaded ‘Burn’ Error
The ‘Burn’ error is a common concern for Instant Pot users. It typically occurs when thick sauces or small food particles stick to the bottom of the inner pot, or when there isn’t enough thin liquid. Ingredients like tomato paste or thick purees are frequent culprits, and dairy can also scorch if added too early.
- Layering Ingredients: My top tip is to always layer your ingredients correctly. Add liquids first, followed by beans and corn, and then place the chicken breasts on top. Do not stir before pressure cooking. This ensures the thinner liquids remain at the bottom, protecting the denser ingredients from direct contact with the heating element.
- Deglazing after Sauté: After the spice bloom and sautéing the onions, always deglaze the pot thoroughly. Pour in a splash of broth or water and use a wooden spoon to scrape up any stuck-on bits from the bottom. This is critical for preventing the ‘Burn’ error.
- Sufficient Liquid: Always ensure your recipe calls for enough liquid. This white chicken chili recipe has been tested with the right amount of broth.
- Avoid Dairy/Thickening Agents before PC: Understanding the food science is key here. Dairy products like cream cheese and Greek yogurt can easily scorch under the high heat and pressure of the Instant Pot. Always stir them in *after* the pressure cooking cycle is complete.
Adjusting Consistency & Spiciness
Sometimes you need to fine-tune your chili to get it just right. Here’s how to adjust the consistency and heat:
- Chili Too Thin:
- Cornstarch Slurry: If your chili is too thin, create a cornstarch slurry. Mix 1 tablespoon of cornstarch with 1 tablespoon of cold water until smooth. Turn the Instant Pot back to ‘Saute’ (Low) and stir the slurry into the hot chili. Simmer, stirring constantly, for a few minutes until it thickens to your desired consistency. Arrowroot powder is another great alternative.
- Mashing Beans: For a more natural thickening, use a fork or potato masher to mash about 1 cup of the cooked white beans against the side of the pot. This adds body and creaminess.
- Simmer on Sauté: You can also simmer the chili on the ‘Saute’ (Low) function with the lid off for 5-10 minutes, allowing some liquid to evaporate and the chili to thicken naturally.
- Chili Too Thick:
- Simply stir in additional low-sodium chicken broth, 1/4 cup at a time, until your desired consistency is reached.
- Adjusting Spiciness:
- For More Heat: To kick up the heat, add finely chopped fresh jalapenos (with or without seeds, depending on your preference) or serrano peppers along with the other ingredients before pressure cooking. You can also stir in a dash of your favorite hot sauce, like Cholula or Tabasco, at the end. Crushed red pepper flakes can be added during the initial sauté step.
- For Less Heat (Kid-Friendly): If you’re making this for very young children or those sensitive to spice, you can slightly reduce the amount of chili powder. Ensure any diced green chilies you use are labeled “mild.” Offering a generous dollop of Greek yogurt or sour cream, or some creamy avocado, as a garnish can also help cool things down.
Pro Tips & Troubleshooting
Making great Instant Pot White Chicken Chili is all about understanding a few key techniques and avoiding common pitfalls. Here are my expert tips and warnings:
Pro Tips for the Best Chili
- Don’t Skip the Spice Bloom: I can’t stress this enough! Blooming the dry spices (cumin, chili powder, garlic powder) in a bit of fat for 30-60 seconds on ‘Saute’ is the absolute secret to a deeply flavorful chili. It makes all the difference.
- Layer, Don’t Stir (Before PC): Always layer your ingredients as instructed: liquids first, then solids like beans and corn, and finally, your chicken breasts on top. Resist the urge to stir before pressure cooking to effectively prevent a ‘Burn’ notice.
- Embrace the NPR (10 Min): Allowing a 10-minute Natural Pressure Release (NPR) before performing a Quick Release is crucial. It prevents messy splattering and ensures your chicken is incredibly tender and juicy, having reabsorbed all its goodness.
- Dairy Last: Always add the Greek yogurt and cream cheese only after the pressure cooking cycle is complete and the pressure has been fully released. This prevents scorching and keeps your chili wonderfully creamy.
- Quality Broth Matters: Using a good quality, low-sodium chicken broth will build the best foundation for flavor, allowing you to control the salt content precisely.
- Fresh Lime Finish: A final squeeze of fresh lime juice at the end brightens all the flavors and adds a delicious, essential tang that really ties the chili together.
Common Mistakes to Avoid
- Stirring Before Pressure Cooking: This is a leading cause of the dreaded ‘Burn’ error. Once your ingredients are layered, leave them be until after cooking!
- Immediate Quick Release: Releasing the pressure immediately after cooking can cause hot liquid to splatter all over your kitchen and can result in tougher chicken. Patience for the 10-minute NPR is a virtue here.
- Under-Seasoning: Pressure cooking can sometimes subtly mute flavors. Always taste and adjust salt and pepper at the very end to ensure your chili is perfectly seasoned. Don’t be afraid to add a little more!
- Adding Dairy Before Pressure Cooking: As mentioned, this can lead to scorching and a ‘Burn’ notice on your Instant Pot. Save the Greek yogurt and cream cheese for the finishing touch.
- Overcooking on Sauté (Post-PC): If you’re thickening your chili on the ‘Saute’ function after pressure cooking, don’t let it simmer for too long and dry out. Be especially careful once dairy is added, as vigorous boiling can cause it to curdle.
Serving & Storage
Once your delicious Instant Pot White Chicken Chili is ready, you’ll want to enjoy every last spoonful. Here’s how I like to serve it and keep it fresh for later.
Serving Ideas
The beauty of this white chicken chili is how wonderfully it pairs with a variety of toppings and sides. Get creative!
- Classic Garnishes: My go-to toppings include creamy diced avocado, a sprinkle of fresh cilantro, thinly sliced green onion, and a dollop of cooling Greek yogurt or sour cream. For cheese lovers, shredded cheddar cheese or crumbled cotija cheese are fantastic. And for a little extra kick, a dash of your favorite hot sauce (like Cholula or Tapatco) is always a good idea.
- Crunch & Texture: Don’t forget the crunch! Tortilla chips or strips add a satisfying texture that complements the creamy chili perfectly.
- Hearty Pairings: For a complete and comforting meal, I love serving this chili over a bed of fluffy rice or alongside warm, freshly baked cornbread or cornbread muffins.
- Meal Base: This chili is hearty enough to be enjoyed on its own, but it also makes a fantastic topping for baked potatoes.
Storage and Make-Ahead
This Instant Pot White Chicken Chili is a dream for make-ahead meals and storing leftovers. It tastes even better the next day!
- Refrigerating Leftovers: Any leftover chili stores wonderfully. Transfer it to an airtight container and keep it in the refrigerator for up to 3-4 days. The flavors often deepen overnight, making it even more delicious.
- Freezing Cooked Chili: This is a fantastic freezer meal! Allow the chili to cool completely before transferring it to freezer-safe bags or containers. Leave a little headspace for expansion if using rigid containers. It can be frozen for up to 3 months.
- Thawing & Reheating Tips:
- Thawing: For the best results, thaw frozen chili overnight in the refrigerator. If you’re in a hurry, you can use the defrost setting on your microwave or place the sealed container in a bowl of cold water.
- Reheating: Reheat gently on the stovetop over medium-low heat, stirring occasionally, or in the microwave. If the chili has thickened too much in the fridge or freezer, add a splash of chicken broth or water to reach your desired consistency. Avoid boiling vigorously if dairy is present, as it can sometimes curdle.
Conclusion
There you have it—my absolute favorite recipe for Instant Pot White Chicken Chili! This recipe truly delivers on all fronts: speed, ease, and, most importantly, a superior, rich flavor that truly stands out, all thanks to our special spice blooming technique. I promise you, even if you’re new to Instant Pot cooking, you’ll achieve fantastic results with this dish.
It’s the perfect answer for a wholesome, high-protein, one-pot meal that comes together quickly and warms you from the inside out. Don’t be afraid to experiment with your favorite toppings and variations to truly make this chili your own. Enjoy, and please share your delicious creations with me!
FAQ
Can I make Instant Pot white chicken chili in the slow cooker or on the stovetop?
Absolutely! For the slow cooker, first sauté the spices and onion in a pan, then transfer them to the slow cooker along with all other ingredients (except dairy). Cook on high for 4-6 hours or low for 6-8 hours. Stir in dairy and lime juice at the end. For the stovetop, sauté the spices and onion in a large pot, then add the remaining ingredients (except dairy and lime). Bring to a simmer, cover, and cook until the chicken is cooked through and easily shreddable (about 20-25 minutes). Shred chicken, return to pot, then stir in dairy and lime juice.
Can I make this white chicken chili dairy-free or with different chicken types?
Yes, you can! To make it dairy-free, simply omit the cream cheese and use a dairy-free yogurt or sour cream alternative, or achieve creaminess by mashing about 1 cup of the cooked white beans directly into the chili. For chicken, boneless skinless chicken thighs work perfectly with the same cook time. If using cooked rotisserie chicken or ground chicken, you can reduce the pressure cook time to 10 minutes (for rotisserie, it just needs to heat through) or sauté ground chicken first before adding other ingredients.
How do I prevent the Instant Pot ‘Burn’ error when making white chicken chili?
The key steps are to layer your ingredients without stirring (liquids first, then solids, chicken on top), thoroughly deglaze the pot after any sautéing to remove stuck-on bits, and crucially, add all dairy products (Greek yogurt, cream cheese) *only after* the pressure cooking cycle is complete and the pressure has been released. This prevents thicker ingredients from scorching on the bottom.
What are the best toppings and side dishes for Instant Pot white chicken chili?
For toppings, I love diced avocado, fresh cilantro, a dollop of sour cream or Greek yogurt, shredded cheddar or cotija cheese, and a dash of hot sauce. Crumbled tortilla chips add a fantastic crunch! As for sides, warm cornbread or cornbread muffins, or a simple bed of fluffy rice, are classic and delicious pairings.
What’s the best way to store or freeze Instant Pot white chicken chili?
This chili stores beautifully! Refrigerate leftovers in an airtight container for 3-4 days. To freeze, allow the chili to cool completely, then transfer it to freezer-safe bags or containers, leaving a little headspace. It can be frozen for up to 3 months. Thaw overnight in the refrigerator, then reheat gently on the stovetop or in the microwave, adding a splash of broth if needed.
Do I need to stir ingredients or pre-cook chicken before pressure cooking white chicken chili?
No, and in fact, you absolutely should *not* stir the ingredients before pressure cooking the chili! Layering the ingredients as instructed helps prevent the ‘Burn’ error. Also, there’s no need to pre-cook the chicken; boneless, skinless chicken breasts (fresh or frozen) cook perfectly right in the Instant Pot during the pressure cooking cycle.
Can I use dried beans instead of canned, and what type of white beans are best?
Yes, you can use dried beans! For this recipe, you could use 1 cup of unsoaked dried white beans (such as cannellini, great Northern, or navy beans) along with 2 cups of broth, and increase the pressure cook time to about 35 minutes. Cannellini beans are very creamy, great Northern beans are slightly firmer, and navy beans are also excellent. Any of these will work beautifully and contribute a lovely texture and flavor to your chili.
What kind of Instant Pot should I use for this recipe?
This recipe is designed for a standard 6-quart Instant Pot, like the Duo, Ultra, or Nova models. If you have a 3-quart Instant Pot, you can halve the recipe, keeping the cook time the same. For an 8-quart Instant Pot, you can double the recipe; just ensure your ingredients do not exceed the 2/3 maximum fill line, and the cook time will remain the same for the chicken.
Instant Pot White Chicken Chili: Best Creamy, Flavorful Recipe
Ingredients
Equipment
Method
- First, add a small amount of oil to your Instant Pot. Select the 'Saute' function. Add the cumin, chili powder, and garlic powder. Bloom for 30-60 seconds, stirring constantly, until the spices become incredibly fragrant and aromatic. Immediately add the diced onion and continue to sauté until it's softened and lightly golden, building a fantastic flavor base. If any bits stick to the bottom, deglaze the pot with a splash of broth to prevent sticking and a 'Burn' error.
- Now, add the drained and rinsed beans, corn, chicken broth, diced green chilies, salt, and pepper to the pot. Gently lay the boneless, skinless chicken breasts on top of the other ingredients. Do not stir the ingredients after adding them, as this helps prevent a 'Burn' notice by keeping the thinner liquids at the bottom.
- Close the lid of your Instant Pot and ensure the pressure vent is set to Sealing. Select the Pressure Cook (or Manual) setting on High. Set the cook time for 20 minutes. This timing works perfectly for both fresh and frozen chicken breasts.
- Once cooking is complete, allow the pressure to naturally release (NPR) for 10 minutes. After 10 minutes, perform a Quick Release (QPR) by turning the pressure valve to the Venting position.
- Carefully open the lid. Remove the cooked chicken breasts from the pot and easily shred them using two forks. Return the shredded chicken to the pot. Now, stir in the fresh cilantro, Greek yogurt (or sour cream), cream cheese, and lime juice until everything is well combined and the chili is wonderfully creamy.
- Ladle the hot chili into bowls.