Skip to content
 There’s nothing quite like the comforting aroma and satisfying simplicity of homemade bread, especially a quick, yeast-free option. In my kitchen, few things bring as much joy as a freshly baked loaf of Irish Soda Bread. It’s a beloved classic, perfect for any meal, not just your St. Patrick’s Day celebrations. This recipe is designed to be incredibly easy to follow, even if you’re a beginner baker, and promises a result that’s both authentically delicious and wonderfully unique, thanks to a special twist. Get ready to bake a loaf with a perfectly crusty exterior and a tender, soft interior!
Why You’ll Love This Recipe
My recipe for Irish Soda Bread goes beyond the traditional, with a simple yet transformative twist you’ll adore. The secret? Immediately after removing the warm loaf from the oven, I brush it generously with melted butter, a touch of honey, and a sprinkle of flaky sea salt. This isn’t just for looks; it’s a game-changer.
- Irresistible Crust: The butter-honey glaze creates a beautiful sheen and contributes to the Maillard reaction, deepening the golden-brown hue and adding subtle sweetness. It also locks in moisture, ensuring that signature crusty exterior doesn’t become too hard.
- Flavor Elevation: The flaky sea salt provides a delightful contrast, balancing the slight sweetness of the honey and buttermilk, and highlighting the rich, savory notes of the bread. It truly takes the flavor profile to the next level.
- Quick & Easy: This is a true quick bread, meaning no yeast is involved! Forget lengthy proofing times; this yeast-free bread is perfect for busy schedules, delivering that homemade bread experience without the wait.
- Authentic Comfort: My recipe delivers the traditional, comforting flavors of classic Irish cuisine. You’ll get that wonderful dense texture, a wonderfully soft interior, and that coveted crusty exterior that makes Irish Soda Bread so beloved.
- Versatile & Family-Friendly: Whether it’s for a holiday like St. Patrick’s Day, alongside a hearty stew, or simply toasted for breakfast, this bread is incredibly versatile and always a family favorite.
Ingredients Needed

Gathering your ingredients is the first step to baking this delightful loaf. Here’s exactly what you’ll need, perfectly measured for success:
- 1 and 3/4 cups (420ml) buttermilk*
- 1 large egg (optional, see note)
- 4 and 1/4 cups (531g) all-purpose flour (spooned & leveled), plus more for your hands and counter
- 3 Tablespoons (38g) granulated sugar
- 1 teaspoon baking soda
- 1 teaspoon salt
- 5 Tablespoons (71g) unsalted butter, cold and cubed*
- optional: 1 cup (150g) raisins
Ingredient Notes & Substitutions
Understanding your ingredients is key to great baking. Here are a few notes and potential substitutions for your Irish Soda Bread:
- Buttermilk: This is truly the star! Buttermilk is the essential acidic ingredient that reacts with the baking soda, creating the gas that helps your bread rise without yeast. If you don’t have buttermilk on hand, don’t worry. You can easily make your own by adding 1 tablespoon of lemon juice or white vinegar to a liquid measuring cup, then filling the rest with milk to reach 1 and 3/4 cups. Let it sit for 5-10 minutes until it slightly curdles.
- Flour: I always recommend using all-purpose flour, and it’s critical to measure it correctly using the spooned & leveled technique to prevent a dry, dense loaf. For a slightly denser crumb, you could experiment with bread flour, or for a heartier, nuttier flavor, a portion of whole wheat flour can be substituted, though it might change the texture.
- Butter: Always use unsalted butter, and make sure it’s cold and cubed. Just like in biscuits or scones, very cold butter is crucial for creating a wonderfully flaky texture in the final bread as it melts and releases steam during baking.
- Egg (Optional): Including a large egg in your dough will result in a slightly richer flavor and a softer crumb. If you prefer a more traditional, slightly denser loaf, or want to keep it simpler, feel free to omit it.
- Raisins/Add-ins: Raisins are a traditional and delicious addition, but completely optional. If you’re using them, a pro tip is to soak your raisins in hot water for about 10 minutes, then drain thoroughly before adding to the dough. This prevents them from burning during baking and keeps them plump. Feel free to explore other dried cranberries, orange zest, or even savory options like grated cheese and sun-dried tomatoes.
- Dietary Adjustments: While this recipe is not designed to be vegan or gluten-free, it’s possible to explore alternatives. For a vegan version, use plant-based buttermilk and a flax egg. For gluten-free, a good quality gluten-free all-purpose flour blend can be used, though the texture will be noticeably different.

How to Make Irish Soda Bread
Baking this Irish Soda Bread is a straightforward and rewarding process. Follow these steps for a perfect loaf every time!
Prepare Your Baking Environment
First, preheat oven to 400°F (204°C). For the pan, you have a few excellent options. You can use a regular baking sheet lined with parchment paper or a silicone baking mat – just know the bread might spread a bit more. I often reach for my seasoned 10-12 inch cast iron skillet, which gives the bread a wonderfully crisp bottom crust (no need to preheat the skillet itself unless you prefer). Alternatively, a greased 9-10 inch cake pan or pie dish works beautifully. A 5-quart or larger Dutch oven is also a great choice; grease or line it with parchment paper, and remember to bake the bread with the lid off.
Mix the Dough
In a separate mixing bowl, whisk the buttermilk and optional large egg together, then set it aside. In a large bowl, combine the all-purpose flour, granulated sugar, baking soda, and salt. Now for the butter: cut in butter using a pastry cutter, a fork, or your fingertips. The mixture will be quite flour-heavy, but work the cold butter until it resembles pea-sized crumbs. Stir in the optional raisins. Pour the buttermilk/egg mixture into the dry ingredients. Using a sturdy spoon, gently fold the dough together until it becomes too stiff to stir. This gentle mixing prevents over-working the dough, which can lead to a tough bread.
Shape and Score
Turn the crumbly dough out onto a lightly floured work surface. With floured hands, carefully work the dough into a ball. Knead dough for about 30 seconds, just until all the flour is moistened and the dough comes together. If the dough is too sticky, add a little more flour, a tablespoon at a time, until it’s manageable but still slightly shaggy.
Transfer the shaped dough ball to your prepared skillet or pan. Now, grab a very sharp knife or a bread lame and score the dough with a deep slash or an X, about 1/2 inch deep. This isn’t just for aesthetics; scoring helps the center bake evenly and allows the bread to expand beautifully in the oven.
Bake to Golden Perfection
Place your bread in the preheated oven. Bake time will be approximately 45-55 minutes, or until the loaf is a beautiful golden brown and the center appears cooked through. If you notice the top browning too quickly, loosely tent the bread with aluminum foil. For the most accurate test of doneness, I highly recommend using an instant-read thermometer; the bread is perfectly done when the internal temperature reads 195°F (90°C).
Apply the Honey-Butter Glaze (The Twist!)
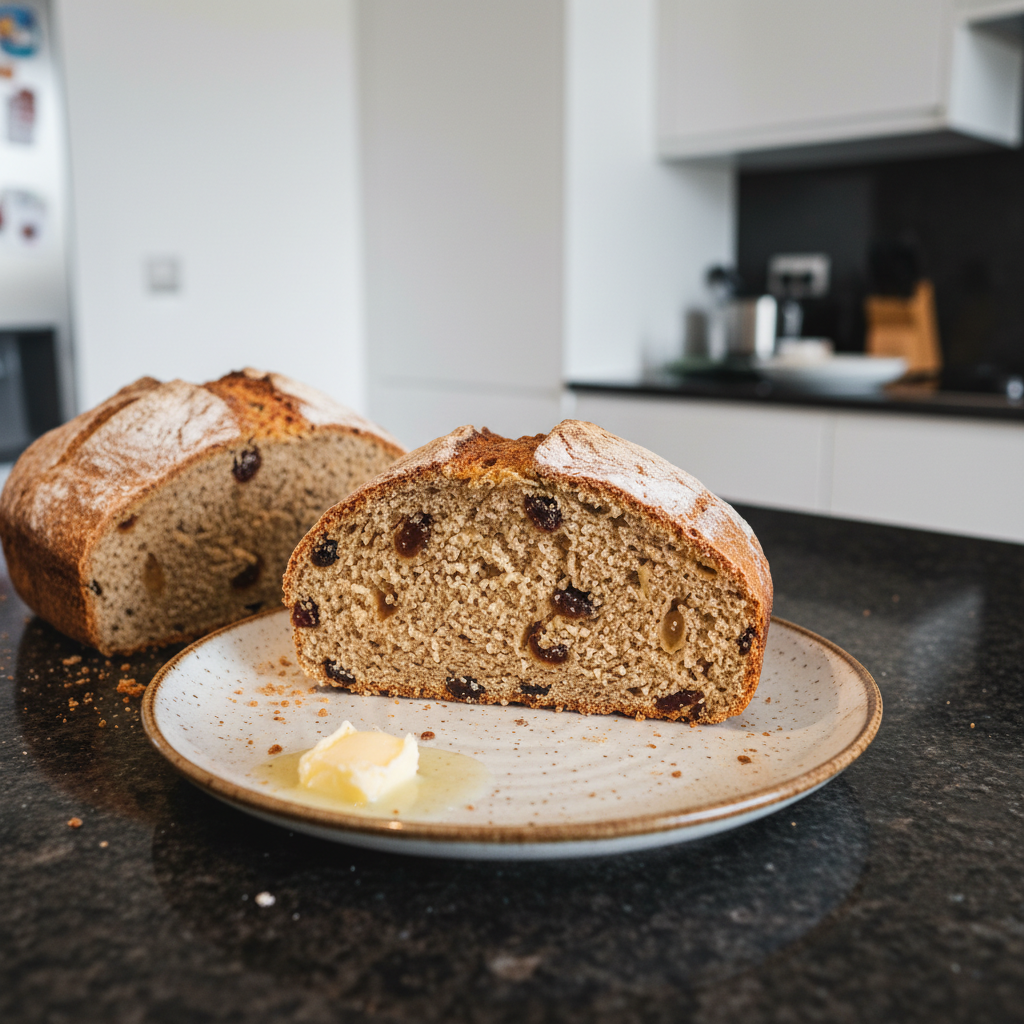
As soon as you remove the hot bread from the oven, this is where our special twist comes in! While the loaf is still piping hot, generously brush the entire top with melted butter that you’ve mixed with a touch of honey and a sprinkle of flaky sea salt. The heat from the bread will help it absorb this delicious glaze. Let the bread cool in the pan for 10 minutes, then transfer it to a cooling rack to cool completely. Serve warm, at room temperature, or even toasted with your favorite toppings!
Storage
After cooling, cover and store any leftover bread at room temperature for up to 2 days, or in the refrigerator for up to 1 week. I find wrapping it tightly in aluminum foil works best for maintaining freshness.
The Story of Irish Soda Bread & Its Simple Science
Beyond being a delicious treat, Irish Soda Bread holds a rich history and a fascinating scientific secret to its rise.
A Brief History of This Irish Staple
Irish Soda Bread is more than just a recipe; it’s a symbol of Irish resilience and ingenuity. Its origins are deeply rooted in necessity, dating back to the mid-19th century when baking soda (bicarbonate of soda) was introduced to Ireland. Traditional yeast breads required specific strains of yeast, consistent temperatures, and often, more expensive ingredients that weren’t readily available to many Irish households. Instead, soda bread became a household staple because it could be made quickly with just four basic ingredients: flour, salt, baking soda, and soured milk (buttermilk). It was a lifesaver for families, providing a hearty, filling loaf that could be baked in a pot over an open fire or in a simple oven. This simplicity and accessibility cemented its place in Irish cuisine as the ultimate quick bread and a beloved tradition.
The Magic Behind the Rise: Buttermilk & Baking Soda
The science behind Irish Soda Bread is surprisingly simple yet incredibly effective. Since it’s a yeast-free bread, it doesn’t rely on traditional fermentation for its rise. Instead, it uses a chemical reaction between two key players: baking soda and buttermilk. Baking soda acts as the leavening agent, but it needs an acid to activate it. That’s where buttermilk comes in – it’s the perfect acidic ingredient! When these two combine in the dough, they produce carbon dioxide bubbles. These bubbles get trapped in the dough, causing it to expand and rise during baking. This rapid reaction is what gives soda bread its characteristic light yet dense texture and that signature soft interior, all without any need for gluten development or long proofing times.
Pro Tips & Troubleshooting for Perfect Irish Soda Bread
Even though this is an easy recipe, a few expert tips can elevate your Irish Soda Bread, and knowing how to troubleshoot common issues ensures success every time!
Pro Tips for Success
- Cold Butter is Key: Always use very cold or even frozen cubed butter. This helps achieve that desirable flaky texture as the cold butter melts slowly, creating pockets of steam.
- Accurate Flour Measurement: Avoid a dry loaf by always using the spooned & leveled technique for your all-purpose flour. Scooping directly can pack in too much flour.
- Score Deeply for Even Baking: Don’t be shy when you score the dough! A cut about 1/2 inch deep is necessary to help the center bake evenly and prevent cracks.
- Trust Your Thermometer: For foolproof doneness, use an instant-read thermometer. The bread is perfectly baked when the internal temperature reaches 195°F (90°C).
- Don’t Forget the Twist: Apply the butter-honey-salt glaze immediately after the bread comes out of the oven. This allows it to absorb into the warm crust for the best flavor and sheen.
- Prevent Burnt Add-ins: If you’re adding raisins or other dried fruits, soak them in hot water for 10 minutes, then drain thoroughly before mixing into the dough. This keeps them plump and prevents them from burning during baking.
Common Mistakes to Avoid
- Over-Working the Dough: This is a cardinal sin for soda bread! Over-working the dough can develop too much gluten, resulting in a tough, chewy bread. Aim for a slightly shaggy texture and knead only for about 30 seconds, just until combined.
- Dry or Dense Bread: The most common culprits are over-measuring flour or under-measuring liquid. Ensure your flour is spooned & leveled and your buttermilk is accurately measured. Baking at too high a temperature or for too long can also lead to a hard crust or dry interior.
- Sticky Dough Dilemma: If your dough is too sticky to handle, gradually add more flour to your work surface or directly into the dough, one tablespoon at a time, until you reach a workable dough consistency. Don’t add too much, or the bread will be dry.
- Hard Crust or Dry Interior: This often happens if the oven is too hot or the bread bakes for too long. Stick to the recommended oven temperature and baking time, and use that thermometer for accuracy. If the top is browning too much, tent it with foil.
- High-Altitude Adjustments: For high-altitude baking, you might need to make minor adjustments. Leavening agents can react more quickly, so you might slightly decrease the baking soda by 1/4 teaspoon. A slight increase in liquid (1-2 tablespoons) can also help prevent dryness.
Serving & Storage
Once your incredible Irish Soda Bread is baked and glazed, it’s time to enjoy it! And knowing how to store it properly ensures you can savor every bite.
Serving Ideas
My favorite way to enjoy this bread is simple: served warm with a generous spread of butter, maybe some extra honey butter, or a dollop of your favorite jam. The sweet and savory notes from the glaze make it perfect on its own too!
- Pair it with hearty stews or soups for a truly comforting and complete meal, especially on a chilly evening.
- It’s fantastic toasted for breakfast or a snack, perhaps with a slice of cheese.
- For St. Patrick’s Day, it’s a must-have alongside corned beef and cabbage, or simply with a cup of tea or coffee.
- The unique glaze, with its subtle sweetness and flaky sea salt, makes every bite a delightful sensory experience, perfectly complementing both sweet and savory toppings.
Storage and Make-Ahead
Proper storage is key to keeping your Irish Soda Bread fresh and delicious.
- Room Temperature & Refrigerator: Once fully cooled, cover and store leftover bread at room temperature for up to 2 days. For longer storage, up to 1 week, keep it in the refrigerator. Always wrap it tightly in aluminum foil or plastic wrap to prevent it from drying out and to maintain its crusty exterior and soft interior.
- Freezing: Yes, you can freeze Irish Soda Bread! You can freeze a whole loaf or slices. Wrap it very tightly in plastic wrap, then an additional layer of aluminum foil, to prevent freezer burn. It will keep well for up to 3 months.
- Thawing & Reheating: To thaw a frozen loaf, simply leave it wrapped at room temperature for several hours or overnight. To restore its deliciousness and that lovely crusty exterior, you can reheat thawed bread in a preheated oven at 350°F (175°C) for 10-15 minutes, or toast individual slices.
Conclusion
And there you have it—my absolute favorite Irish Soda Bread recipe, elevated with that irresistible honey-butter-sea salt glaze. It’s a recipe that truly delivers on its promise: easy to make, quick from start to finish, and profoundly delicious. The unique twist ensures a perfectly tender soft interior and a beautifully glazed crusty exterior that stands out.
Whether you’re a seasoned baker or just starting your journey, this yeast-free bread is a guaranteed success. With all my expert tips and clear instructions, you’ll be baking a traditional loaf that tastes like it came straight from an Irish kitchen. Don’t hesitate to experiment with variations like dried cranberries or savory herbs, and enjoy it with anything from honey butter to hearty soups. I can’t wait for you to try this; happy baking!
FAQ
What makes Irish Soda Bread different from other breads?
Irish Soda Bread is a unique quick bread because it relies on the chemical reaction between baking soda and buttermilk as its leavening agent, rather than yeast. This creates a distinctive dense texture, a wonderfully soft interior, and a signature crusty exterior with a subtle tangy flavor, all without any proofing time.
Why is my Irish Soda Bread dry or too dense?
A dry or dense loaf is typically due to a few common mistakes: over-working the dough, over-measuring flour (make sure to use the spooned & leveled technique), or baking at too high a temperature or for too long. Follow the exact measurements and avoid excessive kneading.
How can I adjust the recipe for different add-ins or savory versions?
This recipe is wonderfully versatile! You can easily swap raisins for other dried fruits like dried cranberries, or add flavors like chopped pecans, cinnamon, or orange zest. For savory versions, try mixing in grated cheese, chopped black olives, sun-dried tomatoes, or fresh herbs like rosemary and thyme.
Can I bake Irish Soda Bread as smaller rolls, and what are the adjustments?
Absolutely! Dividing the dough into smaller loaves or buns is a great idea. Just be aware that smaller portions will require significantly shorter baking times. Keep a close eye on them, and use an instant-read thermometer to check for a internal temperature of 195°F (90°C) for perfect doneness.
What’s the best way to store and reheat leftover Irish Soda Bread?
For best results, store cooled Irish Soda Bread wrapped tightly in aluminum foil or plastic wrap at room temperature for up to 2 days, or in the refrigerator for up to 1 week. To reheat, you can warm slices in a toaster or place the whole loaf in a 350°F (175°C) oven for about 10-15 minutes to refresh its crusty exterior and soft interior.
What should I do if my dough is too sticky or too dry?
If your dough is too sticky, gradually add more flour, a tablespoon at a time, to your work surface or to the dough itself until it reaches a manageable dough consistency. If it’s too dry and crumbly, add a splash more buttermilk, a teaspoon at a time, until the dough just comes together.
Does Irish Soda Bread contain yeast?
No, Irish Soda Bread is a traditional yeast-free bread. Its rise comes from the chemical reaction between baking soda and an acidic ingredient like buttermilk, which produces carbon dioxide bubbles that expand during baking.
Are there high-altitude adjustments for Irish Soda Bread?
Yes, for high-altitude baking, you may need to make minor adjustments. Consider slightly reducing the baking soda by about 1/4 teaspoon and potentially increasing the liquid by 1-2 tablespoons to prevent the bread from becoming too dry. These small changes can help maintain the perfect dough consistency and texture.
Best Irish Soda Bread Recipe with Honey-Butter Glaze (Easy & No Yeast!)
Ingredients
Equipment
Method
- First, preheat your oven to 400°F (204°C).
- Prepare your baking pan: use a regular baking sheet lined with parchment paper or a silicone baking mat. Alternatively, a greased 9-10 inch cake pan, pie dish, or a 5-quart or larger greased/lined Dutch oven (baked with the lid off) all work well.
- In a separate mixing bowl, whisk together the buttermilk and the optional large egg, then set aside.
- In a large bowl, combine the all-purpose flour, granulated sugar, baking soda, and salt.
- Add the cold, cubed butter to the dry ingredients. Using a pastry cutter, fork, or your fingertips, cut in the butter until the mixture resembles pea-sized crumbs.
- Stir in the optional raisins, if using.
- Pour the buttermilk/egg mixture into the dry ingredients. Gently fold the dough together with a sturdy spoon until it becomes too stiff to stir, being careful not to over-work it.
- Turn the crumbly dough out onto a lightly floured work surface. With floured hands, carefully work the dough into a ball. Knead the dough for about 30 seconds, just until all the flour is moistened and the dough comes together. If the dough is too sticky, add a tablespoon of flour at a time until it's manageable but still slightly shaggy.
- Transfer the shaped dough ball to your prepared skillet or pan.
- Using a very sharp knife or a bread lame, score the dough with a deep slash or an X, about 1/2 inch deep. This helps the center bake evenly and allows the bread to expand beautifully.
- Place your bread in the preheated oven. Bake for approximately 45-55 minutes, or until the loaf is golden brown and the center appears cooked through. If the top browns too quickly, loosely tent with aluminum foil. For perfect doneness, the internal temperature should read 195°F (90°C) with an instant-read thermometer.
- As soon as you remove the hot bread from the oven, generously brush the entire top with the melted butter mixed with honey and flaky sea salt. The heat from the bread will help absorb this delicious glaze.
- Let the bread cool in the pan for 10 minutes, then transfer it to a cooling rack to cool completely. Serve warm, at room temperature, or toasted with your favorite toppings!