 Skip to content
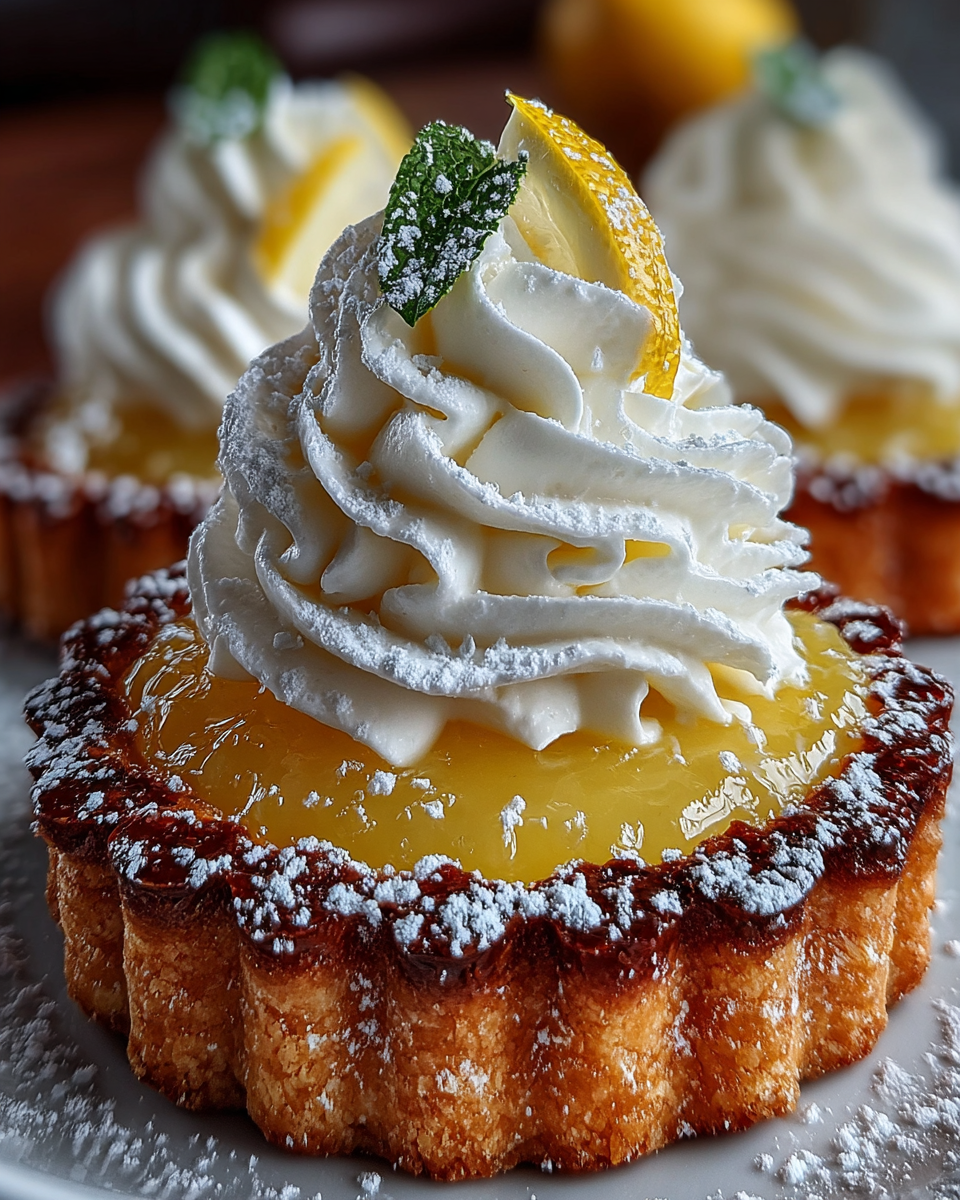
 Welcome to your new favorite dessert! These classic mini lemon tarts are a delightful balance of vibrant citrus flavor and sweet indulgence. Featuring a delicate shortbread crust and a bright, creamy lemon curd, they bring elegant appeal to any gathering. Get ready to impress your friends and family with these easy-to-make, utterly irresistible lemon treats.
Why You’ll Love These Mini Lemon Tarts
You are going to adore these delightful mini lemon tarts for so many reasons.
- They offer a perfect balance of tangy and sweet flavors in every bite.
- Each tart features a delicate, crumbly shortbread crust that melts in your mouth.
- The bright, refreshing lemon curd filling is smooth and full of zesty goodness.
- They look incredibly impressive yet are surprisingly simple to assemble.
- These bite-sized treats are ideal for entertaining or just a delightful treat for yourself.
Ingredients
For the Shortbread Tartlet Shells
- 3/4 cup unsalted butter, at room temperature
- 1/2 cup granulated sugar
- 1/2 teaspoon pure vanilla extract
- 1 3/4 cups all-purpose flour
- Pinch of salt
For the Lemon Curd
- 2 teaspoons finely grated lemon zest (use a microplane to zest the lemons)
- 3/4 cup granulated sugar
- 1/4 cup fresh lemon juice
- 2 large eggs
- 4 tablespoons cold unsalted butter, cut into small pieces
- 1/8 teaspoon kosher salt
For Serving
- 1 cup heavy whipping cream
- 1/4 cup powdered sugar
Notes & Substitutions
Always use fresh lemon zest and juice for the brightest, most authentic flavor in your mini lemon tarts. Bottled juice simply won’t compare. You can adjust the amount of sugar in the lemon curd to match your preferred level of tartness; start with less if you like it super zesty. For the crust, unsalted butter is best to control salt levels, but if using salted butter, omit the added pinch of salt. Feel free to experiment with a good quality gluten-free all-purpose flour blend for a gluten-friendly version of the tart shells.
Equipment
You will need an electric stand mixer or hand mixer for the dough. A food processor simplifies the lemon curd preparation. A 24-well mini-muffin pan is essential for shaping these charming little desserts. Grab a rolling pin, a 2 1/2-inch round cutter, and a small offset spatula. For the curd, a saucepan, rubber spatula, and whisk are necessary. Don’t forget baking spray, mini cupcake liners or parchment paper, and pie weights (like rice or beans) for blind baking.
Instructions
Let’s walk through creating these perfect mini lemon tarts step by step. This recipe is designed to be easy and enjoyable!
For the Tartlet Shells
- Prepare Dough: In your stand mixer with the paddle attachment (or using a hand mixer), cream together the room temperature butter, granulated sugar, and vanilla extract until just combined and smooth. Gradually add the all-purpose flour and a pinch of salt. Mix on low speed until the dough just comes together, forming a soft ball. Avoid overmixing.
- Chill Dough: Form the dough into a flat disk, wrap it tightly in plastic wrap, and refrigerate for at least 30 minutes, or until it feels firm to the touch. Chilled dough is much easier to handle.
- Preheat Oven & Pan: While the dough chills, preheat your oven to 375°F (190°C). Generously spray your 24-well mini-muffin pan with baking spray to prevent sticking. This ensures your mini lemon tarts shells release easily.
- Roll and Cut: On a lightly floured surface, roll the chilled dough to an even 1/8-inch thickness. Use your 2 1/2-inch round cutter to cut out as many circles as possible. Gather and re-roll scraps gently if needed.
- Blind Bake: Carefully press each dough round into the prepared mini-muffin wells. Line each raw shell with a mini cupcake liner or a small piece of parchment paper, then fill with pie weights (or dried beans/rice). Bake for 10 minutes.
- Final Bake & Cool: Remove the pan from the oven. Carefully lift out the liners and pie weights. Return the pan to the oven and continue baking for another 5-8 minutes, or until the edges are lightly golden brown. Let the tart shells cool completely in the pan on a wire rack before carefully removing them.
Understanding the technique behind blind baking ensures a crisp, perfectly shaped crust for your tarts. For more details on the importance of blind baking pastry shells, consult expert baking resources.
For the Lemon Curd
- Combine Ingredients: In a food processor, combine the finely grated lemon zest and 3/4 cup granulated sugar. Process until the zest is very fine and fragrant, about 30 seconds. Add the fresh lemon juice, large eggs, cold unsalted butter pieces, and kosher salt. Process until the mixture is completely smooth and well blended, about 1 minute.
- Cook Curd: Pour the lemon mixture from the food processor into a medium saucepan. Cook over medium-low heat, stirring constantly with a rubber spatula or whisk. Continue cooking until the curd thickens significantly, coats the back of your spatula, and reaches 175°F (79°C) on an instant-read thermometer. This usually takes 8-12 minutes. Do not boil.
Mastering the cooking temperature for lemon curd is essential to achieve a smooth, rich consistency and prevent unwanted curdling. Learn more about the optimal temperature for lemon curd to ensure perfect results every time.
- Cool & Chill: Immediately remove the saucepan from the heat. Pour the hot curd into a clean bowl. Stir it occasionally as it cools to room temperature to prevent a skin from forming. Once cooled, cover the bowl with plastic wrap, pressing the wrap directly onto the surface of the curd. Refrigerate for at least 2 hours, or until completely firm and cold.
For Serving
- Whip Cream: In a chilled bowl, combine the heavy whipping cream and powdered sugar. Whip with an electric mixer until soft peaks form. Be careful not to over-whip.
- Assemble Tartlets: Spoon or pipe the chilled lemon curd into each cooled tartlet shell. Top each of your delicious mini lemon tarts with a dollop of whipped cream just before serving.
Pro Tips for Perfect Mini Lemon Tarts
Achieving bakery-quality mini lemon tarts is simple with these helpful tips.
- Dough Consistency: Always ensure your shortbread dough is properly chilled. This makes it easier to roll and cut, preventing sticky messes and ensuring a crisp, stable shell.
- Even Shell Thickness: Roll your dough uniformly to an even 1/8-inch thickness. This prevents some shells from baking too quickly or unevenly, ensuring perfect texture.
- Blind Baking is Key: Do not skip blind baking with pie weights. This crucial step prevents the tartlet shells from puffing up or shrinking during their initial bake, resulting in beautifully formed bases.
- Lemon Curd Safety: Cook your lemon curd slowly over consistent medium-low heat. Constant stirring prevents the eggs from scrambling and ensures a silky-smooth consistency.
- Temperature Matters: Use an instant-read thermometer to accurately gauge the curd’s temperature. Reaching 175°F (79°C) guarantees the perfect thickness and prevents it from being runny.
- Smooth Curd: For an extra-velvety lemon curd, consider straining it through a fine-mesh sieve after cooking to remove any tiny bits of zest or potential egg particles.
Serving, Storage, and Variations
These mini lemon tarts are wonderful served simply, but a few garnishes can elevate them further.
- Serving Suggestions: Garnish your finished tarts with fresh raspberries, blueberries, or a tiny curl of lemon zest. A delicate sprig of fresh mint also adds a beautiful touch and aroma.
- Storage: Store assembled mini lemon tartlets in an airtight container in the refrigerator. They will remain fresh and delicious for 2-3 days.
- Make-Ahead: You can prepare the lemon curd up to 1 week in advance and store it tightly covered in the refrigerator. Baked tartlet shells can also be made a few days ahead and kept in an airtight container at room temperature. Assemble them just before serving.
- Citrus Variations: Feel free to get creative with the curd! Experiment with lime, orange, or even grapefruit zest and juice for different delightful citrus curd flavors in your small tarts.
Nutrition Information
Here’s an estimated nutritional breakdown for one of your delightful mini lemon tarts.
Serving size: 1 tartlet (Makes about 24)
Calories: 195
Total Fat: 13g
Saturated Fat: 8g
Cholesterol: 55mg
Sodium: 25mg
Total Carbohydrates: 18g
Dietary Fiber: 0g
Total Sugars: 12g
Protein: 2g
*Please note: Nutritional values are estimates and may vary based on specific ingredients and preparation methods.*
Frequently Asked Questions (FAQ)
Can I use store-bought mini tart shells for these mini lemon tarts?
Yes, you certainly can for convenience! While homemade crust offers a superior delicate texture, good quality store-bought shells will work if you are short on time.
Can mini lemon tarts be frozen?
You can freeze the baked tart shells and the lemon curd separately. Once thawed, fill the shells with thawed curd and assemble as usual. Assembled tarts can be frozen too, but the crust might soften slightly.
How do I prevent my tart shells from getting soggy after filling?
Ensure your tart shells are completely cooled before filling them with lemon curd. For best results, fill your mini lemon tarts just a few hours before serving, especially if topping with whipped cream.
What type of lemons are best for this recipe?
Always choose fresh, bright yellow lemons that feel heavy for their size. Look for smooth, unblemished skins, as these indicate juicier lemons with plenty of flavorful zest.
Why did my lemon curd curdle?
Lemon curd often curdles if it’s cooked over too high heat or if the eggs are added too quickly without tempering. Cook it slowly and stir constantly to prevent this.
Conclusion
There you have it – the ultimate guide to creating perfect mini lemon tarts right in your own kitchen! These little gems offer an unbeatable combination of tangy, sweet, and buttery goodness. They are truly a crowd-pleasing dessert, elegant enough for special occasions yet simple enough for an everyday treat. Don’t wait; gather your ingredients and start baking these irresistible lemon creations today. You’ll love every zesty bite!
Mini Lemon Tarts: Tangy, Sweet, and Bite-Sized Perfection
Ingredients
Equipment
Method
- In your stand mixer with the paddle attachment (or using a hand mixer), cream together the room temperature butter, granulated sugar, and vanilla extract until just combined and smooth. Gradually add the all-purpose flour and a pinch of salt. Mix on low speed until the dough just comes together, forming a soft ball. Avoid overmixing.
- Form the dough into a flat disk, wrap it tightly in plastic wrap, and refrigerate for at least 30 minutes, or until it feels firm to the touch. Chilled dough is much easier to handle.
- While the dough chills, preheat your oven to 375°F (190°C). Generously spray your 24-well mini-muffin pan with baking spray to prevent sticking. This ensures your mini lemon tarts shells release easily.
- On a lightly floured surface, roll the chilled dough to an even 1/8-inch thickness. Use your 2 1/2-inch round cutter to cut out as many circles as possible. Gather and re-roll scraps gently if needed.
- Carefully press each dough round into the prepared mini-muffin wells. Line each raw shell with a mini cupcake liner or a small piece of parchment paper, then fill with pie weights (or dried beans/rice). Bake for 10 minutes.
- Remove the pan from the oven. Carefully lift out the liners and pie weights. Return the pan to the oven and continue baking for another 5-8 minutes, or until the edges are lightly golden brown. Let the tart shells cool completely in the pan on a wire rack before carefully removing them.
- In a food processor, combine the finely grated lemon zest and 3/4 cup granulated sugar. Process until the zest is very fine and fragrant, about 30 seconds. Add the fresh lemon juice, large eggs, cold unsalted butter pieces, and kosher salt. Process until the mixture is completely smooth and well blended, about 1 minute.
- Pour the lemon mixture from the food processor into a medium saucepan. Cook over medium-low heat, stirring constantly with a rubber spatula or whisk. Continue cooking until the curd thickens significantly, coats the back of your spatula, and reaches 175°F (79°C) on an instant-read thermometer. This usually takes 8-12 minutes. Do not boil.
- Immediately remove the saucepan from the heat. Pour the hot curd into a clean bowl. Stir it occasionally as it cools to room temperature to prevent a skin from forming. Once cooled, cover the bowl with plastic wrap, pressing the wrap directly onto the surface of the curd. Refrigerate for at least 2 hours, or until completely firm and cold.
- In a chilled bowl, combine the heavy whipping cream and powdered sugar. Whip with an electric mixer until soft peaks form. Be careful not to over-whip.
- Spoon or pipe the chilled lemon curd into each cooled tartlet shell. Top each of your delicious mini lemon tarts with a dollop of whipped cream just before serving.


