Skip to content
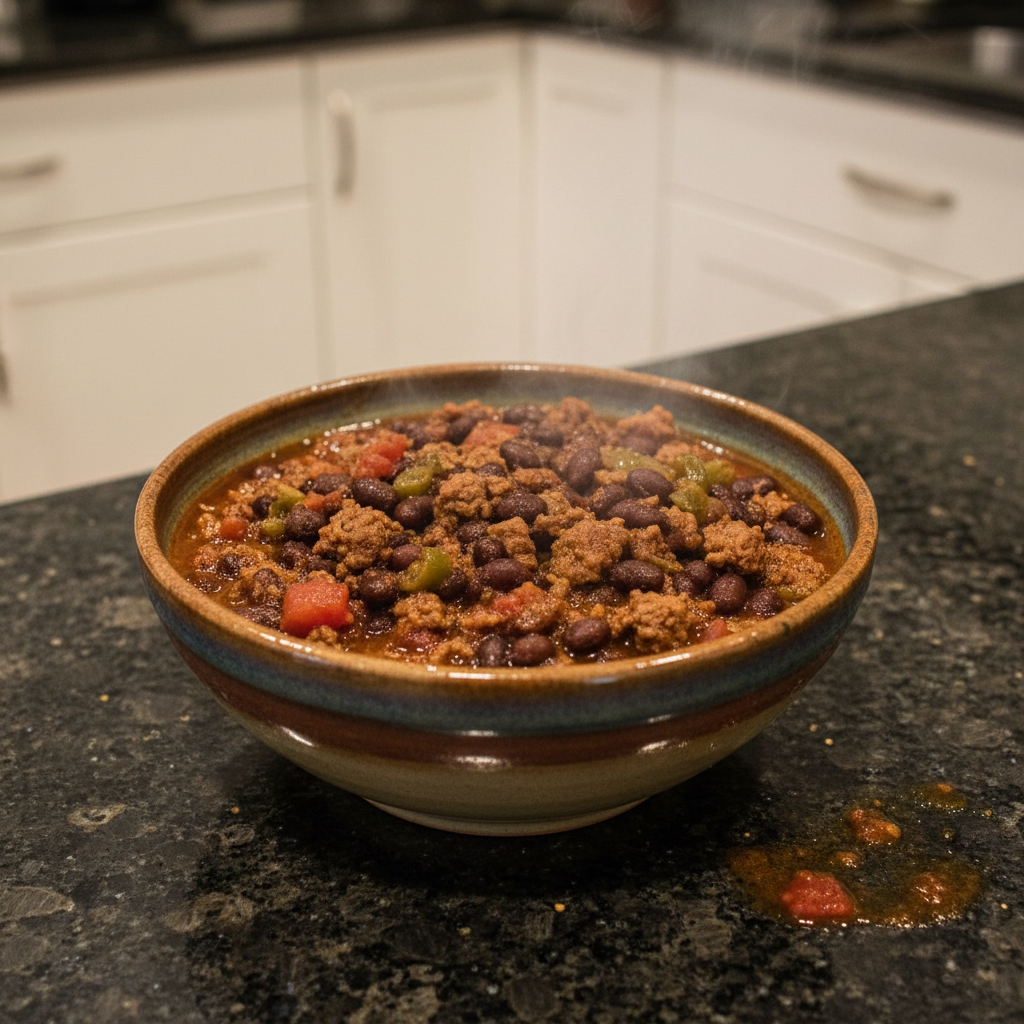
 There’s nothing quite like a warm bowl of chili to bring comfort to a busy weeknight or satisfy a hungry family. In my kitchen, a truly great chili is hearty, flavorful, and, ideally, comes together with minimal fuss. That’s exactly what you’ll find with my favorite One-Pot Black Bean Chili. This recipe isn’t just easy; it boasts an incredible depth of flavor thanks to a secret spice-blooming technique that elevates it beyond your average pot of chili. Get ready to create a remarkably delicious and satisfying meal that will quickly become a household favorite!
Why You’ll Love This Recipe
I genuinely believe this One-Pot Black Bean Chili stands out, and it’s all thanks to a simple yet powerful technique.
The Flavor Secret: Blooming Your Spices
My unique twist for this chili is to **bloom the chili powder, ground cumin, smoked paprika, and dried oregano in the olive oil and cooked aromatics (onion, garlic) for 1 minute before adding the ground beef.** Why do I do this? It’s all about maximizing flavor. Toasting these dried spices in fat helps extract and intensify their fat-soluble compounds. This direct heat and interaction with the oil dramatically enhances their aroma and depth, creating a richer, more complex flavor profile that truly coats your palate. It’s this small step that makes all the difference, making this chili unforgettable.
More Reasons to Love This One-Pot Wonder
- One-Pot Convenience: This is a true one-pot chili, which means minimal cleanup and a straightforward process. It’s perfect for those busy weeknights when you want a delicious, satisfying meal without a sink full of dishes.
- Hearty & Budget-Friendly: With robust black beans and savory ground beef, this chili is incredibly filling and economical. It’s a fantastic way to feed a crowd or stretch your grocery budget without sacrificing flavor.
- Meal Prep & Leftover Friendly: I always make a big batch of this chili because it stores and freezes beautifully. The flavors actually meld and improve the next day, making it an excellent choice for meal prep. It’s ideal for easy lunches or dinners all week long, and freezing chili means a homemade meal is always within reach.
Ingredients Needed

Here’s everything you’ll need to make this delicious One-Pot Black Bean Chili. I’ve listed them exactly as I use them in my kitchen:
- 1 Tbsp olive oil ($0.22)
- 1 yellow onion ($0.70)
- 4 cloves garlic ($0.16)
- 1/2 lb. ground beef ($2.49)
- 3 15oz. cans black beans, drained ($2.82)
- 1 10oz. can diced tomatoes with green chiles* ($1.06)
- 1 6oz. can tomato paste ($0.94)
- 1 Tbsp chili powder ($0.30)
- 1 tsp ground cumin ($0.10)
- 1/2 tsp smoked paprika ($0.05)
- 1/2 tsp dried oregano ($0.05)
- ½ tsp salt ($0.04)
- 2 cups water ($0.00)
Ingredient Notes & Smart Substitutions
- Black Beans: It’s crucial to drain your black beans properly before adding them, as the liquid can affect the chili’s texture and flavor. If you don’t have black beans, kidney beans or pinto beans are excellent alternatives. Black beans are also packed with fiber and protein, making this a healthy and hearty meal!
- Ground Beef: I typically use lean ground beef. For a lighter option or dietary preference, feel free to substitute with ground turkey or ground bison.
- Diced Tomatoes with Green Chiles: In the US, this often refers to Rotel tomatoes, which add a lovely subtle kick. If you prefer a milder chili or don’t like spice, plain diced tomatoes will work just as well.
- Spices: Each spice plays a vital role in our flavor development. The chili powder provides the classic chili base, ground cumin adds warmth and earthiness, smoked paprika contributes a deep, smoky note, and dried oregano brings a hint of herbaceousness. The blooming technique ensures these flavors are at their absolute best.
- Dietary Adaptations: This recipe is naturally gluten-free. To make it dairy-free, simply omit any dairy toppings like sour cream or cheese.

How to Make One-Pot Black Bean Chili
Making this One-Pot Black Bean Chili is straightforward, but paying attention to a few key steps will ensure the best flavor. Follow my lead for a fantastic result!
1. Prep & Sauté Aromatics
First, dice your yellow onion and mince the garlic. Add the olive oil to a large pot or Dutch oven over medium-low heat. Add the diced onion and minced garlic and cook, stirring occasionally, until they’re softened and fragrant, about 2-3 minutes. Don’t rush this step; cooking them thoroughly builds a strong flavor foundation for your chili.
2. Brown the Beef
Next, add the ground beef to the pot. Sauté the ground beef, breaking it up with a spoon, until it’s cooked through, which usually takes about 5-7 minutes. If you notice a lot of excess fat, you can carefully drain it off at this point, though I often leave a little for extra richness.
3. Bloom the Spices (The Unique Twist!)
This is where the magic happens! With the beef and aromatics still in the pot, sprinkle in the chili powder, ground cumin, smoked paprika, and dried oregano. Stir constantly for just 1 minute. You’ll immediately notice an intense, fragrant aroma released as the spices toast in the hot oil. This blooming process is key to unlocking their full flavor development.
4. Combine & Simmer
Now, add the drained black beans, the entire can of diced tomatoes with green chiles (with their juices!), the tomato paste, and the water to the pot. Give everything a good stir to ensure all the ingredients are well combined.
5. Develop Flavors
Place a lid on your pot. Increase the heat to medium-high to bring the chili to a gentle simmer. Once simmering, reduce the heat to medium-low and let it cook for about 15 minutes, stirring occasionally. This simmering time is crucial for the flavor development and allows the liquid to thicken slightly, creating that perfect chili consistency.
6. Season & Serve
Finally, taste the chili and add salt as needed. The exact amount of salt will depend on the sodium content of your canned goods. I usually add about ½ tsp. Serve your delicious One-Pot Black Bean Chili immediately with your favorite toppings and enjoy!
Mastering Your Chili: Troubleshooting & Perfecting Flavor
Even the best chili makers run into questions sometimes. Here are my tips for perfecting your One-Pot Black Bean Chili every time.
Essential Equipment for One-Pot Chili
Choosing the right pot can make a big difference in one-pot meals. I always recommend using a heavy-bottomed Dutch oven or a sturdy large pot. These types of pots ensure even heating and prevent sticking or scorching, which is crucial for building deep flavors without burning. A 5-6 quart size is usually perfect for this recipe, fitting comfortably in most US kitchens.
Fixing Common Chili Woes
- Chili Too Thin: If your chili is a bit too watery, don’t worry! You can simmer it longer without the lid to allow more liquid to evaporate. Another trick is to mash a portion of the black beans against the side of the pot with a spoon; their starch acts as a natural thickening agent. For a quicker fix, you can stir in a cornstarch slurry (1 tablespoon cornstarch mixed with 1 tablespoon cold water) and simmer for another minute.
- Chili Too Thick: On the flip side, if your chili is too thick, simply add a splash more water or even some beef broth until you reach your desired consistency.
- Bland Chili: A bland chili can be disappointing, but it’s an easy fix. First, ensure you properly bloomed your spices—that’s key for flavor development! Then, taste and adjust the salt; it’s amazing how much a little more salt can brighten flavors. A squeeze of fresh lime juice at the end can also add a burst of brightness, or you can stir in a bit more chili powder or cumin for an extra boost.
Customizing Your Chili’s Spice & Smoke Level
- Making it Spicier: If you crave more heat, try adding some chopped fresh jalapeños (or pickled) during the cooking process, or as a topping. A small pinch of cayenne pepper simmered with the chili can also add a nice kick, or a dash of your favorite hot sauce at the table.
- Adding More Smoky Flavor: To deepen the smoky notes, you can increase the amount of smoked paprika. Fire-roasted diced tomatoes are another excellent way to add a layer of smoky flavor, or for an intense depth, a very small amount of liquid smoke can be used sparingly.
Pro Tips & Troubleshooting
Years of cooking have taught me a few tricks that make all the difference. Here are my top pro tips and common mistakes to avoid for your One-Pot Black Bean Chili.
Chef’s Pro Tips for the Best Chili
- Taste and Adjust Seasoning: This is my cardinal rule! Always taste your chili at the end and adjust the salt and other seasonings. The sodium content in canned goods varies, so don’t be afraid to add a little more salt to perfectly balance the flavors.
- Let Flavors Meld: Trust me on this one – leftover chili tastes even better the next day! The flavors continue to meld and deepen overnight, making it a fantastic meal prep option.
- Don’t Rush Aromatics: Take your time to thoroughly cook your onions and garlic until softened. This forms the essential flavor foundation for your chili. Undercooked aromatics mean a less developed base.
- The Power of Blooming: Remember our unique twist! Blooming the spices in hot oil is the ultimate tip for achieving that deep, complex flavor development that sets this chili apart.
- Use a Good Pot: A heavy-bottomed large pot or a Dutch oven is your best friend here. It ensures even heat distribution, prevents scorching, and guarantees consistent, delicious results every time.
Common Chili Mistakes to Avoid
- Not Draining Beans Properly: Failing to properly drain black beans can introduce too much excess liquid and affect the overall texture and taste of your chili.
- Under-Seasoning: A common pitfall! Not adding enough salt or other seasonings after tasting can leave your chili tasting flat and uninspired. Be bold and adjust until it sings!
- Rushing the Simmer: Don’t shortchange the simmer time. Allowing the chili to gently simmer for at least 15 minutes is crucial for the flavors to fully blend and for the chili to naturally thicken.
- Skipping the Spice Bloom: This is a missed opportunity for maximum spice blending and flavor depth. The blooming technique is the unique heart of this recipe, so don’t skip it!
Serving & Storage
Once your One-Pot Black Bean Chili is ready, the fun isn’t over! Here’s how I love to serve and store it.
Perfect Pairings: Serving Suggestions
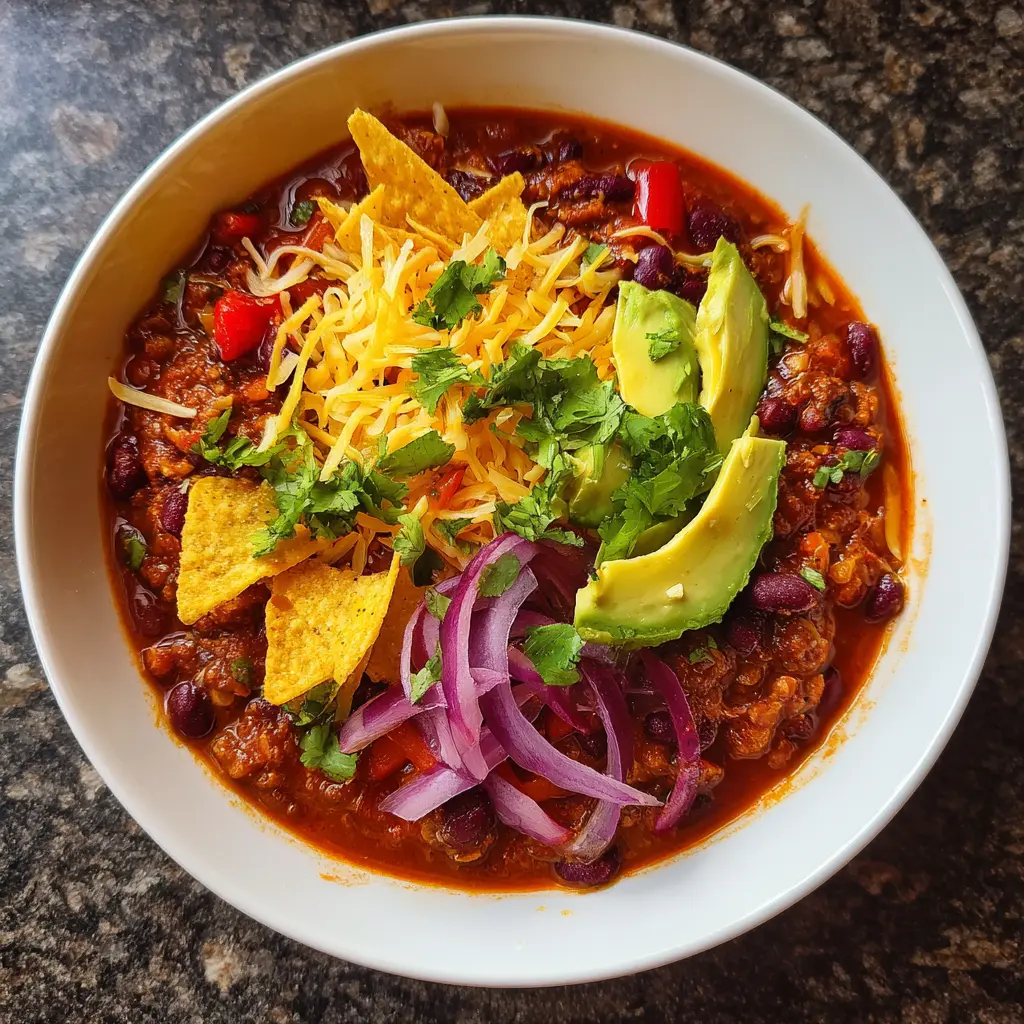
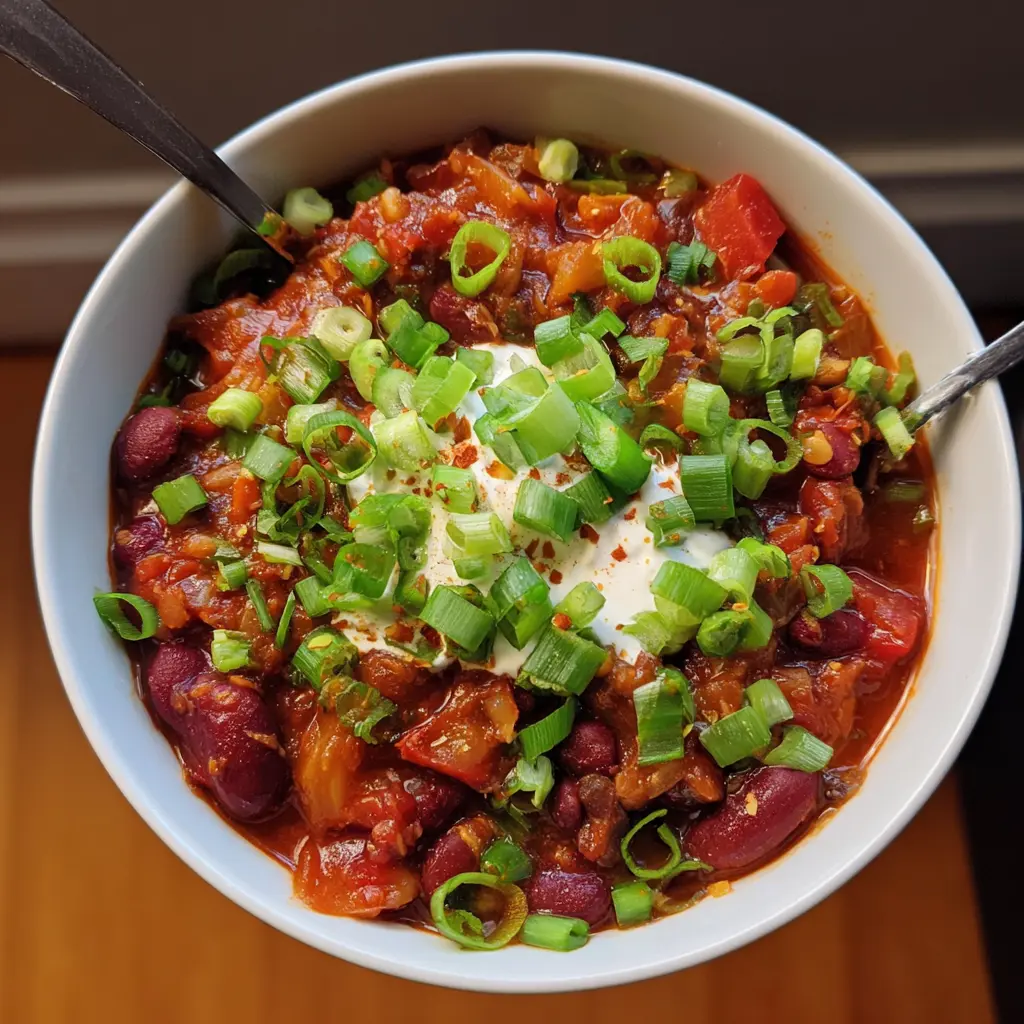
- Essential Chili Toppings: A great bowl of chili deserves great toppings! My favorites include a dollop of sour cream, a generous sprinkle of shredded cheddar cheese, sliced avocado, fresh cilantro, thinly sliced jalapeños (fresh or pickled), diced red onion, sliced green onion, and crunchy crushed tortilla chips. A squeeze of fresh lime juice or a spoonful of pico de gallo also adds a lovely freshness.
- Hearty Side Dishes: Nothing beats warm cornbread alongside chili. My go-to is often a Jalapeño Cheddar Cornbread for an extra kick!
Storing & Reheating Your Black Bean Chili
- Refrigeration: This black bean chili lasts beautifully in the fridge. Store it in an airtight container for up to 3-4 days.
- Freezing: Yes, you can absolutely freeze black bean chili! Make sure it’s completely cooled before transferring it to freezer-safe containers or bags. It will keep well for up to 3 months.
- Reheating: To reheat chili, I prefer the stovetop. Gently warm it over medium-low heat, stirring occasionally, until it’s heated through. You can also microwave individual portions, stirring halfway through.
- Meal Prep Tips: This one-pot chili is a fantastic candidate for meal prep. Cook a big batch on Sunday, and you’ll have easy, delicious meals ready for the week!
Conclusion
I hope you’re as excited as I am about this One-Pot Black Bean Chili recipe! It’s truly a testament to how simple techniques can unlock extraordinary flavor development. The ease and convenience of cooking everything in one pot, combined with the rich, comforting taste, make it a true winner in my kitchen. Remember that crucial step of blooming the spices—it’s what makes this recipe a standout!
Whether you’re a seasoned chef or just starting your culinary journey, I’m confident you can create this deeply satisfying chili with these tips. Don’t be shy about personalizing it with your favorite chili toppings or exploring different bean variations and protein alternatives. Enjoy your delicious creation!
FAQ
How can I adjust the thickness of my one-pot black bean chili?
You can make your chili thicker by simmering it longer uncovered, mashing some of the black beans against the side of the pot, or stirring in a cornstarch slurry (1 tbsp cornstarch mixed with 1 tbsp cold water) and simmering for another minute. If it’s too thick, simply add a splash more water or beef broth.
Can this one-pot black bean chili be made vegetarian or vegan?
Absolutely! To make it vegetarian or vegan, substitute the ground beef with plant-based crumbles, lentils, or sliced mushrooms. Ensure any additional broth used in variations is vegetable-based.
What are the best toppings and serving suggestions for black bean chili?
Popular chili toppings include sour cream, shredded cheddar cheese, avocado, fresh cilantro, sliced jalapeños, and a squeeze of fresh lime juice. For serving, a side of warm cornbread is a classic pairing.
How should I store and reheat leftover black bean chili?
Store leftover black bean chili in an airtight container in the fridge for 3-4 days. It can be frozen for up to 3 months. To reheat chili, gently warm on the stovetop over medium-low heat or in the microwave until heated through.
What are common ingredient substitutions and variations for this recipe?
You can substitute ground beef with ground turkey or ground bison. For beans, kidney beans or pinto beans work well in place of black beans. If you prefer a milder flavor, use plain diced tomatoes instead of those with green chiles.
What are essential tips for making the best tasting black bean chili?
The key tips include blooming your spices (our unique twist!) to enhance flavor development, tasting and adjusting salt at the end, and allowing sufficient time for the aromatics to cook and the chili to simmer.
What kind of pot should I use for one-pot chili?
A heavy-bottomed large pot or a Dutch oven is ideal. Its even heat distribution prevents sticking and helps to build deep, consistent flavors in your chili.
What are the nutritional benefits of black beans?
Black beans are a nutritional powerhouse! They are an excellent source of dietary fiber, plant-based protein, and essential minerals like iron and magnesium, contributing to a very healthy and satisfying meal.
Can I adapt this recipe for an Instant Pot or slow cooker?
Yes, you can adapt this recipe for an Instant Pot or a slow cooker chili. For an Instant Pot, brown the meat and bloom the spices using the sauté function, then add remaining ingredients and pressure cook for 15-20 minutes. For a slow cooker, brown the meat and bloom spices on the stovetop first, then transfer all ingredients to the slow cooker and cook on low for 6-8 hours or high for 3-4 hours.
One-Pot Black Bean Chili
Ingredients
Equipment
Method
- First, dice the yellow onion and mince the garlic. Add the olive oil to a large pot or Dutch oven over medium-low heat. Add the diced onion and minced garlic and cook, stirring occasionally, until softened and fragrant, about 2-3 minutes. This builds a strong flavor foundation.
- Next, add the ground beef to the pot. Sauté the ground beef, breaking it up with a spoon, until cooked through, about 5-7 minutes. If desired, carefully drain off any excess fat.
- With the beef and aromatics still in the pot, sprinkle in the chili powder, ground cumin, smoked paprika, and dried oregano. Stir constantly for just 1 minute. An intense, fragrant aroma will be released as the spices toast, unlocking their full flavor.
- Now, add the drained black beans, the entire can of diced tomatoes with green chiles (with their juices), the tomato paste, and the water to the pot. Stir well to combine all ingredients.
- Place a lid on the pot and increase heat to medium-high to bring the chili to a gentle simmer. Once simmering, reduce heat to medium-low and cook for about 15 minutes, stirring occasionally. This simmering time is crucial for flavor development and to thicken the chili.
- Finally, taste the chili and add salt as needed, usually about ½ tsp, depending on the sodium content of canned goods. Serve immediately with your favorite toppings and enjoy!