Skip to content
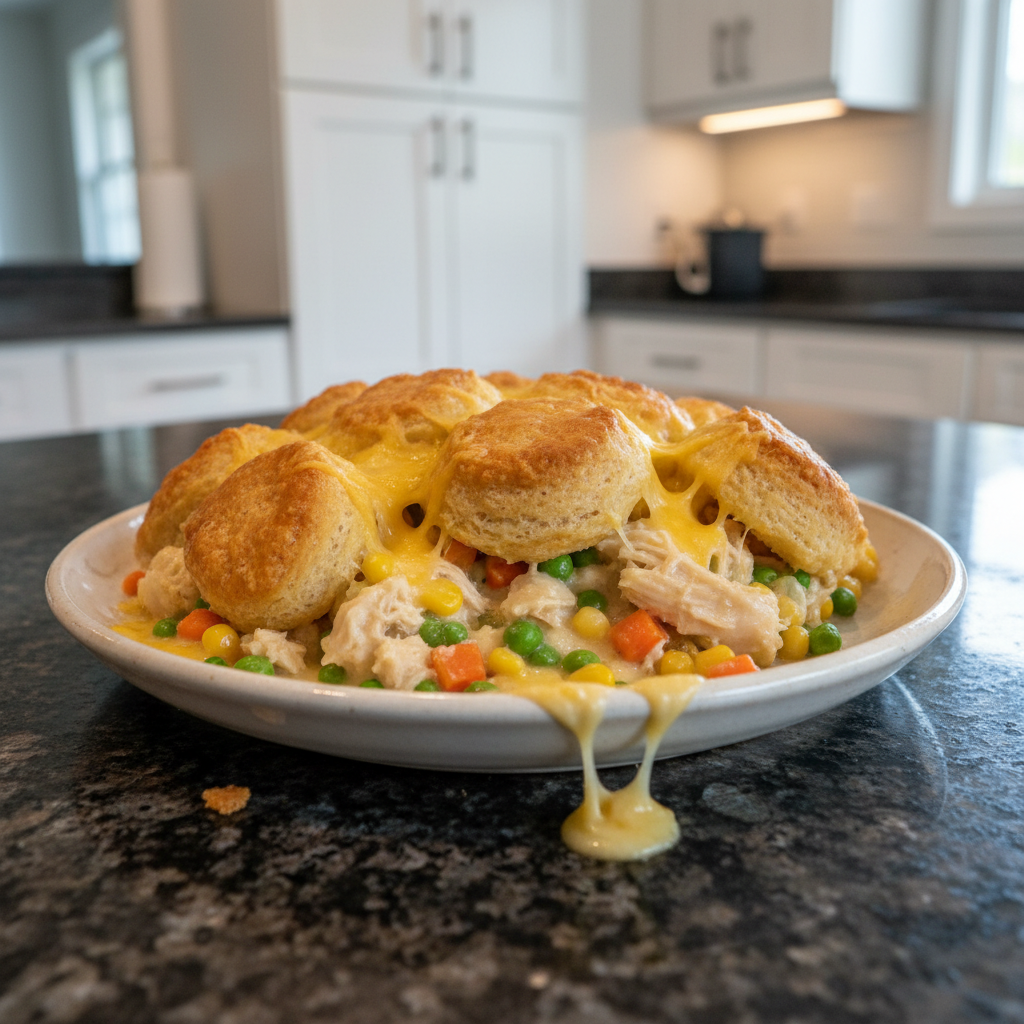
 There are some dishes that just wrap you in a warm hug, and for me, a comforting casserole is at the top of that list. If you’re looking for an incredibly easy, one-pan meal that promises pure satisfaction on a busy weeknight, then my Chicken Pot Pie Bubble Up Casserole is about to become your new best friend. This recipe delivers all the classic, creamy flavors of traditional chicken pot pie but with the delightful ease of refrigerated biscuits bubbling up through a rich, savory filling. I’m going to walk you through exactly how to make this delicious, straightforward meal, plus share all my secrets for meal prep, variations, and how to get perfect results every single time.
Why You’ll Love This Recipe
I know what you’re thinking: another chicken pot pie casserole? But trust me, I’ve got a unique twist that takes this classic comfort food from good to absolutely glorious.
- Extra Rich & Smooth Filling: My secret to a truly luxurious filling is adding a quarter cup of heavy cream. This simple addition creates an incredibly rich, smoother consistency that prevents any dryness, especially when you’re using condensed soup. It’s a game-changer! To understand more about the role of this ingredient, learn about the magic of heavy cream in cooking.
- Deep, Savory Flavor: To elevate that classic pot pie taste, I stir in a half teaspoon of dried thyme or poultry seasoning. These herbs introduce traditional, deep savory notes that make every bite sing.
- Perfectly Golden, Crispy Biscuits: The final touch that makes all the difference? Lightly brushing the biscuit pieces with melted butter just before baking. This step ensures a perfectly golden, crispy finish, preventing dryness and guaranteeing even browning across the top of your casserole.
Beyond these delicious tweaks, you’ll love how easy this Chicken Pot Pie Bubble Up Casserole is, making it the perfect weeknight dinner. It’s truly a versatile dish, fantastic for family dinners, and excellent for meal prep, ensuring you get delicious, reliable results every time.
Ingredients Needed

Gathering your ingredients is the first step to this delightful casserole. Here’s exactly what you’ll need:
- 2 cups chicken, cooked/shredded
- 1 can cream of chicken soup
- 1 cup sour cream
- 1 cup cheddar cheese, shredded
- 1 1/2 cups mixed frozen veggies
- 1 tsp garlic powder
- 1/2 tsp seasoned salt
- 2 cans refrigerated biscuits (*6 oz cans)
- 1/4 cup heavy cream (for unique twist)
- 1/2 tsp dried thyme or poultry seasoning (for unique twist)
- 2 tbsp melted butter (for unique twist)
Ingredient Notes & Substitutions
Let’s dive into some specifics to make sure your casserole is perfect, and to offer some helpful alternatives!
- Chicken: For the shredded chicken, convenience is key! I often grab a rotisserie chicken from the grocery store and shred it. You can also boil a couple of chicken breasts until cooked through, then shred them with two forks, or even use canned chicken if you’re really pressed for time.
- Refrigerated Biscuits: This recipe calls for two 6 oz cans. If you find larger 7.5 oz cans, that’s perfectly fine; the slight increase in biscuit quantity won’t harm the casserole. Just ensure the pieces are evenly distributed. For alternatives, crescent rolls can be used, but be aware they will create a softer, flakier top rather than the chewy biscuit texture. Adjust cook time as needed, as crescent rolls might bake a bit faster. Puff pastry is another elegant topping idea, offering a very light, crispy crust. For a different twist on the classic, you might enjoy an easy chicken pot pie soup with puff pastry croutons.
- Cream of Chicken Soup: I always recommend looking for a low-sodium cream of chicken soup. This helps you control the overall sodium content of your dish, especially since seasoned salt is also added.
- Sour Cream: Full-fat sour cream delivers the richest, creamiest texture, contributing beautifully to the unique twist of this recipe. However, if you’re looking for a slightly lighter option, light sour cream works well too.
- Cheese: Cheddar cheese is fantastic here because it melts beautifully and adds a familiar, savory note. Other excellent melting cheeses like Monterey Jack, Colby Jack, or a blend of cheddar and mozzarella would also be delicious.
- Mixed Frozen Vegetables: The beauty of frozen mixed vegetables is their convenience. If you prefer to use fresh, pre-chopped vegetables (like carrots, peas, and corn), I suggest giving them a quick sauté for 5-7 minutes before adding them to the mixture. This ensures they soften adequately during the casserole’s baking time.
- Dairy-Free/Gluten-Free: If you have dietary restrictions, this casserole can still be yours! For dairy-free alternatives, look for dairy-free cream of mushroom or chicken soup, plant-based sour cream, and dairy-free cheddar cheese shreds. For gluten-free options, several brands now offer gluten-free refrigerated biscuits. Always double-check ingredient labels to ensure all components are certified gluten-free.
- Heavy Cream/Thyme/Poultry Seasoning: These are the stars of my unique twist! The heavy cream adds unparalleled richness, while the dried thyme or poultry seasoning brings that authentic, deep pot pie flavor. Don’t skip these for the best results!

How to Make Your Perfect Chicken Pot Pie Bubble Up Casserole
Let’s get cooking! This recipe is incredibly straightforward, but I’ll guide you through each step to ensure your Chicken Pot Pie Bubble Up Casserole comes out perfectly golden and bubbly.
Prepare the Filling
First, grab a spacious medium mixing bowl. Into this, you’ll combine your pre-cooked, shredded chicken, the can of cream of chicken soup, the sour cream, shredded cheddar cheese, and your mixed frozen veggies. Now, for my special touch: stir in the garlic powder, seasoned salt, the quarter cup of heavy cream, and the half teaspoon of dried thyme or poultry seasoning. Mix everything thoroughly until all the ingredients are beautifully combined and the filling looks wonderfully creamy and fragrant.
Add the Biscuits
Next, take your refrigerated biscuits. Cut each biscuit into fourths. Once they’re all cut, gently toss these biscuit pieces directly into your chicken mixture. Fold them in carefully until they are evenly coated and distributed throughout the creamy filling. You want every bite to have a piece of biscuit!
Assemble and Prepare for Baking
Take a 9 x 13 baking pan and lightly spray it with cooking spray to prevent sticking. Carefully spread your chicken and biscuit mixture evenly into the prepared pan. Aim for an optimal fill level that isn’t too tightly packed, allowing the biscuits room to expand and bubble up as they bake. Now, for the final touch of my unique twist: lightly brush the tops of the biscuit pieces with about 2 tablespoons of melted butter. This creates that irresistible golden-brown, crispy crust!
Bake to Golden Perfection
Preheat your oven to 375°F (190°C). Once hot, place your baking pan in the preheated oven. Bake for about 35-45 minutes. Baking time can vary slightly depending on your oven, so keep an eye on it! You’ll know it’s cooked through when the biscuits are beautifully golden brown, the filling is bubbly around the edges, and an internal temperature reaches 165°F (74°C). If you notice the biscuit tops browning too quickly, you can loosely cover the casserole with aluminum foil for part of the baking time.
Serve and Enjoy!
Once your casserole emerges from the oven, golden and bubbly, remove it and let it rest for a few minutes before serving. This allows the filling to set slightly. Then, scoop out generous portions and enjoy your perfectly cooked Chicken Pot Pie Bubble Up Casserole!
Make-Ahead & Freezing Your Casserole
This Chicken Pot Pie Bubble Up Casserole is a fantastic candidate for meal prep, making weeknight dinners even easier. Here’s how you can prepare it ahead of time or freeze it for later.
Make-Ahead (Refrigeration)
You can easily assemble the entire casserole up to 24 hours in advance. Simply follow all the steps for combining the ingredients and spreading them into your 9×13 baking dish. Cover the dish tightly with plastic wrap or aluminum foil and store it in the refrigerator. When you’re ready to bake, you might need to add an extra 5-10 minutes to the baking time since you’re starting with a cold casserole.
Freezing Instructions (Unbaked)
This is my preferred method for freezing this dish! Assemble the casserole completely in a freezer-safe baking dish, ensuring it’s an oven-to-freezer-safe dish if you plan to bake it directly from frozen. Cover it very tightly with a layer of plastic wrap, then a layer of heavy-duty aluminum foil. Label it with the date and baking instructions. It can be stored in the freezer for up to 3 months.
To bake from frozen:
- Preheat your oven to 350°F (175°C).
- Remove the plastic wrap, but keep the foil cover on.
- Bake for 60-75 minutes with the foil on.
- Remove the foil and continue baking for another 20-30 minutes, or until the biscuits are golden brown and an internal temperature of 165°F (74°C) is reached.
Freezing Instructions (Baked)
If you have leftovers or want to freeze a fully baked casserole, allow it to cool completely first. You can freeze individual portions in airtight, freezer-safe containers or freeze the entire casserole in its baking dish, covered tightly. It will keep for 2-3 months.
To reheat baked and frozen casserole:
- Thaw overnight in the refrigerator if possible.
- Reheat individual portions in the microwave until warmed through.
- To reheat a whole casserole, cover with foil and bake at 325°F (160°C) for 20-30 minutes, or until heated through. Uncover for the last 5-10 minutes if you want to crisp up the biscuits.
Having this casserole ready to go in the freezer makes for the ultimate convenient weeknight dinner!
Customize Your Casserole: Healthier & Dietary Swaps
One of the beauties of a casserole like this is how easily it can be customized to fit various preferences or dietary needs. Here are some suggestions for making your Chicken Pot Pie Bubble Up Casserole healthier or adapting it for specific diets.
Lighter/Healthier Options
- Sodium Reduction: As I mentioned, opting for low-sodium cream of chicken soup is a great start. You can also reduce or even omit the seasoned salt and rely more on fresh herbs and other spices for flavor. Always taste your filling before adding the biscuits to adjust seasonings.
- Fat Content: While the heavy cream is part of my unique twist for richness, you can use light sour cream and reduced-fat cheddar cheese to lower the overall fat content. If you’re willing to slightly alter the richness of the filling, you could swap some of the heavy cream for milk, though it will be less indulgent.
- Add More Vegetables: Don’t hesitate to pile in extra mixed frozen vegetables or even add some fresh, pre-sautéed options like diced carrots, celery, or peas. The more veggies, the more nutrients!
- Leaner Protein: Ensure you’re using lean shredded chicken, such as chicken breast, to keep the protein light and healthy.
Gluten-Free Adaptations
Making this casserole gluten-free is quite achievable! The primary component to swap out is the refrigerated biscuits. Many brands now offer gluten-free refrigerated biscuits that can be used directly in this recipe. Alternatively, you could use a gluten-free pie crust, cut into pieces, or even a gluten-free puff pastry for the topping, though these will alter the texture of the “bubble up” considerably. Always verify that your cream of chicken soup and any seasoned salts are certified gluten-free, as hidden gluten can sometimes be present.
Dairy-Free Alternatives
If you need to avoid dairy, there are excellent dairy-free alternatives available. Look for dairy-free cream of mushroom or chicken soup (often made with plant-based milks), plant-based sour cream substitutes, and dairy-free cheddar cheese shreds. While these substitutions will create a slightly different flavor and texture profile than the original, they can still yield a delicious and comforting casserole. Be sure to use a dairy-free butter substitute for brushing the biscuit tops.
Pro Tips & Troubleshooting
Even the simplest recipes can benefit from a few expert insights. Here are my top tips for success and common mistakes to avoid when making your Chicken Pot Pie Bubble Up Casserole.
Pro Tips
- Even Cooking: To ensure your biscuits cook through evenly and the casserole bakes beautifully, avoid packing the mixture too tightly in the 9×13 pan. Give those biscuits some room to expand!
- Golden Tops: If you notice the biscuits browning too quickly during baking, simply cover the casserole loosely with aluminum foil for part of the baking time. This protects the tops while the interior finishes cooking.
- Flavor Boost: Don’t skip the unique twist of heavy cream and dried thyme or poultry seasoning! The heavy cream adds incredible richness and a smoother consistency, while the herbs provide that classic, deep pot pie flavor.
- Crispy Finish: Brushing the biscuit tops with melted butter before baking is a small step with a big payoff. It ensures a beautiful golden-brown color and a deliciously crispy crust.
- Taste Test: Before you add the biscuits, taste your chicken filling mixture. This is your chance to adjust the seasoned salt, especially since condensed soup can already be quite salty. It’s much easier to add more seasoning now than later!
- Doneness Check: For absolute certainty that your casserole is cooked through, in addition to visual cues like golden-brown biscuits and bubbly filling, use a food thermometer to confirm the internal temperature of the chicken mixture reaches 165°F (74°C).
Common Mistakes to Avoid
- Overpacking: Resist the urge to cram too much mixture into your baking dish. Overpacking can prevent the biscuits from cooking through properly in the center, leading to a doughy interior.
- Burnt Biscuits: Neglecting to cover the casserole if the biscuit tops are browning too fast is a common pitfall. Keep an eye on it, and if needed, loosely tent with foil to prevent burnt tops while allowing the inside to cook.
- Too Salty: Be mindful of adding too much seasoned salt, especially when using condensed soup, which often contains a fair amount of sodium. Start with less and add more after tasting, if necessary.
- Undercooked from Frozen: If you’re baking your casserole from frozen, remember that it will require a significantly longer bake time than if starting from room temperature. Always refer to the freezing instructions for extended bake times.
- Skipping the Twist: Omitting the heavy cream, dried herbs, or the melted butter brush will compromise the unique richness, depth of flavor, and crispy texture that make this specific Chicken Pot Pie Bubble Up Casserole truly special.
Serving & Storage
Once your irresistible Chicken Pot Pie Bubble Up Casserole is out of the oven, it’s time to think about serving and how to keep those delicious leftovers fresh.
Serving Ideas
This casserole is incredibly hearty and satisfying on its own, but a few simple additions can make it a complete meal:
- Side Dishes: I love to pair this rich casserole with something fresh and light. A crisp green salad with a zesty vinaigrette, steamed green beans, or roasted broccoli are perfect choices that complement the creamy flavors without overwhelming them. A side of cranberry sauce can also add a lovely tart contrast.
- Garnishing: For a pop of color and a fresh herbaceous note, sprinkle some chopped fresh parsley or chives over the top just before serving.
- Beverage Pairings: A light, crisp white wine or a refreshing iced tea makes for a lovely beverage pairing.
Storage and Make-Ahead
One of the best things about this Chicken Pot Pie Bubble Up Casserole is how well it stores, making it ideal for future meals!
- Refrigeration: Allow any leftovers to cool completely before transferring them to an airtight container. Stored properly in the refrigerator, the casserole will stay fresh and delicious for 3-4 days.
- Reheating Leftovers: For individual portions, a quick reheat in the microwave works perfectly. If reheating a larger amount, I recommend covering it loosely with foil and warming it in an oven preheated to 300°F (150°C) until heated through. This helps the biscuits retain their texture and prevents the casserole from drying out.
- Cross-Reference Freezing: For detailed instructions on how to freeze this casserole, either unbaked or baked, and specific reheating times from frozen, please refer back to the “Make-Ahead & Freezing Your Casserole” section. It’s truly a fantastic dish for meal prep!
Conclusion
This Easy Chicken Pot Pie Bubble Up Casserole truly embodies the spirit of comfort food—easy to make, incredibly satisfying, and perfect for families and busy schedules. My unique twist, with the added heavy cream for a richer, smoother filling, the depth of dried thyme, and the buttery, crispy biscuit tops, transforms a simple recipe into something truly special.
Whether you’re a seasoned chef or a beginner in the kitchen, you can achieve fantastic results with these clear instructions and helpful tips. I encourage you to try this recipe, experiment with your own variations, or explore other one-pan meal ideas that bring warmth and ease to your table. If you love this recipe, please share it with your friends or leave a comment below—I always love hearing from you!
FAQ
Q: Should I cover my chicken pot pie bubble up casserole while baking?A: Generally, you start baking uncovered. However, if you notice the biscuit tops browning too quickly before the casserole is fully cooked, loosely cover it with aluminum foil. Remove the foil for the last 10-15 minutes to ensure a golden, crispy finish.
Q: Can you freeze chicken pot pie bubble up casserole?A: Yes, absolutely! This casserole freezes wonderfully. You can freeze it either unbaked or baked. For comprehensive instructions and specific reheat/bake times from frozen, please refer to the “Make-Ahead & Freezing Your Casserole” section of this article.
Q: How do I prevent my chicken pot pie casserole from being too salty or rich?A: To reduce sodium, use a low-sodium cream of chicken soup and start with less seasoned salt, tasting the mixture before adding the biscuits. For richness, while the heavy cream is part of our unique twist, you can use light sour cream or reduced-fat cheese, or slightly adjust the amount of heavy cream. However, keep in mind this may alter the intended creamy texture.
Q: What are some substitutions for refrigerated biscuits?A: While refrigerated biscuits are ideal for the “bubble up” texture, you can substitute crescent rolls for a flakier, softer topping, or even puff pastry for a light, crispy crust. Be aware that these substitutions may require adjustments to baking time and will change the overall texture.
Q: How do I know when my bubble up casserole is fully cooked?A: Your casserole is fully cooked when the biscuits are beautifully golden brown, the filling is bubbly around the edges, and an internal temperature of 165°F (74°C) is reached in the center. A quick peek with a food thermometer ensures perfect doneness.
Q: What are the best serving suggestions for chicken pot pie bubble up casserole?A: This hearty casserole pairs wonderfully with light, fresh side dishes. I recommend a crisp green salad with a simple vinaigrette, steamed green beans, or roasted broccoli to balance the richness. A sprinkle of fresh parsley or chives also adds a nice touch.
Q: What kind of chicken should I use for chicken pot pie bubble up casserole?A: I suggest using cooked, shredded chicken. A rotisserie chicken is fantastic for convenience, or you can boil chicken breasts until cooked through and then shred them. Canned chicken can also be used if you’re looking for a super quick option.
Q: Can I use fresh vegetables instead of frozen in this casserole?A: Yes, you can! If using fresh, pre-chopped vegetables like carrots, peas, or corn, I recommend quickly sautéing them for about 5-7 minutes before adding them to the mixture. This helps ensure they soften adequately during the casserole’s baking time and integrate well with the other ingredients.
Easy Chicken Pot Pie Bubble Up Casserole
Ingredients
Equipment
Method
- Grab a spacious medium mixing bowl. Combine the pre-cooked, shredded chicken, cream of chicken soup, sour cream, shredded cheddar cheese, and mixed frozen veggies. Stir in the garlic powder, seasoned salt, heavy cream, and dried thyme or poultry seasoning. Mix thoroughly until all ingredients are combined and the filling is creamy.
- Cut each refrigerated biscuit into fourths. Gently toss these biscuit pieces directly into the chicken mixture. Fold them in carefully until they are evenly coated and distributed throughout the creamy filling.
- Lightly spray a 9x13 baking pan with cooking spray to prevent sticking. Carefully spread the chicken and biscuit mixture evenly into the prepared pan, allowing room for the biscuits to expand. Lightly brush the tops of the biscuit pieces with about 2 tablespoons of melted butter.
- Preheat your oven to 375°F (190°C). Place the baking pan in the preheated oven and bake for about 35-45 minutes. The casserole is cooked when the biscuits are beautifully golden brown, the filling is bubbly around the edges, and an internal temperature of 165°F (74°C) is reached. If the biscuit tops brown too quickly, loosely cover the casserole with aluminum foil.
- Once the casserole is golden and bubbly, remove it from the oven and let it rest for a few minutes before serving. Scoop out generous portions and enjoy your perfectly cooked Chicken Pot Pie Bubble Up Casserole!