 Skip to content
 The quintessential American holiday treat gets a sophisticated upgrade. Whether you call them truffles or no-bake candy, these peanut butter balls evoke cherished memories of cookie swaps and family gatherings. This version respects the nostalgia of the classic recipe while introducing a professional flavor profile that sets it apart from every other plate on the dessert table.
Why You Will Love This Recipe
The Gourmet Upgrade: I’ve discovered that infusing the butter with a toasted, nutty ‘beurre noisette’ aroma elevates these to a truly sophisticated level, far beyond what creamy peanut butter alone can achieve.
Scientific Balance: The subtle hint of smoked sea salt I add to the coating beautifully cuts through the richness of the confectioners’ sugar and creamy peanut butter, creating a perfectly balanced finish.
Foolproof Texture: This recipe guarantees a delightful contrast between a melt-in-your-mouth, nutty center and that satisfying crisp chocolate snap we all adore.
Ingredients and Substitutions

Crafting the perfect peanut butter ball begins with selecting the right foundation of ingredients. Each component plays a vital role in achieving that creamy texture and rich flavor.
Ingredients
- 1 1/2 cups creamy peanut butter
- 1 cup unsalted butter (room temperature)
- 4 cups powdered sugar
- 1 1/2 cup graham cracker crumbs
- 1/2 teaspoon salt
- 1 package (16 to 24-ounce) chocolate almond bark/candy coating
Ingredient Notes and Substitutions
Nut-Free Schools: If you’re catering to a nut-free environment, sunflower seed butter, often known as SunButter, is an excellent 1:1 substitute. Just ensure you use the no-stir variety for the best texture.
Graham Cracker Crumbs: These finely ground crumbs aren’t just for flavor; they are the primary binding agent, giving the peanut butter dough its structure and preventing it from being too sticky or runny.
Almond Bark vs. Real Chocolate: While almond bark or candy coating is a beginner-friendly choice due to its stability and ease of melting, a high-quality tempered semisweet chocolate chips can offer a richer, more complex flavor for those with a bit more experience.
How to Make Peanut Butter Balls
The Brown Butter Base
- Begin by browning your unsalted butter. In a light-colored skillet, melt the butter over medium heat, swirling occasionally. Watch closely as it transitions from foamy to a beautiful toasted amber hue, releasing a wonderfully nutty aroma. Once browned, pour it into a heatproof bowl and allow it to cool completely to room temperature before proceeding.
Mixing and Shaping the Dough
- In a large mixing bowl, combine the cooled browned butter with the creamy peanut butter, powdered sugar, graham cracker crumbs, and salt. Gently mix with a sturdy wooden spoon or your impeccably clean hands until all ingredients are well incorporated into a cohesive dough. Avoid overworking, as we don’t want to aerate it too much.
- Using a small cookie scoop for uniform size, roll approximately 1-tablespoon portions of the mixture into tight, smooth spheres. Place these perfectly formed balls onto a baking sheet lined with parchment paper.
Chilling and Dipping
- Transfer the baking sheet of peanut butter balls to the refrigerator for at least 30 minutes. This chilling phase is crucial; firm dough is the secret to a smooth and even chocolate coating that won’t melt or fall apart.
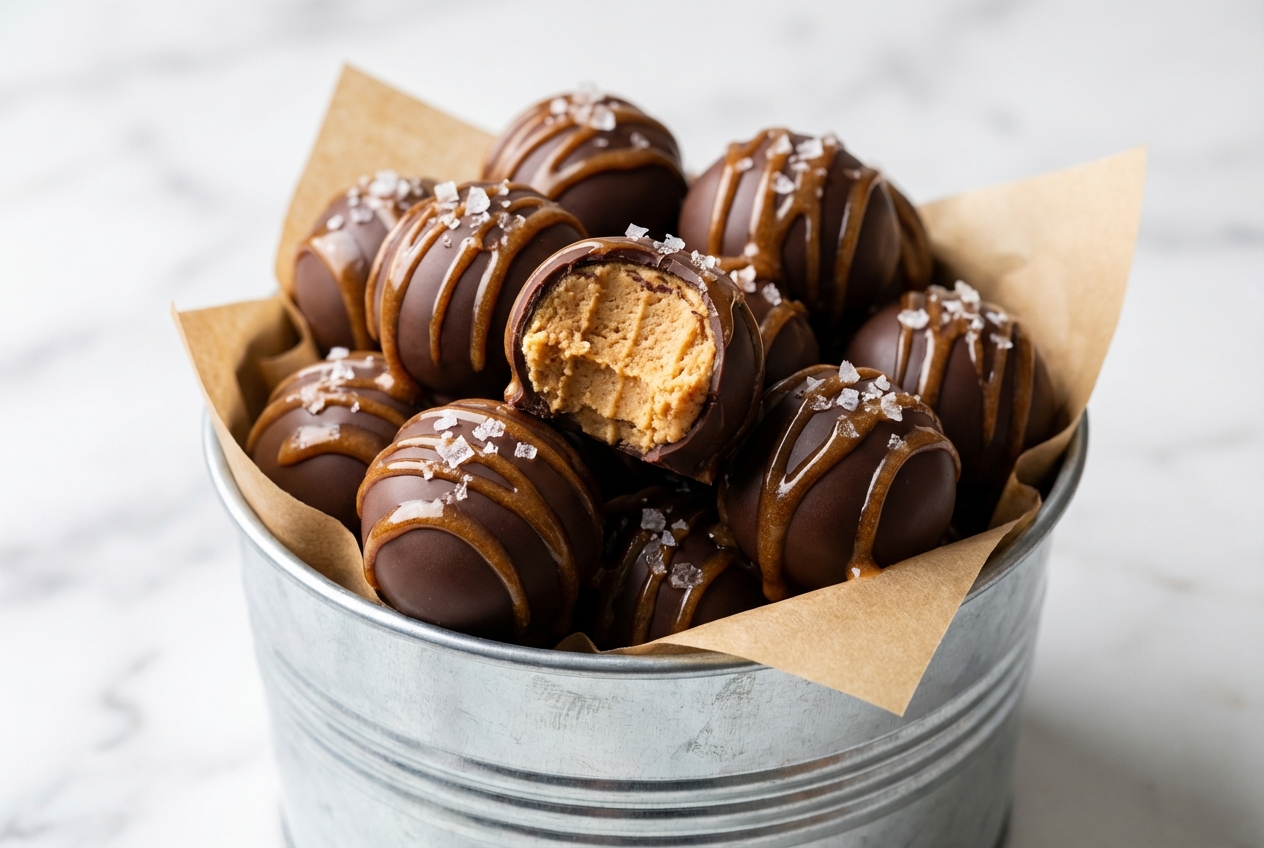
- Melt your chocolate almond bark according to its package instructions. For an extra glossy finish and easier dipping, stir in 1 teaspoon of coconut oil into the melted chocolate.
- Using two forks, carefully roll each chilled peanut butter ball in the melted chocolate, ensuring it’s fully coated. Gently tap the fork against the edge of the bowl to allow any excess chocolate to drip off, preventing unsightly “chocolate feet” at the base.
- Immediately after dipping, and while the chocolate is still wet, sprinkle a tiny pinch of smoked sea salt over the top of each ball to lock in that gourmet flavor twist. Place the coated balls back onto the parchment-lined baking sheet.
- Allow the chocolate to set completely, either at room temperature or by returning them to the refrigerator for a quicker set. Once firm, they are ready to store and enjoy!
Secrets for Confection Perfection

Understanding Chocolate Seizing: Even a single drop of water or a wisp of steam from a double boiler can cause your beautiful, melted chocolate to instantly seize into a lumpy, unusable mess. This happens because water causes the sugar particles in chocolate to clump together. If this happens, don’t despair; sometimes, you can rescue it by stirring in a teaspoon of vegetable oil or shortening, but prevention is always best. For a deeper dive into this phenomenon, you might explore the molecular explanation of chocolate seizing.
Almond Bark vs. Tempering: For beginners, candy coating like almond bark is your best friend because it melts smoothly and sets without special treatment. Tempering real chocolate, however, requires precise temperature control and technique to achieve that perfect snap and glossy finish, a skill often reserved for more experienced confectioners.
Sifting for Success: Always sift your powdered sugar before adding it to the mixture. This simple step ensures a lump-free, melt-in-your-mouth interior for your peanut butter balls, preventing any grainy texture.
The Temperature Gap: Dipping room-temperature peanut butter balls into hot melted chocolate is a common pitfall. The temperature difference can cause the balls to lose their shape and melt into the coating, resulting in a less-than-perfect finish. Always chill your centers thoroughly!
Pro Tips and Troubleshooting
Expert Tips for Success
- Give your peanut butter balls a quick 20-minute freeze before dipping to make the chocolate set almost instantly upon contact, streamlining the process.
- Utilize a slow cooker on its “warm” setting with a bowl of melted chocolate inside. This ingenious hack keeps your chocolate at the perfect dipping consistency for hours, ideal for large batches.
- If your peanut butter dough is too crumbly, add a teaspoon of softened butter to restore its pliability. If it’s too sticky, incorporate a bit more graham cracker crumbs until it reaches the ideal texture, much like perfecting the dough for chocolate thumbprint cookies.
Common Mistakes to Avoid
- Using Natural Peanut Butter: Natural, oil-separated peanut butter often leads to a runny, unstable center. If it’s your only option, you may need to add extra powdered sugar or graham cracker crumbs for binding.
- High-Speed Mixing: Resist the urge to use a stand mixer on high speed. Over-mixing introduces too much air, compromising the structural integrity of your peanut butter balls and making them difficult to dip.
Serving and Storage

Elegant Serving Ideas
- For a truly professional “candy shop” aesthetic, melt a small amount of white chocolate and drizzle it decoratively over your finished peanut butter balls.
- Present your creations in mini metallic cupcake liners. This instantly elevates their look, making them perfect for gift-giving or a festive dessert platter alongside other holiday favorites like peppermint fudge.
Storage and Shipping Instructions
- Store these delightful confections in an airtight container in the refrigerator, where they will stay fresh and delicious for up to two weeks.
- For holiday shipping, layer the peanut butter balls with parchment paper in a sturdy tin. Include cold packs and ship them quickly to prevent melting or cracking, especially during warmer travel.
- For long-term enjoyment, you can freeze peanut butter balls for up to three months. Simply place them in freezer-safe bags or containers, ensuring they are well-protected from freezer burn. For more detailed food safety storage recommendations, consulting university extension resources is always wise.
The Ultimate Homemade Confection
These peanut butter balls, with their toasted brown butter and smoked salt elevation, are more than just a sweet treat; they’re a gourmet gift from your kitchen. The balance of sweet and savory, creamy and crisp, makes them truly irresistible. Share them with loved ones, gift them in a basket alongside Italian Christmas cookies, or simply savor them yourself. I encourage you to try this recipe and discover the magic of a classic made even better!
Gourmet Peanut Butter Balls
Ingredients
Equipment
Method
- Brown the unsalted butter in a light-colored skillet over medium heat. Swirl occasionally until the butter transitions from foamy to a toasted amber hue with a nutty aroma. Pour into a heatproof bowl and allow it to cool completely to room temperature.
- In a large mixing bowl, combine the cooled browned butter with the creamy peanut butter, powdered sugar, graham cracker crumbs, and salt. Mix with a sturdy wooden spoon or your hands until a cohesive dough forms. Avoid overworking the mixture.
- Using a small cookie scoop, roll approximately 1-tablespoon portions of the dough into tight, smooth spheres. Place the balls onto a baking sheet lined with parchment paper.
- Refrigerate the baking sheet for at least 30 minutes. This chilling phase ensures the centers are firm enough to be coated without melting or losing their shape.
- Melt the chocolate almond bark according to package instructions. For a glossier finish, you may stir in 1 teaspoon of coconut oil.
- Using two forks, roll each chilled ball in the melted chocolate until fully coated. Tap the fork against the edge of the bowl to remove excess chocolate before placing the ball back onto the parchment paper.
- While the chocolate is still wet, sprinkle a tiny pinch of smoked sea salt over each ball. Allow the chocolate to set completely at room temperature or in the refrigerator before serving.


