 Skip to content
 There’s nothing quite like waking up to the aroma of warm, homemade banana waffles filling your kitchen. The promise of a golden, crispy exterior giving way to a soft, fluffy interior, bursting with sweet banana flavor, is enough to get anyone out of bed. If you’ve been searching for the ultimate banana waffles recipe that delivers on all fronts – simple to make, incredibly delicious, and never, ever stuck to the iron – you’ve found it. I’m going to share my expert tips and a special technique that guarantees perfectly crispy, fluffy, and non-stick banana waffles every single time.
Why You’ll Love This Recipe
I know the frustration of waffles sticking to the iron, or ending up soft and floppy instead of beautifully crisp. That’s why I developed this banana waffle recipe with a secret weapon: the addition of 1/4 cup melted unsalted butter or neutral oil directly into the wet ingredients. This simple twist is a game-changer.
The Science Behind the Crisp: Adding this extra fat works wonders. It creates a tender crumb on the inside while promoting an incredibly crispy exterior. The fat helps prevent the batter from clinging to the waffle iron, ensuring easy release every time. This also enhances the Maillard reactions, giving your waffles that gorgeous golden-brown color and irresistible flavor. It truly is the ultimate solution to the dreaded sticking problem!
Naturally Sweet and Kid-Friendly: These banana waffles are naturally sweet thanks to the mashed bananas, making them a luscious and kid-friendly breakfast option. They are quick to prepare, consistently fluffy, and always cook up golden. You’ll be serving restaurant-quality banana waffles right from your own kitchen, without any of the usual hassle.
Ingredients Needed
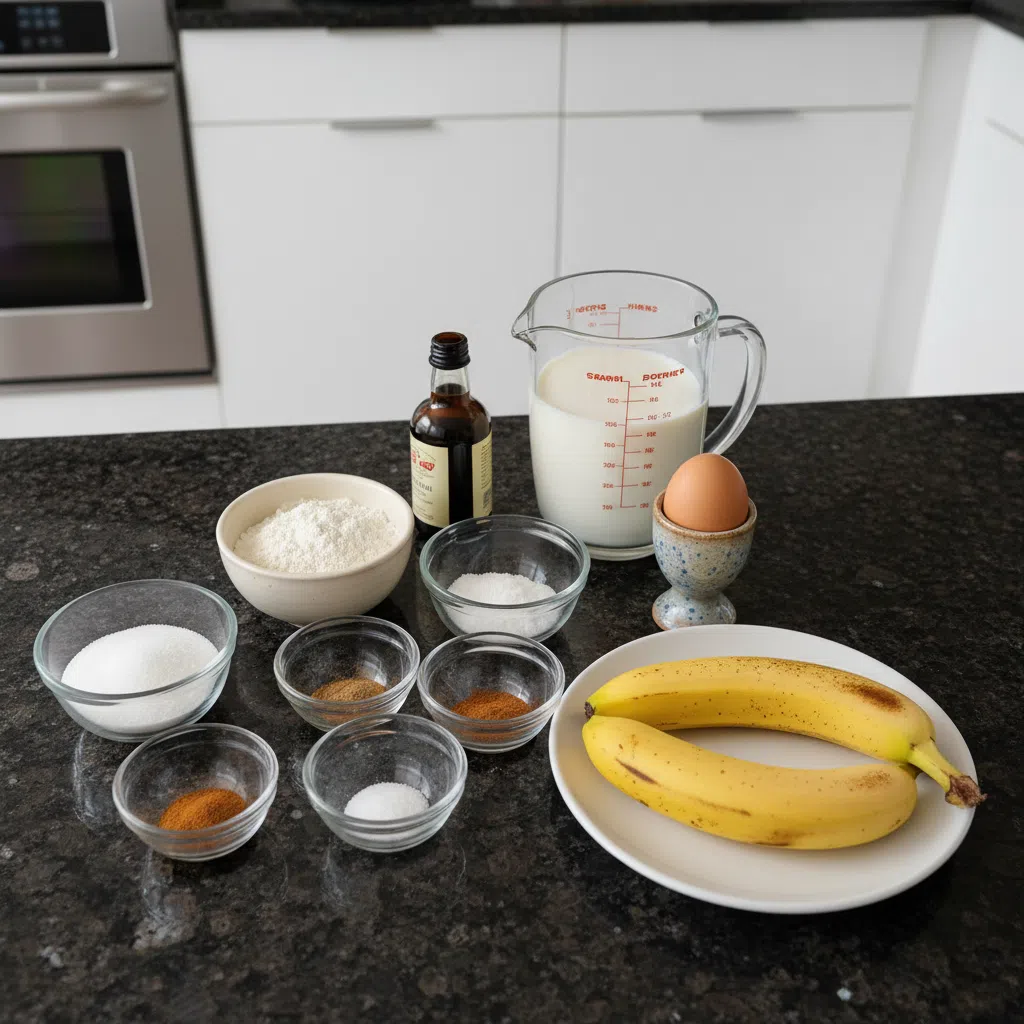
Here are the simple ingredients you will need for these perfect banana waffles:
- 1 1/4 cup all-purpose flour
- 1 tbsp baking powder
- 1 tbsp sugar
- 1/2 tsp salt
- pinch nutmeg
- pinch cinnamon
- 1 cup milk
- 1 egg
- 1 tsp vanilla extract
- 2 bananas, mashed
- 1/4 cup melted unsalted butter or neutral oil (e.g., vegetable or canola oil)
Ingredient Notes & Substitutions
Bananas: For the best banana waffles, I always recommend using very ripe bananas with plenty of brown spots. This ensures optimal sweetness and a wonderfully pronounced banana flavor in your mashed bananas, similar to what you’d find in delicious banana chocolate chip muffins.
Fat (Our Unique Twist): My recipe calls for either melted unsalted butter, vegetable oil, or canola oil. Any of these neutral oils or butter will serve the same crucial purpose: enhancing texture, creating crispiness, and preventing sticking. This melted butter or oil is key for those crispy waffles.
Flour: If you need a gluten-free option, a 1:1 gluten-free flour blend can be used. Just be aware that the texture might be slightly denser, and you might need a tiny bit more liquid. Using gluten-free flour works beautifully with this recipe.
Milk: For dairy-free milk alternatives, feel free to swap in almond milk, soy milk, or oat milk in a 1:1 ratio. Dairy-free milk will work perfectly here.
Egg: To make these banana waffles vegan, you can use egg substitutes such as a flax egg (1 tablespoon ground flaxseed meal mixed with 3 tablespoons water, let sit for 5 minutes) or a commercial egg replacer.
How to Make Perfect Banana Waffles
Making delicious banana waffles is a straightforward process when you follow these steps carefully.
Prepare Your Waffle Iron
First things first, preheat waffle iron fully. A properly preheated waffle iron is essential for crispy waffles and preventing sticking. Wait for the indicator light, or when it stops steaming, to know it’s ready.
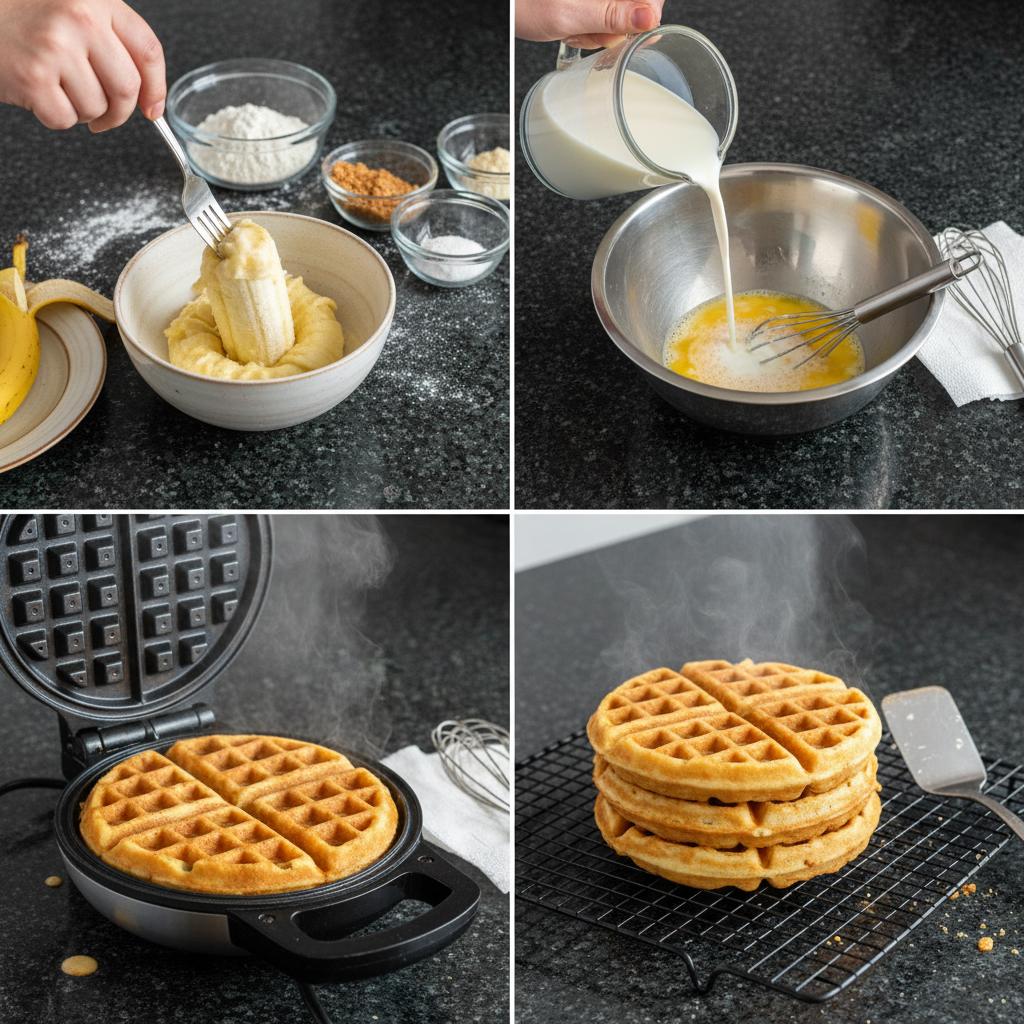
Combine Dry Ingredients
In a large mixing bowl, sift together the all-purpose flour, sugar, baking powder, salt, nutmeg, and cinnamon. Sifting ensures everything is evenly distributed and helps create a light texture. I always mix my dry ingredients separately first to guarantee a consistent batter.
Combine Wet Ingredients & Mix Batter
In a separate bowl, whisk together the milk, egg, vanilla extract, and your mashed bananas. This is also where you will whisk in the 1/4 cup of melted butter or neutral oil that is our secret weapon for perfect banana waffles. Once combined, pour the wet ingredients into the dry ingredients and mix until just incorporated. Do not overmix the batter; it’s perfectly fine if there are a few small lumps in batter. Overmixing batter develops the gluten too much, leading to tough rather than fluffy waffles.
Rest the Batter
Always let your batter sit for about 5-10 minutes to thicken before making the waffles. This resting period allows the flour to fully hydrate and gives the baking powder a chance to activate, resulting in even fluffier waffles.
Cook Waffles
Lightly grease your waffle iron, even if it’s non-stick, especially for the first waffle. Pour about 1/2 cup to 3/4 cup of batter per waffle, depending on the size of your waffle maker, ensuring the grids are filled without overflowing. Close the lid and cook until golden. You’ll know they’re done when the steam subsides and they are beautifully golden-brown and release easily.
Serve Warm
Serve your banana waffles immediately for the best crispy texture. They are truly best enjoyed right off the waffle iron.
Mastering Your Waffle Iron: Settings, Greasing, and Batter
Understanding your waffle iron is key to consistently perfect banana waffles.
Waffle Iron Temperature Settings
I find that medium-high heat is ideal for most waffle irons. Proper preheat is absolutely crucial for achieving crispy waffles and ensuring they don’t stick. If your iron isn’t hot enough, your waffles will be pale and soft. Always wait until the iron indicates it’s fully preheated before adding any batter.
Greasing Different Waffle Irons
Non-stick irons: Even with a non-stick surface, I recommend a very light greasing for the first waffle using a baking spray or a brush with a tiny bit of oil or melted butter. After that, check if the waffles release easily; you may not need to grease again for the rest of the batch thanks to the fat in our batter. Proper waffle maker care ensures longevity and performance.
Cast iron waffle makers: These require more attention. Ensure your cast iron waffle maker is well-seasoned. For each waffle, I suggest brushing the grids with a neutral oil or melted butter to guarantee a non-stick release.
Recommended Batter Quantity per Waffle
A good starting point for batter quantity is 1/2 cup to 3/4 cup for standard waffle irons. You want to fill the grid just enough so that it spreads to the edges without overflowing when you close the lid. Adjust this amount slightly based on the size of your specific waffle maker.
Why Your Waffles Stick
Waffles sticking to the iron is a common complaint. The main culprits are often insufficient fat in the batter (which our unique twist remedies!), improper greasing, and not preheating your waffle iron enough. My recipe directly tackles these issues for a consistently smooth experience.
Pro Tips & Troubleshooting
Even with a perfect recipe, a few expert insights can elevate your banana waffles from good to absolutely phenomenal.
Pro Tips for Perfect Waffles
- Don’t Overmix! This is my golden rule for fluffy waffles. Overmixing batter develops gluten, resulting in tough, dense waffles. A few lumps in batter are perfectly acceptable and actually desirable for a light texture.
- Rest the Batter: Let your banana waffle batter sit for 5-10 minutes before cooking. This allows the flour to fully hydrate and the leavening agents to activate, making for an even fluffier waffle.
- Separate Dry and Wet: Always mix your dry ingredients separately first. This ensures that the baking powder, sugar, and spices are evenly distributed throughout the all-purpose flour before wet ingredients are added.
- Golden Ratio of Fat: The added melted butter or oil is crucial for both achieving crispy waffles and preventing sticking. Ensure the fat is melted but not hot when adding to the wet ingredients.
- Preheat Fully: A fully preheated waffle iron is essential for a crisp exterior and even cooking.
- Don’t Peak Too Soon: Resist the urge to open the waffle iron too early! It can disrupt the cooking process and prevent proper crisping. Wait until the steam largely subsides.
- Keep Waffles Warm & Crispy: As you cook a batch, place finished waffles on a wire rack in a warm oven (around 200°F / 95°C) to keep them crispy while you finish the rest.
Common Mistakes to Avoid
- Overmixing the Batter: This is worth repeating! Overmixing the batter will lead to tough, chewy banana waffles instead of light and fluffy ones.
- Insufficient Greasing: Not properly greasing your waffle iron is a sure way to have waffles sticking to the iron. Follow my guidance for your specific waffle maker type.
- Cold Waffle Iron: An under-heated waffle iron results in pale, soft, and potentially stuck waffles. Always allow it to preheat fully.
- Not Enough Fat in Batter: Many traditional banana waffle recipes lack sufficient fat, which causes common issues like sticking and a lack of crispiness. My recipe solves this with the added melted butter or oil.
- Ignoring Banana Ripeness: Under-ripe bananas will not give you the same depth of sweetness or flavor. Spotted, very ripe bananas are key here.
Serving & Storage
Once your perfect banana waffles are ready, it’s time to enjoy them! Here are some ideas for serving and how to store any leftovers.
Serving Ideas
For a classic breakfast, I love serving my banana waffles with warm maple syrup and a dollop of whipped cream. Sliced fruit like fresh bananas or berries are also fantastic. You can get really creative with toppings:
- Chocolate sauce
- Peanut butter or Nutella
- Honey
- Flavored jams or fruit compotes
- A sprinkle of chocolate chips
- Chopped nuts like walnuts or pecans
These are truly a kid-friendly breakfast, and letting everyone choose their own toppings makes it extra fun. Don’t forget, waffles make a great base for a full breakfast alongside bacon or eggs! You might also enjoy a batch of healthy banana oatmeal pancakes.
Storage and Make-Ahead
Fridge Storage: If you have leftover banana waffles, store them in an airtight container in the refrigerator for up to 2-3 days. These storage tips help keep them fresh.
Freezing Waffles: Banana waffles freeze beautifully! First, allow them to cool completely. Then, arrange them in a single layer on a baking sheet and flash freeze for about 30 minutes to an hour until firm. Once firm, transfer them to a freezer-safe bag or container, separating layers with parchment paper. They will last for 2-3 months in the freezer. Freezing waffles is a fantastic meal prep hack.
Reheating Waffles: The best way to reheat banana waffles and restore their crispiness is to avoid the microwave.
- Toaster or Toaster Oven: This is my favorite method, especially from frozen, as it brings back that wonderful crisp texture.
- Oven: Preheat your oven to 300°F (150°C). Place waffles directly on a baking rack and heat for 5-10 minutes, or until warmed through and crispy. This works well for multiple waffles.
- Air Fryer: Place waffles in a single layer in your air fryer basket and air fry at 350°F (175°C) for 2-4 minutes for a quick and crispy reheat. This method also works wonders for other dishes like crispy air fryer chicken bites.
These reheating waffles methods ensure your banana waffles taste just as good as fresh!
Conclusion
There you have it—the ultimate recipe for perfect banana waffles that are crispy, fluffy, and never stick! My unique twist of adding melted butter or oil directly into the batter truly makes all the difference, solving those common waffle woes. Whether you’re a seasoned chef or a beginner cook, you can achieve restaurant-quality results in your own kitchen with ease. I encourage you to try this recipe, experiment with all the delightful serving ideas, and share your delicious creations. These banana waffles are sure to become a cherished part of your breakfast rotation. If you love waffles as much as I do, consider exploring other variations like Belgian Waffles or Pumpkin Waffles or even High-Protein Waffles next!
FAQ
How do you keep banana waffles from sticking to the waffle iron?
My recipe’s secret is adding melted butter or oil directly to the batter, which significantly reduces sticking. Additionally, always ensure your waffle iron is fully preheated before adding batter and lightly grease it, even if it’s non-stick, especially for the first waffle.
What is the best way to store and reheat leftover banana waffles?
Store leftover banana waffles in an airtight container in the fridge for 2-3 days or freeze them for up to 2-3 months. To reheat and restore crispiness, use a toaster, toaster oven, conventional oven (at 300°F / 150°C), or an air fryer (at 350°F / 175°C for 2-4 minutes).
Can I make gluten-free or dairy-free banana waffles?
Yes, absolutely! For gluten-free banana waffles, simply swap the all-purpose flour for a 1:1 gluten-free flour blend. For dairy-free, substitute regular milk with almond milk, soy milk, or oat milk. These substitutions will result in delicious waffles with only minor texture differences.
What are the best tips for making fluffy and crispy banana waffles?
To achieve fluffy and crispy banana waffles, remember these key tips: do not overmix the batter (lumps are fine!), allow the batter to rest for 5-10 minutes, use the melted butter or oil in the batter for crispiness, and always ensure your waffle iron is fully preheated.
How ripe should bananas be for banana waffles?
For the best sweetness and banana flavor in your banana waffles, I recommend using very ripe bananas that have plenty of brown spots on their skins. The riper the banana, the more natural sugar and concentrated flavor it will impart.
What are some creative topping ideas for banana waffles?
Beyond classic maple syrup, try toppings like whipped cream, chocolate chips, chopped nuts, fresh berries, sliced bananas, chocolate sauce, peanut butter, Nutella, or flavored jams. The possibilities for creative topping combinations are endless!
Do banana waffles need oil in the batter?
While some banana waffle recipes omit it, my recipe explicitly includes melted butter or oil in the batter. This is a crucial step for superior texture, ensuring a crispy exterior, a tender interior, and most importantly, preventing the waffles from sticking to the iron.
What makes waffles fluffy?
Fluffy waffles are achieved through a few key factors: using baking powder for leavening, being careful not to overmix the batter (which develops gluten and makes them tough), and allowing the batter to rest for a few minutes so the leavening agents can activate and the flour can hydrate.
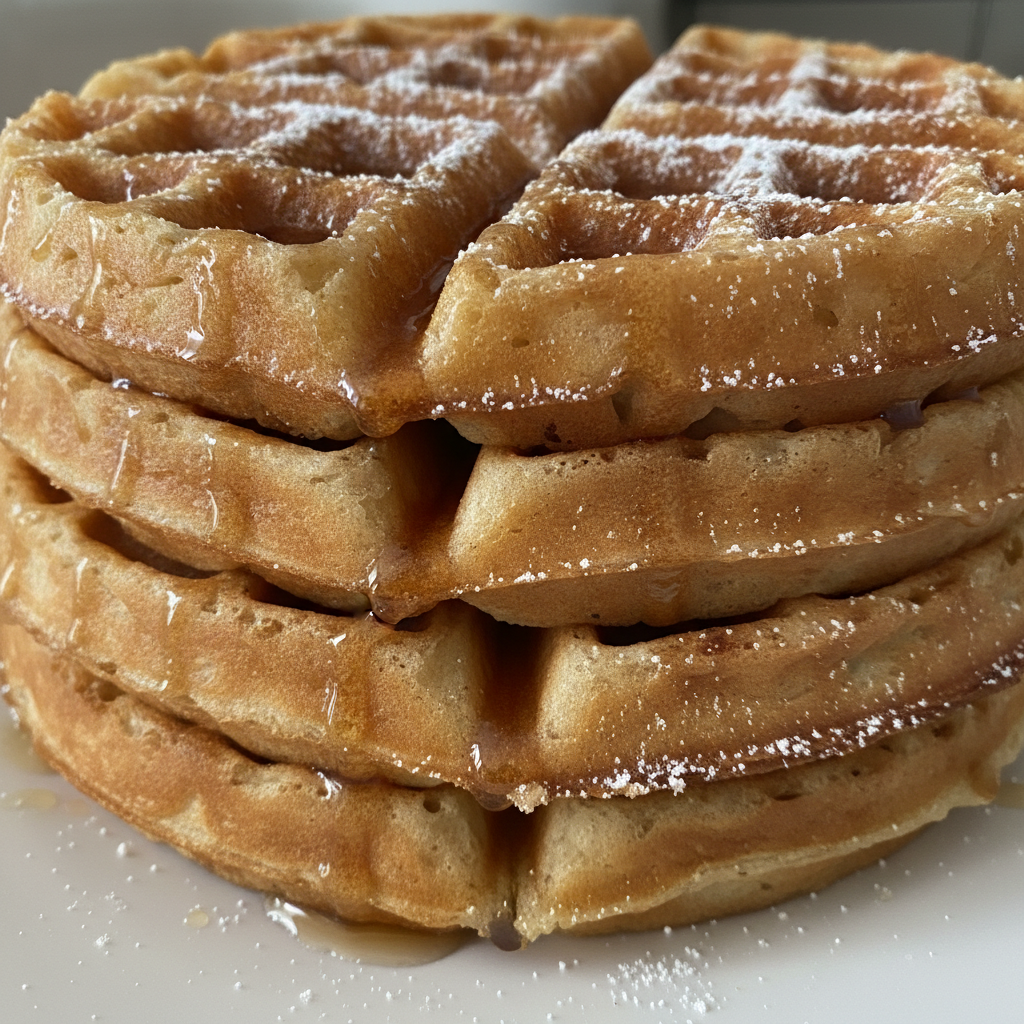
Perfect Banana Waffles: Crispy, Fluffy & Never Stick!
Ingredients
Equipment
Method
- First things first, preheat your waffle iron fully. A properly preheated waffle iron is essential for crispy waffles and preventing sticking. Wait for the indicator light, or when it stops steaming, to know it's ready.
- In a large mixing bowl, sift together the all-purpose flour, sugar, baking powder, salt, nutmeg, and cinnamon. Sifting ensures everything is evenly distributed and helps create a light texture.
- In a separate bowl, whisk together the milk, egg, vanilla extract, and your mashed bananas. Whisk in the 1/4 cup of melted butter or neutral oil. Once combined, pour the wet ingredients into the dry ingredients and mix until just incorporated. Do not overmix the batter; it's perfectly fine if there are a few small lumps.
- Always let your batter sit for about 5-10 minutes to thicken before making the waffles. This resting period allows the flour to fully hydrate and gives the baking powder a chance to activate, resulting in even fluffier waffles.
- Lightly grease your waffle iron, even if it's non-stick, especially for the first waffle. Pour about 1/2 cup to 3/4 cup of batter per waffle, depending on the size of your waffle maker, ensuring the grids are filled without overflowing. Close the lid and cook until golden. You'll know they're done when the steam subsides and they are beautifully golden-brown and release easily.
- Serve your banana waffles immediately for the best crispy texture. They are truly best enjoyed right off the waffle iron.


