 Skip to content
 Every family gathering at our house just wasn’t complete without Grandma’s signature pineapple upside down cake recipe. That shimmering, sticky top, the perfectly moist cake underneath, it always felt like a ray of sunshine on a plate.
Today, I’m thrilled to share my perfected version of this beloved classic. We’ll dive into the secrets for achieving a cake that’s not just visually stunning but also boasts an incredible depth of flavor, ensuring your dessert table is the talk of the town.
Why You’ll Love This Recipe
The Unique Twist: This isn’t just standard melted butter; we elevate the topping with **Beurre noisette**, or brown butter, infused with a generous pinch of flaky sea salt for an extraordinary caramel base.
Salty Sweet Balance: The subtle saltiness brilliantly cuts through the intense sweetness of the canned fruit, preventing the cake from being overly cloying. It creates a delightful interplay of flavors on your palate.
Sophisticated Depth: The toasted, nutty notes from the brown butter add a sophisticated, toffee-like dimension, making this pineapple upside down cake recipe far more complex and interesting than typical versions.
Sensory Experience: Imagine the contrast between the deeply sticky, caramelized edges and the light, airy, and incredibly moist sponge. Each bite offers a harmonious blend of textures and vibrant tropical sweetness.
Ingredients and Substitutions

Gathering your ingredients for this pineapple upside down cake recipe is the first step to a truly delightful dessert, promising layers of flavor and a wonderfully moist crumb.
Ingredients
Topping:
- 565g canned pineapple slices in juice
- 12 maraschino cherries
- 60g unsalted butter, melted
- 1/2 cup brown sugar
Cake:
- 1 1/2 cups flour
- 1 tsp baking powder
- 1/4 tsp baking soda
- 1/4 tsp salt
- 1/3 cup milk
- 1/4 cup pineapple juice
- 1/4 cup sour cream
- 1 tsp vanilla extract
- 115g unsalted butter, softened
- 3/4 cup white sugar
- 2 large eggs
- Any leftover pineapple, chopped
Ingredient Notes & Substitutions
Sour Cream: This unsung hero is absolutely essential for achieving a deeply moist and tender **crumb texture**. Its acidity also works wonders with the baking soda, contributing to a lighter rise.
Pineapple Juice: Instead of plain water, using the juice directly from the canned pineapple intensifies the tropical flavor throughout the cake. Don’t let that precious liquid go to waste!
Metric Conversions: While this recipe provides standard US measurements, using grams for ingredients like flour and butter ensures greater precision. This is particularly important for the **leavening agents** to work correctly and yield a consistent result every time.
How to Make the Perfect Pineapple Upside Down Cake
Preparation and Topping
- Start by preheating your oven to a welcoming 180°C (350°F), or 160°C for a fan-forced oven, ensuring it’s ready for baking.
- To prevent a soggy top, line a tray with paper towels or a clean tea towel. Carefully arrange your pineapple slices and maraschino cherries on it, then pat them bone-dry with extra paper towels. This crucial step ensures vibrant colors and prevents a watery caramel.
- Instead of simply melting the butter, gently brown the 60g unsalted butter in a small pan until it sizzles, turns a beautiful golden hue, and emits a wonderfully nutty aroma. This is our beurre noisette , the secret to a rich topping. Whisk in a generous pinch of flaky sea salt.
- Pour this aromatic, salted brown butter into your 23cm (9″) cake pan, ensuring it’s at least 5cm (2″) deep. Avoid springform pans, as the topping will leak. Use a pastry brush to coat the bottom and sides evenly.
- Evenly sprinkle the brown sugar over the butter-coated base, gently spreading it with your brush. This layer will magically transform into a luscious, salty caramel during baking, thanks to the caramelization process.
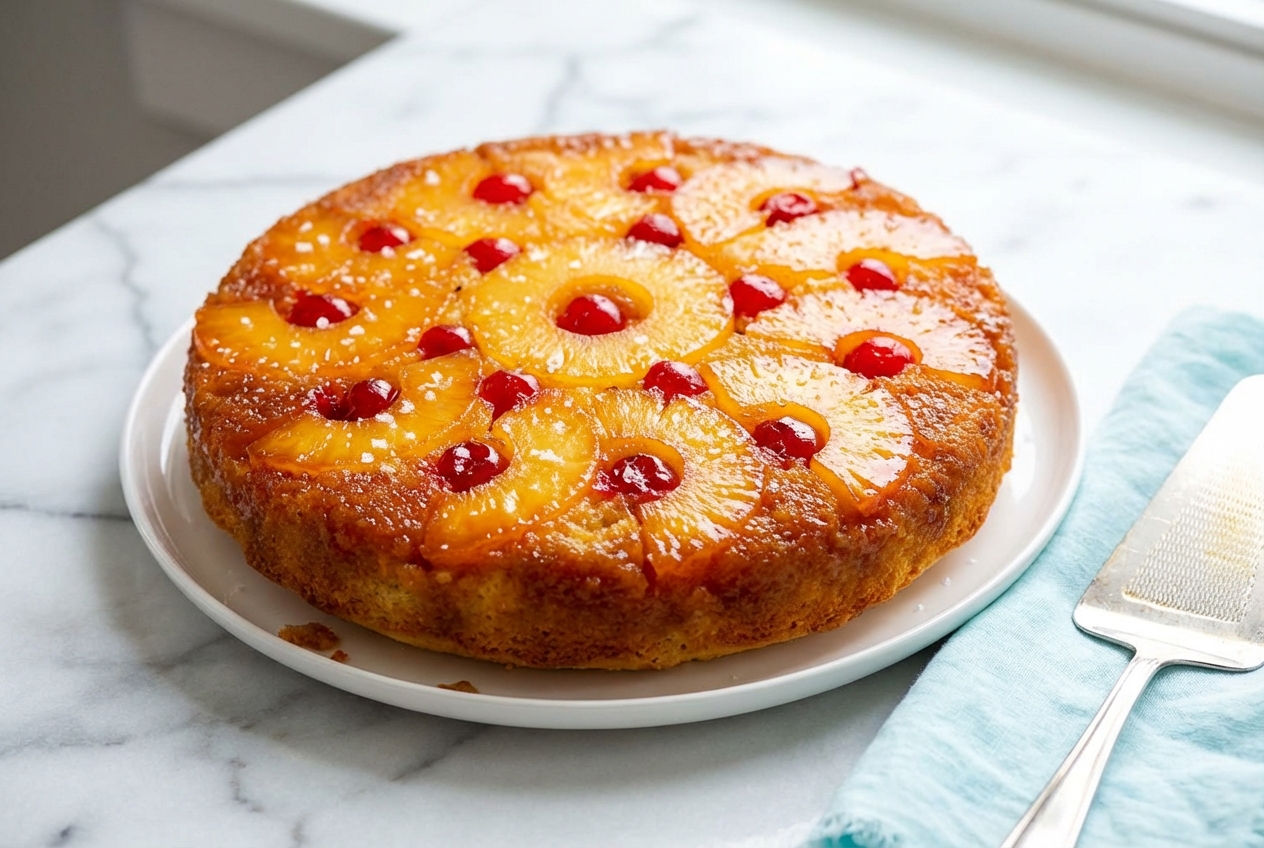
- Carefully place one pineapple ring in the center of the pan, then surround it with the remaining pineapple rings, either whole or halved. Arrange the maraschino cherries artfully within the pineapple rings or in the gaps, creating your desired pattern.
- Gently press the pineapple and cherries down firmly, ensuring they are in direct contact with the pan’s base. This critical step ensures a stunning display of vibrant red and yellow colors after the inversion, untarnished by the caramel.
Crafting the Airy Batter
- In your first bowl, whisk together the flour, baking powder, baking soda, and salt until thoroughly combined.
- In a second bowl, whisk the milk, sour cream, and vanilla extract until smooth. Don’t forget to add the pineapple juice from your canned fruit for an extra flavor boost.
- Now, in a third, larger bowl, beat the softened 115g unsalted butter and white sugar with an electric mixer on high speed for about 2 minutes, until the mixture is light, pale, and fluffy.
- Add the large eggs one at a time to the butter mixture, beating well for 20 seconds after each addition. Continue beating until the mixture reaches a ‘ribbon stage,’ where it falls in thick ribbons from the whisk, indicating excellent aeration.
- Alternately add the dry and wet mixtures to the creamed butter. Begin by folding in one-third of the flour mixture with a rubber spatula. Then, incorporate half of the milk mixture. Follow with another half of the remaining flour mixture, then all of the remaining milk mixture. Finish by folding in the last of the flour mixture just until combined. Stir in any chopped leftover pineapple pieces for extra fruitiness.
The Bake and Grand Flip
- Gently spread the cake batter evenly over the pineapple layer in the pan, smoothing and leveling the surface with your spatula.
- Bake for an initial 30 minutes. Then, carefully remove the cake, loosely cover it with aluminum foil to prevent over-browning, and return it to the oven for another 15 minutes. The cake is perfectly done when a toothpick inserted into the center comes out clean, indicating a successful toothpick test.
- Remove the baked cake from the oven and, here’s the crucial part, leave it in the pan to cool for a precise 20 minutes. This allows the caramel to set slightly without hardening, preparing it for the glorious inversion.
- After the cooling window, carefully run a thin butter knife around the inner edge of the cake pan to loosen the sides. Place a serving plate or platter over the cake, then with a confident and swift motion, flip the cake over. Give the base of the pan a few gentle taps or shakes, then slowly lift it, revealing your stunning pineapple upside down cake!
- Allow the cake to cool completely on the serving platter before slicing and enjoying its delightful flavors.
Secrets for a Flawless Result

Pan Selection Matters: For the best results, a sturdy cast iron skillet or a heavy-bottomed metal cake pan, about 23cm (9 inches) in diameter, works wonders. Cast iron ensures a deeper, more even caramelization of the brown sugar, leading to a richer topping. While a glass pan can be used, it conducts heat slower, potentially altering baking times. Remember, for a moist and tender crumb texture in any cake, much like my popular blackberry velvet cake, precision in baking is key.
High-Altitude Adjustments: If you live in a high-altitude region, subtle adjustments are often necessary for perfect baking. You may need to reduce your leavening agents slightly for optimal results, as detailed by resources like the Colorado State University Extension’s guide on high-altitude adjustments, to prevent the cake from rising too quickly and collapsing.
The Maillard Reaction: The magic behind browning the butter (creating beurre noisette) and the interaction of the sugars during baking is the Maillard reaction. This chemical process creates hundreds of complex, savory, and sweet flavor compounds that simple melting utterly lacks, truly elevating the taste profile of your cake.
Pro Tips & Troubleshooting

Baker’s Pro Tips
- Always use room temperature eggs, milk, and sour cream. This ensures your batter emulsifies smoothly, creating a more uniform and tender crumb.
- For an exceptionally light and airy sponge, sift your flour not just once, but three times. This incorporates air and eliminates any lumps.
- For a professional, bakery-style finish, gently brush the warm, inverted cake with warmed apricot jam. This creates a beautiful, glossy shine that makes it irresistible.
Common Mistakes to Avoid
- The Springform Trap: Never, ever use a springform pan for this recipe. The butter and sugar mixture will inevitably leak out, creating a smoking mess in your oven and a ruined cake.
- The Soggy Top: The number one cause of a wet, unappealing topping is failing to thoroughly pat the pineapple and cherries dry. Excess moisture will prevent proper caramelization.
- The Timing Error: Flipping the cake too early, before the caramel has slightly set, can cause it to break apart. Flipping too late, when the caramel has hardened, will make it stick firmly to the pan. Stick to the 20-minute cooling window!
Serving & Storage
Serving Ideas
- Serve this glorious cake warm, allowing the sticky caramel to be at its most luxurious. A generous scoop of vanilla bean ice cream is a classic pairing that’s hard to beat.
- For a delightful ‘Tropical Twist,’ try a dollop of coconut-infused whipped cream. The creamy coconut perfectly complements the pineapple’s sweetness.
- Garnish your pineapple upside down cake with a few fresh mint leaves for a beautiful pop of contrasting color and a hint of freshness. For a truly delightful pairing, consider serving this warm dessert alongside a refreshing strawberry matcha latte.
Storage & Reheating
Store any leftover pineapple upside down cake in an airtight container at room temperature for up to two days, or in the refrigerator for up to four days. This keeps the cake fresh and prevents it from drying out.
When it comes to reheating, avoid the microwave if you want to maintain the sticky integrity of the caramel topping. Instead, gently warm individual slices in a low-heat oven (around 150°C/300°F) for about 10-15 minutes until heated through. This secret ensures the topping remains soft and delicious, just like day one.
Grandma’s Pineapple Upside Down Cake Recipe With Salty Brown Butter
Ingredients
Equipment
Method
- Preheat your oven to 180°C (350°F), or 160°C for fan-forced ovens.
- Arrange the pineapple slices and maraschino cherries on paper towels and pat them completely dry to prevent a soggy topping.
- In a small pan, brown 60g of unsalted butter until it turns golden and smells nutty. Whisk in a pinch of sea salt to complete your salted beurre noisette.
- Pour the salted brown butter into a 23cm (9 inch) cake pan (at least 5cm deep) and coat the bottom and sides evenly using a pastry brush.
- Sprinkle the brown sugar evenly over the buttered base.
- Arrange the pineapple rings in the pan with one in the center and the rest surrounding it. Place cherries in the center of the rings and in the gaps.
- Press the fruit down firmly so it makes direct contact with the bottom of the pan.
- Whisk together the flour, baking powder, baking soda, and salt in a medium bowl.
- In another bowl, mix the milk, sour cream, vanilla extract, and reserved pineapple juice until smooth.
- Using an electric mixer, beat the 115g of softened butter and white sugar for 2 minutes until light and fluffy.
- Add the eggs one at a time, beating for 20 seconds after each addition until the mixture reaches the ribbon stage.
- Alternately fold the dry and wet mixtures into the butter mixture, starting and ending with the dry ingredients. Gently fold in any leftover chopped pineapple pieces.
- Spread the batter evenly over the pineapple layer in the pan and smooth the top.
- Bake for 30 minutes, then cover loosely with foil and bake for another 15 minutes or until a toothpick comes out clean.
- Let the cake cool in the pan for exactly 20 minutes. This is critical for the caramel to set without hardening.
- Run a knife around the edge, place a plate over the pan, and flip the cake over with a swift motion. Tap the base and lift the pan.
- Allow the cake to cool completely on the serving plate before slicing.
Nutrition
Notes
Tried this recipe?
Let us know how it was!Conclusion
There you have it—my treasured pineapple upside down cake recipe, perfected with that unexpected salty brown butter twist. It’s a dish that embodies both nostalgia and a touch of gourmet flair, balancing vibrant tropical sweetness with complex, toasted notes.
Don’t let the ‘flip’ scare you away; with these tips, you’re set for a show-stopping success. Gather your ingredients, embrace the joy of baking, and prepare to delight everyone with this elevated classic from your own kitchen!


