 Skip to content
 There’s something truly special about St. Patrick’s Day in my kitchen. It is a day for a little bit of magic, a lot of green, and, of course, delicious food. This year, I am so excited to share my recipe for Shamrock Mini Pizza Pot Pies. They are not just incredibly cute and festive, making them the perfect St. Patrick’s Day recipe, but they are also surprisingly easy to make and a huge hit with everyone, especially the kids. Imagine individual pizza pot pies with a crispy, golden crust, a savory, cheesy filling, and a fun shamrock topping. This recipe takes your mini pizza experience to a new level, ensuring a perfect bite every time.
Why You’ll Love This Recipe
These Shamrock Mini Pizza Pot Pies are all about bringing joy and flavor to your St. Patrick’s Day celebration. They are a delightful twist on classic pizza, transforming it into a cozy, individual pot pie that is both fun and satisfying.
The secret to their incredible taste and texture lies in one crucial step: blind baking the crescent dough circles for 5-7 minutes before adding the filling. This unique twist is a game-changer because it pre-cooks the dough slightly, driving out excess moisture. This means you will never have a soggy bottom, only a beautifully stable, crispy base that holds up to the rich, savory filling. Pre-baking also allows for a better Maillard reaction on the dough, leading to enhanced browning and a more flavorful, flaky crust that perfectly complements the melty mozzarella cheese and zesty marinara sauce. These pizza pot pies offer quick prep, are a fantastic family-friendly activity to get everyone involved, and deliver a satisfyingly savory, cheesy experience with every crispy bite.
Ingredients Needed
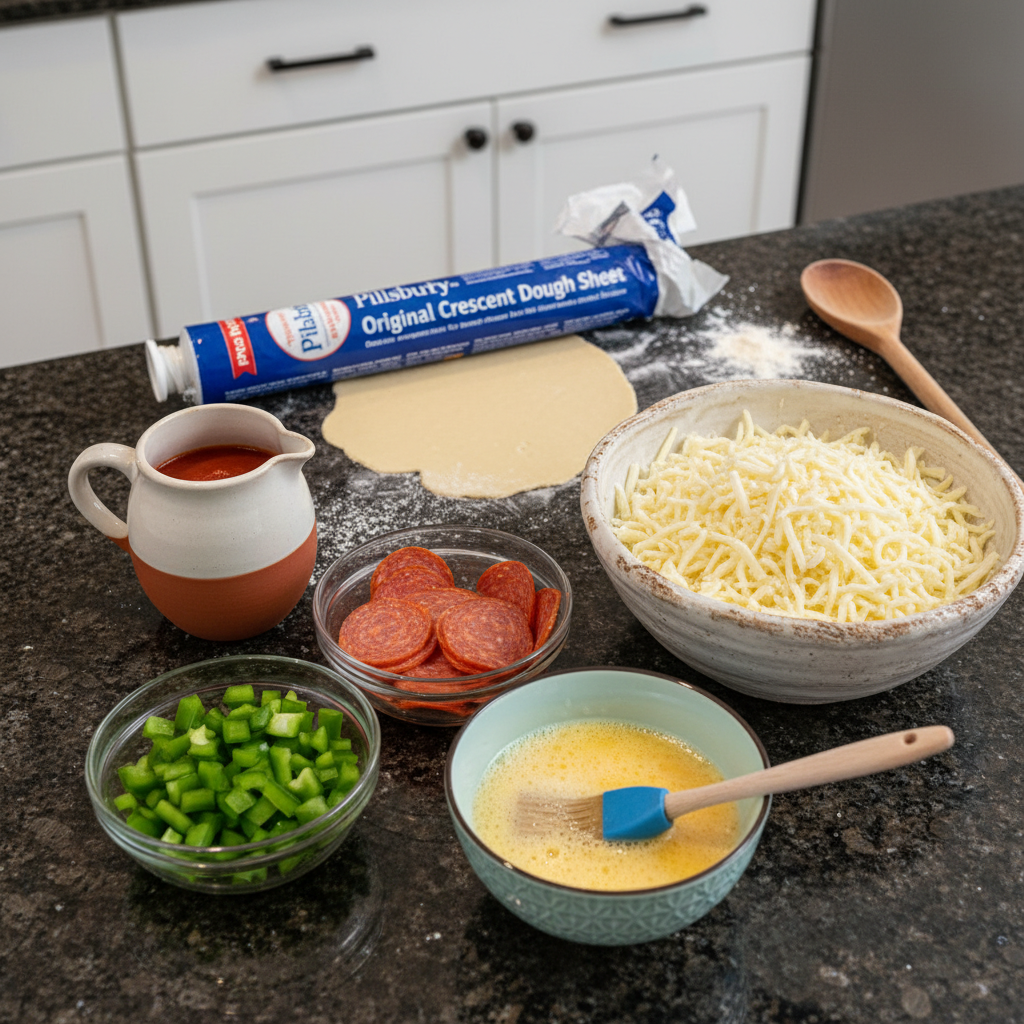
- 1 small green bell pepper
- 1 1/2 cups roasted garlic marinara sauce or regular marinara sauce
- 1 block (8 oz) mozzarella cheese, shredded
- 1 package (3.5 oz) sliced pepperoni, chopped
- 1 can (8 oz) refrigerated Pillsbury™ Original Crescent Dough Sheet
- 1 egg, slightly beaten
Ingredient Notes & Substitutions
For the green bell pepper, choose one that is firm and boasts a vibrant green color. This is not just for flavor, but it is also essential for creating our iconic shamrock shape. Its mild, slightly sweet crunch is a wonderful contrast to the rich pizza filling.
When it comes to marinara sauce, feel free to use your favorite! A roasted garlic marinara sauce adds a lovely depth of flavor, but a good quality regular marinara sauce works beautifully too. Store-bought options like Rao’s or Prego are always reliable, or you can certainly use a homemade version if you have one on hand.
For the mozzarella cheese, I always recommend using low-moisture, part-skim mozzarella and shredding it yourself from a block. Pre-shredded cheese often contains anti-caking agents that can hinder smooth melting. Freshly shredded mozzarella melts into a gooey, irresistible layer, making your mini pizza pot pies truly decadent.
The pepperoni adds a classic pizza flavor. You can use mini pepperoni slices or simply chop larger slices. If you are looking for variations, feel free to substitute with cooked crumbled sausage, or even chopped cooked chicken breast for a different protein twist.
The Pillsbury™ Original Crescent Dough Sheet is perfect for this recipe due to its convenience and flaky texture. It makes creating these individual pizza pot pies incredibly easy. I will discuss some great alternatives later if you prefer a different kind of dough.
Finally, the egg wash is a simple but effective step. A slightly beaten egg brushed over the dough before baking helps it achieve that beautiful golden brown and slightly crisp finish.
How to Make Shamrock Mini Pizza Pot Pies
Preheat your oven to 375°F. You will want to lightly spray 4 (8-oz) glass custard cups or ramekins with cooking spray. Place these prepared ramekins on a pan with sides to catch any potential drips and make handling easier.
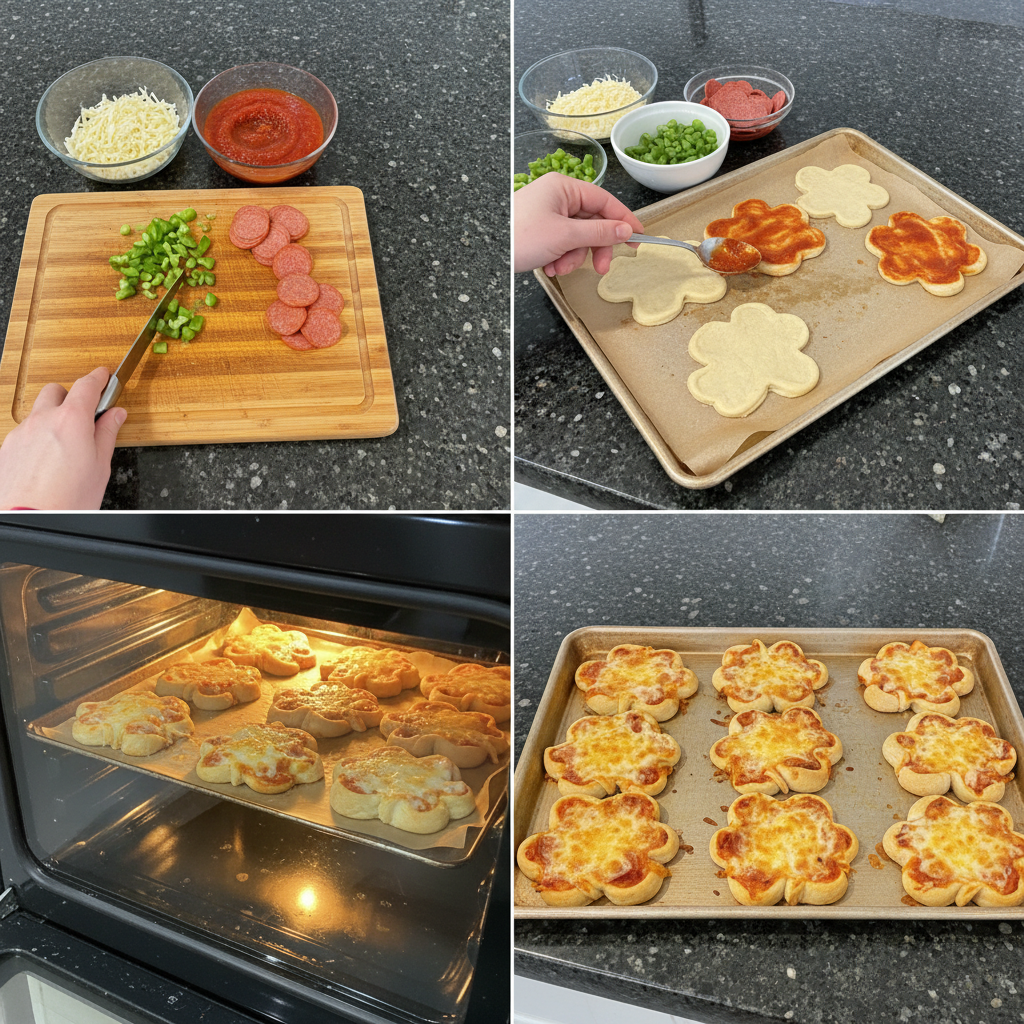
Next, we will prepare our festive green bell pepper. Cut 4 (1/4-inch) rings from the center portion of the bell pepper; these will be our shamrock tops, so set them aside carefully. Chop the remaining bell pepper into small pieces. In a large microwavable bowl, combine the chopped bell pepper, marinara sauce, shredded mozzarella cheese, and chopped pepperoni. Microwave this mixture uncovered on High for 4 minutes, stirring after each minute, until the mixture is hot and fragrant. This pre-heating ensures your filling is piping hot when it goes into the oven. Divide this hot pizza mixture evenly among your prepared ramekins, filling each with about 3/4 cup.
Now for the dough. On a lightly floured surface, gently pat out the Pillsbury™ Original Crescent Dough Sheet to form a 14×9-inch rectangle. Ensure the thickness is even across the entire sheet for consistent baking. Using a round cookie cutter or a glass rim, cut 4 (4 1/2-inch) circles from the dough sheet.
This is where our unique twist comes in! Place these dough circles on a separate baking sheet and blind bake them in the preheated 375°F oven for 5-7 minutes, or until they are lightly golden and firm to the touch. This crucial step prevents a soggy bottom and gives you a wonderfully crispy crust.
Once the dough circles are blind-baked, carefully place one dough circle on top of each ramekin, gently pressing the dough around the edges to seal. Brush the top of each dough circle generously with the slightly beaten egg. Finally, top each pot pie with one of the reserved green bell pepper rings to create your charming shamrock mini pizza.
Bake for 15 to 18 minutes, or until the dough is beautifully golden brown and fully baked through, with the cheese inside bubbling and melted. The crust should look flaky and inviting.
Allow the mini pizza pot pies to cool slightly before serving, as the filling will be very hot. Enjoy your festive Shamrock Mini Pizza Pot Pies!
Shamrock Shapes & Dough Alternatives
Crafting the Perfect Bell Pepper Shamrock Shape
Making the bell pepper shamrock shape is a really fun part of this recipe, and it is a great way to involve kids in the kitchen! To create consistent shamrocks, choose a medium-sized green bell pepper. Carefully cut off the top and bottom, then slice the remaining middle section into 1/4-inch thick rings. You can use the natural curves of the pepper to suggest the shamrock shape, or for extra precision, you can use a very small, sharp cookie cutter (like a tiny heart or clover shape) to cut out the inner parts of the ring. Guide kids by showing them how to gently press the cookie cutter. If green bell peppers are not your thing, or if you want to try something different, consider arranging a few small green olive slices or even tiny spinach leaves in a clover pattern on top of the dough before baking. The goal is to add that festive green touch!
Dough Alternatives for Your Mini Pizza Pot Pies
While Pillsbury™ Original Crescent Dough Sheet is fantastic for its ease and flaky texture, there are several great alternatives if you want to experiment or use something different. Each will give your mini pizza pot pies a slightly different character!
Puff Pastry: This is an excellent choice for an even flakier, richer crust. Thaw a sheet of puff pastry according to package directions, then roll it slightly thinner and cut out 4 1/2-inch circles. Blind bake as directed in the recipe, but keep an eye on it as puff pastry can brown faster. The texture will be incredibly light and airy.
Store-bought Pizza Dough: If you prefer a more traditional pizza crust, store-bought pizza dough works well. Roll it out very thin, to about 1/8-inch thickness, then cut your circles. You might need to blind bake it for a few minutes longer than the crescent dough, perhaps 7-10 minutes, to ensure it is firm and lightly golden before adding the filling.
Homemade Pizza Dough: For those who love baking from scratch, your favorite homemade pizza dough recipe can certainly be used. Just be sure to roll it out thin enough and blind bake it to prevent a soggy bottom, as homemade dough can be quite moist.
Gluten-Free Options: To make these Shamrock Mini Pizza Pot Pies gluten-free, look for store-bought gluten-free puff pastry sheets or gluten-free pizza dough. Follow the rolling and cutting instructions, and adjust blind baking times as needed, keeping an eye on the specific product’s recommendations. This allows everyone to enjoy these festive treats!
Each of these alternatives will affect the final texture and potentially the baking time, so always monitor your pot pies closely as they bake.
Pro Tips & Troubleshooting
Pro Tips for Success
Always blind bake the dough: I cannot stress this enough! This is the unique twist that guarantees a crispy, golden crust and prevents any dreaded sogginess, making your mini pizza pot pies perfect every time.
Handle hot ramekins safely: After baking, always use sturdy oven mitts to remove the ramekins from the oven. Place them on a heat-safe surface or a cooling rack, and allow them to cool for a few minutes before serving. The filling will be extremely hot.
Ensure a hot filling: While the filling is microwave-heated, it is important to ensure it is piping hot before assembly. This helps everything bake evenly and quickly. If you add pre-cooked meat like sausage, aim for an internal temperature around 165°F (74°C) for food safety, though the cheese will be deliciously melted long before that.
Achieve even browning: To ensure your dough browns beautifully, use cooking spray liberally on the ramekins and brush the dough with egg wash. If you notice one side browning faster, rotate your baking sheet halfway through the baking time.
Shred your own cheese: For the best melt and flavor, shred a block of mozzarella cheese yourself. Pre-shredded varieties often contain starches that can make the cheese less gooey and flavorful.
Use a pizza cutter for dough: A pizza cutter is surprisingly effective for cutting clean, precise circles from your dough sheet. It is much easier than a knife and ensures smooth edges.
Do not overfill: Be mindful not to overfill your ramekins. About 3/4 cup of filling per ramekin is perfect. Overfilling can lead to spillage in the oven and unevenly baked pot pies.
Common Mistakes to Avoid
Soggy Crust: The biggest mistake you can make is skipping the blind bake! As I have emphasized, this step is essential for a crisp crust. Without it, the moisture from the filling will seep into the dough, resulting in a soft, unappetizing bottom. Always blind bake for that perfect texture.
Dough Not Browning: If your dough is not achieving that beautiful golden brown, it could be a few things. First, double-check your oven temperature; an inaccurate oven can prevent proper browning. Make sure you have applied the egg wash evenly, as this aids in browning. Also, avoid overcrowding the oven, which can trap moisture and inhibit browning.
Filling Too Runny: This can happen if your toppings release a lot of moisture. If you are adding very watery vegetables like mushrooms or extra bell peppers, consider sauteing them briefly beforehand to remove excess water. For a quick fix, if your filling seems too liquidy, stir in a spoonful of breadcrumbs before dividing it into the ramekins.
Overflowing Ramekins: Filling the ramekins too high is a common pitfall. This leads to messy spills in your oven, makes cleanup harder, and can also prevent the dough from baking properly around the edges. Stick to the recommended filling amount.
Under-baked Dough: Do not pull your mini pizza pot pies out of the oven too soon. The dough needs to be truly golden brown, not just lightly colored, to ensure it is fully cooked through and wonderfully flaky. If it looks pale, give it a few more minutes, keeping a close eye on it.
Serving & Storage
Serving Ideas
These Shamrock Mini Pizza Pot Pies are absolutely delightful served hot as individual mini pizza pot pies, perfect for a festive occasion like St. Patrick’s Day. The cheesy, savory filling with that crispy, flaky crust is a meal in itself. To make it a complete St. Patrick’s Day themed meal, I love serving them alongside a fresh, crisp green salad with a light vinaigrette. A slice of warm Irish soda bread would also be a lovely accompaniment, or even a light vegetable soup. For plating, you can garnish each pot pie with a sprinkle of fresh parsley for an extra pop of green, or offer a small side of extra marinara for dipping. Just be sure to let them cool for a few minutes after baking; the filling will be molten hot!
Storage and Make-Ahead
These mini pizza pot pies are fantastic for leftovers, though they rarely last long in my house! If you do have any, allow them to cool completely before storing. Place them in an airtight container in the refrigerator, where they will keep well for 3-4 days.
They are also quite freezer-friendly! Once completely cooled, you can individually wrap each pot pie tightly in plastic wrap, then place them in a freezer-safe bag or container. They will keep in the freezer for up to 1-2 months. When you are ready to enjoy, you can reheat them from frozen or thawed.
For reheating, I recommend using the oven or an air fryer to help maintain that wonderful crispness. Reheat in a preheated oven at 350°F (175°C) for about 15-20 minutes for thawed pies, or 25-30 minutes for frozen, until heated through and the crust is crisp again. An air fryer at 325°F (160°C) for 8-12 minutes also works beautifully. While a microwave will heat them quickly, the crust might lose some of its crisp texture.
If you want to get a head start, you can definitely prepare the filling ahead of time. Mix all the filling ingredients and store them in an airtight container in the refrigerator for 1-2 days. This streamlines assembly when you are ready to bake, making these a great option for easy entertaining!
Conclusion
These Shamrock Mini Pizza Pot Pies are truly a festive delight, embodying the spirit of St. Patrick’s Day with their vibrant green bell pepper shamrock and delicious, comforting flavors. What truly sets them apart is that ingenious blind-baking method, ensuring every bite delivers a perfectly crispy, flaky crust that stands up to the rich, cheesy filling. This easy recipe is not just a meal; it is an experience, inviting creativity in the kitchen and bringing smiles to the table. Whether you are a seasoned chef or a beginner, you will find these mini pizza pot pies simple to master and incredibly rewarding to make. So, gather your family, try out the suggested variations, and make these your own. I encourage you to whip up a batch this St. Patrick’s Day and share your delicious creations!
FAQ
- How do you make the shamrock shape for these mini pizzas?
- To make the shamrock shape, cut 1/4-inch thick rings from the center of a green bell pepper. You can use these rings as they are, or for a more defined shape, you can use a tiny cookie cutter to cut out a clover design from the pepper ring itself.
- Can I customize the fillings for Shamrock Mini Pizzas?
- Absolutely! The filling is highly customizable. Beyond pepperoni, consider cooked crumbled sausage, chopped ham, or even diced cooked chicken. For vegetables, try finely chopped onions, mushrooms, or black olives. Just ensure any high-moisture vegetables are sautéed first to avoid a runny filling.
- How long can I store leftover Shamrock Pizza Pot Pies?
- Leftover Shamrock Mini Pizza Pot Pies can be stored in an airtight container in the refrigerator for 3-4 days. They are also freezer-friendly and can be kept for 1-2 months if individually wrapped and stored properly.
- What are some kid-friendly variations for St. Patrick’s Day pizzas?
- Kids love these! You can simplify the filling with just cheese and sauce, or let them choose their favorite toppings. Instead of bell pepper, you could use green olives or even just a sprinkle of dried basil for a green touch. They can also help pat out the dough and place the shamrock rings.
- What if I don’t have glass custard cups (ramekins)?
- If you do not have glass custard cups or ramekins, you can use a muffin tin. Simply line the muffin tin with parchment paper cups, or spray it very well with cooking spray. You will likely need to adjust the dough circle size to fit your muffin cups, and the baking time might be slightly shorter.
- Can I prepare Shamrock Pizza Pot Pies ahead of time?
- Yes, you can! The filling mixture can be prepared 1-2 days in advance and stored in an airtight container in the refrigerator. When ready to bake, simply microwave the filling until hot, then proceed with the rest of the recipe.
- Is Pillsbury crescent dough sheet gluten-free?
- No, Pillsbury Original Crescent Dough Sheet is not gluten-free. If you need a gluten-free option, look for store-bought gluten-free puff pastry or gluten-free pizza dough as alternatives.
- What’s the best way to reheat mini pizza pot pies?
- For the crispiest crust, reheat cooled or thawed mini pizza pot pies in an oven preheated to 350°F (175°C) for 15-20 minutes, or in an air fryer at 325°F (160°C) for 8-12 minutes, until heated through and the crust is crisp. Microwaving is quicker but may result in a softer crust.
- Can I use different cheeses for Shamrock Mini Pizzas?
- Absolutely! While mozzarella is classic, you can blend it with other cheeses for added flavor. A mix of mozzarella and provolone, or a touch of Parmesan or sharp white cheddar, would also be delicious. Just ensure the primary cheese is a good melter.

Shamrock Mini Pizza Pot Pies: Your New St. Patrick's Day Favorite!
Ingredients
Equipment
Method
- Preheat your oven to 375°F (190°C). Lightly spray 4 (8-oz) glass custard cups or ramekins with cooking spray and place them on a baking pan with sides.
- Prepare the green bell pepper: cut 4 (1/4-inch) rings from the center for shamrock tops and set aside. Chop the remaining bell pepper into small pieces. In a large microwavable bowl, combine the chopped bell pepper, marinara sauce, shredded mozzarella cheese, and chopped pepperoni. Microwave uncovered on High for 4 minutes, stirring after each minute, until hot and fragrant. Divide this hot pizza mixture evenly among the prepared ramekins, filling each with about 3/4 cup.
- On a lightly floured surface, gently pat out the Pillsbury™ Original Crescent Dough Sheet to form a 14x9-inch rectangle with even thickness. Using a 4 1/2-inch round cookie cutter or a glass rim, cut 4 circles from the dough sheet.
- Place these dough circles on a separate baking sheet and blind bake them in the preheated 375°F (190°C) oven for 5-7 minutes, or until lightly golden and firm to the touch.
- Once blind-baked, carefully place one dough circle on top of each ramekin, gently pressing the dough around the edges to seal. Brush the top of each dough circle generously with the slightly beaten egg. Top each pot pie with one of the reserved green bell pepper rings to create your shamrock.
- Bake for 15 to 18 minutes, or until the dough is beautifully golden brown and fully baked through, with the cheese inside bubbling and melted.
- Allow the mini pizza pot pies to cool slightly before serving, as the filling will be very hot. Enjoy your festive Shamrock Mini Pizza Pot Pies!


