 Skip to content
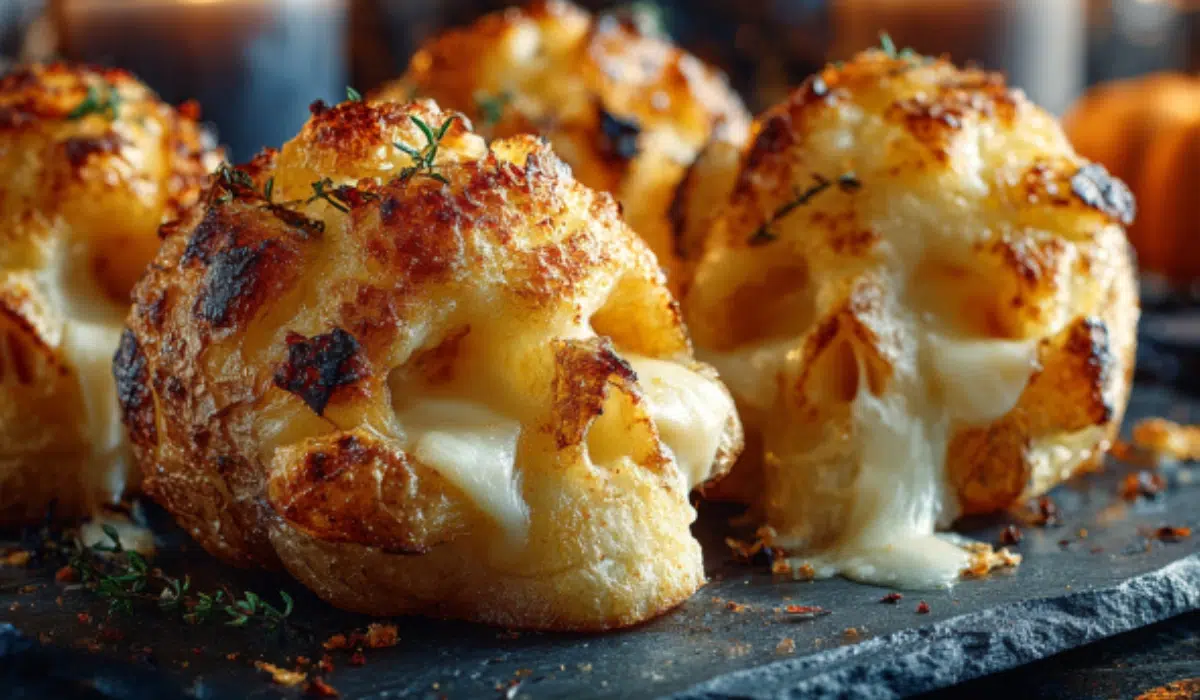
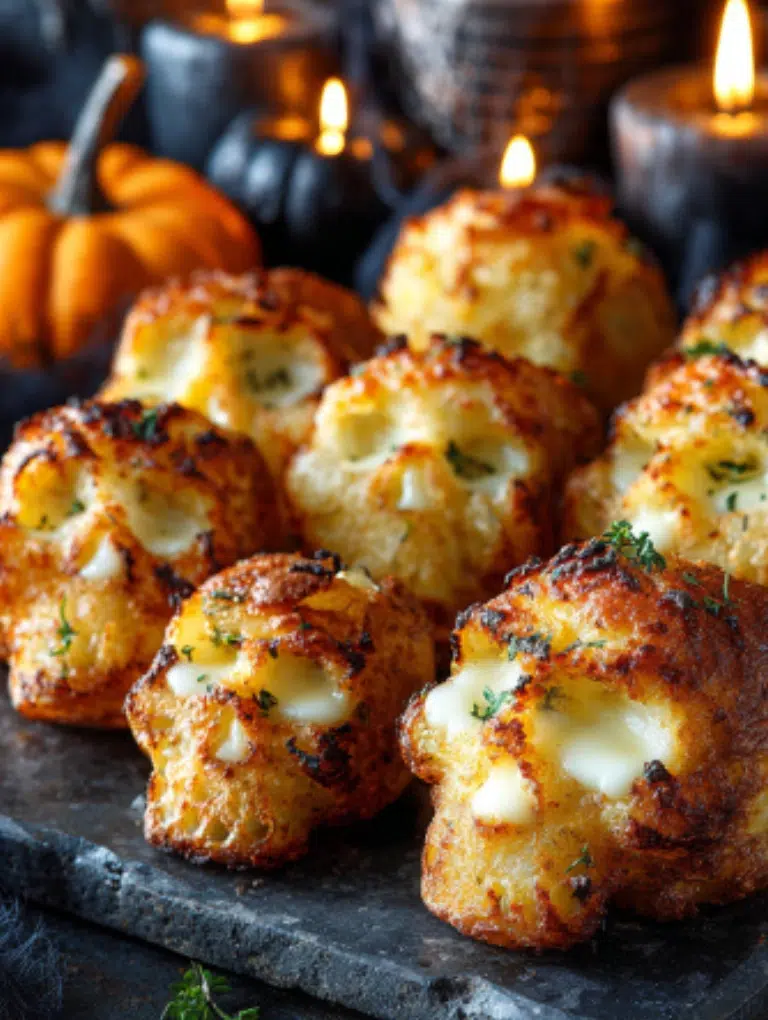
Halloween is the season for playful scares, and these Spooky Halloween Skull Potatoes will steal the show at your party table. Shaped like eerie little skulls, they’re crispy on the outside, cheesy in the middle, and almost too fun to eat. This recipe takes simple potatoes and transforms them into a spooky snack that guests of all ages will love. Whether you carve or mold them, the result is a dish that looks impressive but comes together with ease, perfect for a festive gathering.
Table of Contents
Why You’ll Love This Recipe
- Quick prep and fast cook time. You get party ready in under an hour.
- Simple staples. Potatoes, cheese, olive oil, and a few fun toppings.
- Two easy methods. Carve slices or use silicone molds for picture perfect skulls.
- Crowd pleaser. Kids giggle, adults snack, and the platter clears fast.
- Make ahead friendly. Shape early, bake or broil right before guests arrive.
These Spooky Halloween Skull Potatoes look bold and taste comforting. Crisp edges meet melty cheese, so every bite feels rich and satisfying. You will impress guests without stress.
Ingredients Needed
For Molded Mashed Skull Potatoes
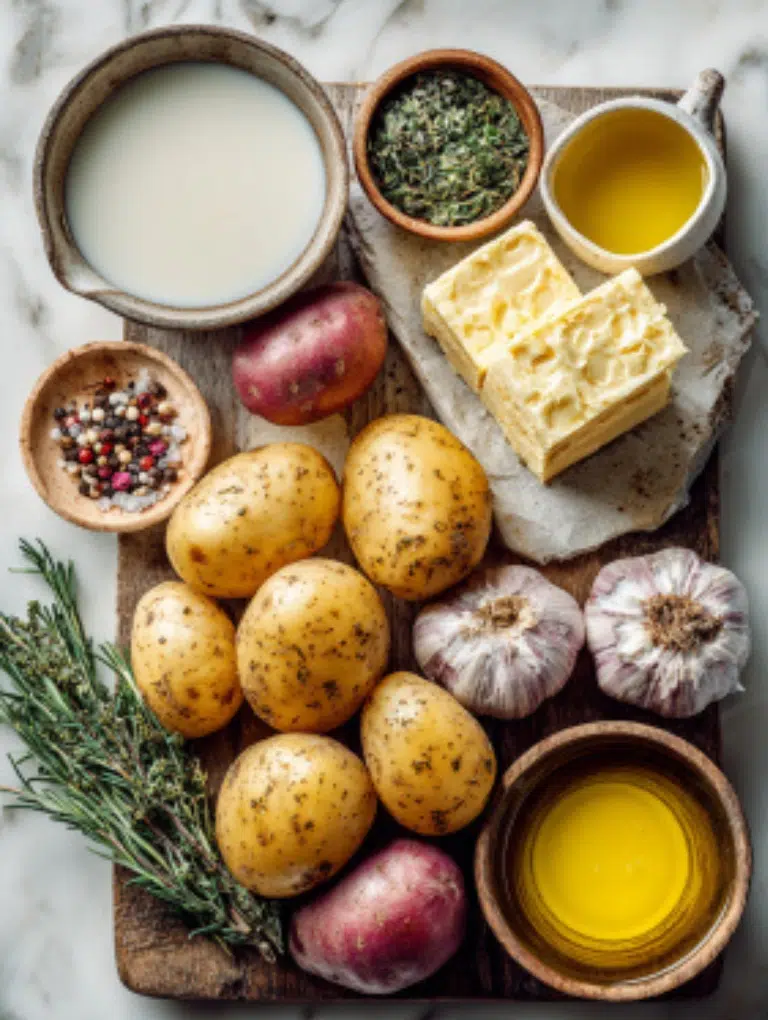
- 2 pounds russet potatoes, peeled and chopped
- 4 tablespoons unsalted butter, softened
- ½ cup whole milk or cream, warmed
- 1 large egg, lightly beaten (helps set the shape)
- 1 teaspoon garlic powder
- 1 teaspoon salt, more to taste
- ½ teaspoon black pepper
For Carved Roasted Skull Potatoes
- 2 pounds small waxy potatoes (Yukon gold or red work best)
- 3 tablespoons olive oil
- 1 teaspoon smoked paprika
- 1 teaspoon garlic powder
- ½ teaspoon onion powder
- ½ teaspoon salt
- ¼ teaspoon black pepper
Optional Toppings and Dips
- ½ cup shredded mozzarella or Parmesan
- Chopped chives or green onions
- Sour cream or garlic aioli
- Spicy ketchup or marinara for dipping
Notes & Substitutions
- Potatoes: Use starchy Russets for fluffy mash and choose waxy varieties like Yukon Gold or red when you need slices that hold their shape, as noted by Illinois Extension, and for another cozy use try this potato soup recipe.
- Dairy-free: Use olive oil and plant-based milk in place of butter and cream.
- Cheese swaps: Try sharp cheddar for stronger flavor or vegan cheese for dairy-free.
- Spice it up: Add cayenne or chili flakes for heat.
How to Make Spooky Halloween Skull Potatoes
Before You Start
- Preheat oven to 400°F for baked skulls or 375°F if using an air fryer.
- Grease silicone skull molds lightly with oil or butter if molding.
- If carving, have a small paring knife ready and choose evenly sized potatoes.
Method 1: Molded Mashed Skull Potatoes
- Boil the potatoes: Place peeled chunks in salted water, bring to a boil, and cook until fork tender, about 15 minutes. Drain well.
- Steam dry: Let potatoes sit in the hot pot for 2–3 minutes so excess moisture evaporates. This keeps the mash firm.
- Mash and season: Add butter, warm milk, garlic powder, salt, and pepper. Mash until smooth, then stir in the beaten egg. The egg helps hold the skull shape.
- Fill the molds: Pack the mash firmly into greased skull molds. Chill 10 minutes for stability, or bake right away.
- Bake until set: Place molds on a tray and bake 20–25 minutes, or air fry 15–18 minutes, until lightly golden and firm to touch.
- Unmold and finish: Gently release skulls. For crispier edges, return unmolded skulls to oven for another 5–7 minutes.
Method 2: Carved Roasted Skull Potatoes
- Slice slabs: Cut large potatoes into ½-inch slices. Use a skull-shaped cookie cutter to punch out skulls. Save scraps for mash or soup.
- Soak in ice water: Rinse or briefly soak the cut potatoes to remove surface starch before drying, a step Penn State Extension recommends for better texture.
- Season: Toss skulls with olive oil, paprika, garlic powder, onion powder, salt, and pepper.
- Pan sear first: Heat a skillet with a little oil and cook skulls 3–4 minutes per side until golden.
- Bake or broil: Transfer to a tray, top with mozzarella if desired, and broil 1–2 minutes until cheese melts and bubbles.
- Add spooky features: Place mini pepperoni for eyes and nose, then serve with marinara dip.
Air Fryer Option
- Molded: 375°F for 15–18 minutes until golden.
- Carved: 390°F for 12–15 minutes, flipping halfway for even crispness.
Pro Tips & Troubleshooting
Expert Tips
- Steam dry potatoes: After boiling, let them sit a few minutes so excess water evaporates. This gives you fluffy mash that holds shape.
- Grease molds well: A light coat of oil or butter helps the skulls release cleanly.
- Pack tightly: Press mashed potatoes firmly into molds to avoid gaps that cause breakage.
- Carve shallow: When cutting faces into raw potato slices, stick to simple shapes so they don’t collapse during roasting.
- Use high heat: A hot oven or air fryer makes the edges crisp and golden.
Common Mistakes to Avoid
- Overmixing mash: This makes the texture gummy instead of smooth. Mash gently.
- Skipping soak: If you don’t soak carved slices, they may stick and cook unevenly.
- Underseasoning: Potatoes need plenty of salt and spices or they taste flat.
- Pulling too soon: Let skulls bake long enough to firm up, or they’ll crumble when unmolded.
Quick Creative Trick
Add a slice of black olive or mini pepperoni in the eye sockets before baking. It makes the skulls look extra spooky and saves you a garnish step later.
Serving, Storage & Variations
Serving Ideas
- Arrange skull potatoes on a dark platter with a bowl of marinara for a creepy effect, and add Pumpkin Chocolate Chip Cookies for a sweet finish.
- Sprinkle chives or parsley for a pop of color, or round out the spread with Cheesy Meat Potato Casserole for hungry guests.
- Serve alongside sliders, chicken wings, or Halloween-themed dips, plus a refreshing Agua Fresca recipe for balance.
- Add edible “blood” by drizzling spicy ketchup or sriracha over the skulls, and serve them with a zesty lemon chicken recipe.
Make Ahead, Fridge, and Freezer
- Make ahead: Shape molded skulls up to a day early and store covered in the fridge. Bake right before serving.
- Fridge/Freezer: Store cooked skulls in the fridge for 3 to 4 days, or freeze for best quality up to 3 to 4 months, according to the USDA Food Safety and Inspection Service.
- Reheat: Reheat leftovers until they reach an internal temperature of 165°F for safety, as advised by the Academy of Nutrition and Dietetics, then bake or air fry to restore crispness.
Variations
- Cheesy jalapeño: Stir shredded cheddar and diced jalapeños into the mash.
- Garlic herb: Add roasted garlic and fresh thyme or rosemary.
- Vegan: Swap butter for olive oil, milk for plant-based milk, and use vegan cheese.
- Kid-friendly: Skip carving and just use molds, then let kids decorate with edible “faces” using olives or veggies.
Nutritional Information
Here’s an approximate breakdown per serving (based on 1 of 6 servings, with cheese and toppings included):
| Nutrient | Amount per serving |
|---|---|
| Calories | 390 |
| Total Fat | 24 g |
| Saturated Fat | 9 g |
| Cholesterol | 40 mg |
| Sodium | 650 mg |
| Carbohydrates | 31 g |
| Fiber | 2 g |
| Sugars | 3 g |
| Protein | 14 g |
| Potassium | 775 mg |
| Vitamin C | 9 mg |
Potatoes contribute potassium and vitamin C, nutrients highlighted by University of Nebraska–Lincoln Extension.
Note: These values were calculated using the listed ingredients and may vary with substitutions or toppings. For accuracy with your changes, use a nutrition calculator like MyFitnessPal or Cronometer.
Conclusion
Spooky Halloween Skull Potatoes are the ultimate mix of fun and flavor. They look impressive on any party table yet use simple ingredients you already have. With two easy methods molding mashed potatoes or carving roasted slices you can choose the style that fits your time and tools. Both deliver crispy edges, cheesy centers, and smiles all around.
If you give these skulls a try, leave a comment and a star rating to let others know how they turned out. Share your spooky creations on Pinterest or Facebook, and tag your friends to inspire their Halloween menu. What toppings or twists will you add to your skull potatoes? We’d love to hear your ideas below!
Frequently Asked Questions (FAQ)
Can I make skull potatoes a day ahead and reheat without losing shape?
Yes. Shape and chill molded skulls up to 24 hours in advance, then bake just before serving. If already cooked, reheat in the oven or air fryer so they stay crisp.
Which potatoes work best for molds vs carving?
Russet potatoes are best for mash in molds because they turn fluffy and set firmly. Waxy potatoes like Yukon gold or red are ideal for carving since they hold shape when roasted.
How do I keep molded skulls from sticking to silicone molds?
Grease the molds lightly with oil or butter, then press the mash firmly. Let the baked skulls cool a few minutes before unmolding. This helps them release cleanly.
What oven and air fryer temps give the best browning?
Bake molded skulls at 400°F for 20–25 minutes or air fry at 375°F for 15–18 minutes. Carved slices crisp best at 425°F or 390°F in the air fryer.
Can I make a dairy-free version that still tastes rich?
Yes. Replace butter with olive oil or vegan butter and swap in unsweetened plant milk. Use dairy-free cheese for topping if you want the melty finish.
How do I stop mashed skulls from collapsing after baking?
Make sure the mash is not too wet. Steam dry the potatoes after boiling and pack the molds tightly. Adding one egg to the mash also helps hold structure.
Are skull potatoes freezer friendly, and how should I thaw and reheat?
Yes. Cool them completely, wrap in foil or store in freezer bags, and freeze for up to 1 month. Reheat from frozen in the oven at 375°F until hot and crisp.
Spooky Halloween Skull Potatoes
Crispy, cheesy, and hauntingly fun, these Spooky Halloween Skull Potatoes bring Halloween spirit to your table. Perfect for parties, they’re easy to make with simple ingredients and two creative methods.
6
servings20
minutes25
minutes390
kcalIngredients
- For Molded Mashed Skull Potatoes
2 lbs russet potatoes, peeled and chopped
4 tbsp unsalted butter, softened
½ cup whole milk or cream, warmed
1 egg, lightly beaten
1 tsp garlic powder
1 tsp salt
½ tsp black pepper
- For Carved Roasted Skull Potatoes
2 lbs small waxy potatoes (Yukon gold or red)
3 tbsp olive oil
1 tsp smoked paprika
1 tsp garlic powder
½ tsp onion powder
½ tsp salt
¼ tsp black pepper
- Optional Toppings/Dips
Shredded mozzarella or Parmesan
Fresh chives
Sour cream or garlic aioli
Marinara or spicy ketchup
Directions
- Molded Mash Method: Boil potatoes until tender, steam dry, mash with butter, milk, seasoning, and egg. Pack firmly into greased skull molds and bake at 400°F for 20–25 minutes. Unmold and crisp if desired.
- Carved Roast Method: Slice potatoes into ½-inch slabs, cut skull shapes with a cookie cutter, soak in ice water, pat dry, season, pan sear, then bake or broil. Add cheese and toppings.
- Air Fryer Option: Bake molded skulls at 375°F for 15–18 minutes, or carved at 390°F for 12–15 minutes.
Notes
- Russets are best for mash; waxy potatoes hold shape when carved.
- Grease molds well for easy release.
- Steam dry boiled potatoes to avoid gummy mash.
- Make ahead: Shape a day early, then bake before serving.
Nutrition Facts
- Calories: 390kcal
- Fat: 24g
- Saturated Fat: 9g
- Cholesterol: 40mg
- Sodium: 650mg
- Potassium: 775mg
- Carbohydrates: 31g
- Fiber: 2g
- Sugar: 3g
- Protein: 14g
- Vitamin C: 9mg


