 Skip to content
 St. Patrick’s Day brings with it a vibrant energy, a celebration of all things green, and, in my kitchen, a wonderful excuse to indulge in decadent desserts. If you are looking for a show-stopping centerpiece that captures the festive spirit and delights every palate, allow me to introduce you to my ultimate St. Patrick’s Day Brownie Trifle. This layered beauty combines rich chocolate brownies, creamy mint-infused pudding, and a luxurious homemade Mint Irish Cream Whipped Cream. It is an irresistible creation perfect for celebrating. St. Patrick’s Day is a vibrant cultural and religious holiday with fascinating traditions, including unique culinary customs. Whether you are a seasoned baker or just starting, this recipe is designed to guide you effortlessly to a spectacular dessert that will impress everyone.
Why You’ll Love This Recipe
I know there are many St. Patrick’s Day dessert recipes out there, but this St. Patrick’s Day Brownie Trifle truly stands out because of a few special touches I have added. My unique twist elevates this treat from simply festive to truly extraordinary. If you’re looking for another equally delightful and easy treat, consider trying this no-bake shamrock shake pie.
Superior Texture and Flavor: For this trifle, I skip the store-bought whipped topping and opt for a homemade Mint Irish Cream Whipped Cream. This provides a lighter, richer dairy flavor and a silkier texture that you just cannot get from a tub. The Irish cream liqueur adds a sophisticated, adult-friendly boozy note that is absolutely perfect for a holiday celebration like St. Patrick’s Day. For another amazing dessert perfect for your St. Patrick’s Day festivities, check our Ultimate Guinness Chocolate Cake.
Intense Mint Profile: Instead of just relying on the green color for a hint of mint, I infuse the vanilla pudding directly with mint extract. This offers a cleaner, more vibrant mint flavor that perfectly complements the rich chocolate brownies without tasting artificial. It is a game-changer for any mint chocolate dessert.
Effortless Elegance: Despite these gourmet twists, I promise you this St. Patrick’s Day Brownie Trifle recipe remains relatively simple to assemble. It offers a high reward for minimal effort, making it ideal for busy hosts. Its visual appeal as a festive, layered dessert speaks for itself.
Perfect for Parties: This brownie trifle is fantastic for gatherings. You can easily make it ahead of time, which frees you up to enjoy your St. Patrick’s Day festivities without last-minute stress. It is also quite scalable, making it suitable for any size party.
Ingredients Needed
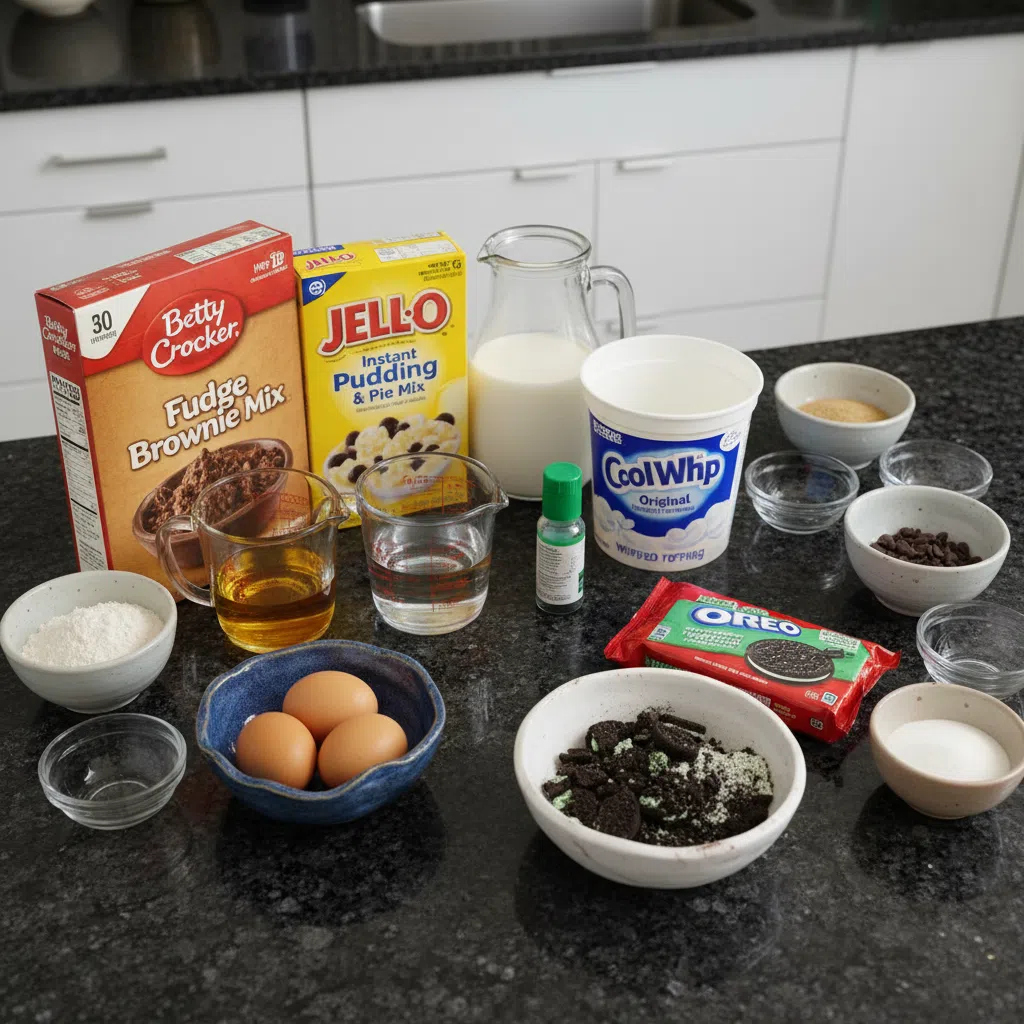
- 1 box Brownie Mix (*plus ingredients on box, 8×8 pan size)
- 3.5 oz Instant Vanilla Pudding Mix (* use large box if making full size trifle)
- 8 oz Cool Whip
- Green Food Coloring
- Mint Oreo’s (*crushed)
Ingredient Notes & Substitutions
I always find that understanding your ingredients makes for a better baking experience. Here is a little more detail on what we are using for our St. Patrick’s Day Brownie Trifle.
Brownie Mix: For the chocolate layers in your brownie trifle, you can absolutely use your favorite boxed brownie mix. I often reach for a dark chocolate or fudge brownie mix for an extra decadent flavor, but any 8×8 pan size mix will work beautifully. If you are feeling ambitious, feel free to use your go-to homemade brownie recipe. Just ensure they are completely cooled before cutting!
Instant Vanilla Pudding Mix: Instant vanilla pudding mix provides a wonderfully creamy base for our green layer. The trick to our unique twist is adding mint extract directly to the pudding. For a truly festive St. Patrick’s Day dessert, you can also use pistachio pudding mix, which naturally gives you a lovely green color and a subtle nutty flavor, eliminating the need for food coloring. If you are making a full-size trifle in a large trifle bowl, I recommend using a large box of pudding mix to ensure you have enough for generous layers.
Cool Whip vs. Homemade Mint Irish Cream Whipped Cream: While the basic recipe mentions Cool Whip, I strongly encourage you to embrace our unique twist and make your own Mint Irish Cream Whipped Cream. It is surprisingly simple and so much more delicious. For a basic batch, you will need 2 cups of heavy whipping cream, 1/2 cup powdered sugar, 1/2 teaspoon mint extract, and 2 tablespoons of Irish cream liqueur (like Baileys). Whip the cream, sugar, and mint extract until soft peaks form, then gently fold in the Irish cream. This homemade version adds a rich, airy texture and a sophisticated, boozy mint flavor that truly elevates this layered dessert.
Green Food Coloring: To achieve that vibrant St. Patrick’s Day green, you will need green food coloring. Gel food coloring provides a more intense and consistent color with fewer drops compared to liquid food coloring, which is something I often prefer. You can adjust the amount to get your desired shade, from a subtle pastel to a bold emerald.
Mint Oreos: These are essential for our St. Patrick’s Day Brownie Trifle. The crushed Mint Oreos add a delightful crunch and an extra burst of mint and chocolate flavor to each bite. You will need about 10-12 cookies for both the layers and the top garnish. Aim for a mix of fine crumbs and slightly larger chunks for textural interest.
Dietary Swaps: If you have dietary restrictions, this brownie trifle can be adapted! Look for gluten-free brownie mixes, which are widely available now. For a dairy-free option, you can use dairy-free instant pudding mixes (often made with almond milk or coconut milk) and substitute the heavy cream for full-fat coconut cream (chilled overnight) in the whipped topping. Just make sure your Irish cream liqueur is also dairy-free if you are using it.
How to Make St. Patrick’s Day Brownie Trifle
Making this St. Patrick’s Day Brownie Trifle is a fun and rewarding experience. Here is my step-by-step guide to creating a truly spectacular layered dessert.
Bake the Brownies
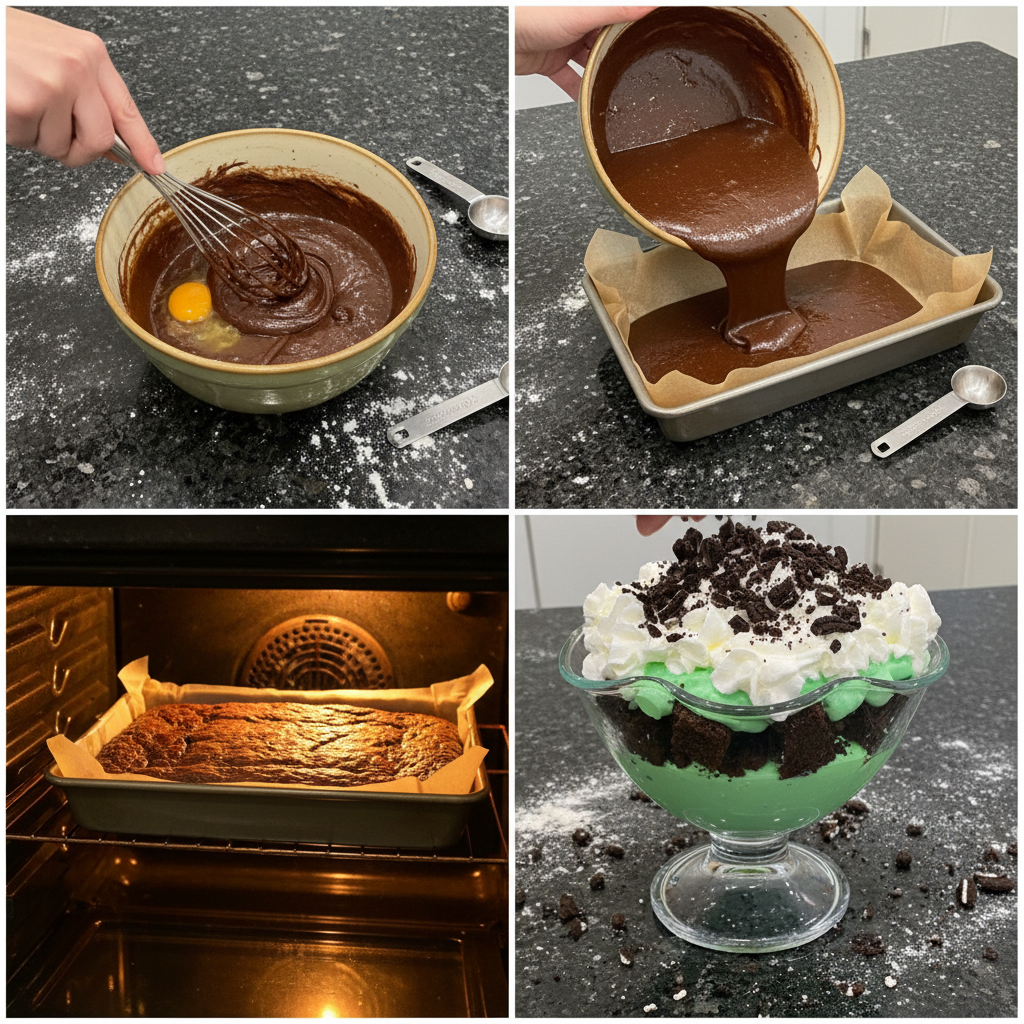
First, you will want to cook your brownies according to the directions on the box. I always make sure they are baked through but still wonderfully fudgy, not dry. Keep an eye on the baking time, as ovens can vary. Once they are baked, the most crucial step is to allow them to cool completely. I mean completely! This prevents crumbling when you cut them and ensures your layers stay neat and defined. If you are using homemade brownies, the same rule applies. A fully cooled brownie is a happy brownie in a trifle.
Prepare the Pudding
Next, prepare your instant vanilla pudding according to the package directions, typically by whisking with cold milk until it thickens. Aim for a smooth, lump-free consistency. Once the pudding is done and nicely thickened, this is where we add our unique twist: stir in a few drops of green food coloring until your desired shade of festive green is reached. More importantly, now is the time to add your mint extract! Start with about 1/2 teaspoon and taste, adding more if you desire a stronger mint flavor. This infusion truly makes the pudding layer pop with vibrant mint.
Crush the Mint Oreos
This step is quick and satisfying. Take a Ziploc bag and place about 10-12 Mint Oreos inside. Seal the bag, removing as much air as possible, and then use a rolling pin or the back of a spoon to smash the cookies. I like to aim for a mix of fine crumbs and some slightly larger chunks for varied texture, which adds a great crunch to our brownie trifle. This will provide enough for both the layers and a generous garnish on top.
Assemble the Trifle Layers
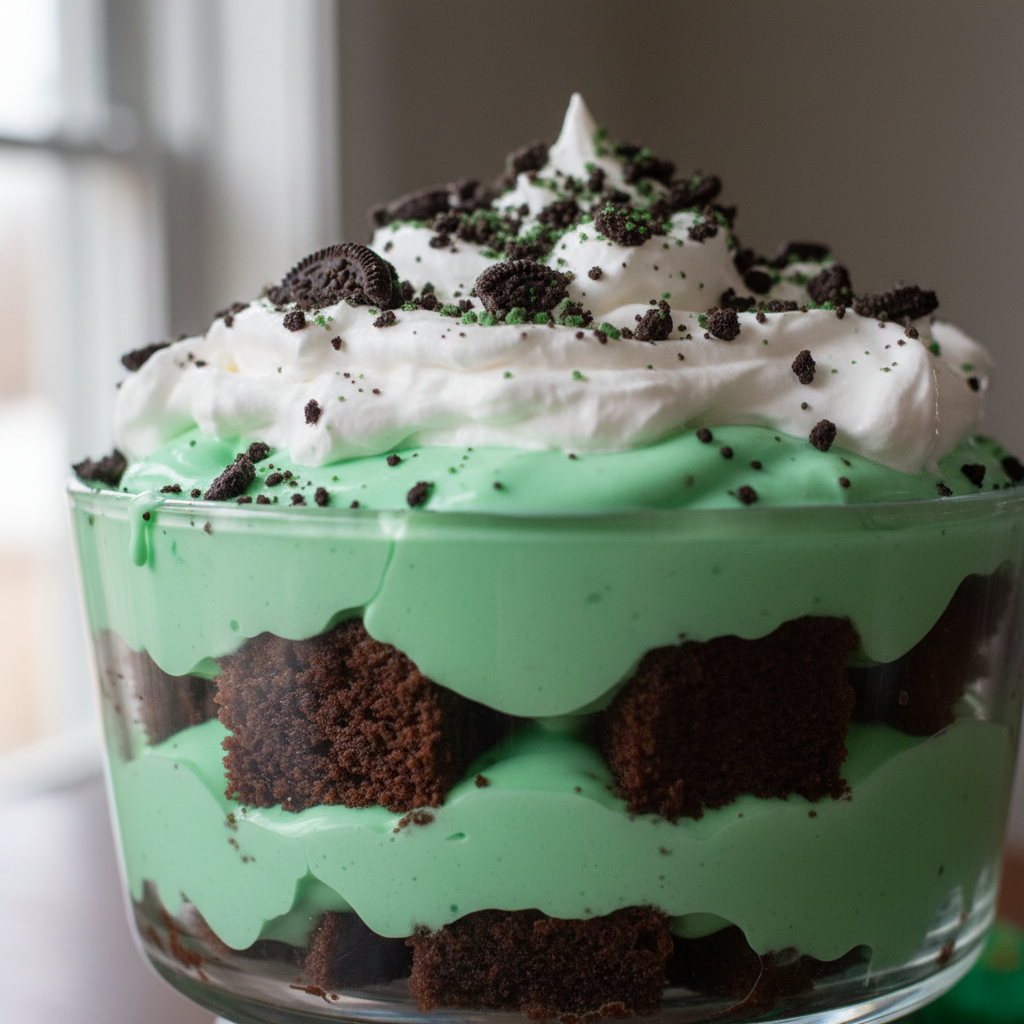
Now for the fun part: assembly! This is where your St. Patrick’s Day Brownie Trifle truly comes to life. First, cut your completely cooled brownies into even cubes, about 1-inch squares. Chilling the brownies in the fridge for a bit before cutting can help you get cleaner cuts. Now, grab your trifle bowl and begin layering. Start with a layer of the cut-up brownie cubes at the bottom. Gently press them down to form an even base. Next, carefully spread a layer of your mint-infused green pudding over the brownies, extending it to the edges of the bowl for a beautiful visual. Then, add a generous layer of our homemade Mint Irish Cream Whipped Cream. Remember, we are using this instead of Cool Whip for that superior flavor and texture. Follow with another layer of brownie cubes, then another layer of pudding, and finally, top it all off with a scattering of your crushed Mint Oreos. You can create two or three full sets of layers, depending on the size of your trifle bowl, always ending with the whipped cream and crushed Oreos for the top.
Chill and Serve
Once your beautiful trifle is assembled, cover it lightly and chill it in the refrigerator until you are ready to serve. This chilling time is important for the flavors to meld together beautifully and for the layers to set firmly, making for a much cleaner slice. I recommend at least 4 hours, but overnight is even better. As a reminder, if you want to skip the food coloring, you can use pistachio pudding mix for a natural green hue and a delicious minty flavor profile.
Mastering Your Trifle: Presentation & Customization
Creating a St. Patrick’s Day Brownie Trifle is an art, and I am here to help you master the presentation and customize it to your heart’s content.
Choosing the Right Trifle Bowl
The trifle bowl itself plays a starring role in this dessert. For a large family-style St. Patrick’s Day Brownie Trifle, I recommend a 3 to 4-quart clear glass trifle bowl. This allows all those beautiful layers of chocolate, green pudding, and creamy topping to shine through. If you are hosting a smaller gathering or want to offer individual servings, consider using smaller 8-10 ounce individual trifle cups or even charming mason jars for cute mini trifles. The visual impact of a clear glass vessel truly makes this dessert a showstopper.
Perfecting Your Layers
Neat layers are key to an impressive brownie trifle. To ensure your brownie cubes are uniform and do not crumble, I suggest chilling your baked brownies in the refrigerator for at least 30 minutes before cutting them. Use a sharp, serrated knife to cut them into even 1-inch cubes. When layering, gently press down each brownie layer to create a flat surface. When spreading the pudding and whipped cream, use an offset spatula or the back of a spoon to carefully extend the creamy layers right to the edges of the bowl, striving to keep distinct lines between each color. This careful layering technique creates that visually appealing presentation everyone admires.
Creative Garnishes & Food Coloring Tips
While crushed Mint Oreos are a classic garnish for our St. Patrick’s Day Brownie Trifle, do not stop there! You can elevate your creation even further with alternative garnishes like green and white sprinkles, elegant chocolate shavings, delicate fresh mint leaves, or even a decadent drizzle of chocolate syrup or homemade ganache. For the green food coloring, I always recommend gel food coloring over liquid. Gel provides a more vibrant and intense green with just a small amount, and it does not thin out your pudding as much as liquid coloring might. You can achieve different shades by adding more or less gel, from a pale shamrock to a deep emerald green.
Pro Tips & Troubleshooting
Even for experienced chefs, a few expert tips and troubleshooting advice can make all the difference for a perfect St. Patrick’s Day Brownie Trifle.
Pro Tips for a Perfect Trifle
Plan Ahead: This St. Patrick’s Day Brownie Trifle is the ultimate make-ahead dessert. I always emphasize making it up to one day in advance. This allows all the delicious flavors to meld together and the layers to set beautifully, resulting in a more cohesive and flavorful experience.
Cooling is Key: I cannot stress this enough: completely cool your brownies before you start assembling your trifle. Warm brownies will melt your pudding and whipped cream layers, leading to a soggy and messy result. Patience here truly pays off.
Pudding Quantity: For a full-size trifle bowl, ensure you are using enough pudding. Many common mistakes stem from using insufficient pudding, which can lead to dry spots or uneven layers. A large box of instant pudding mix is usually perfect.
Mint Extract Power: Mint extract can be potent. When adding it to your pudding and homemade whipped cream, start with a small amount (1/2 teaspoon) and taste as you go. You can always add more, but you cannot take it away if it becomes overpowering.
Pistachio Pudding Shortcut: If you want to avoid artificial food coloring, remember my tip about using pistachio pudding. It naturally provides that festive green color and a lovely minty flavor, making it a convenient shortcut for this St. Patrick’s Day dessert.
Homemade Whipped Cream: Briefly, I will reiterate the benefits of our unique twist. Making your own whipped cream with Irish cream liqueur and mint extract provides a superior texture and richer flavor that elevates this brownie trifle beyond compare. It is easy and worth the small extra effort.
Common Mistakes to Avoid
Soggy Brownies: This is a common pitfall. Soggy brownie layers can result from warm brownies, insufficient chilling of the assembled trifle, or pudding that is too thin. Always chill your brownies thoroughly before assembly and ensure your pudding has set properly before layering.
Runny Pudding/Whipped Cream: To prevent runny pudding, always use cold milk and whisk vigorously for the recommended time. For whipped cream, make sure your heavy cream is very cold, and whip it until firm peaks form. If your homemade whipped cream feels a bit loose, try chilling it for 15-20 minutes and re-whipping briefly.
Over-crushing Oreos: While we want crushed Oreos, do not pulverize them into a fine powder. A mix of fine crumbs and small chunks provides a much more satisfying crunch and textural contrast in your brownie trifle.
Assembling Too Early (without proper chill): While making it ahead is good, assembling and then immediately serving without proper chilling time will lead to less set layers and flavors that have not fully melded. Give it time in the fridge to truly become its best self.
Serving & Storage
After all your hard work, it is time to enjoy your St. Patrick’s Day Brownie Trifle. Here is how I recommend serving and storing it to maintain its deliciousness.
Serving Ideas
Presentation is everything, especially for a layered dessert like our St. Patrick’s Day Brownie Trifle. Serve your masterpiece in a beautiful, clear glass trifle bowl to showcase its dramatic layers of chocolate, green mint pudding, and creamy topping. This instantly makes it the centerpiece of any festive celebration. For a more casual gathering or individual portions, consider serving it in individual trifle cups or charming mason jars, which are always a hit. To elevate the presentation, garnish with fresh mint sprigs, elegant chocolate curls, a dusting of cocoa powder, or even a decadent drizzle of chocolate ganache. For pairings, I find this rich St. Patrick’s Day dessert pairs wonderfully with a warm cup of coffee, an Irish coffee for the adults, or simply a cold glass of milk to balance the indulgent flavors.
Storage and Make-Ahead
Your St. Patrick’s Day Brownie Trifle must be stored in the refrigerator. This dessert is fantastic for making ahead! For the best results, I recommend assembling it up to one day in advance. This gives all the flavors ample time to meld together beautifully and the layers to set perfectly. The trifle will last up to 3 days in the fridge, though I find it is always best when enjoyed fresh, within the first 24-48 hours. I do not recommend freezing brownie trifle leftovers. The textures of both the pudding and the whipped cream tend to change significantly upon thawing, becoming watery or grainy, which can compromise the overall quality of your lovely dessert.
Conclusion
I hope you are now as excited as I am to create this truly irresistible St. Patrick’s Day Brownie Trifle. This layered dessert is more than just a sweet treat; it is a celebration in itself, combining the rich decadence of chocolate with the vibrant freshness of mint, all brought together by my unique Mint Irish Cream Whipped Cream. With the detailed steps and pro tips I have shared, you have all the knowledge to create a stunning, delicious, and memorable St. Patrick’s Day dessert. Do not be afraid to try this recipe, experiment with your own favorite variations, and make it your own. I encourage you to share your creations, print out this recipe for your recipe book, and explore other festive dessert ideas right here on the blog. Happy St. Patrick’s Day, and happy baking!
FAQ
What is the history and common variations of a trifle dessert?
The trifle is a traditional English dessert that dates back to the 16th century. Historically, it consisted of layers of sponge cake or ladyfingers soaked in sherry, fruit, custard, and whipped cream. Modern American trifles, like our St. Patrick’s Day Brownie Trifle, often use brownies or cake, pudding, fruit, and whipped topping, allowing for endless creative variations perfect for holidays or any celebration.
Can St. Patrick’s Day Brownie Trifle be made in advance and how should it be stored?
Absolutely! This St. Patrick’s Day Brownie Trifle is an excellent make-ahead dessert. For the best flavor and texture, I recommend assembling it up to one day in advance. Store it covered in the refrigerator until you are ready to serve. It will maintain its quality for up to 3 days in the fridge.
What are some creative ways to customize your St. Patrick’s Day Brownie Trifle?
Beyond our Mint Irish Cream Whipped Cream and mint-infused pudding, you can customize your St. Patrick’s Day Brownie Trifle with different brownie flavors (dark chocolate, espresso), add other green elements like fresh kiwi or lime zest, incorporate a layer of chocolate ganache, or even swap out the Mint Oreos for regular Oreos and add green sprinkles for color.
How much pudding is recommended for a full-sized trifle bowl to ensure adequate layers?
For a standard 3 to 4-quart full-sized trifle bowl, I recommend using one large 5.1-ounce box of instant pudding mix (which typically makes about 4-6 servings) to ensure you have enough for generous and distinct layers in your St. Patrick’s Day Brownie Trifle.
How can I make the green pudding layer festive without using artificial food coloring?
The easiest way to achieve a natural green pudding layer for your St. Patrick’s Day Brownie Trifle is to use pistachio instant pudding mix instead of vanilla. This provides a lovely green hue and a delicious complementary flavor without any artificial dyes.
Are there any dietary considerations or swaps for a St. Patrick’s Day Brownie Trifle (e.g., gluten-free, dairy-free)?
Yes, you can certainly adapt this St. Patrick’s Day Brownie Trifle. For a gluten-free version, use a certified gluten-free brownie mix. For a dairy-free trifle, opt for dairy-free instant pudding mixes (often made with almond or coconut milk) and use well-chilled full-fat coconut cream as a substitute for heavy cream in the whipped topping.
What kind of brownies should I use for a trifle?
I recommend using a rich, fudgy brownie for your St. Patrick’s Day Brownie Trifle, whether from an 8×8 pan sized box mix or your favorite homemade recipe. The dense texture holds up well within the layers, providing a wonderful contrast to the creamy pudding and whipped cream. Ensure they are completely cooled before cutting.
How do I prevent my trifle from becoming soggy?
To prevent a soggy St. Patrick’s Day Brownie Trifle, ensure your brownies are completely cooled before layering. Also, make sure your pudding is fully set and not too thin, and allow the assembled trifle to chill in the refrigerator for at least 4 hours (or overnight) before serving. This allows the layers to set properly and prevents the brownies from absorbing too much moisture too quickly.
St. Patrick's Day Brownie Trifle
Ingredients
Equipment
Method
- Cook your brownies according to the directions on the box, ensuring they are baked through but still wonderfully fudgy. Once baked, allow them to cool completely. This crucial step prevents crumbling when cutting and keeps layers neat.
- Prepare your instant vanilla pudding according to the package directions, typically by whisking with cold milk until it thickens to a smooth, lump-free consistency. Stir in a few drops of green food coloring until your desired festive shade is reached. Add about 1/2 teaspoon of mint extract, taste, and add more if you desire a stronger mint flavor.
- Place about 10-12 Mint Oreos in a Ziploc bag, seal it, and use a rolling pin or the back of a spoon to smash them. Aim for a mix of fine crumbs and slightly larger chunks for varied texture, which adds a great crunch to the trifle. This amount will be enough for both layers and garnish.
- Cut your completely cooled brownies into even 1-inch cubes. Chilling the brownies beforehand can aid in cleaner cuts. In your trifle bowl, begin layering: first, a layer of brownie cubes, gently pressed down to form an even base. Next, carefully spread a layer of your mint-infused green pudding to the edges of the bowl. Then, add a generous layer of the homemade Mint Irish Cream Whipped Cream (prepared by whipping cream, powdered sugar, and mint extract until soft peaks, then folding in Irish cream).
- Repeat the layers with another layer of brownie cubes, then more pudding, and finally, top it all off with a scattering of your crushed Mint Oreos. You can create two or three full sets of layers, depending on the size of your trifle bowl, always ending with whipped cream and crushed Oreos for the top.
- Once assembled, cover the trifle lightly and chill it in the refrigerator until ready to serve. This chilling time is important for flavors to meld and layers to set firmly. Recommend at least 4 hours, but overnight is even better for the best result. Serve directly from the trifle bowl or in individual portions.


