 Skip to content
 There’s nothing quite like the comforting aroma and taste of a warm slice of Starbucks banana bread. That irresistible richness, the perfect balance of sweet banana, and that signature moist crumb often have me craving a trip to my local coffee shop. But what if I told you that you can recreate that bakery-style magic right in your own kitchen? This Starbucks Banana Bread Recipe delivers all the flavor you love, plus some expert insights to elevate your home baking game. Get ready to bake a loaf so good, you might just skip the line!
Why You’ll Love This Recipe
My kitchen thrives on creating recipes that aren’t just delicious, but also offer a little something extra. This banana bread is no exception, bringing a few key elements that make it truly shine:
Deep, Nutty Flavor: My secret weapon for that bakery-style richness? Browned butter. While not in the core ingredient list, a little trick I’ll share later for advanced bakers, this technique coaxes out deep, nutty, and caramelized notes through the Maillard reaction, giving your bread an incredible depth that truly mimics the Starbucks taste.
Aromatic Warmth: I find a tiny pinch of freshly grated nutmeg, added with the dry ingredients, works wonders. It provides a subtle, warm spice that complements the banana and cinnamon beautifully, enhancing the overall sensory experience without overpowering it.
Unbeatable Moisture: Thanks to the buttermilk in the recipe, you’ll achieve an incredibly tender and moist crumb. Buttermilk reacts with the baking soda, creating air pockets that keep the bread light and fluffy, ensuring every bite is perfectly soft.
Bakery-Quality at Home: Imagine the joy of pulling a perfectly golden, fragrant loaf from your oven. This recipe empowers you to achieve professional, bakery-quality results, saving you money and letting that wonderful aroma fill your home. It’s perfect for impressing family and friends, or simply for a satisfying treat for yourself!
Ingredients Needed

Here’s exactly what you’ll need to create this delightful Starbucks banana bread copycat:
- 2 cups all purpose flour (spoon and leveled)
- 1 teaspoon baking soda
- 1/4 teaspoon salt
- 1/2 teaspoon cinnamon
- 1 egg
- 1 1/8 cup sugar
- 1/2 cup vegetable oil
- 2 tablespoons buttermilk (see notes)
- 1 teaspoon vanilla
- 3 extra ripe bananas
- 1/2 cup chopped walnuts
Ingredient Notes & Substitutions
Getting the right ingredients, and preparing them properly, is key to an exceptional loaf.
Ripe Bananas: The star of the show! For the best flavor and sweetness, always use extra ripe bananas. You want them to be very spotty, almost entirely brown. This indicates that their starches have converted to sugar, providing natural sweetness and crucial moisture. When mashing, I like to use a fork, leaving a few small lumps for texture rather than pureeing them completely.
Buttermilk: This ingredient is crucial for creating that tender crumb. Buttermilk is acidic, and it reacts with the baking soda to create carbon dioxide, which acts as a leavening agent, giving the bread its rise and soft texture. If you don’t have buttermilk on hand, don’t worry! You can easily make a substitute by adding 1/2 tablespoon of lemon juice or white vinegar to a liquid measuring cup, then filling the rest with regular milk (dairy or non-dairy) until it reaches the 1/2 cup mark. Let it sit for 5 minutes until it slightly curdles.
Flour & Oil: All-purpose flour provides the necessary structure, while a neutral-flavored vegetable oil, such as canola or grapeseed oil, adds significant moisture without imparting a strong taste. This combination keeps the banana bread deliciously tender.
Optional Flavor Additions: For an enhanced aromatic depth, I highly recommend adding a small pinch (about 1/8 teaspoon) of freshly grated nutmeg along with your dry ingredients. It truly elevates the spice profile.
How to Make Starbucks Banana Bread
Let’s get baking! Follow these steps carefully for a perfect loaf every time.
Prepare Your Pan and Oven
Preheat your oven to 325 degrees Fahrenheit. I always spray an 8×5 inch loaf pan with nonstick spray, and if I want super easy removal, I also line it with parchment paper, leaving an overhang on the sides like “handles.”
Combine Dry Ingredients
In a medium bowl, add your all-purpose flour, baking soda, salt, and cinnamon. Whisk these together just until they are combined. This ensures the leavening and spices are evenly distributed. If you’re using my optional flavor enhancer, now is the time to add that pinch of freshly grated nutmeg here!
Mix Wet Ingredients (First Pass)
In another medium bowl, whisk together the egg, sugar, and vegetable oil until they are well combined and smooth. The mixture will be slightly pale.
Combine Wet and Dry
Add the whisked dry ingredients into the wet ingredients. Mix until just combined. The batter will be quite thick and look a bit dry at this stage, which is perfectly normal. Remember, don’t overmix! Overmixing can develop the gluten in the flour, leading to a tough, dense banana bread.
Add Flavor and Moisture
Now, stir in the buttermilk, vanilla extract, and your mashed ripe bananas. Continue to mix until everything is just combined and no streaks of dry ingredients remain. The batter should look more cohesive and moist now.
Fill and Top
Pour your delicious batter into the prepared loaf pan. Evenly sprinkle the chopped walnuts over the top of the batter. As the bread bakes, some of these will sink slightly, and some will remain on top, creating a lovely textural element.
Bake to Perfection
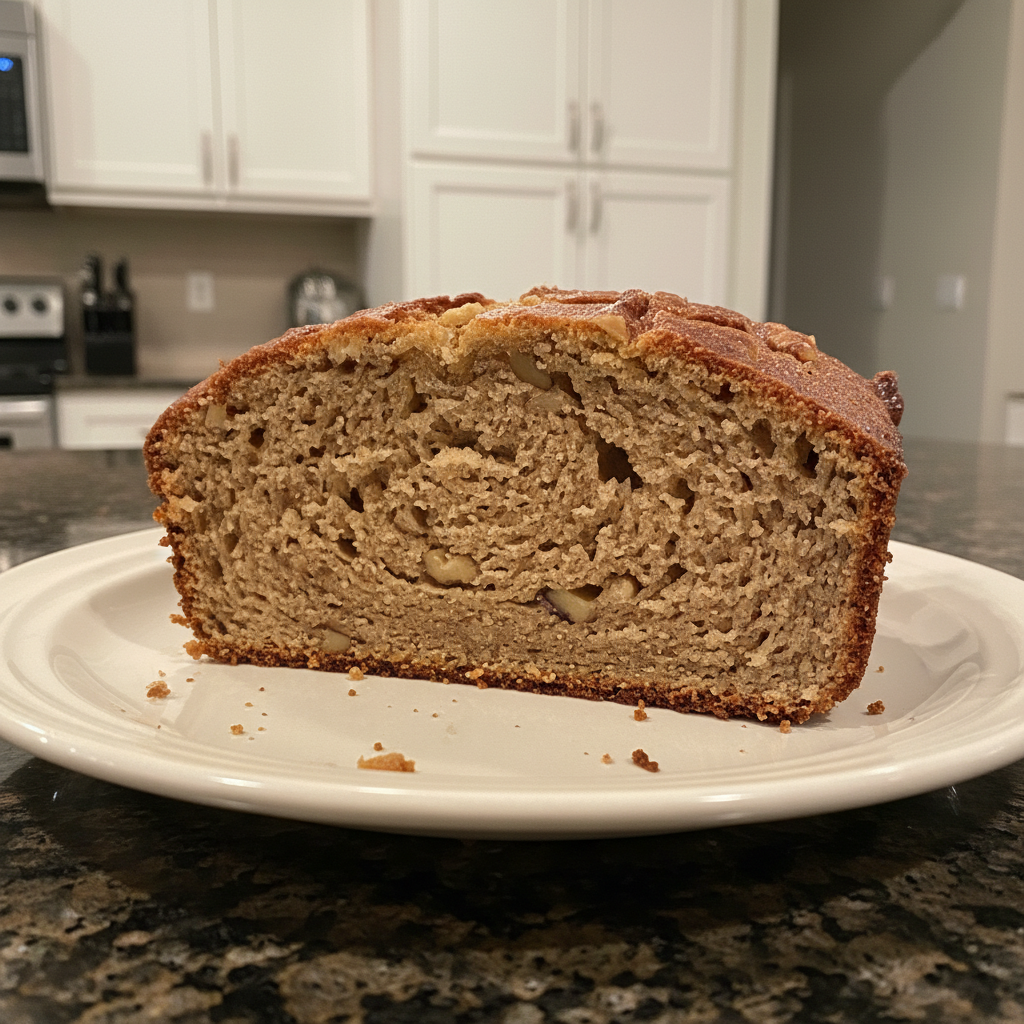
Place your loaf pan on the center oven rack. Bake for 60 to 75 minutes. You’ll know it’s done when the top is a beautiful deep golden-brown with a slight crack down the middle, and the edges are starting to pull away from the pan. For absolute certainty, insert an instant-read thermometer into the center of the loaf; it should read between 200-205°F. A clean knife or wooden skewer inserted into the center should also come out clean. If you notice the top browning too quickly, simply tent the loaf loosely with aluminum foil for the remaining bake time.
Mastering Banana Bread Doneness & Flavor Boosters
Achieving that perfect banana bread involves a bit more than just sticking a knife in the middle. Here’s how to ensure your loaf is always spot on, and how to fix common issues.
Beyond the Toothpick Test
While the “knife comes out clean” test is good, I like to look for a few other visual cues for ultimate doneness. Your banana bread should have a rich, deep golden-brown crust. You’ll often see a beautiful, slight crack running down the middle, which is a sign of a good rise. The edges of the bread should also appear to pull slightly away from the sides of the pan. For absolute certainty and a truly perfectly baked, moist loaf, an instant-read thermometer inserted into the center should register between 200-205°F. This ensures it’s cooked through without being dry.
Troubleshooting Common Banana Bread Problems
Even seasoned bakers run into issues sometimes. Here’s how to prevent and fix common banana bread woes:
- Dense Bread: This is almost always caused by overmixing the batter. When you overmix, you develop the gluten in the flour too much, leading to a tough, chewy, and dense texture. Mix only until the ingredients are just combined.
- Sunken Middle: A sunken middle can be frustrating! Common culprits include underbaking (the structure isn’t set), too much leavening agent, or opening the oven door too early in the baking process, which can cause the bread to deflate. Ensure your oven temperature is accurate and bake for the full recommended time, resisting the urge to peek too often.
- Dry Crumb: If your banana bread turns out dry, it’s usually due to insufficient moisture (using underripe bananas with less natural moisture) or, most commonly, overbaking. Always use extra ripe bananas and keep an eye on your baking time, using the visual cues and internal temperature test I mentioned above.
Creative Mix-Ins & Flavor Boosters
While walnuts are a classic for a reason, don’t be afraid to get creative with your mix-ins! Consider adding:
- Chocolate Chips: Milk, semi-sweet, or dark chocolate chips are always a hit.
- Other Nuts: Toasted pecans or almonds can add a different nutty crunch.
- Shredded Coconut: For a tropical twist, add about 1/2 cup of shredded coconut.
- Cream Cheese Swirl: For a decadent touch, dollop a softened cream cheese mixture (cream cheese, a little sugar, and vanilla) over the top of the batter before baking, then swirl it lightly with a knife.
Pro Tips & Troubleshooting
These are my go-to strategies for consistently amazing banana bread, and how to avoid common pitfalls.
Pro Tips
- Optimal Banana Ripeness: Always, always use extra ripe bananas. I’m talking about bananas that are heavily spotted or almost entirely brown. They provide the best natural sweetness and moisture.
- Homemade Buttermilk: No buttermilk? No problem! Mix 1/2 tablespoon of white vinegar or lemon juice with regular milk to make 1/2 cup, let it sit for 5 minutes, and you’ve got a perfect substitute.
- Flavor Melding: Here’s a secret – banana bread often tastes even better the day after baking! The flavors have more time to meld and deepen.
- Preventing Over-Browning: If you notice the top of your loaf getting too dark before the inside is cooked, simply tent it loosely with aluminum foil for the remainder of the baking time.
- The Browned Butter Advantage (Optional Advanced Tip): For an incredible nutty depth, especially if you want to mimic that deep bakery richness, try browning 1/4 to 1/2 cup of unsalted butter. Melt it in a light-colored saucepan over medium heat, swirling occasionally, until it turns amber and smells nutty. Immediately remove from heat and pour into a heat-safe bowl to stop cooking. Let it cool slightly before incorporating it with your other wet ingredients. This adds an amazing layer of flavor!
- Pan Preparation: Always spray your loaf pan thoroughly with nonstick spray. For extra assurance, I also like to line it with parchment paper, leaving a slight overhang to easily lift the finished loaf out.
Common Mistakes to Avoid
- Underripe Bananas: Using green or barely yellow bananas will result in a loaf that lacks sweetness and banana flavor. Patience is key for ripe bananas!
- Overmixing the Batter: This is a big one. Overmixing develops the gluten in the flour, leading to a tough, dense, and less tender banana bread. Mix just until the wet and dry ingredients are combined.
- Underbaking: Pulling the bread out too early can lead to a gummy, raw center and a sunken middle. Always ensure it passes the doneness tests.
- Opening Oven Door Too Often: Resist the urge to constantly check on your bread! Frequent opening of the oven door can cause temperature fluctuations that interfere with the bread’s rise and can make it fall.
- Incorrect Pan Size: Using a pan that’s too large or too small can impact baking time and density. Stick to the recommended 8×5 inch loaf pan for optimal results.
Serving & Storage
Once your irresistible banana bread is baked, here’s how to best enjoy and preserve it.
Serving Ideas
- Classic Warm Slice: There’s nothing quite like a slice served warm, fresh from the oven, perhaps with a simple pat of salted butter melting into it. Pure bliss!
- Breakfast & Brunch: This banana bread is a hearty and satisfying breakfast item. It pairs beautifully with your morning coffee, especially a Starbucks latte, or a comforting cup of tea. For another delicious banana-infused breakfast, consider trying our healthy blender banana oatmeal pancakes.
- Sweet Dessert: Elevate it to dessert status! Serve a warm slice with a scoop of vanilla bean ice cream and a drizzle of caramel or chocolate sauce.
- Snack Time: It’s the perfect grab-and-go snack for any time of day, satisfying your sweet cravings and providing a little energy boost.
Storage and Make-Ahead
Proper storage ensures your banana bread stays fresh and moist for as long as possible.
- Countertop Storage: For optimum freshness, allow the banana bread to cool completely. Then, wrap it tightly in plastic wrap or store it in an airtight container at room temperature. It will stay wonderfully moist for 2-3 days.
- Refrigerator Storage: If you want to extend its freshness, especially if you’ve added any fresh fruit glazes or cream cheese swirls, store it in the refrigerator. Wrap it well in plastic wrap, then place it in an airtight container. It will last for up to a week.
- Freezing Instructions: Banana bread freezes beautifully! Once completely cooled, you can wrap the entire loaf tightly in several layers of plastic wrap, then an additional layer of aluminum foil. For individual servings, slice the loaf first, then wrap each slice individually before placing them in a freezer-safe bag or container. It will keep well in the freezer for up to 3 months. Thaw frozen loaves or slices overnight in the refrigerator, or at room temperature for a few hours.
- Reheating Tips: To bring back that fresh-baked warmth and texture, you have a few options. For a quick reheat, a slice can be microwaved for 15-30 seconds. For a crispier exterior, warm slices in a toaster oven or conventional oven at 300°F (150°C) for about 5-10 minutes until heated through.
Conclusion
There you have it – my ultimate Starbucks banana bread recipe, designed to bring that beloved bakery flavor right into your home. With its incredible moisture, rich banana taste, and that special browned butter secret, this copycat is truly superior. Armed with these tips, you’ll find that achieving bakery-quality results is not just for the pros. I encourage you to try out some of the serving suggestions or even experiment with your own mix-ins. So go ahead, print out this recipe, get baking, and share your delicious creations! Happy baking!
FAQ
Can I freeze banana bread and how should I thaw it?
Yes, banana bread freezes exceptionally well! Wrap the cooled loaf or individual slices tightly in plastic wrap, then in foil, and freeze for up to 3 months. Thaw overnight in the refrigerator or at room temperature for a few hours.
How long does homemade banana bread stay fresh?
At room temperature, tightly wrapped, homemade banana bread typically stays fresh for 2-3 days. In the refrigerator, it can last up to a week.
What is the best way to use frozen bananas in this recipe?
If using frozen bananas, thaw them completely first. They will release a lot of liquid, which you should drain off before mashing. Don’t worry if they look darker; they’re still perfect for baking!
How can I make my own buttermilk if I don’t have any?
It’s easy! For this recipe’s 2 tablespoons of buttermilk, use 1/2 tablespoon of lemon juice or white vinegar and fill the rest of a 1/2 cup measuring cup with milk. Let it sit for 5 minutes until it slightly curdles.
What are common mistakes to avoid for a perfect banana bread?
Avoid using underripe bananas, overmixing the batter (which leads to dense bread), and underbaking. Also, try not to open the oven door too frequently during baking.
How do I know my banana bread is perfectly baked?
Look for a deep golden-brown top with a slight crack down the middle, and edges pulling away from the pan. An instant-read thermometer inserted into the center should read 200-205°F.
What kind of loaf pan is best for baking banana bread?
For even baking, I recommend a light-colored metal 8×5 inch loaf pan. Darker pans can sometimes cause the crust to brown too quickly. Ceramic or glass pans also work but may require a slight adjustment in baking time or temperature.
Why is this recipe better than other banana bread recipes?
This recipe stands out due to its specific ratio of ingredients that ensures superior moisture from the buttermilk, combined with the option to use browned butter for an incredible nutty depth, and a hint of nutmeg, all contributing to that authentic bakery-style richness reminiscent of Starbucks.
Starbucks Banana Bread Recipe: The Ultimate Copycat (Browned Butter Twist!)
Ingredients
Equipment
Method
- Preheat your oven to 325 degrees Fahrenheit. Spray an 8x5 inch loaf pan with nonstick spray, and optionally line it with parchment paper, leaving an overhang on the sides.
- In a medium bowl, whisk together the all-purpose flour, baking soda, salt, and cinnamon until just combined. If desired, add a pinch (about 1/8 teaspoon) of freshly grated nutmeg here.
- In another medium bowl, whisk together the egg, sugar, and vegetable oil until well combined and smooth, becoming slightly pale.
- Add the whisked dry ingredients into the wet ingredients. Mix only until just combined. The batter will be thick and look a bit dry, which is normal. Avoid overmixing to prevent a tough loaf.
- Stir in the buttermilk, vanilla extract, and mashed ripe bananas. Continue to mix until everything is just combined and no streaks of dry ingredients remain. The batter should now be cohesive and moist.
- Pour the batter into the prepared loaf pan. Evenly sprinkle the chopped walnuts over the top of the batter.
- Place the loaf pan on the center oven rack. Bake for 60 to 75 minutes. The bread is done when the top is a deep golden-brown with a slight crack down the middle, and the edges pull away from the pan. An instant-read thermometer inserted into the center should read between 200-205°F, or a clean knife/wooden skewer comes out clean. If the top browns too quickly, tent loosely with aluminum foil for the remaining time.


