 Skip to content
 There’s something truly magical about Starbucks Birthday Cake Pops, isn’t there? That perfectly sweet vanilla flavor, the tender crumb, and those cheerful sprinkles just bring a smile to your face. For years, I’ve adored these delightful treats, and like many of you, I’ve often wished I could recreate that happiness in my own kitchen. Well, get ready! I’m here to share my ultimate copycat Starbucks Cake Pops recipe. It’s not just a copycat; it’s an enhanced version that I truly believe is better than the original, offering a deeper vanilla taste and an even more satisfying texture. Whether you’re a seasoned baker or new to the cake pop game, this comprehensive guide will equip you with all the tips and tricks to master these beloved treats right at home.
Why You’ll Love This Recipe
When I set out to create the perfect Starbucks Cake Pops copycat, I knew I wanted to do more than just replicate them. I wanted to elevate them. My unique twist introduces a simple yet powerful addition to the cake batter: a touch of sour cream and vanilla bean paste. This seemingly small change makes all the difference, transforming a humble box of vanilla cake mix into something truly extraordinary.
This addition significantly boosts the moisture content of the cake, leading to an incredibly tender, moist, and dense texture. This rich cake crumb is exactly what you need to form that cohesive, truffle-like cake pop dough we all crave. The sour cream also adds a subtle tang that perfectly balances the sweetness, while the vanilla bean paste delivers a profound, aromatic vanilla flavor that goes far beyond what you’d get from standard extract alone. The result is a more sophisticated, deeply satisfying vanilla flavor enhancement.
Beyond the incredible taste and texture, you’ll love this recipe because it empowers you to create impressive, customizable treats that are perfect for any occasion. These homemade Starbucks Cake Pops are ideal for birthday parties, thoughtful gifts, or simply as a special treat for yourself. Plus, making them at home is far more budget-friendly than buying a whole batch from your favorite coffee shop!
Ingredients Needed
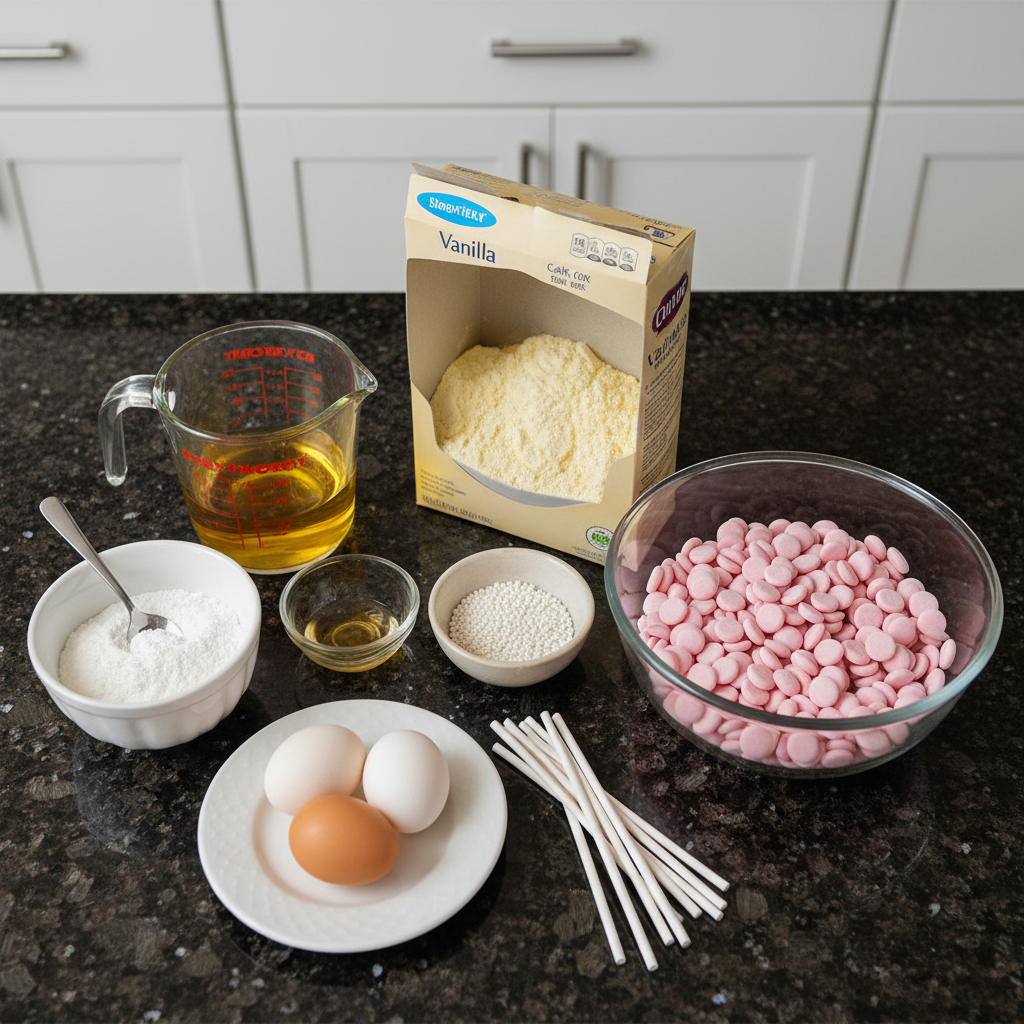
Here’s exactly what you’ll need to make these delightful Starbucks Cake Pops:
- 1 box vanilla cake mix ((plus the ingredients on the back) )
- 1/4 cup (27g) powdered sugar
- 1/2 tsp vanilla extract
- 12 oz light pink color melts
- white nonpareils sprinkles
- 24 lollipop sticks
Ingredient Notes & Substitutions
Let’s dive a little deeper into these ingredients and explore some helpful notes and substitutions for your Starbucks Cake Pops.
Vanilla Cake Mix: While we’re starting with a convenient box mix, our special twist—adding sour cream and vanilla bean paste—truly elevates it. You can use any brand of vanilla cake mix you prefer from your local US grocery store.
Sour Cream / Vanilla Bean Paste (Our Unique Twist): This is where the magic happens! The sour cream introduces fat and acidity, resulting in a more tender, moist, and dense cake crumb that binds beautifully. For the vanilla, vanilla bean paste offers a richer, deeper, and more aromatic vanilla flavor compared to standard vanilla extract, though a high-quality vanilla extract can be used in a pinch. If you don’t have sour cream, plain Greek yogurt is an excellent alternative that provides similar benefits.
Powdered Sugar: This fine sugar is crucial for binding the crumbled cake into a smooth, moldable cake pop dough. It adds sweetness and helps achieve that perfect, firm consistency.
Vanilla Extract: This is added directly to the cake pop dough itself, providing an extra layer of vanilla flavor that complements the vanilla in the cake. This is separate from the vanilla bean paste we add to the initial cake batter.
Light Pink Color Melts: These candy melts give our Starbucks Birthday Cake Pops their iconic light pink hue. You can certainly use other colored candy melts to customize your cake pops for different holidays or themes. If you’re looking for alternatives, almond bark is a common and easy substitution that provides a similar smooth coating. For more advanced bakers, tempered white chocolate or a simple ganache can also be used, though they require more precise handling and technique.
White Nonpareils Sprinkles: These little white nonpareils are the classic decoration for Birthday Cake Pops. Feel free to get creative and experiment with other types of sprinkles or edible decorations to match your occasion or personal style.
Lollipop Sticks: Standard 4-inch lollipop sticks are perfect for these cake pops. They provide the necessary handle for dipping and serving.
How to Make Your Own Starbucks Birthday Cake Pops
Let’s get started on creating these delightful Starbucks Cake Pops. Remember to integrate our special twist right at the beginning for the best results!
Prepare and Bake the Cake
First, prepare and bake the vanilla cake mix according to the directions on the box. This is where our unique twist comes in! **Add 1/4 cup sour cream and 1 teaspoon vanilla bean paste (or high-quality vanilla extract) to the cake batter before baking** for enhanced moisture and a deep, delicious vanilla flavor. Make sure not to overcook the cake, as a slightly moist cake is key for a workable cake pop dough. An overcooked cake will be dry and crumbly, making it harder to form perfect cake balls.
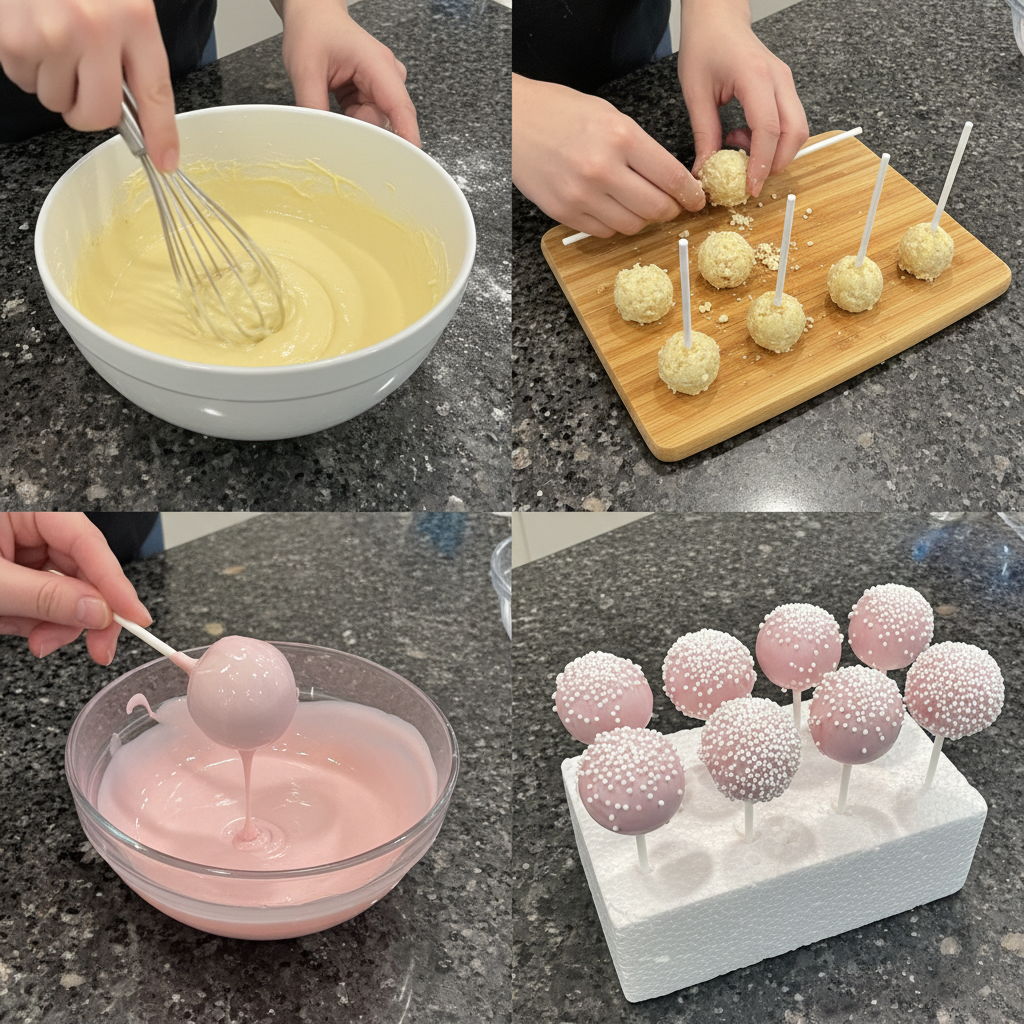
Form the Cake Dough
Immediately after taking the cake out of the oven, pour the hot cake directly into the bowl of a stand mixer. Now, add in the powdered sugar and the 1/2 teaspoon of vanilla extract. Using the paddle attachment, mix on low speed until a cohesive, dense dough forms. The dough should be easily pressed together into a ball, resembling firm cookie dough. It should not be sticky or too wet.
Roll Cake Balls
Portion out the cake dough into roughly 1.5-inch balls. You can use your hands to roll them into a tight sphere or use a cake pop press for uniform shapes. Aim for about 20-24 cake balls from one cake mix.
Initial Chilling
Place the rolled cake balls on a cookie sheet. Then, transfer the cookie sheet into the freezer to chill for 10-15 minutes. This chilling time is crucial; it helps firm up the cake balls so they hold their shape and prevents them from crumbling when you insert the lollipop sticks. The cake balls should be firm to the touch but not completely frozen solid.
Melt the Candy Melts
While the cake balls are chilling, it’s time to melt your light pink color melts. The best method for melting is gently, either in the microwave or using a double boiler. If using the microwave, heat in short 30-second bursts, stirring well after each interval, until smooth and fully melted. Be careful not to overheat, as this can cause the melts to seize or become clumpy. The consistency should be fluid enough for dipping, but not too thin.
Insert Lollipop Sticks
Once the chocolate coating is melted and the cake balls are chilled, remove them from the freezer. Dip each lollipop stick into the candy melt about 1/2 inch. Then, immediately press the coated stick into the center of each chilled cake ball. This little bit of melted candy acts as a “glue” and is essential to prevent the cake pop from falling off of the stick when you dip it.
Set the Sticks
Return the cake balls with the inserted sticks to the fridge or freezer for another 5-10 minutes. This quick chill helps the chocolate set firmly around the stick, ensuring extra stability for dipping. You want that stick to be well-anchored!
Dip the Cake Pops
Once the chocolate on the sticks is set, pour the remaining melted candy melt into a tall, skinny jar or glass. This shape allows for full, even coverage when dipping. Dip each cake pop one by one into the candy melt, ensuring the entire cake ball is coated. Gently tap and rotate the cake pop to allow any excess melted chocolate to drip off. While the coating is still wet, immediately add your white nonpareils sprinkles or any other desired decorations.
Allow to Set
Allow the candy melt to set completely while the cake pop is right side up. You can poke holes into a cardboard box or a foam block to help them stand up straight to dry. This prevents them from flattening on one side. Once the coating is firm, your cake pops are ready!
Serve and Enjoy
Serve your beautiful homemade Starbucks Cake Pops as is, or package them up individually in bags with ribbon if you’re planning to give them as gifts or party favors. Enjoy these delightful treats immediately. Store any leftovers at room temperature for up to 3 days.
Mastering Your Cake Pop Dough & Chilling
Creating the perfect cake pop truly comes down to two key factors: achieving the right dough consistency and mastering the art of chilling. I’ve learned these lessons through countless batches, and I’m here to share my insights to ensure your success.
The Science of Chilling for Stability
The goal for your cake pop dough is a texture that’s cohesive, dense, and easily moldable into a ball, similar to firm cookie dough. Our unique twist of adding sour cream and vanilla bean paste to the cake batter significantly reduces the chance of ending up with a dry cake, which is a common culprit for crumbly dough.
However, if your cake does turn out slightly dry, or if your dough feels too crumbly, you can troubleshoot by adding a tiny bit more moisture. A teaspoon or two of additional frosting, a splash of milk, or even a small amount of softened cream cheese can help bring it together. Add these very sparingly, mixing well after each addition until the desired consistency is reached. Conversely, if your dough feels too wet or sticky, you can incorporate an extra tablespoon or two of powdered sugar, which helps absorb excess moisture and firms up the dough. Be cautious about adding too much liquid directly to the dough after it’s formed, especially flavorings like coffee syrup. Too much liquid can dramatically alter the texture, often leading to a greasy or unappealing playdough-like consistency.
If you’re using other cake mix flavors, like a chocolate cake mix or a red velvet cake mix, be aware that their moisture levels might vary slightly. Our sour cream twist is beneficial for all cake types, but you might need to make minor adjustments to the powdered sugar or extra moisture to achieve that perfect rollable dough.
The Science of Chilling for Stability
Chilling isn’t just a suggestion; it’s a critical step for perfect cake pops. Here’s why and how to do it right at different stages:
Initial Cake Ball Chill: After rolling your cake balls, place them on a cookie sheet and into the freezer for 10-15 minutes. This is the sweet spot. The cake balls will become firm enough to handle without crumbling when you insert the lollipop sticks, creating a stable base. Crucially, they won’t be frozen solid, which prevents cracking later when they meet the warm candy melt coating.
Stick Setting Chill: Once you’ve dipped your lollipop sticks into the candy melt and inserted them into the cake balls, return them to the fridge or freezer for another 5-10 minutes. This quick chill allows the small amount of chocolate around the stick to set firmly, creating a strong anchor. This step is absolutely key to preventing your cake pops from slipping off their sticks during the final dipping process.
Post-Dipping Chill: After dipping and decorating, the candy melt coating will typically set fairly quickly at room temperature. If you’re in a hurry or working in a warm kitchen, a short stint in the fridge (5-10 minutes) can expedite the setting process, ensuring a firm, glossy finish.
Pro Tips & Troubleshooting
Making cake pops can feel a bit intimidating, but with these pro tips and an understanding of common mistakes, you’ll be a cake pop master in no time. Our unique sour cream and vanilla bean paste twist already sets you up for success!
Pro Tips for Cake Pop Perfection
Don’t Overcook the Cake: This is my number one tip. A cake that is slightly underbaked (but still cooked through) will yield a moister crumb that is much easier to work into a cohesive dough. Our sour cream addition naturally helps keep the cake wonderfully moist, so you’re already ahead of the game!
Pre-Dip Your Sticks: This step is non-negotiable. Dipping the tip of each lollipop stick into melted candy melt before inserting it into the cake ball creates a strong bond, ensuring your cake pops stay securely on their sticks during the final dip.
Optimal Chilling is Key: As we discussed, precise chilling is paramount. Aim for 10-15 minutes in the freezer initially for firm-but-not-frozen cake balls, and then another 5-10 minutes in the fridge or freezer after inserting the sticks to fully secure them. This prevents crumbling and ensures smooth dipping.
Melt Candy Melts Correctly: For the best results, use a microwave or double boiler. Melt your color melts slowly and gently, stirring frequently. In the microwave, use 30-second intervals. The ideal consistency is smooth and fluid, but not too thin. Overheating will cause the candy melts to seize, become thick and clumpy, or lose their shine. Do a test dip with one cake pop to check the consistency before doing the whole batch.
Use a Tall, Skinny Jar: Pour your melted candy melts into a tall, skinny jar or glass. This shape allows you to fully submerge the cake pop, ensuring an even, complete coating without awkward angles.
Shake Off Excess Gently: After dipping, gently tap and rotate the cake pop over the jar. This helps remove any excess candy melt, resulting in a thin, smooth, and professional-looking coating.
Work Efficiently: Once dipped, add your white nonpareils sprinkles or other decorations immediately while the candy melt coating is still wet. If you’re making a large batch, consider working in smaller groups of cake pops so the coating doesn’t set before you can decorate them.
Common Mistakes to Avoid
Overcooking the Cake: This is a repeat because it’s so important! An overcooked cake will be dry and crumbly, making it incredibly difficult to form a smooth, pliable dough. This often leads to crumbling cake pops.
Not Pre-Dipping Sticks: Skipping this step is a leading cause of cake pops falling off their sticks into the melted chocolate, which is frustrating and messy.
Over-Adding Liquid to Dough: Resist the urge to add too much liquid, like extra frosting, milk, or especially syrups, directly to the cake pop dough once it’s formed. This can lead to a greasy, dense, or overly sticky consistency that resembles playdough and is very difficult to work with.
Cake Balls Too Warm or Too Cold: If your cake balls are too warm, they can fall apart easily when dipped. If they are frozen solid, the sudden temperature change when they hit the warm candy melt can cause the coating to crack, leaving unsightly lines.
Overheated Candy Melts: Candy melts that are too hot or heated too quickly can seize, become thick and clumpy, or develop a dull finish. This makes dipping difficult and can result in an uneven or cracking coating.
Forcing the Dip: Don’t force a cold cake pop into thick candy melts. This can cause the cake ball to crumble or detach from the stick. Ensure your candy melts are at the right, fluid consistency.
Not Shaking Enough: Leaving too much excess coating on your cake pops will result in a thick, uneven, and sometimes runny layer that detracts from the smooth finish.
Serving & Storage
Now that you’ve mastered making your Starbucks Cake Pops, let’s talk about how to best enjoy and preserve them.
Serving Ideas
These Starbucks Cake Pops are incredibly versatile and perfect for many occasions.
Simple Sweet Treat: Serve them as a delightful standalone dessert. They’re portion-controlled and satisfying without being too heavy.
Gifting & Party Favors: Package them individually in small cellophane bags tied with a ribbon for thoughtful homemade gifts or charming party favors. They always impress!
Celebration Desserts: These visually appealing treats are a fantastic addition to birthday parties, baby showers, holiday spreads, or any dessert buffet. Arrange them upright in a foam block for an attractive display.
Coffee Pairing: Just like at Starbucks, these vanilla cake pops pair wonderfully with a fresh cup of coffee or your favorite tea. It’s a match made in heaven!
Storage and Make-Ahead
Proper storage is key to keeping your homemade Starbucks Cake Pops fresh and delicious.
Room Temperature Storage: As per the recipe, your cake pops can be stored at room temperature for up to 3 days. Make sure they are in an airtight container to prevent them from drying out, and keep them away from direct sunlight or heat sources.
Refrigerated Storage: For a longer shelf life, store your cake pops in the refrigerator. Place them in an airtight container, and they will keep well for up to 1 week. When removing them from the fridge, you might notice a little condensation; simply let them sit at room temperature for about 15-20 minutes before serving to allow the condensation to dissipate and the cake pop to come to a more enjoyable temperature.
Freezer Storage: Cake pops freeze beautifully! To freeze them, first flash freeze them individually on a cookie sheet until solid (about 1-2 hours). Then, transfer the frozen cake pops to an airtight container or a freezer-safe bag. They will stay fresh in the freezer for up to 1 month. When you’re ready to enjoy them, thaw them overnight in the refrigerator, and then let them come to room temperature for about 30 minutes before serving.
Make-Ahead Tips: You can definitely prepare components of this recipe in advance. The cake can be baked and crumbled, and the cake balls can be formed and chilled (or even frozen) several days before you plan to dip and decorate them. This makes the final assembly much quicker and easier.
Conclusion
There you have it—your ultimate guide to creating incredible homemade Starbucks Cake Pops that are truly better than the original! By incorporating the simple yet transformative twist of sour cream and vanilla bean paste into your cake batter, you’ll achieve an unparalleled depth of flavor and a perfectly moist, tender texture every single time. Coupled with all the expert tips on dough consistency, precise chilling, and flawless dipping, even if you’re a beginner, you now have all the tools to achieve impressive, delicious results.
I encourage you to give this recipe a try and experience the joy of making these iconic treats right in your own kitchen. Don’t be afraid to experiment with different sprinkles or even other cake flavors once you’ve mastered the vanilla. Share your creations, enjoy every bite, and spread the happiness! Feel free to print this recipe, share it with friends, and explore other copycat recipes on my site for more delicious adventures.
FAQ
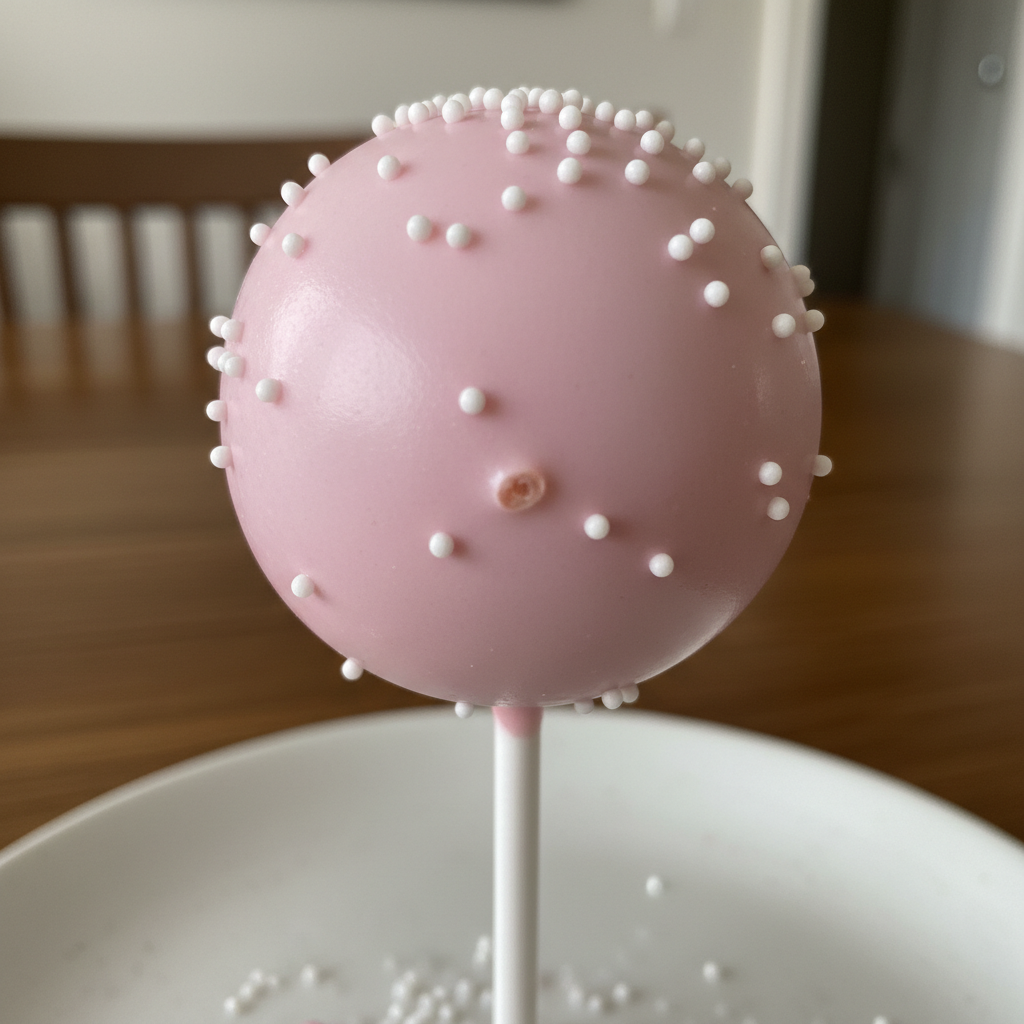
What flavor is the Starbucks Birthday Cake Pop?
The classic Starbucks Birthday Cake Pop features a vanilla-flavored cake base, typically mixed with frosting, and coated in a vibrant pink white chocolate-flavored shell, finished with white nonpareils sprinkles. Our recipe enhances this classic vanilla flavor even further.
How much do homemade Starbucks cake pops cost compared to store-bought?
Homemade cake pops are significantly more cost-effective. While a single Starbucks cake pop can cost a few dollars, a single box of cake mix (plus a few pantry staples) can yield 20-24 cake pops for a fraction of the price per pop.
How many cake pops does one box of cake mix make?
Following this recipe, one standard box of vanilla cake mix typically yields between 20 to 24 cake pops, depending on the size you roll them.
Can I use other cake mix flavors for this recipe?
Absolutely! This recipe works wonderfully with other cake mix flavors. Chocolate cake mix or red velvet cake mix are popular choices. Just be aware that some mixes might have slightly different moisture levels, so you might need to make minor adjustments to the amount of powdered sugar or added moisture in the dough.
How long should I chill the cake balls in the freezer?
For the initial chill of the cake balls, aim for 10-15 minutes in the freezer until they are firm but not frozen solid. After inserting the lollipop sticks, return them to the fridge or freezer for another 5-10 minutes to help the chocolate set firmly around the stick.
Can I use almond bark instead of candy melts for the coating?
Yes, almond bark is a great alternative to candy melts for the coating. It melts smoothly and sets well. The main differences might be in flavor profile and a slightly different texture, but it’s a perfectly good substitute.
Why did my cake pop dough feel like playdough after adding syrup?
Adding too much liquid directly to your cake pop dough, such as syrup, can drastically change its texture. It often results in a greasy, dense, or overly sticky consistency that resembles playdough and is very difficult to work with. It’s best to adjust moisture with small amounts of frosting, milk, or cream cheese if needed, rather than syrups.
What is the shelf life of homemade cake pops?
Homemade cake pops can be stored at room temperature in an airtight container for up to 3 days. If refrigerated in an airtight container, they’ll last for up to 1 week. For longer storage, you can freeze them for up to 1 month, ensuring they are properly sealed to prevent freezer burn.
Starbucks Birthday Cake Pops Copycat (Better Than Original!)
Ingredients
Equipment
Method
- Prepare and bake the vanilla cake mix according to the directions on the box. Add 1/4 cup sour cream and 1 teaspoon vanilla bean paste (or high-quality vanilla extract) to the cake batter before baking for enhanced moisture and a deep, delicious vanilla flavor. Make sure not to overcook the cake, as a slightly moist cake is key for a workable cake pop dough.
- Immediately after taking the cake out of the oven, pour the hot cake directly into the bowl of a stand mixer. Now, add in the powdered sugar and the 1/2 teaspoon of vanilla extract. Using the paddle attachment, mix on low speed until a cohesive, dense dough forms. The dough should be easily pressed together into a ball, resembling firm cookie dough, and should not be sticky or too wet.
- Portion out the cake dough into roughly 1.5-inch balls. You can use your hands to roll them into a tight sphere or use a cake pop press for uniform shapes. Aim for about 20-24 cake balls from one cake mix.
- Place the rolled cake balls on a cookie sheet. Then, transfer the cookie sheet into the freezer to chill for 10-15 minutes. This chilling time helps firm up the cake balls so they hold their shape and prevents them from crumbling when you insert the lollipop sticks. The cake balls should be firm to the touch but not completely frozen solid.
- While the cake balls are chilling, gently melt your light pink color melts. Use a microwave (in short 30-second bursts, stirring well after each interval) or a double boiler. Be careful not to overheat. The consistency should be fluid enough for dipping, but not too thin.
- Once the chocolate coating is melted and the cake balls are chilled, remove them from the freezer. Dip each lollipop stick into the candy melt about 1/2 inch. Then, immediately press the coated stick into the center of each chilled cake ball. This acts as a "glue" to prevent the cake pop from falling off the stick.
- Return the cake balls with the inserted sticks to the fridge or freezer for another 5-10 minutes. This quick chill helps the chocolate set firmly around the stick, ensuring extra stability for dipping.
- Once the chocolate on the sticks is set, pour the remaining melted candy melt into a tall, skinny jar or glass. Dip each cake pop one by one, ensuring the entire cake ball is coated. Gently tap and rotate the cake pop to allow any excess melted chocolate to drip off. While the coating is still wet, immediately add your white nonpareils sprinkles or any other desired decorations.
- Allow the candy melt to set completely while the cake pop is right side up. You can poke holes into a cardboard box or a foam block to help them stand up straight to dry. Once the coating is firm, your cake pops are ready!
- Serve your beautiful homemade Starbucks Cake Pops as is, or package them up individually for gifts. Enjoy these delightful treats immediately. Store any leftovers at room temperature for up to 3 days in an airtight container.


