 Skip to content
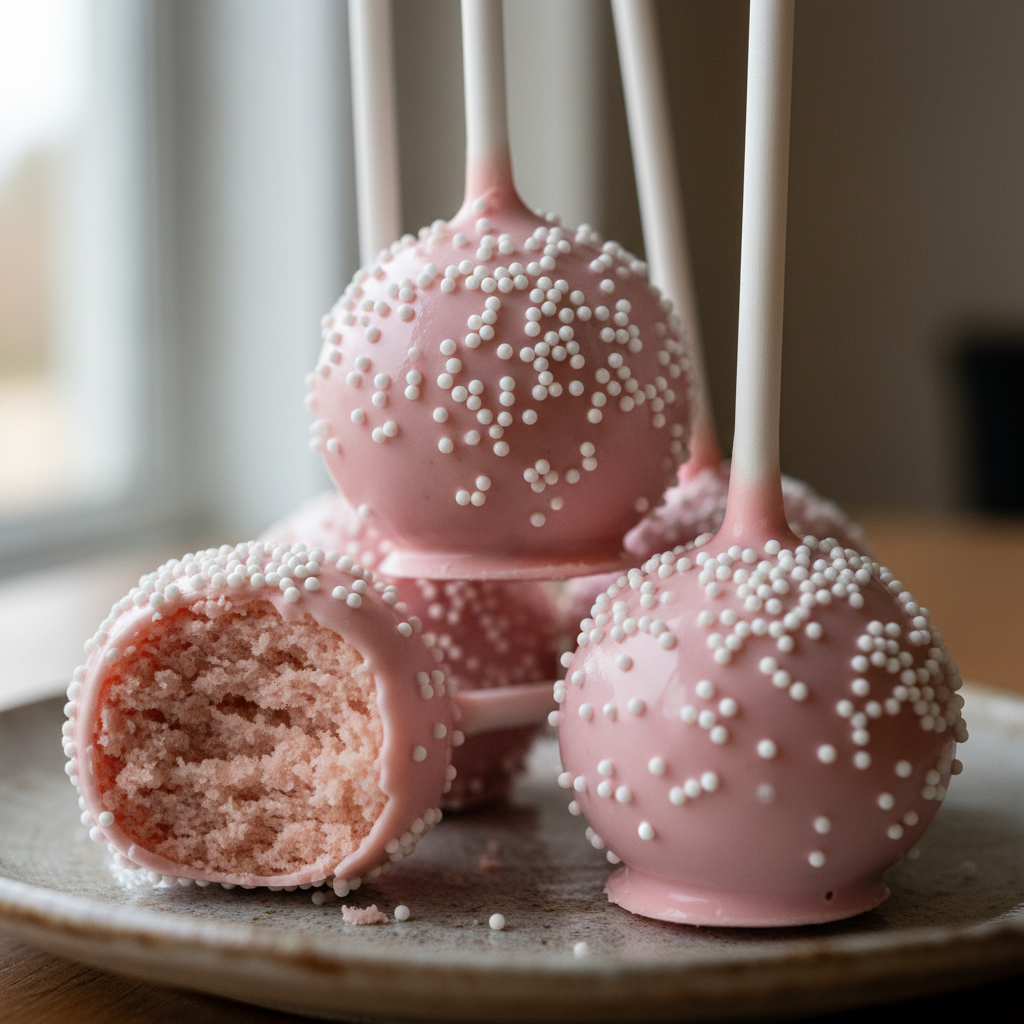
 There’s something undeniably magical about Starbucks Cake Pops, those bite-sized bursts of vanilla birthday cake joy covered in a perfectly smooth coating and fun sprinkles. Cake pops are a delightful treat that brings a smile to anyone’s face, but what if I told you that you could recreate that magic, and even elevate it, right in your own kitchen? My recipe for homemade Starbucks Cake Pops will guide you through every step, ensuring you achieve that iconic flavor and irresistible texture, plus reveal a unique twist that makes them even better than the original. Get ready to master the art of homemade cake pops!
Why You’ll Love This Recipe
In my culinary adventures, I’ve discovered the secret to truly exceptional cake pops, a twist that sets these apart from any other recipe you’ll find. While most recipes rely solely on powdered sugar as a binder, I’ve found that incorporating a small amount of cream cheese frosting creates a game-changing difference.
This isn’t just a random addition; it’s a bit of food science magic! When you mix warm cake crumbs with cream cheese frosting, the fats and moisture from the frosting beautifully emulsify with the cake particles. This creates a velvety smooth texture and enhances the tenderness of the cake pop core, making it incredibly moist and rich, much like the Starbucks original. The slight tang from the cream cheese also subtly balances the sweetness, making the overall flavor more sophisticated and less cloying.
Beyond the enhanced taste and texture, this unique approach offers several practical benefits. You’ll find the cake dough is significantly easier to form into perfect cake balls, thanks to its improved consistency. Plus, making these delicious treats at home means you save money compared to buying Starbucks cake pops. The best part? You can customize the flavors and decorations for any occasion, all while enjoying the immense satisfaction of a homemade treat that tastes gourmet.
Ingredients Needed
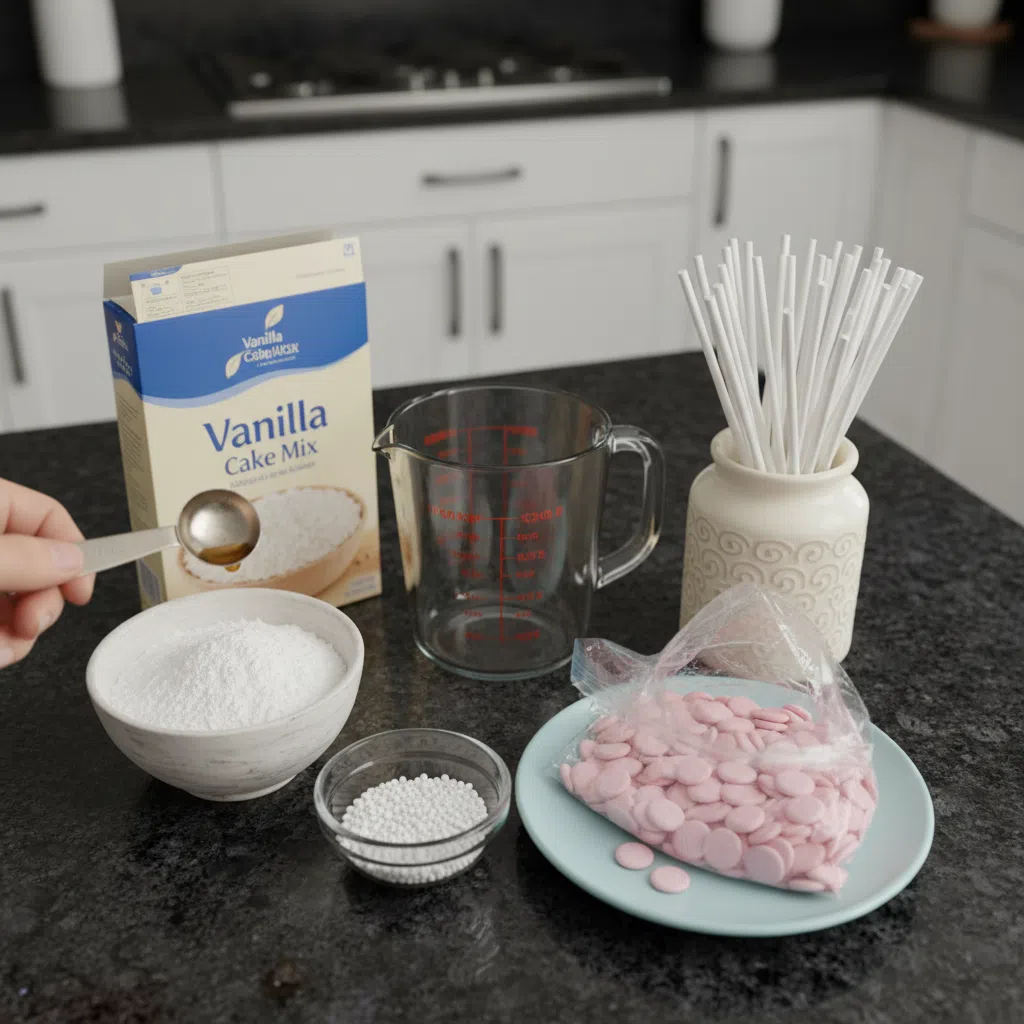
Here’s everything you’ll need to make these delightful Starbucks Cake Pops:
- 1 box vanilla cake mix (plus the ingredients on the back)
- 1/4 cup (27g) powdered sugar
- 1/2 tsp vanilla extract
- 12 oz light pink color melts
- white nonpareils sprinkles
- 24 lollipop sticks
Ingredient Notes & Substitutions
When selecting your ingredients, a few choices can really make a difference. For the vanilla cake mix, I recommend reputable brands like Duncan Hines or Betty Crocker for consistently good results. This vanilla cake mix is the cornerstone of the classic Birthday Cake Pop flavor. If you’re looking for a gluten-free option, many brands now offer excellent gluten-free cake mix varieties that work beautifully in this recipe.
Now, for the key to our unique twist: you will need approximately 1/4 to 1/2 cup (about 2-4 oz) of softened cream cheese frosting, which can be store-bought or homemade. This cream cheese frosting acts as the primary binding agent, creating that superior moist and tender texture that sets this recipe apart from those using only powdered sugar. While the powdered sugar still adds sweetness, the frosting is truly critical for the ideal consistency and mouthfeel.
For the vanilla extract, always opt for a good quality pure vanilla extract for the best, most authentic flavor. For the candy melts, light pink color melts are essential for that classic Starbucks Birthday Cake Pop look. Brands like Wilton or Ghirardelli offer reliable candy melt options. If light pink is hard to find, or you prefer alternatives, white almond bark or high-quality white chocolate can be used. For those with dietary restrictions, dairy-free melts are also available and work just as well.
The white nonpareils sprinkles provide that signature finish, but feel free to get creative with other sprinkles to match any theme. Finally, ensure you have sturdy lollipop sticks; different lengths are available, so choose what works best for your presentation.
How to Make Starbucks Birthday Cake Pops
Making these Starbucks Cake Pops is a fun and rewarding process. Follow these steps carefully for perfect results every time.
Bake the Cake Base
First, prepare and bake the vanilla cake mix according to the directions on the box. This is a crucial step for achieving the optimal texture for your cake pops. Remember, do not overcook the cake! An overbaked cake will result in a dry, crumbly texture that is much harder to form into the smooth cake dough we need.
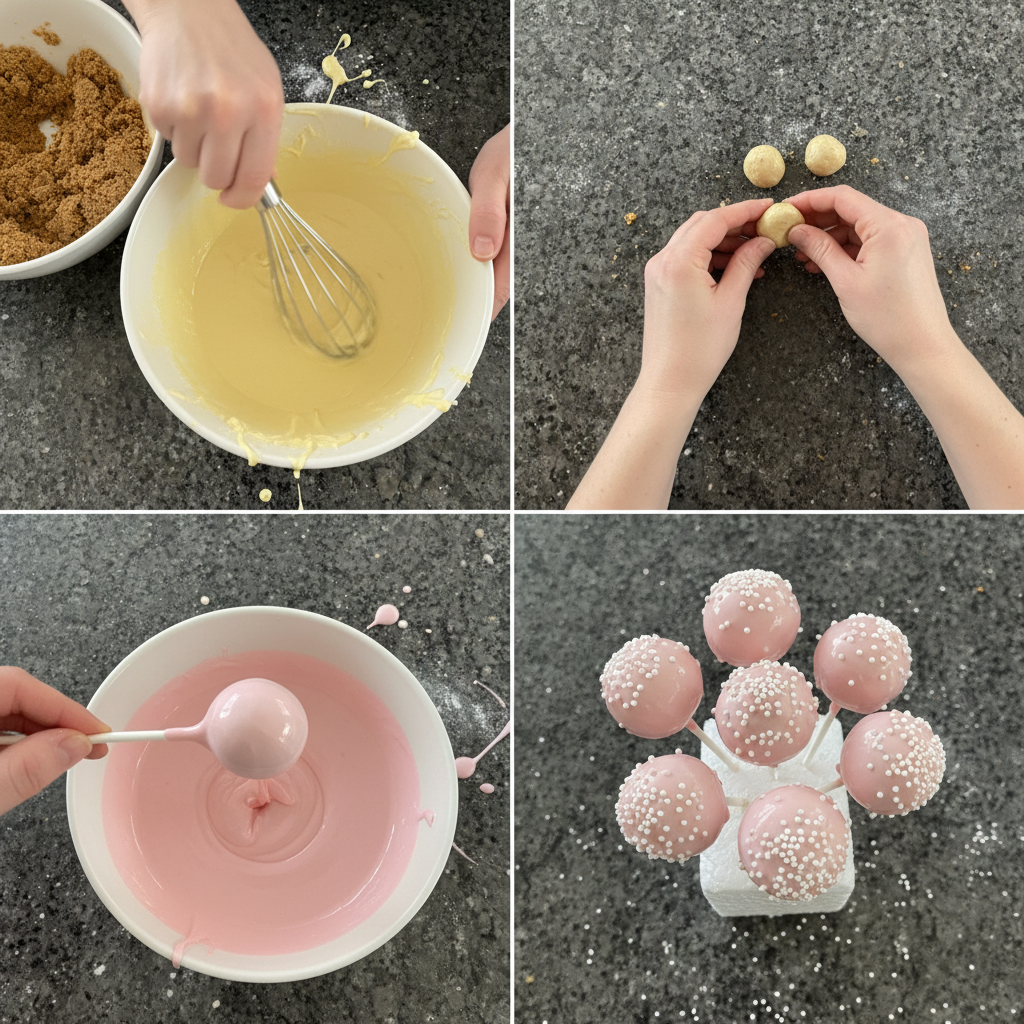
Form the Cake Dough (The Secret Twist!)
Immediately after taking the warm cake out of the oven, crumble it into the bowl of a stand mixer. Now for the unique twist that makes these cake pops extraordinary: add in the 1/4 cup (27g) powdered sugar and the 1/2 tsp vanilla extract. Crucially, also add approximately 1/4 to 1/2 cup of softened cream cheese frosting. Using the paddle attachment, mix on low speed. Watch as the frosting works its magic, creating a pliable and easily workable cake dough. You’ll know it’s ready when the mixture comes together into a cohesive dough that can be easily pressed into a firm ball in the palm of your hand, not crumbly or too sticky. This cream cheese binder truly transforms the texture, making it wonderfully tender and moist.
Shape and Chill the Cake Balls
Portion out the cake dough and press it into uniform balls using the palm of your hands or a dedicated cake pop press for consistent sizing. Once formed, place the cake balls on a cookie sheet and transfer them to the freezer to chill. A quick chill in the freezer for about 5-10 minutes is ideal to firm them up without freezing them solid, which helps prevent cracking later.
Prepare for Dipping
While your cake balls are chilling, prepare your candy melts. Once the cake balls are firm, remove them from the freezer. Now, dip each lollipop stick about a quarter-inch into the melted candy melt, then press the stick firmly into the center of each cake ball. This little bit of melted candy acts as a strong edible “glue,” which is absolutely critical to avoid the common problem of the cake pop falling off the stick. Return the sticks-and-balls to the fridge or freezer for a few minutes to allow this chocolate bond to set quickly.
Dip and Decorate
Once the chocolate on the lollipop sticks is set, pour the remaining melted candy melt into a tall, skinny jar or glass. This shape makes dipping much easier and helps achieve an even coating. Dip the cake pops one by one into the candy melt, fully submerging them. Gently tap and shake the cake pop to remove any excess melted chocolate, allowing it to drip back into the jar. Immediately turn the cake pop right side up and add your white nonpareils sprinkles, if desired, before the coating sets. The sprinkles adhere best when the chocolate is still wet.
Set and Serve
To allow the candy melt to set properly, you can stand the cake pops upright. I often poke holes into a cardboard box or use a foam block to help them stand straight while drying. Once the chocolate coating is completely set and firm, your Starbucks Cake Pops are ready! You can serve them as is, or for a lovely presentation or gifting, package them individually in bags tied with ribbon. Enjoy your homemade, perfectly moist, and delicious treats! Store them at room temperature for up to 3 days.
Mastering Your Candy Melts & Essential Equipment
Achieving that glossy, perfect finish on your cake pops is all about understanding your candy melts and having the right tools.
Perfecting Your Candy Melt Coating
Getting a smooth, even chocolate coating on your cake pops can feel like a challenge, but with the right technique, it’s easily achievable. I’ve found two reliable methods for melting candy melt:
Microwave Melting: Place your candy melts in a microwave-safe bowl. Heat in 30-second intervals on 50% power, stirring thoroughly after each interval. It’s crucial not to overheat them, as this can cause the candy melts to seize or become clumpy. Continue until the melts are smooth and fluid, usually around 90-100°F (32-38°C).
Double Boiler Method: This is a gentler method for melting candy melt. Place your candy melts in a heatproof bowl set over a saucepan of simmering water, ensuring the bottom of the bowl does not touch the water. Stir frequently until melted and smooth. The steam provides indirect, even heat, greatly reducing the risk of seizing. Keep the heat on low.
For that professional, streak-free chocolate coating, aim for a consistency that is thin enough to drip smoothly but thick enough to provide good coverage. If your candy melt is too thick, you can thin it with a small amount of paramount crystals or a neutral oil like coconut oil (about 1/2 teaspoon at a time). When dipping, submerge the cake pop completely in a single, swift motion, then gently tap off the excess. This prevents too much chocolate from building up. Apply sprinkles immediately after dipping, before the coating sets.
If your coating looks dull or starts cracking, it’s often due to temperature shock (very cold cake balls dipped into very warm coating) or too thick a coating. Ensure your cake balls are firm but not frozen solid, and your candy melts are at the ideal dipping temperature.
Essential Equipment for Homemade Cake Pops
While you don’t need a professional kitchen, a few key tools will make your cake pop journey much smoother. A stand mixer with a paddle attachment is practically a must-have for thoroughly combining the cake crumbs with the frosting, creating a perfectly smooth cake dough. Of course, a sturdy cookie sheet for chilling is essential, as are the lollipop sticks.
For those aiming for uniform cake pops, a cake pop press can be a fantastic investment. It helps create perfectly spherical and consistently sized cake balls with minimal effort. I also recommend using tall and narrow jars or glasses for dipping; this depth allows you to fully submerge the cake ball without waste. Finally, a drying rack specifically for cake pops or a simple foam block with holes poked into it will be invaluable for letting your finished cake pops dry upright without smudging the pristine coating.
Pro Tips & Troubleshooting
Even seasoned bakers encounter challenges. Here are my best tips to help you achieve cake pop perfection and troubleshoot common issues.
Pro Tips for Perfect Cake Pops
Do not overbake your cake: This is arguably the most crucial tip. An overbaked cake will result in a dry, crumbly cake dough that is difficult to work with and yields a less moist texture in the final cake pop. Aim for just-baked and moist.
Embrace the cream cheese advantage: Our unique twist using cream cheese frosting as the binder is your secret weapon. It provides unparalleled moisture, a rich texture, and makes the cake dough incredibly pliable and easy to form. This consistency also makes the cake less prone to cracking once coated.
Secure the stick: Always dip each lollipop stick into melted candy melt before inserting it into the cake ball. This creates a strong adhesive bond, preventing your beautiful cake pops from falling off the stick during dipping or handling.
Strategic chilling: Chill your cake balls in the freezer for a quick 5-10 minutes each time they need to firm up. This speeds up the process and ensures they are firm enough for dipping. However, avoid over-freezing, which can lead to cracking when they hit the warmer candy coating.
Ideal dipping temperature: Maintain the correct temperature of your chocolate coating. If it’s too hot, it will melt your cake balls. If it’s too cool, it will be too thick and result in a lumpy, uneven coating.
Forming uniform balls: For professional-looking results, use a small cookie scoop or a cake pop press to ensure all your cake pops are roughly the same size and shape.
Common Mistakes to Avoid
Overcooking the cake: As mentioned, this is a big one. Overcooked cake leads to a dry, hard cake dough that’s a nightmare to roll and will impact the final texture of your cake pop.
Adding excess liquid: Resist the urge to add liquid flavorings like coffee syrup directly to the cake dough. Too much liquid can make the dough ‘playdough-like’ and overly sticky, altering its consistency and making it hard to handle.
Insufficient chilling: Not chilling your cake balls long enough will result in them crumbling or falling apart during the dipping process. They need to be firm to hold their shape.
Overly thick coating: If your chocolate coating is too thick, your cake pops will look lumpy and can be prone to cracking as the thick coating sets.
Temperature mismatch: Dipping very cold cake balls into very warm coating can cause the chocolate to crack once it sets. Allow your cake balls to warm up slightly from the freezer (or chill them in the fridge instead) to avoid this.
Serving & Storage
Once your beautiful Starbucks Cake Pops are complete, you’ll want to serve them up and know the best ways to keep them fresh.
Serving Ideas
These delightful Starbucks Cake Pops are perfect as simple, individual treats, offering a convenient and charming dessert. They are absolutely ideal for gifting; package them individually in clear bags tied with a festive ribbon for a thoughtful homemade present or party favor. For a truly impressive display at birthdays or celebrations, arrange your cake pops into a cake pop bouquet. Simply stand them upright in a decorative container, perhaps nestled in a bit of floral foam or crinkled paper. They also pair wonderfully with a glass of cold milk, a warm cup of coffee, or rich hot chocolate, making them a versatile treat for any time of day.
Storage and Make-Ahead
Finished cake pops can be stored at room temperature for up to 3 days. Place them in an airtight container to prevent them from drying out and to protect them from any ambient odors. For extending their shelf life, refrigeration is a great option. Store them in an airtight container in the fridge for up to a week. To prevent condensation and maintain quality, you might want to bring them to room temperature for about 15-20 minutes before serving. For longer preservation, cake pops freeze beautifully! You can freeze raw cake balls before dipping, or even freeze the finished cake pops. Place them in a single layer on a cookie sheet until solid, then transfer to a freezer-safe airtight container or bag for up to 1-2 months. Thaw them in the fridge overnight before bringing them to room temperature to serve.
To streamline your baking process, you can make the cake balls ahead of time and store them in the fridge for a day or two, or freeze them. This means you only have to melt the chocolate and dip on the day you plan to serve, making entertaining much easier.
Conclusion
And there you have it! With my unique twist of using cream cheese frosting as a binder, you now possess the secret to creating Starbucks Birthday Cake Pops that are not only incredibly moist and tender but also burst with rich flavor. By following these detailed steps and incorporating my pro tips, you can confidently succeed in making impressive Starbucks Birthday Cake Pops, even if you’re a beginner. I truly believe you’ll find the results speak for themselves.
Don’t be afraid to experiment with variations! This recipe is a fantastic base for different cake mix flavors, perhaps a red velvet cake for a special occasion, or even chocolate or lemon. You can also play with different colored candy melts and a variety of sprinkles to match any theme or holiday. I encourage you to print this recipe, share your beautiful creations on social media, and explore other delightful dessert recipes right here on my blog. Happy baking!
FAQ
Frequently Asked Questions
What flavor is the birthday cake pop at Starbucks?
The Starbucks Birthday Cake Pop is primarily a vanilla-flavored cake pop, often with subtle hints of almond, covered in a white chocolate-flavored coating and finished with colorful sprinkles. Our recipe perfectly captures this classic Birthday Cake Pop flavor.
How much does Starbucks charge per cake pop?
The price for Starbucks Cake Pops typically ranges from $2.25 to $2.75 in the US, depending on your location. Making them at home is a significant cost saving, allowing you to enjoy more for less!
How many cake pops can you get out of one cake mix?
From one standard box of cake mix, you can typically yield about 24 cake pops, depending on the size you roll them.
Can I use other cake flavors like red velvet for this recipe?
Absolutely, yes! This recipe is incredibly versatile. You can easily use other cake mix flavors such as red velvet cake, chocolate, or lemon. The cream cheese frosting binder works universally well with various cake flavors, ensuring a moist and delicious result every time.
How long should cake pops chill before dipping?
For best results, chill your cake balls in the freezer for 5-10 minutes to ensure they are firm but not frozen solid. Alternatively, you can chill them in the fridge for 30 minutes to an hour.
How do you store homemade Starbucks cake pops?
Store finished cake pops at room temperature in an airtight container for up to 3 days. For longer freshness, you can refrigerate them in an airtight container for up to a week. For extended shelf life, you can also freeze them in an airtight container for up to 1-2 months.
What is the best way to melt candy melts?
You can melt candy melts using a microwave or a double boiler. For microwave melting, heat in 30-second intervals on 50% power, stirring between each, to avoid seizing. For a double boiler, place melts in a heatproof bowl over simmering water, stirring until smooth. Both methods require careful temperature guidance to achieve a perfectly smooth chocolate coating.
How do you prevent cake pops from falling off the stick?
The best expert tip to prevent cake pops from falling off the stick is to first dip the lollipop stick into a bit of melted candy melt before inserting it firmly into the center of the cake ball. This creates a strong edible bond. Additionally, ensure your cake dough is firm and well-chilled before assembly.
Starbucks Birthday Cake Pops: The Ultimate Homemade Recipe (Secret Twist!)
Ingredients
Equipment
Method
- Prepare and bake the vanilla cake mix according to the directions on the box. Ensure you do not overcook the cake to prevent a dry, crumbly texture.
- Immediately after baking, crumble the warm cake into the bowl of a stand mixer. Add the 1/4 cup powdered sugar, 1/2 tsp vanilla extract, and approximately 1/4 to 1/2 cup of softened cream cheese frosting. Mix on low speed with the paddle attachment until a pliable, cohesive cake dough forms that can be easily pressed into a firm ball.
- Portion the cake dough and roll it into uniform balls using your hands or a cake pop press. Place the cake balls on a cookie sheet and transfer them to the freezer for 5-10 minutes to firm up without freezing solid.
- While the cake balls chill, prepare your candy melts. Once the cake balls are firm, remove them. Dip each lollipop stick about a quarter-inch into the melted candy, then firmly insert the stick into the center of each cake ball. Return them to the fridge or freezer for a few minutes to allow this edible glue to set.
- Once the chocolate on the sticks is set, pour the remaining melted candy melt into a tall, skinny jar or glass. Dip each cake pop one by one, fully submerging it. Gently tap and shake to remove excess candy. Immediately turn right side up and add white nonpareils sprinkles before the coating sets.
- Stand the cake pops upright in a cardboard box or foam block to allow the candy melt to set completely. Once the coating is firm, your Starbucks Cake Pops are ready to enjoy! Store at room temperature for up to 3 days.


