Skip to content
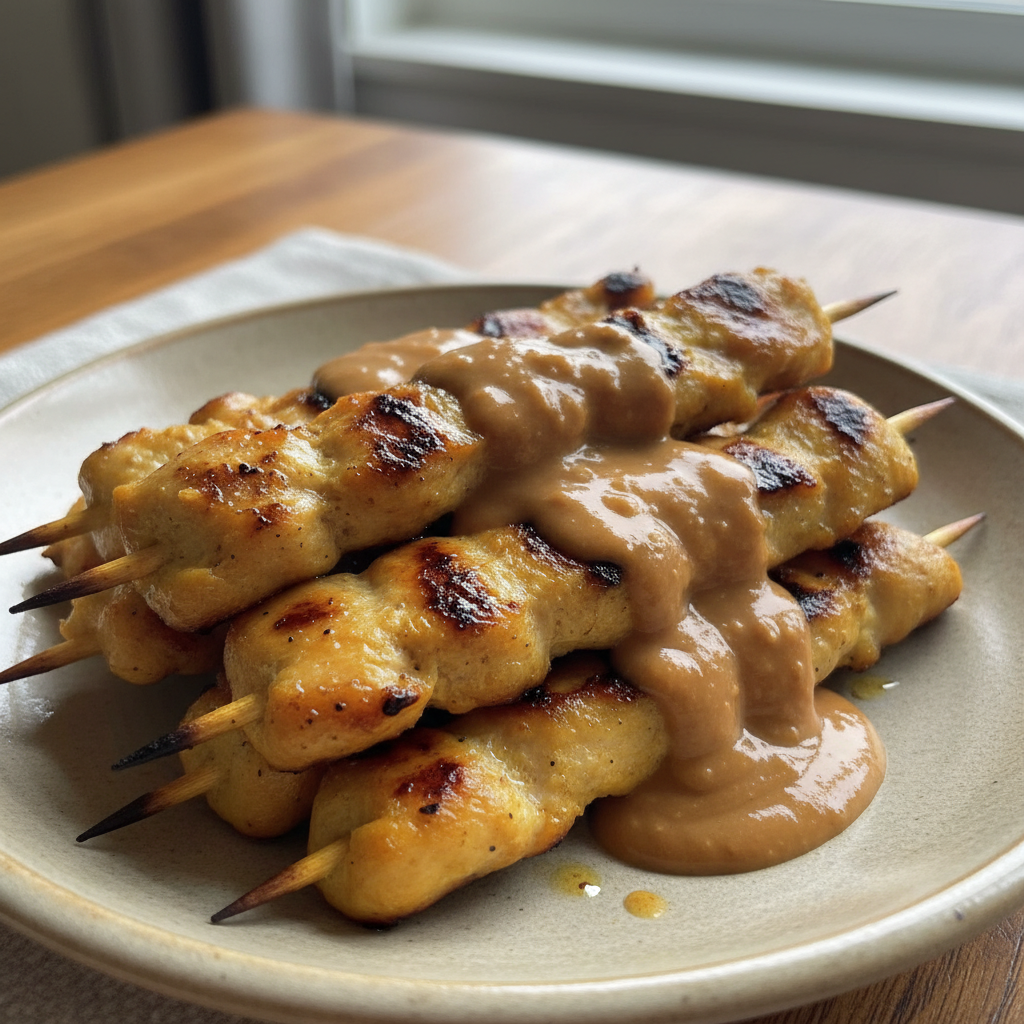
 There’s something truly magical about Thai Chicken Satay. The moment those skewers hit the grill, oven, or skillet, my kitchen fills with the most intoxicating aroma of spices, promising the tender, flavorful chicken that’s about to come. And then, there’s the peanut sauce – that creamy, dreamy, irresistible dip that transforms every bite into an unforgettable experience. Thai Chicken Satay with Peanut Sauce isn’t just a dish; it’s a culinary journey, a perfect balance of savory, sweet, and tangy with just the right kick of spice. Whether you’re a seasoned chef or a home cook looking for an authentic, yet easy-to-follow recipe, you’ve come to the right place. I’m going to show you how to create restaurant-quality satay right in your own home, with a special finishing touch that will make your chicken incredibly juicy and flavorful, no matter which cooking method you choose.
Why You’ll Love This Recipe
In my kitchen, I’m always looking for that extra something that elevates a dish from good to absolutely phenomenal. For this Thai Chicken Satay, that “something” is a unique char-glaze finish. After you’ve cooked your chicken satay using your preferred method—be it grilling, baking, or pan-frying—we’ll give it a quick pass under a broiler or over high heat for a light char. Then, we brush it with a warm, thinned glaze made from the marinade base and a touch of palm sugar. This simple step is a game-changer.
This technique creates a beautiful, smoky char that brings out deeper, savory Maillard reaction flavors, while simultaneously locking in the chicken’s juices. The palm sugar glaze adds a final layer of caramelized sweetness and shine, making the satay visually stunning and boosting its authentic Thai taste. It’s truly the secret to preventing dryness and ensuring every piece of chicken is packed with flavor.
Here are just a few reasons why you’ll adore this recipe:
Unrivaled Flavor and Texture: You’ll achieve that perfect balance of a juicy interior, smoky char, and a sweet-savory glaze that’s incredibly difficult to get with just one cooking method alone. The combination ensures a truly authentic experience.
Versatility and Ease: Whether you prefer to cook with a grill, your oven, or a simple skillet, this recipe is designed to be accessible for any kitchen and adaptable for any day of the week. You get delicious results every time.
Restaurant-Quality at Home: Prepare to impress your family and guests. This dish looks and tastes like it came straight from your favorite Thai restaurant, yet it’s surprisingly easy for you to master in your own kitchen.
Ingredients Needed

Here are the ingredients you will need for this delicious Thai Chicken Satay with Peanut Sauce:
- 2 pounds chicken breasts or thighs* (sliced into 1 1/2″ wide strips by 3-5″ long )
- 3 tablespoons olive oil
- 1/4 cup coconut milk plus more as needed ((may sub water))
- 1/3-1/2 cup smooth peanut butter
- 12-15 skewers
- 1/4 cup low sodium soy sauce
- 1/4 cup packed brown sugar
- 1 tablespoon chili paste ((like Sambal Oelek))
- 1 1/2 tablespoons lime juice
- 1 1/2 tablespoons fish sauce
- 1 teaspoon dried basil
- 1 teaspoon ground coriander
- 1/2 teaspoon ground ginger
- 1/2 teaspoon garlic powder
- 1/2 teaspoon ground turmeric
Ingredient Notes & Substitutions
Chicken: For your Thai Chicken Satay, you have a choice between chicken breasts and chicken thighs. Chicken breasts are leaner and offer a classic texture, while chicken thighs are generally juicier and more forgiving if you’re worried about overcooking. Both work beautifully in this recipe, so choose based on your preference for leanness or moisture.
Peanut Butter: The type of smooth peanut butter you choose can significantly impact your Peanut Sauce. Natural peanut butter, which often separates, will yield a richer, more rustic sauce, while conventional brands will create a thicker, more uniform consistency. For the best Peanut Sauce, I recommend a smooth, creamy variety without added chunks to ensure a silky texture.
Soy Sauce: To make this Thai Chicken Satay with Peanut Sauce gluten-free, simply substitute low sodium soy sauce with Tamari. Tamari is a fantastic gluten-free alternative that maintains a similar umami flavor profile.
Fish Sauce: Selecting a quality fish sauce is key to authentic Thai flavors. Look for reputable Thai brands that list a simple ingredient list, typically just anchovies, salt, and water. A good quality fish sauce will have a clear, reddish-brown color and a robust, savory aroma without being overly pungent.
Chili Paste: Sambal Oelek is a vibrant, fresh chili paste that I love for its clean heat. If you don’t have Sambal Oelek, you can use Sriracha for a similar spice level, or a pinch of red pepper flakes if you prefer a drier heat. Adjust the amount to your desired spice level.
Coconut Milk: This recipe is naturally dairy-free thanks to the use of coconut milk, which adds a wonderful richness and subtle sweetness to the Peanut Sauce. If you happen to be out of coconut milk or prefer a lighter sauce, you can substitute it with water, though the sauce will be less creamy.
Spices: The combination of dried basil, ground coriander, ground ginger, garlic powder, and ground turmeric is crucial. These spices infuse the chicken with an incredibly aromatic and authentic Thai flavor profile, making every bite of your Thai Chicken Satay truly special.

How to Make Thai Chicken Satay with Peanut Sauce
Let’s dive into making this incredible Thai Chicken Satay with Peanut Sauce! This recipe is designed to deliver maximum flavor and juiciness, whether you’re grilling, baking, or pan-frying.
Preparing the Marinade and Chicken
First, in a medium bowl, whisk together all the marinade and sauce ingredients until well combined and beautifully fragrant. The vibrant color and aromatic blend of spices will immediately hint at the deliciousness to come. Remove about 1/3 cup of this mixture to a freezer-size bag and whisk in 3 tablespoons of olive oil. This is your dedicated marinade. Add your sliced chicken breasts or chicken thighs to the bag, toss to evenly coat each strip, and then seal it. Marinate the chicken in the refrigerator for at least 6 hours, or ideally, overnight. This long marination time is crucial for infusing maximum flavor and ensuring incredibly juicy chicken. Remember to refrigerate the remaining marinade and sauce mixture separately; this will become the rich base for your creamy Peanut Sauce.
When you’re ready to cook, start by soaking your wooden skewers in water for at least 30 minutes to prevent them from burning during cooking. While the skewers soak, remove your marinated chicken from the refrigerator and let it come to room temperature for about 30 minutes. This helps the chicken cook more evenly. Carefully thread the chicken strips onto the skewers. Lightly dab any excess marinade off the chicken with paper towels, ensuring a better sear or char.
Cooking Your Thai Chicken Satay
Now, choose your preferred cooking method:
OVEN Method
Preheat your oven to 350 degrees F (175 degrees C). Line two baking sheets with foil and lightly spray them with nonstick cooking spray. Evenly divide the skewered chicken between the baking sheets. Bake for 15-20 minutes, or until the chicken is cooked through. Use a meat thermometer to ensure the internal temperature reaches 165 degrees F (74 degrees C). Be careful not to overcook, as this can make the chicken less tender.
GRILL Method
Grease your indoor or outdoor grill and preheat it to high heat. Once hot, add the chicken skewers, then reduce the heat to medium. Cover the grill and cook the chicken for 3-4 minutes per side, or until it’s cooked through. You’ll see a lovely sizzle as the chicken cooks. Again, verify with a meat thermometer that the internal temperature reaches 165 degrees F (74 degrees C).
SKILLET Method
Heat 1 1/2 tablespoons of olive oil in a large non-stick skillet over medium-high heat. Working in batches to avoid overcrowding, add the skewers to the hot skillet. Cook for 2-3 minutes per side, or until the chicken is golden brown and cooked through. Ensure the internal temperature reaches 165 degrees F (74 degrees C) with a meat thermometer.
The Unique Char-Glaze Finish
Regardless of your cooking method, this is where the magic happens! Once your chicken is cooked through, give it a quick pass under a broiler (if using the oven) or over high heat on your grill or skillet. This will create a beautiful, light char that enhances the smoky flavor. Immediately after charring, brush the satay lightly with a thinned, warm glaze made from a small portion of the reserved marinade base combined with a touch of palm sugar. This creates a caramelized sweetness and irresistible shine, making your Thai Chicken Satay truly special.
Preparing the Creamy Peanut Sauce
In a small saucepan, combine your reserved sauce base with 1/4 cup of coconut milk or 3 tablespoons of water. Bring this mixture to a boil, then reduce the heat and simmer for just 1 minute. Remove the saucepan from the heat and stir in 1/3 cup of smooth peanut butter until it’s completely combined and the sauce becomes wonderfully thick and creamy. If you prefer a thicker or nuttier sauce, add additional peanut butter, a tablespoon at a time. For a thinner sauce, whisk in additional water or coconut milk, one tablespoon at a time, until you reach your desired consistency. Taste the sauce and add more chili paste if you desire a spicier kick, customizing it perfectly to your liking.
Final Serving
Serve your warm Thai Chicken Satay immediately with the luscious Peanut Sauce. It’s perfect as an appetizer, or you can make it a full main course by serving it alongside fluffy rice and your favorite stir-fried vegetables.
Mastering Your Thai Peanut Sauce & Marinade
Perfecting Your Peanut Sauce Consistency & Flavor
A truly great Peanut Sauce is the heart of any Thai Chicken Satay. Achieving the perfect consistency and flavor balance can make all the difference. Sometimes, with natural smooth peanut butter, you might notice oil separation. Don’t worry, this is normal! Simply whisk the sauce vigorously, and if needed, gently warm it over low heat while whisking until it emulsifies again. If your sauce ends up too gritty, try using a blender or food processor for a smoother result, or ensure all your ingredients are thoroughly combined. The type of smooth peanut butter you use will also affect this, so choose one known for its creamy texture.
Customizing the flavor is where the fun begins! If you prefer a sweeter sauce, stir in a bit more brown sugar. For a saltier kick, a dash more fish sauce or low sodium soy sauce works wonders. To brighten it up with tang, add a squeeze of fresh lime juice. And if you crave more heat, a bit more chili paste or Sambal Oelek will do the trick. Remember, the goal is a balance that suits your palate. When it comes to consistency, using coconut milk will give you a richer, creamier sauce, while water, as mentioned in the recipe, can be used for a lighter option if desired.
Marinade Magic: Prep Ahead & Flavor Preservation
The marinade is your secret weapon for tender, flavorful Thai Chicken Satay. The great news is that you can absolutely prepare the marinade base in advance. If you’re using fresh aromatics like ginger and garlic (instead of powder), it’s best to add them closer to the time you marinate the chicken to ensure the freshest flavor and prevent any potential bitterness or spoilage if stored for too long. The reserved sauce base, without the peanut butter, stores wonderfully in the refrigerator, making your meal prep a breeze. This allows you to get ahead and enjoy a stress-free cooking experience when dinner time rolls around.
Elevate Your Satay: Skewers & Pairings
Choosing & Handling Skewers
When it comes to skewers for your Thai Chicken Satay, you have a couple of excellent options: bamboo or metal. If you opt for wooden skewers, it’s absolutely crucial to soak them in water for at least 30 minutes before grilling or baking. This simple step prevents them from burning and ensures your delicious chicken stays securely on the skewer. For metal skewers, the benefits include being reusable and eliminating the need for soaking. However, they do get hot and conduct heat to the chicken more quickly, so keep an eye on your cooking time. Always use tongs when handling hot metal skewers to prevent burns.
Beyond Chicken: Protein & Vegetable Variations
While chicken is classic for satay, don’t be afraid to experiment with other proteins! Steak, pork, shrimp, or even beef make for equally delicious satay. Simply adjust your cooking times to match the protein you choose. For a truly vibrant dish, I love adding vegetables to my skewers. Bell peppers, red onions, zucchini, and mushrooms are fantastic choices. Cut them into similar sizes as your chicken so they cook evenly. Pineapple is a particularly wonderful addition; its sweetness and tang beautifully complement the savory chicken and rich Peanut Sauce. You can even marinate these vegetables briefly in a little extra satay marinade for an added burst of flavor.
Pro Tips & Troubleshooting
Pro Tips for Perfect Satay Every Time
Soak wooden skewers for at least 30 minutes before grilling to prevent burning.
Cut each chicken breast in half horizontally to create fillets before slicing into strips for easier handling and consistent thickness.
Marinate chicken for at least 6 hours, ideally 24 hours, for maximum flavor and juiciness.
Bring chicken to room temperature for at least 30 minutes before cooking for more even results.
Adjust peanut sauce consistency with additional peanut butter for thicker/nuttier or water/coconut milk for thinner; it should be thick but pourable.
The unique char-glaze is a crucial step for authentic flavor and presentation, so don’t skip the final broil or high heat char and glaze.
Dress up the platter with chopped cilantro, basil leaves, crushed peanuts, and a swirl of Sriracha for an appealing presentation.
Common Mistakes to Avoid
Do not overcook the chicken; it will become dry and tough. Aim for an internal temperature of 165 degrees F (74 degrees C) using a meat thermometer to ensure both safety and tenderness.
Do not under-marinate the chicken; insufficient time prevents optimal flavor development and tenderization, leaving your satay bland.
Forgetting to soak wooden skewers leads to burnt skewers and potentially lost chicken, which is always a disappointment!
Skipping the unique char and glaze means losing out on the signature smoky flavor and beautiful caramelized sheen that makes this recipe truly stand out.
Serving & Storage
Irresistible Serving Ideas
Thai Chicken Satay with Peanut Sauce is incredibly versatile! I love serving it as an appetizer, garnished with fresh cilantro and a sprinkle of crushed peanuts, which adds a lovely textural contrast. For a more substantial meal, it transforms beautifully into a main course served with fluffy jasmine rice, fragrant coconut rice, or a lighter cauliflower rice, alongside a medley of stir-fried vegetables. Get creative by building Chicken Satay Rice Bowls with various toppings, or even use the chicken in Thai Chicken Tacos or Quesadillas for a fusion twist. It’s also a fantastic topping for a unique Thai Chicken Pizza!
If you’re looking to offer variety, consider alternative dipping sauces like hoisin sauce, Asian sweet chili sauce, a sweet and tangy pineapple sweet and sour sauce, a bright mango honey dip, or even a spicy Sriracha mango honey dip. For a complete Asian feast, pair your satay with other favorites like Wontons, Pot stickers, or Sweet and Sour Chicken Egg Rolls. It also complements various Thai curries such as Red Curry Chicken, Chicken Pad Thai, Panang Curry, Yellow Curry, or a comforting bowl of Tom Kha Gai.
Storage, Freezing & Make-Ahead Tips
To keep your Thai Chicken Satay and Peanut Sauce fresh, store them separately in airtight containers in the refrigerator for up to 3-4 days. This ensures they maintain their best flavor and texture. For longer food storage, cooked chicken satay can be frozen without the sauce. Wrap the chicken tightly in plastic wrap or foil, then place it in a freezer-safe bag for up to 2-3 months. Thaw it overnight in the fridge before reheating.
The Peanut Sauce itself (or the reserved marinade base before adding peanut butter) also freezes remarkably well in an airtight container for up to 3 months. When you’re ready to use it, thaw it in the refrigerator and whisk it thoroughly before gently reheating on the stovetop. When reheating cooked chicken, do so gently in the oven or on a skillet to prevent it from drying out. Reheat the peanut sauce slowly on the stovetop over low heat, adding a splash of water or coconut milk if it has thickened too much during storage. For ultimate meal prep convenience, you can prepare the chicken marinade up to 24 hours in advance, allowing for optimal flavor penetration and a quicker cooking process when you’re ready to eat.
Conclusion
I truly hope you’ll fall in love with this Thai Chicken Satay with Peanut Sauce as much as I have in my own kitchen. Its incredible flavor, thanks to the aromatic marinade, and the juicy texture achieved with our unique char-glaze, make it a standout dish. The best part? It’s surprisingly easy to master, bringing restaurant-quality Thai cuisine right into your home. No matter your cooking skill level, you can achieve fantastic results and impress everyone at your table.
Don’t hesitate to explore the suggested variations and serving ideas. Make this dish your own, experimenting with different proteins or adding your favorite vegetables to the skewers. I encourage you to try this recipe, especially that special char-glaze finish, and discover just how delicious and rewarding homemade Thai Chicken Satay can be. Please feel free to share your creations, leave a comment with your thoughts, or explore other fantastic Thai recipes right here on the site. Happy cooking!
FAQ
What is Chicken Satay and what does it taste like?
Chicken Satay is a popular dish from Southeast Asia, particularly Thailand and Indonesia, consisting of seasoned, skewered, and grilled meat. In our Thai Chicken Satay, you’ll experience tender, juicy chicken infused with a complex blend of aromatic spices like turmeric, coriander, and ginger. It’s traditionally served with a rich, creamy Peanut Sauce that is a delightful balance of salty, savory, sweet, and customizable to your preferred level of spiciness. The overall flavor profile is deeply savory with hints of sweetness and tang, complemented by the nutty sauce.
What are the different cooking methods for Chicken Satay (grill, oven, skillet)?
You have several excellent options for cooking Chicken Satay, making it accessible for any kitchen. Grilling imparts a wonderful smoky flavor and classic char. Baking in the oven is a more hands-off approach that yields tender results. Skillet cooking is perfect for quick preparation and provides a lovely browning. The best part of this recipe is that our unique char-glaze finish can be applied to chicken cooked by any of these methods, ensuring delicious, restaurant-quality results every time.
How can I adjust the flavor and spice level of the Thai Peanut Sauce?
Customizing your Peanut Sauce is easy and encouraged! For a sweeter sauce, add more brown sugar. If you prefer it saltier, a touch more fish sauce or low sodium soy sauce will do the trick. A squeeze of fresh lime juice enhances the tanginess. To increase the spice level, stir in additional chili paste or Sambal Oelek to your liking. You can also adjust the consistency by adding more smooth peanut butter for a thicker, nuttier sauce, or more coconut milk or water for a thinner sauce.
Can I make Thai Chicken Satay gluten-free or dairy-free?
Yes, absolutely! This recipe is naturally dairy-free as it uses coconut milk instead of dairy products. To make your Thai Chicken Satay gluten-free, simply substitute the low sodium soy sauce with Tamari, a readily available gluten-free alternative. Always double-check that your smooth peanut butter is certified gluten-free, as some brands may contain hidden gluten ingredients.
How do I properly store and reheat Chicken Satay and Peanut Sauce?
For optimal freshness, store cooked Thai Chicken Satay and Peanut Sauce separately in airtight containers in the refrigerator for up to 3-4 days. For longer food storage, cooked chicken satay can be frozen without the sauce for 2-3 months. The Peanut Sauce (or the reserved marinade base) also freezes well for up to 3 months. When reheating, gently warm the chicken in the oven or on a skillet to prevent it from drying out. Reheat the peanut sauce slowly on the stovetop over low heat, adding a splash of water or coconut milk if it has thickened.
What are some popular serving suggestions and side dishes for Thai Chicken Satay?
Thai Chicken Satay is incredibly versatile! It makes a fantastic appetizer, or you can serve it as a main course with jasmine rice, coconut rice, or cauliflower rice, and a side of stir-fried vegetables. Get creative by making Thai Chicken Satay Rice Bowls with your favorite toppings. For variety, offer alternative dipping sauces like hoisin sauce or sweet chili sauce. It also pairs wonderfully with other Asian dishes like Wontons, Pot stickers, or various Thai curries such as Red Curry Chicken or Chicken Pad Thai for a complete feast.
What is the target internal temperature for cooked chicken satay?
To ensure food safety and prevent overcooking, the target internal temperature for fully cooked chicken is 165°F (74°C). I always recommend using a meat thermometer inserted into the thickest part of the chicken to accurately check for doneness. This ensures your chicken is perfectly tender and safe to eat every time.
Thai Chicken Satay with Peanut Sauce
Ingredients
Equipment
Method
- In a medium bowl, whisk together all the marinade and sauce ingredients until well combined and beautifully fragrant. Remove about 1/3 cup of this mixture to a freezer-size bag and whisk in 3 tablespoons of olive oil. This is your dedicated marinade. Add your sliced chicken breasts or chicken thighs to the bag, toss to evenly coat each strip, and then seal it. Marinate the chicken in the refrigerator for at least 6 hours, or ideally, overnight. Remember to refrigerate the remaining marinade and sauce mixture separately; this will become the rich base for your creamy Peanut Sauce.
- When you’re ready to cook, start by soaking your wooden skewers in water for at least 30 minutes to prevent them from burning during cooking. While the skewers soak, remove your marinated chicken from the refrigerator and let it come to room temperature for about 30 minutes. Carefully thread the chicken strips onto the skewers. Lightly dab any excess marinade off the chicken with paper towels, ensuring a better sear or char.
- Preheat your oven to 350 degrees F (175 degrees C). Line two baking sheets with foil and lightly spray them with nonstick cooking spray. Evenly divide the skewered chicken between the baking sheets. Bake for 15-20 minutes, or until the chicken is cooked through. Use a meat thermometer to ensure the internal temperature reaches 165 degrees F (74 degrees C). Be careful not to overcook, as this can make the chicken less tender.
- Grease your indoor or outdoor grill and preheat it to high heat. Once hot, add the chicken skewers, then reduce the heat to medium. Cover the grill and cook the chicken for 3-4 minutes per side, or until it’s cooked through. Verify with a meat thermometer that the internal temperature reaches 165 degrees F (74 degrees C).
- Heat 1 1/2 tablespoons of olive oil in a large non-stick skillet over medium-high heat. Working in batches to avoid overcrowding, add the skewers to the hot skillet. Cook for 2-3 minutes per side, or until the chicken is golden brown and cooked through. Ensure the internal temperature reaches 165 degrees F (74 degrees C) with a meat thermometer.
- Regardless of your cooking method, once your chicken is cooked through, give it a quick pass under a broiler (if using the oven) or over high heat on your grill or skillet. This will create a beautiful, light char that enhances the smoky flavor. Immediately after charring, brush the satay lightly with a thinned, warm glaze made from a small portion of the reserved marinade base combined with a touch of palm sugar. This creates a caramelized sweetness and irresistible shine.
- In a small saucepan, combine your reserved sauce base with 1/4 cup of coconut milk or 3 tablespoons of water. Bring this mixture to a boil, then reduce the heat and simmer for just 1 minute. Remove the saucepan from the heat and stir in 1/3 cup of smooth peanut butter until it’s completely combined and the sauce becomes wonderfully thick and creamy. If you prefer a thicker or nuttier sauce, add additional peanut butter, a tablespoon at a time. For a thinner sauce, whisk in additional water or coconut milk, one tablespoon at a time, until you reach your desired consistency. Taste the sauce and add more chili paste if you desire a spicier kick.
- Serve your warm Thai Chicken Satay immediately with the luscious Peanut Sauce. It’s perfect as an appetizer, or you can make it a full main course by serving it alongside fluffy rice and your favorite stir-fried vegetables.