 Skip to content
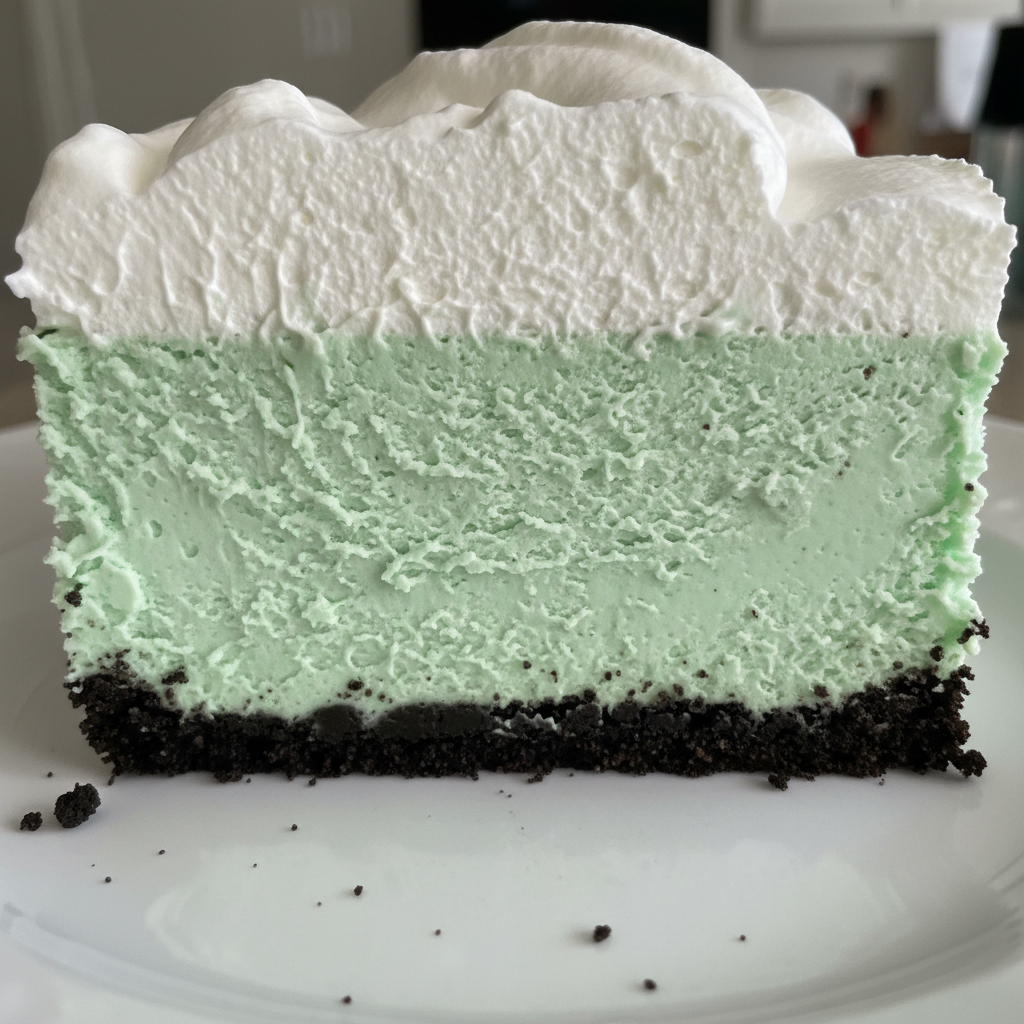
 St. Patrick’s Day always brings a craving for that iconic minty green treat, the Shamrock Shake. This year, I’m taking that beloved flavor and transforming it into an irresistible, no-bake Shamrock Shake Dessert Lasagna. It’s the perfect easy-to-make dessert for any festive celebration, offering layers of creamy, minty goodness that will impress everyone. My unique twist on this classic ensures an intensified mint-chocolate experience that stands out from the rest.
Why You’ll Love This Recipe
In my kitchen, I’m always looking for ways to elevate a classic, and this Shamrock Shake Dessert Lasagna is no exception. My special twist involves a simple yet impactful change: instead of using all Cheesecake Instant Pudding, I swap one box for vanilla instant pudding. Why? Because that vanilla base truly allows the vibrant mint extract to shine without the subtle tang of too much cheesecake, creating a purer “Shamrock Shake” flavor. Then, I fold in finely chopped Andes Mints or mint chocolate chips. This isn’t just for decoration; these little pockets of chocolate provide an authentic mint-chocolate burst and a delightful textural contrast, mimicking the tiny chocolate bits you might find in a real shake.
This dessert is quick to assemble, making it ideal for busy holidays. It’s incredibly family-friendly, and the rich, intense mint-chocolate experience sets it apart from any other layered dessert you’ve tried. It’s a true celebration in every bite!
Ingredients Needed
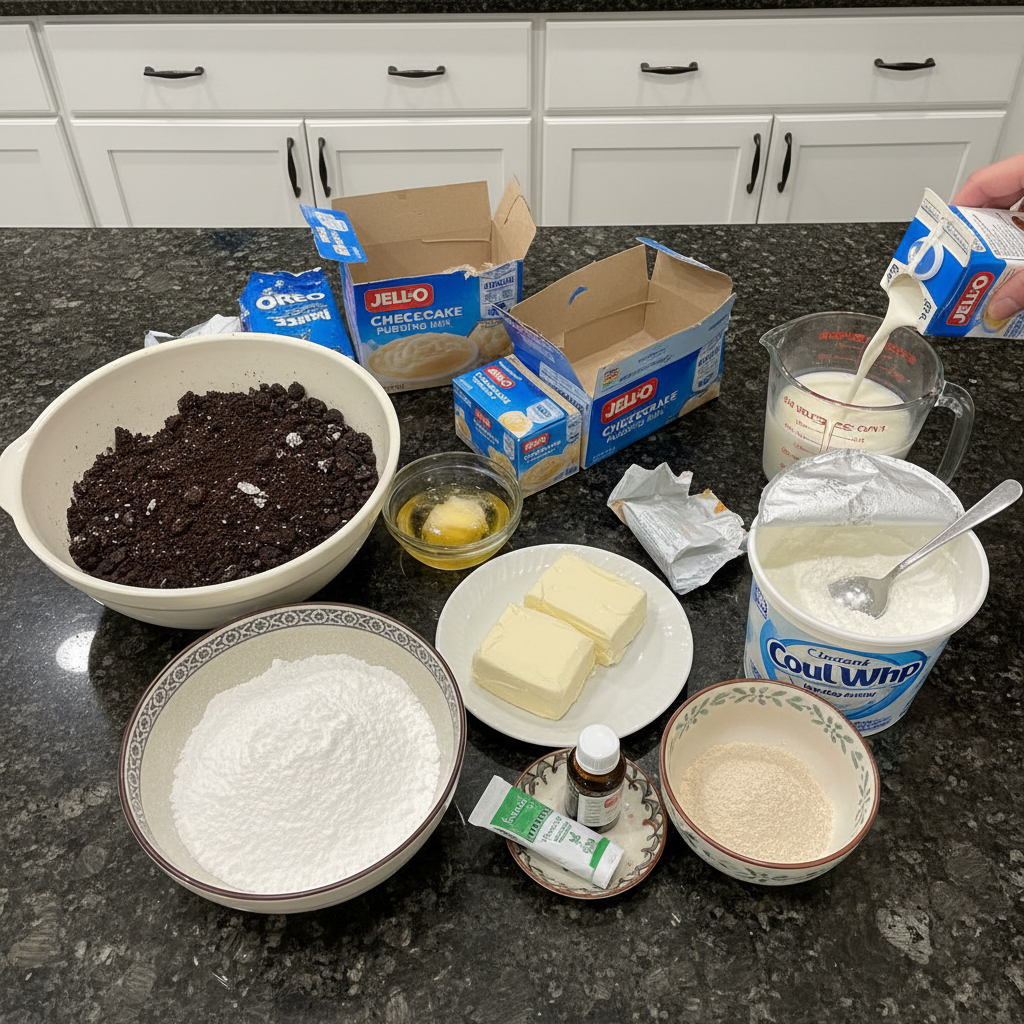
- 36 Oreos, Crushed
- 1/2 cup Butter, Melted
- 1 (8 oz) Cream Cheese, Softened
- 1 cup Powdered Sugar
- 2 (8 oz) tubs Cool Whip, Thawed
- 3 cups Milk
- 3 (3.4 oz) boxes Cheesecake Instant Pudding Mix
- 1 tsp Mint Extract
- Green Gel Food Coloring
Ingredient Notes & Substitutions
Milk: For the creamiest, optimal pudding consistency, I always recommend using whole milk. You can use 2% milk, but I find skim milk doesn’t quite give the pudding the rich texture we’re aiming for. If you’re exploring non-dairy options, almond milk or oat milk can work, but be aware they might slightly vary the setting time or final texture of the pudding.
Cool Whip: While Cool Whip is incredibly convenient for this no-bake dessert, if you prefer homemade, you can certainly use stabilized whipped cream. Just remember that it might slightly change the texture and add a little to your prep time.
Oreos: For those with dietary restrictions, using gluten-free sandwich cookies is a perfect swap for the Oreo crust. Any chocolate-based gluten-free cookie will work beautifully to create that delicious base.
Cream Cheese: To achieve that smooth, luscious cream cheese layer, it’s crucial to use full-fat cream cheese that’s been softened to room temperature. This helps avoid lumps and ensures a wonderfully creamy consistency. Dairy-free cream cheese alternatives are available if needed, but they may alter the final texture slightly.
Instant Pudding Mix: Here’s where our unique twist comes in! Remember, for that vibrant Shamrock Shake flavor, you’ll be swapping *one* of the 3.4 oz boxes of Cheesecake Instant Pudding Mix for a *Vanilla* Instant Pudding Mix. The remaining two boxes will remain cheesecake flavor to provide a hint of richness.
Andes Mints/Mint Chocolate Chips: The key to getting those delightful bursts of flavor and texture is to finely chop your Andes Mints or mint chocolate chips. This ensures even distribution throughout the pudding layer. If Andes Mints are hard to find, good quality mint chocolate chips are a fantastic substitute.
How to Make Shamrock Shake Dessert Lasagna
Step 1: Prep Your Pan & Preheat Oven
I always start by preheating my oven to 375 degrees F. Then, I lightly spray a 9×13 inch baking pan with non-stick spray. While this is primarily a no-bake dessert, that quick bake for the Oreo crust creates a wonderfully sturdy base that really holds up.
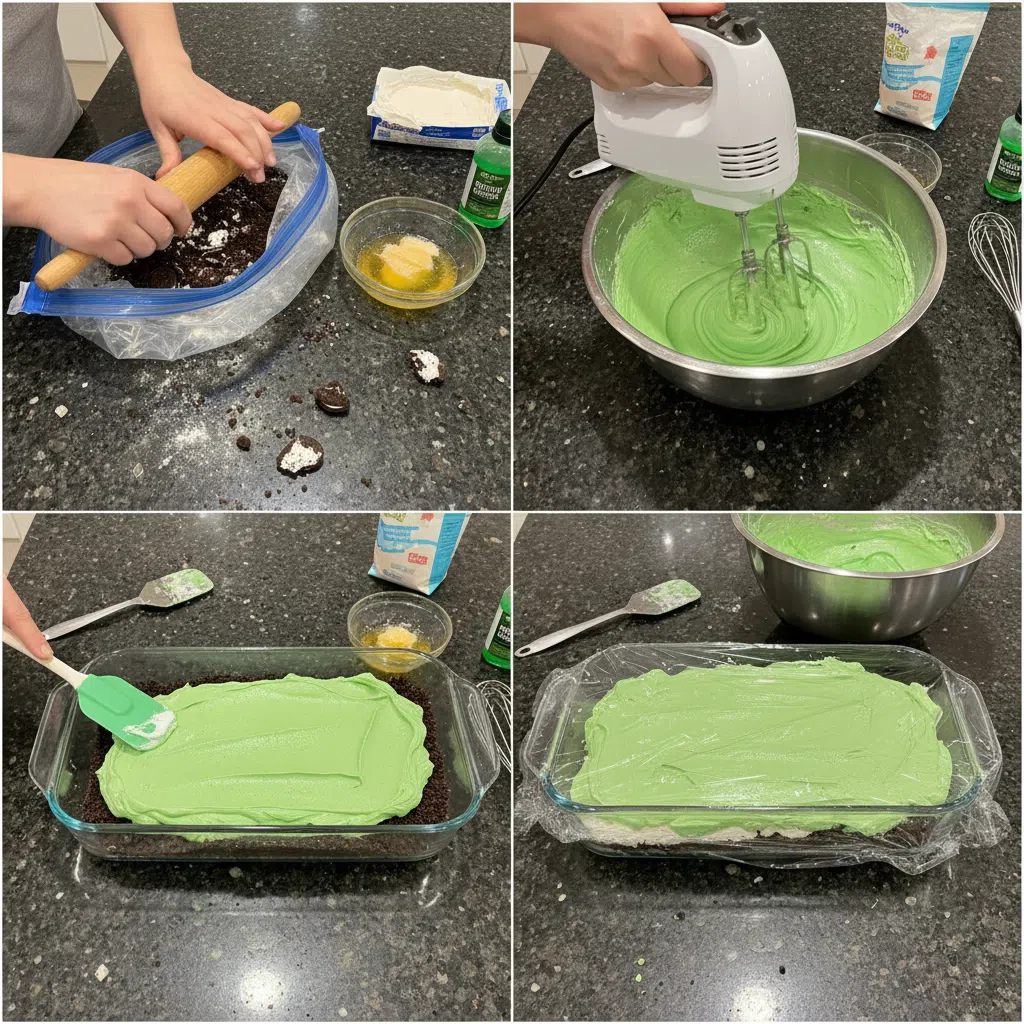
Step 2: Crush Your Oreos
Next, I grab my food processor and pulse the 36 Oreos until they’re finely crushed. You want them to resemble fine crumbs, like sand, for a perfectly firm and consistent crust.
Step 3: Create the Crust Mixture
With the crushed Oreos still in the food processor, I drizzle in the 1/2 cup of melted butter. Then, I pulse again until the mixture is well combined and has the consistency of wet sand. Sometimes, I’ll stop and scrape down the sides or give it a quick stir with a spoon to ensure every crumb is evenly coated.
Step 4: Press the Crust
Now, I transfer that delicious Oreo mixture into the bottom of my prepared 9×13 pan. I make sure to spread it evenly and then firmly press it down to create a compact base. A flat-bottomed glass or measuring cup works wonders for getting a super-even and dense crust.
Step 5: Bake and Cool the Crust
I pop the crust into the oven for just 8 minutes. This brief bake sets the crust beautifully and helps prevent it from crumbling when you cut into it later. Once baked, it’s crucial to let the crust cool completely before adding the next layers; otherwise, they might melt!
Step 6: Prepare the Cream Cheese Layer
In a large bowl, I combine the softened 1 (8 oz) cream cheese, 1 cup of powdered sugar, and 1 (8 oz) tub of thawed Cool Whip. I beat this with my electric mixer until it’s light, fluffy, and perfectly combined. Then, I carefully spread this creamy mixture evenly over my cooled Oreo crust.
Step 7: Craft the Signature Shamrock Shake Pudding Layer (with the Twist!)
In a separate large bowl, this is where the magic happens! I beat together 3 cups of milk, *two* (3.4 oz) boxes of Cheesecake Instant Pudding Mix, and *one* (3.4 oz) box of Vanilla Instant Pudding Mix until it’s well combined and slightly thickened. Next, I gently fold in the remaining 1 (8 oz) tub of thawed Cool Whip and 1 tsp mint extract. For that classic Shamrock Shake look, I squeeze in several drops of green gel food coloring. I continue mixing and adding more food coloring gel until I achieve that vibrant green color. Finally, and this is key for our twist, I fold in 1/2 cup of finely chopped Andes Mints or mint chocolate chips. I then spread this delightful minty green layer evenly over the cream cheese mixture.
Step 8: Garnish and Chill
If I’m feeling extra festive, I’ll top the whole thing with a sprinkle of additional crushed Oreos for extra texture and visual appeal. But the most important step now is chilling! This dessert needs ample time in the fridge to set properly and for all those incredible flavors to meld together beautifully.
Mastering Prep Time & Chill Time
Total Time Estimates
From start to finish, the active prep time for this Shamrock Shake Dessert Lasagna is about 20-30 minutes. However, the crucial part for any no-bake layered dessert is the chilling time. I recommend a minimum of 4-6 hours, but honestly, for the best setting and flavor development, ideally, I let it chill overnight. These times ensure a truly successful and delicious dessert.
The Importance of Chilling
I cannot stress enough how non-negotiable sufficient chilling is for this layered dessert. It’s what allows the pudding to fully set, the cream cheese layer to firm up, and all those amazing flavors to meld beautifully. Proper chilling ensures you get clean, perfect slices and a delightful, firm texture. Rushing this step is a common mistake that often leads to runny, disappointing layers, so be patient!
Pro Tips & Troubleshooting
Pro Tips
Perfect Oreo Crust: To get that sturdy, delicious Oreo crust, make sure your Oreos are pulsed until they are truly finely crushed. Then, drizzle in the melted butter and pulse until every crumb is evenly coated. Don’t forget to scrape down the sides as needed. A well-compacted crust is the foundation of this dessert!
Room Temperature Cream Cheese: For a silky smooth, lump-free cream cheese layer, always use softened cream cheese. Taking it out of the fridge an hour or so beforehand makes a huge difference in how easily it beats.
Vibrant Green Hue: When it comes to the green color, I always advise starting with just a few drops of green gel food coloring. Mix it in, and then gradually add more until you reach that desired vibrant ‘Shamrock Shake’ color. Gel coloring gives you much more intense and consistent results than liquid food coloring.
Intensify Mint-Chocolate (Unique Twist): Remember, using vanilla pudding in that mint layer really helps the mint extract shine. The finely chopped Andes Mints or mint chocolate chips are crucial for those authentic bursts of flavor and delightful texture. A little trick I use is to briefly chill the Andes Mints before chopping; it makes for cleaner cuts!
Whip It Real Good: Always ensure your Cool Whip is completely thawed but still cold before you fold it into your layers. This gives you the best consistency and ensures everything mixes together beautifully.
Common Mistakes to Avoid
Crumbly Crust: A common pitfall is not adequately combining the Oreo crust mixture with the butter or not pressing it down firmly enough into the pan. This can lead to a base that falls apart when you try to serve it. Take your time pressing it down!
Runny Pudding Layer: This usually happens if you use the wrong type of milk, like skim milk instead of whole milk, or if you don’t allow sufficient chilling time. Ensure you use whole milk for optimal setting and give it at least 4-6 hours (preferably overnight) in the refrigerator.
Lack of ‘Shamrock Shake’ Flavor: If you skip or reduce the mint extract, or omit those crucial Andes Mints or mint chocolate chips, your dessert won’t have that authentic, intense mint flavor we’re going for. These ingredients are key to the classic taste.
Lumpy Cream Cheese Layer: This is almost always due to cream cheese that isn’t sufficiently softened before beating. Always make sure it’s at room temperature for a smooth, uniform layer.
Over-Mixing Pudding: While you want the pudding well combined, over-mixing instant pudding can sometimes cause it to become too thick or slightly grainy. Mix until it’s just combined and thickened, then stop.
Serving & Storage
Serving Ideas
Perfectly Chilled: I always emphasize serving this Shamrock Shake Dessert Lasagna well chilled. Not only is it incredibly refreshing, but it also ensures you get the neatest, most firm slices.
Garnish for Presentation: To make your dessert look extra special, I love to garnish individual slices or the entire pan just before serving. A dollop of extra Cool Whip, a sprinkle of additional crushed Oreos, a few delicate chocolate shavings, a small sprig of fresh mint, or even a few extra finely chopped Andes Mints or mint chocolate chips can give it a professional, mouth-watering finish.
Occasion: This is my go-to festive dessert for St. Patrick’s Day parties, but it’s equally wonderful for any family gathering or springtime celebration where a refreshing, minty treat is desired.
Storage and Make-Ahead
Refrigerator Storage: After indulging, make sure to cover any leftover Shamrock Shake Dessert Lasagna tightly with plastic wrap or aluminum foil. It will keep beautifully in the refrigerator for 3-5 days. Covering it prevents it from drying out or absorbing any unwanted refrigerator odors.
Freezing Guidance: For longer storage, this dessert freezes surprisingly well! I recommend tightly wrapping the entire pan or individual slices in multiple layers of plastic wrap, followed by a layer of aluminum foil. It can be frozen for up to 1-2 months. When you’re ready to enjoy it, simply transfer it to the refrigerator overnight to thaw.
Make-Ahead Convenience: This is truly an excellent make-ahead dessert, which is perfect for parties or when you have a busy schedule. Because it requires significant chilling time, preparing it the day before (or even up to 24 hours in advance) ensures it’s perfectly set and stress-free on party day.
Conclusion
There you have it—my ultimate Shamrock Shake Dessert Lasagna! I truly believe my unique twist with the vanilla pudding and finely chopped Andes Mints creates the most intensely mint-chocolate, delightfully textured experience you’ll find. It’s so easy to make, even if you’re new to no-bake desserts, and the results are consistently impressive. I encourage you to try this recipe for your next St. Patrick’s Day celebration or anytime you’re craving a refreshing, minty treat. I can’t wait for you to experience this deliciousness!
FAQ
Q: What kind of milk should I use for the pudding layer in Shamrock Shake Lasagna?
Answer: I always recommend using whole milk for the creamiest, optimal pudding consistency. 2% milk can also work, but I would avoid skim milk. Non-dairy options like almond or oat milk may also be used, but could result in a slightly softer set.
Q: Can I use homemade whipped cream instead of Cool Whip in this dessert lasagna?
Answer: Yes, you certainly can! For the best results, use a stabilized homemade whipped cream to ensure it holds its structure well within the layers. Just be aware that this may add a bit to your prep time.
Q: How long does Shamrock Shake Lasagna last in the fridge and can it be frozen?
Answer: Covered tightly, your Shamrock Shake Dessert Lasagna will last 3-5 days in the refrigerator. And yes, it can absolutely be frozen for 1-2 months when wrapped well. Remember to thaw it in the refrigerator overnight before serving.
Q: What are some tips for crushing Oreos and achieving the perfect green color for the Shamrock Shake layer?
Answer: For the Oreos, I find a food processor works best for fine, even crumbs. Make sure they’re thoroughly mixed with melted butter to avoid a crumbly crust. For the green color, use green gel food coloring. Start with a few drops, mix, and then add more gradually until you achieve your desired vibrant ‘Shamrock Shake’ hue.
Q: Can I make this Shamrock Shake Lasagna ahead of time for a party?
Answer: Absolutely! This is an ideal make-ahead dessert. It requires a minimum of 4-6 hours of chilling, but preparing it the day before (up to 24 hours) allows all the flavors to meld and the layers to set perfectly, making it wonderfully stress-free for party day.
Q: Is it really necessary to bake the Oreo crust for this no-bake dessert?
Answer: While technically a ‘no-bake’ dessert, I highly recommend briefly baking the Oreo crust for 8 minutes. This helps to set the butter and crumbs, creating a much sturdier, less crumbly base that holds its shape beautifully when sliced. If you prefer strictly no-bake, you can skip this step, but make sure to press the crust down very firmly.
Q: What if my pudding layer doesn’t set properly?
Answer: This can happen if not enough chilling time is given, if the wrong type of milk (like skim milk) was used, or if the pudding wasn’t mixed adequately. Ensure you use whole milk and allow at least 4-6 hours (ideally overnight) for the pudding to fully firm up in the refrigerator. If it’s still too soft, unfortunately, it’s hard to rectify once layered, but extra chilling is your best bet.
Q: What’s the best way to get clean slices?
Answer: For perfectly neat slices, ensure your dessert is thoroughly chilled, preferably overnight. Before each cut, I run a sharp knife under hot water, wipe it clean, and then make my slice. Wiping the knife clean again between each slice prevents dragging crumbs and layers, giving you beautiful presentation.
Ultimate Shamrock Shake Dessert Lasagna: Mint-Chocolate Perfection!
Ingredients
Equipment
Method
- Start by preheating your oven to 375 degrees F. Lightly spray a 9x13 inch baking pan with non-stick spray. This brief bake for the Oreo crust creates a wonderfully sturdy base.
- Grab your food processor and pulse the 36 Oreos until they're finely crushed, resembling fine crumbs, like sand.
- With the crushed Oreos still in the food processor, drizzle in the 1/2 cup of melted butter. Pulse again until the mixture is well combined and has the consistency of wet sand. Scrape down the sides if needed for even coating.
- Transfer the Oreo mixture into the bottom of your prepared 9x13 pan. Spread it evenly and firmly press it down to create a compact base, using a flat-bottomed glass or measuring cup for an even crust.
- Bake the crust in the oven for just 8 minutes. Once baked, let the crust cool completely before adding the next layers to prevent melting.
- In a large bowl, combine the softened 1 (8 oz) cream cheese, 1 cup of powdered sugar, and 1 (8 oz) tub of thawed Cool Whip. Beat with an electric mixer until light, fluffy, and perfectly combined. Carefully spread this creamy mixture evenly over your cooled Oreo crust.
- In a separate large bowl, beat together 3 cups of milk, two (3.4 oz) boxes of Cheesecake Instant Pudding Mix, and one (3.4 oz) box of Vanilla Instant Pudding Mix until well combined and slightly thickened. Gently fold in the remaining 1 (8 oz) tub of thawed Cool Whip and 1 tsp mint extract. Add several drops of green gel food coloring, mixing until a vibrant green color is achieved. Finally, fold in 1/2 cup of finely chopped Andes Mints or mint chocolate chips. Spread this minty green layer evenly over the cream cheese mixture.
- Optionally, top with a sprinkle of additional crushed Oreos for extra texture. Chill the dessert in the fridge for a minimum of 4-6 hours, or ideally overnight, for best setting and flavor development.


