Skip to content
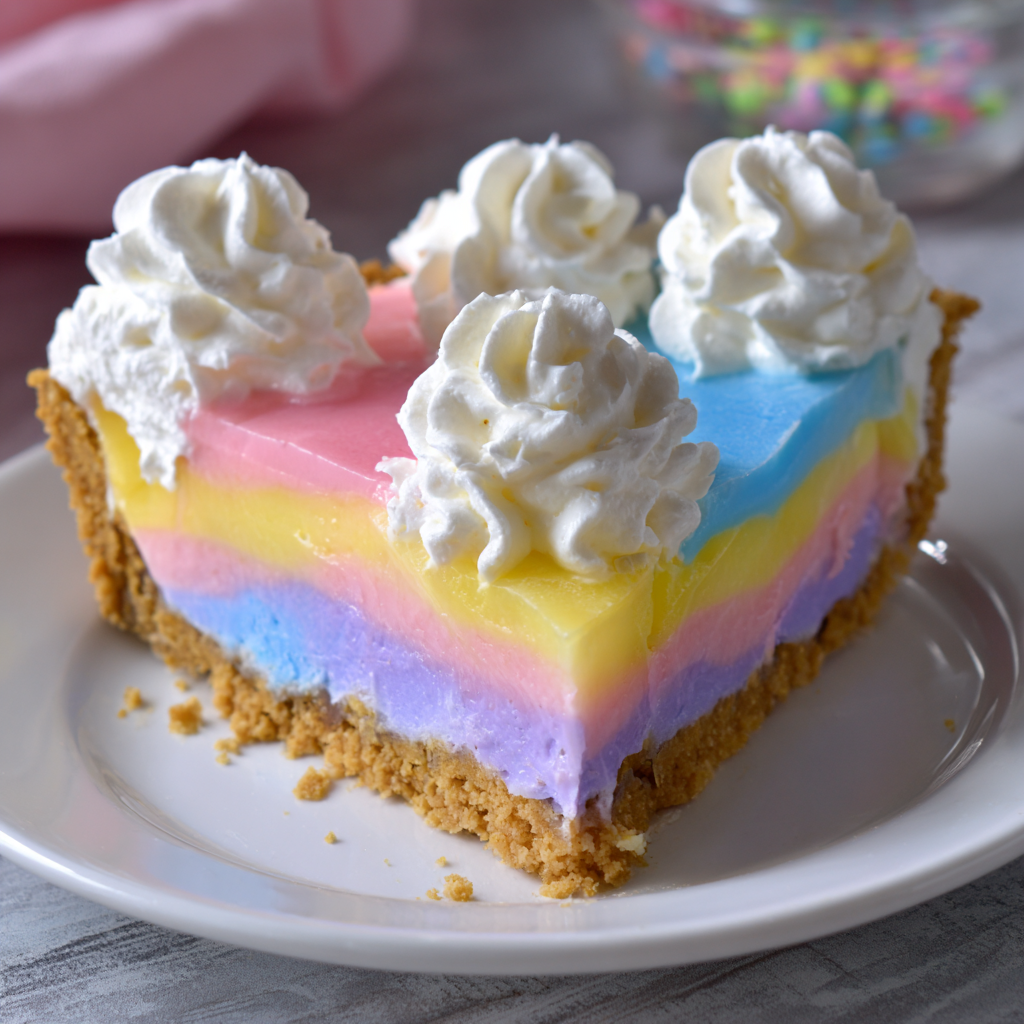
 Welcome the vibrant colors of spring to your dessert table with this delightful Easter no-bake Jello pie! This recipe delivers a light, creamy, and visually stunning layered treat. It’s incredibly simple to prepare, requiring no oven time at all. Perfect for busy parents and beginners, this pie makes an ideal centerpiece for any spring gathering or Easter celebration. You’ll find everything you need to create this festive dessert right here!
Why You’ll Love This Easter No-Bake Jello Pie
This delightful Easter no-bake Jello pie is a true crowd-pleaser for many reasons. First, it’s super easy to make, perfect for any skill level. You’ll love that it requires absolutely no baking, keeping your kitchen cool and stress-free. Its pastel layers are visually stunning, bringing a festive touch to your table.
You can easily customize this layered Jello dessert with your favorite fruit Jello flavors. It’s a light and refreshing treat, ideal for spring weather. This pie is perfect for Easter celebration and other springtime events. Plus, kids love helping with the fun, colorful layers!
Ingredients
Creating this vibrant dessert starts with a few simple ingredients. This delightful no-bake Jello pie uses common pantry staples for a delicious result.
- For the Crust:
- 2½ cups Graham cracker crumbs
- 12 tbsp Butter (1½ sticks), unsalted
- For the Jello Layers:
- ½ package Pink Starburst Jello (a little under 2 ounces)
- 1½ ounces Blue Raspberry Jello (½ package)
- 1½ ounces Lemon Jello (½ package)
- 1½ ounces Grape Jello (½ package)
- 16 ounces Whipped topping (like Cool Whip), thawed, divided
- 3 cups Boiling water
- 1⅓ cup Cold water, divided
- Optional:
- Yellow Food Dye (gel food coloring for brighter hues)
- Pink Food Dye (gel food coloring for brighter hues)
- Extra whipped cream for topping
- Easter sprinkles or candies
Notes & Substitutions
You can easily adapt this recipe to fit your preferences. For the whipped topping, feel free to use homemade whipped cream instead of store-bought. Mix and match any favorite fruit Jello flavors to create your custom color palette. Vary the crust by trying chocolate graham crackers, vanilla wafers, or shortbread cookies. Save time by using a store-bought graham cracker crust. Use gel food coloring sparingly to achieve your desired pastel shades.
Equipment
Gathering your tools beforehand makes the process smooth. You will need a 9-inch springform pan to achieve those perfect slices. Several medium mixing bowls are essential for preparing each Jello color. Ensure you have measuring cups and spoons for accurate ingredient portions. A whisk or spatula helps with mixing. An electric hand mixer is optional if you choose to make homemade whipped cream.
Instructions
Follow these simple steps to create your beautiful Easter no-bake Jello pie. This recipe is designed for beginners, ensuring delicious results.
- Prepare the Crust: First, melt the butter in the microwave until it is fully liquified. Combine the graham cracker crumbs and melted butter in a medium bowl. Mix them until you achieve a thick, sand-like texture. Next, place this mixture into your 9-inch springform pan. Spread it evenly across the bottom and slightly up the sides, pressing it down firmly to pack it in. Finally, place the crust in the freezer for at least 15 minutes to chill while you prepare the Jello layers.
- Dissolve Jello: Place each color of Jello powder in its own separate small bowl. Add ¾ cup of boiling water to each bowl, stirring until no graininess remains on the bottom. Now, place ⅓ cup of cold water into each bowl and stir once more. Let the bowls of Jello cool down slightly, then place them in the fridge for about 20-30 minutes. You want the Jello to be thickened, like syrup, but not fully solidified. This step is crucial for the perfect no-bake Jello pie texture.
- Create Creamy Jello Filling: Remove the thickened Jello bowls from the fridge. Add 4 ounces (about ½ cup) of thawed whipped topping to each Jello bowl. Vigorously mix each color until the whipped topping is fully combined and the mixture is smooth. This may take a minute or two per bowl. If you are using food dye to enhance the yellow and pink colors, add it at this point and mix gently until no color streaks appear and you’ve reached your desired pastel shades.
- Layer the Pie: Retrieve your chilled crust from the freezer. Spread the first color of creamy Jello mixture evenly over the crust. (I typically start with yellow, but you can choose your own order). Place the pie back in the freezer for just 5 minutes to set the layer slightly. This quick freeze prevents the colors from bleeding. Repeat this process for each remaining color, adding one layer at a time and freezing for 5 minutes after each addition.
- Final Chill: Once all four colors have been layered, place the entire pie back into the freezer. Leave it there for 3-4 hours, or until the pie is completely solidified all the way through. This extended chill time ensures the pie holds its shape beautifully.
- Serve: When ready to serve, carefully remove the pie from the springform pan. Top with extra whipped cream, if desired, and decorate with Easter sprinkles or candies. Dip your knife in hot water between slices for clean, smooth cuts. Slice and enjoy your festive Easter no-bake Jello pie!
Pro Tips & Troubleshooting
Achieving the perfect Easter no-bake Jello pie is easy with these insider tips. Understanding the firm chemistry of gelatin can help ensure perfect Jello consistency by chilling the dissolved Jello just until it’s thick and syrupy, not fully set, before incorporating the whipped cream. To avoid chunky Jello, do not let it solidify entirely before mixing. For vibrant colors, use gel food coloring to intensify the naturally lighter Jello shades, especially for pastels. Implement the layering technique by freezing each layer for 5-10 minutes. This ensures crisp, distinct color separation. If your crust isn’t packing together well, add a tiny bit more melted butter, a teaspoon at a time. For smooth slices, dip your knife in hot water between each cut, wiping it clean.
Serving, Storage & Variations
This Easter no-bake Jello pie is incredibly versatile for any spring celebration.
Serving Suggestions: Garnish your beautiful pie with fresh berries like strawberries or raspberries for a pop of freshness. Edible flowers also make a stunning, elegant touch. For a truly festive look, sprinkle with colorful Easter candies or bunny-shaped sprinkles. A dollop of extra whipped cream on each slice never hurts!
Storage Instructions:
- Refrigerate: Store any leftover pie covered tightly with plastic wrap in the refrigerator for up to 4 days.
- Freezing: Freezing is not recommended for this pie. The gelatin texture tends to degrade upon thawing, losing its smooth consistency.
For guidance on safely storing desserts with dairy and gelatin, consult food safety guidelines for no-bake desserts.
Flavor Twists:
- Tropical: Experiment with flavors like pineapple, lime, and orange Jello for a sunny twist.
- Berry Burst: Combine strawberry, raspberry, and blueberry Jello for a rich berry experience.
- Individual Desserts: Create mini versions by layering the Jello mixture in small clear cups or mini pie crusts.
- Other Holidays: Easily adjust the Jello colors to fit different holiday themes, like red and blue for the Fourth of July or green for St. Patrick’s Day.
Nutrition Information
| Nutrient | Amount Per Serving (Estimate) |
|---|---|
| Calories | 420 kcal |
| Total Fat | 25g |
| Saturated Fat | 15g |
| Cholesterol | 45mg |
| Sodium | 250mg |
| Total Carbs | 45g |
| Sugars | 30g |
| Protein | 3g |
Frequently Asked Questions
Can I use a pre-made graham cracker crust?
Absolutely! Using a store-bought crust is a fantastic shortcut for this Easter no-bake Jello pie. It saves time and effort, making the recipe even quicker.
Can I use homemade whipped cream instead of Cool Whip?
Yes, you certainly can. To make it, simply whip heavy cream with a little powdered sugar and a splash of vanilla extract until stiff peaks form.
What if my Jello sets too much before mixing?
If your Jello becomes too firm, gently reheat it in the microwave for a few seconds until it softens slightly. Alternatively, use a hand mixer to break up any chunks and achieve a smoother consistency.
How do I prevent layers from mixing?
The key is to ensure each layer is partially set in the freezer for 5-10 minutes before you carefully add the next one. This creates distinct, beautiful stripes.
Can I use sugar-free Jello?
Yes, sugar-free Jello works perfectly in this recipe. It’s a great option if you are looking to reduce the sugar content without sacrificing flavor.
How long does this pie need to chill?
For the best results and a fully firm pie, chill it in the freezer for at least 3-4 hours. You can even leave it overnight.
Conclusion
This Easter no-bake Jello pie offers a wonderfully easy, colorful, and utterly delicious dessert option. It’s the perfect no-fuss treat for any spring celebration or gathering. With its vibrant layers and creamy texture, it’s sure to impress everyone who tries it. We encourage you to try this simple recipe and enjoy creating those beautiful, eye-catching layers. Share your colorful creations with us and leave a comment below!
Easy Easter No-Bake Jello Pie
Ingredients
Equipment
Method
- First, melt the butter in the microwave until it is fully liquified.
- Combine the graham cracker crumbs and melted butter in a medium bowl. Mix them until you achieve a thick, sand-like texture.
- Next, place this mixture into your 9-inch springform pan. Spread it evenly across the bottom and slightly up the sides, pressing it down firmly to pack it in.
- Finally, place the crust in the freezer for at least 15 minutes to chill while you prepare the Jello layers.
- Place each color of Jello powder in its own separate small bowl.
- Add ¾ cup of boiling water to each bowl, stirring until no graininess remains on the bottom.
- Now, place ⅓ cup of cold water into each bowl and stir once more.
- Let the bowls of Jello cool down slightly, then place them in the fridge for about 20-30 minutes. You want the Jello to be thickened, like syrup, but not fully solidified.
- Remove the thickened Jello bowls from the fridge.
- Add 4 ounces (about ½ cup) of thawed whipped topping to each Jello bowl.
- Vigorously mix each color until the whipped topping is fully combined and the mixture is smooth. This may take a minute or two per bowl.
- If you are using food dye to enhance the yellow and pink colors, add it at this point and mix gently until no color streaks appear and you've reached your desired pastel shades.
- Retrieve your chilled crust from the freezer.
- Spread the first color of creamy Jello mixture evenly over the crust. (I typically start with yellow, but you can choose your own order).
- Place the pie back in the freezer for just 5 minutes to set the layer slightly. This quick freeze prevents the colors from bleeding.
- Repeat this process for each remaining color, adding one layer at a time and freezing for 5 minutes after each addition.
- Once all four colors have been layered, place the entire pie back into the freezer.
- Leave it there for 3-4 hours, or until the pie is completely solidified all the way through.
- When ready to serve, carefully remove the pie from the springform pan.
- Top with extra whipped cream, if desired, and decorate with Easter sprinkles or candies.
- Dip your knife in hot water between slices for clean, smooth cuts. Slice and enjoy your festive Easter no-bake Jello pie!