
Ingredients
Equipment
Method
Prepare the Crust
- First, melt the butter in the microwave until it is fully liquified.
- Combine the graham cracker crumbs and melted butter in a medium bowl. Mix them until you achieve a thick, sand-like texture.
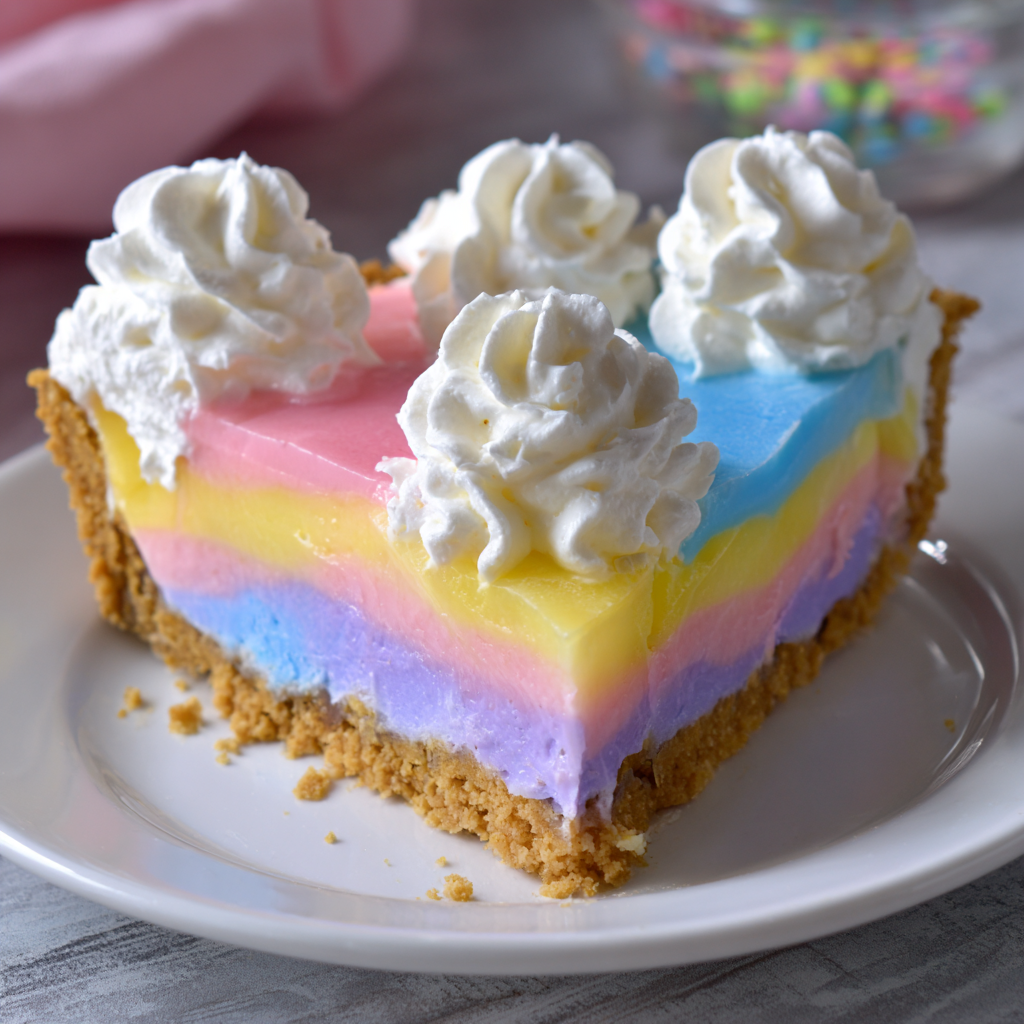
- Next, place this mixture into your 9-inch springform pan. Spread it evenly across the bottom and slightly up the sides, pressing it down firmly to pack it in.
- Finally, place the crust in the freezer for at least 15 minutes to chill while you prepare the Jello layers.
Dissolve Jello
- Place each color of Jello powder in its own separate small bowl.
- Add ¾ cup of boiling water to each bowl, stirring until no graininess remains on the bottom.
- Now, place ⅓ cup of cold water into each bowl and stir once more.
- Let the bowls of Jello cool down slightly, then place them in the fridge for about 20-30 minutes. You want the Jello to be thickened, like syrup, but not fully solidified.
Create Creamy Jello Filling
- Remove the thickened Jello bowls from the fridge.
- Add 4 ounces (about ½ cup) of thawed whipped topping to each Jello bowl.
- Vigorously mix each color until the whipped topping is fully combined and the mixture is smooth. This may take a minute or two per bowl.
- If you are using food dye to enhance the yellow and pink colors, add it at this point and mix gently until no color streaks appear and you've reached your desired pastel shades.
Layer the Pie
- Retrieve your chilled crust from the freezer.
- Spread the first color of creamy Jello mixture evenly over the crust. (I typically start with yellow, but you can choose your own order).
- Place the pie back in the freezer for just 5 minutes to set the layer slightly. This quick freeze prevents the colors from bleeding.
- Repeat this process for each remaining color, adding one layer at a time and freezing for 5 minutes after each addition.
Final Chill
- Once all four colors have been layered, place the entire pie back into the freezer.
- Leave it there for 3-4 hours, or until the pie is completely solidified all the way through.
Serve
- When ready to serve, carefully remove the pie from the springform pan.
- Top with extra whipped cream, if desired, and decorate with Easter sprinkles or candies.
- Dip your knife in hot water between slices for clean, smooth cuts. Slice and enjoy your festive Easter no-bake Jello pie!
Nutrition
Notes
Adapt this pie with different Jello flavors, homemade whipped cream, or varied crusts like chocolate graham crackers. For brighter hues, add gel food coloring. Freeze each Jello layer for 5-10 minutes to ensure distinct stripes. For clean slices, dip your knife in hot water between cuts. Store covered in the refrigerator for up to 4 days; freezing is not recommended. Nutrition information is estimated based on common ingredients and serving sizes and may vary.