 Skip to content
 There is something truly magical about classic Italian desserts, and tiramisu holds a special place in my heart. But what if we could take that beloved creamy, coffee-soaked indulgence and transform it into something bright, vibrant, and perfectly suited for a warm summer day? That’s exactly what I set out to do with this beautiful raspberry tiramisu. Forget the oven, skip the eggs, and get ready to create a no-bake, refreshing treat that marries the elegance of traditional tiramisu with the cheerful burst of fresh raspberries, elevated by a special homemade coulis. It’s a sophisticated yet incredibly easy dessert that promises pure joy with every bite.
Why You’ll Love This Raspberry Tiramisu Recipe
I know what you might be thinking: raspberry tiramisu often uses store-bought preserves. But I have a little secret that elevates this recipe from delicious to absolutely sublime. My unique twist here is replacing those preserves with a quick, homemade raspberry coulis, created by gently cooking fresh raspberries with a touch of sugar and lemon, then straining them. This simple step makes all the difference.
A brighter, fresher, more intense natural raspberry flavor: Store-bought preserves can be overly sweet and jammy. My homemade coulis delivers a vibrant, true raspberry taste that truly sings.
Smoother texture: Straining the coulis ensures a silky-smooth fruit layer, free from seeds, which beautifully contrasts with the creamy mascarpone.
Cuts through richness: The natural acidity of fresh raspberries and lemon in the coulis perfectly balances the rich mascarpone cheese, making each spoonful feel lighter and more refreshing.
This raspberry tiramisu is the ultimate summer dessert. It’s incredibly easy to make with no baking required, and it’s completely egg-free, making it accessible and delightful for everyone. It’s an impressive Italian dessert that will wow your guests with its stunning layers and incredible flavor, all without breaking a sweat in the kitchen.
Ingredients Needed
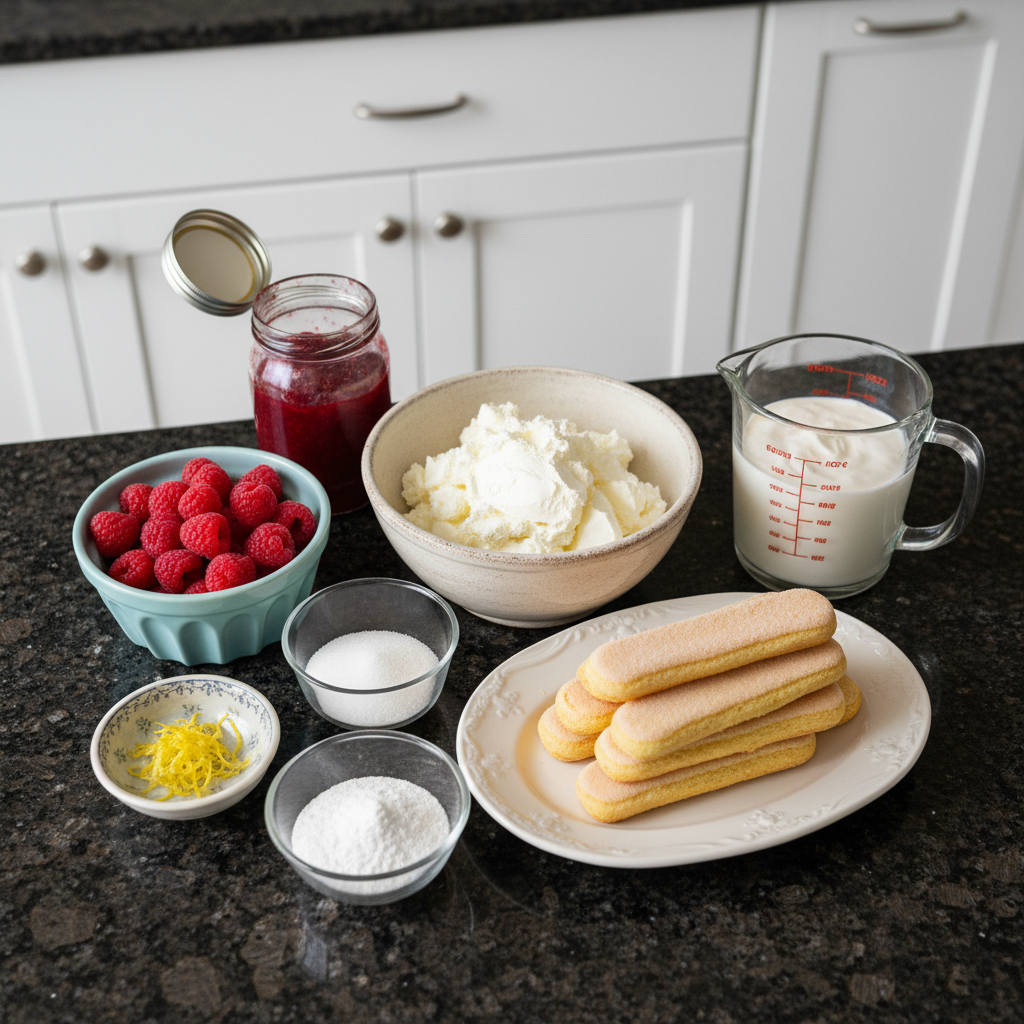
Here is everything you will need to create this delightful raspberry tiramisu in your kitchen:
- ½ cup sugar, divided
- ½ cup water
- 2 cups raspberries
- 1 teaspoon lemon zest
- 8 ounces mascarpone cheese, at room temperature
- 1 cup heavy whipping cream
- ¾ cup raspberry preserves
- 20 or so ladyfinger cookies, soft or hard are fine
- Confectioner’s sugar and raspberries, for decorating
Ingredient Notes & Substitutions
Let’s dive into some specifics about the ingredients to ensure your raspberry tiramisu turns out perfectly.
Mascarpone Cheese: It is crucial for your mascarpone cheese to be at room temperature. This ensures that when you beat it, it becomes wonderfully smooth and lump-free. Always opt for full-fat mascarpone for the best rich texture and flavor in your cream.
Heavy Whipping Cream: For optimal whipping and a stable, fluffy consistency, always use very cold heavy whipping cream. Ensure it is full-fat heavy cream, not just “whipping cream” which can have a lower fat content and may not whip as well.
Raspberries: You can use either fresh or frozen raspberries for the raspberry syrup and the homemade coulis base. Frozen raspberries work wonderfully as their texture breaks down easily during cooking. However, for a beautiful garnish, fresh raspberries are always preferred.
Ladyfingers: Ladyfingers come in two main types: Savoiardi (crispier and more traditional for soaking) and a softer, sponge-like variety. Both work here, but the crispy kind absorbs the syrup beautifully without falling apart. You can typically find them in the international aisle of your grocery store. If you can’t find ladyfingers, vanilla wafers or slices of sponge cake can be used as alternatives, though the texture will be slightly different.
Lemon Zest: Don’t skip the lemon zest! It’s a small but mighty ingredient that brightens all the flavors, cutting through the richness and complementing the sweetness of the raspberries beautifully.
How to Make Raspberry Tiramisu
Let’s get started on creating this incredible raspberry tiramisu. Follow these steps carefully for a perfect dessert.
Prepare the Pan
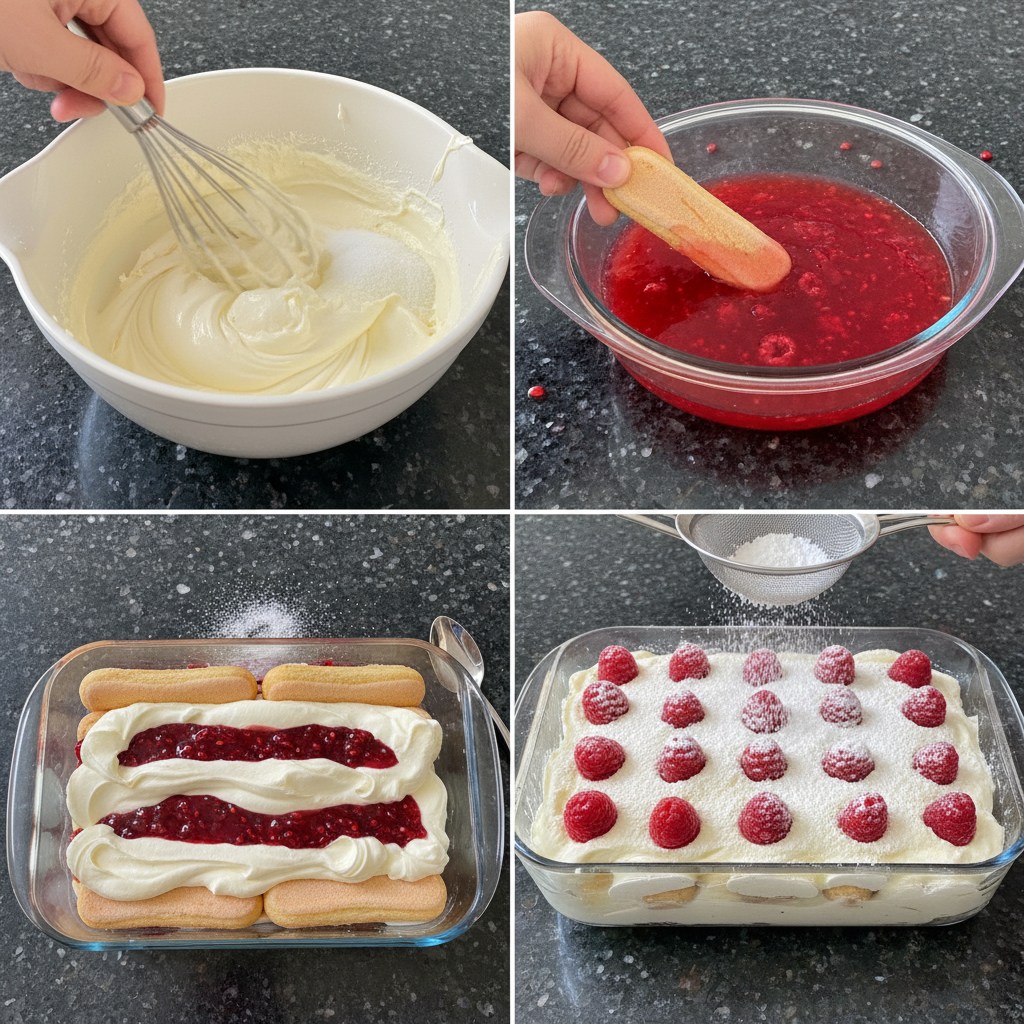
Line an 8×4-inch loaf pan with plastic wrap. Make sure the plastic wrap extends over the sides, as this will make it incredibly easy to remove and serve your finished tiramisu. This also creates a neat and clean presentation.
Craft the Raspberry Syrup (and Coulis Base)
In a medium saucepan, combine ¼ cup of sugar with ½ cup of water and 2 cups of raspberries over medium heat. Stir continuously until the sugar has fully dissolved. Once dissolved, immediately remove the pan from the heat. Gently press down on the raspberries with the back of a spoon to release their juices, creating a vibrant red liquid. Stir in the 1 teaspoon of lemon zest. This flavorful mixture forms the base for both our raspberry syrup for soaking ladyfingers and our special homemade raspberry coulis. You will notice a sweet, aromatic steam rising from the pan.
Whip the Mascarpone Cream
In a medium bowl, gently beat the room-temperature mascarpone cheese with a hand mixer until it is smooth and free of any lumps. This initial step is key to a silky cream. Slowly stream in the 1 cup of heavy whipping cream and the remaining ¼ cup of sugar. Continue to beat on medium speed until the mixture is thickened and fluffy, forming soft peaks. Be careful not to over-beat, as this can lead to a grainy or curdled texture. The cream will be light, airy, and a beautiful pale pinkish-white.
Strain and Assemble Coulis
Carefully strain the cooked raspberries from the syrupy mixture, reserving both the clear, bright red syrup and the strained berries separately. The clear liquid is our refined raspberry syrup, perfect for quickly dunking the ladyfingers. Now, take the strained berries and stir 2 tablespoons of this reserved raspberry syrup into them, along with the ¾ cup of raspberry preserves. This is where our unique homemade coulis takes shape, creating a brighter, fresher fruit layer that truly elevates the tiramisu.
Begin Layering
Now it’s time for the assembly! Quickly dunk each ladyfinger into the prepared raspberry syrup. Saturate both sides, but do not oversoak them—a quick dip is all you need to prevent a soggy tiramisu. Arrange a single layer of these moistened ladyfingers in the bottom of your prepared loaf pan. You may need to gently break some to fit snugly.
Add Cream and Coulis Layers
Spoon a generous, heaping cup of the whipped mascarpone cream over the layer of ladyfingers and spread it smoothly and evenly. Next, spread half of the vibrant berry preserve and coulis mixture on top of the cream layer. Repeat this layering process once more: another layer of quickly soaked ladyfingers, followed by another generous spoonful of whipped mascarpone cream, and then the remaining berry preserve and coulis mixture.
Final Touches & Chill
Finish off your raspberry tiramisu with a final layer of ladyfingers on top, along with any leftover whipped mascarpone cream. Smooth the top surface gently. Cover the pan tightly with plastic wrap and refrigerate for at least 6 hours, or ideally, overnight. This crucial chilling time allows all the flavors to meld together beautifully and ensures the tiramisu firms up properly for clean slices. Patience is truly a virtue here for the best results!
Serve and Garnish
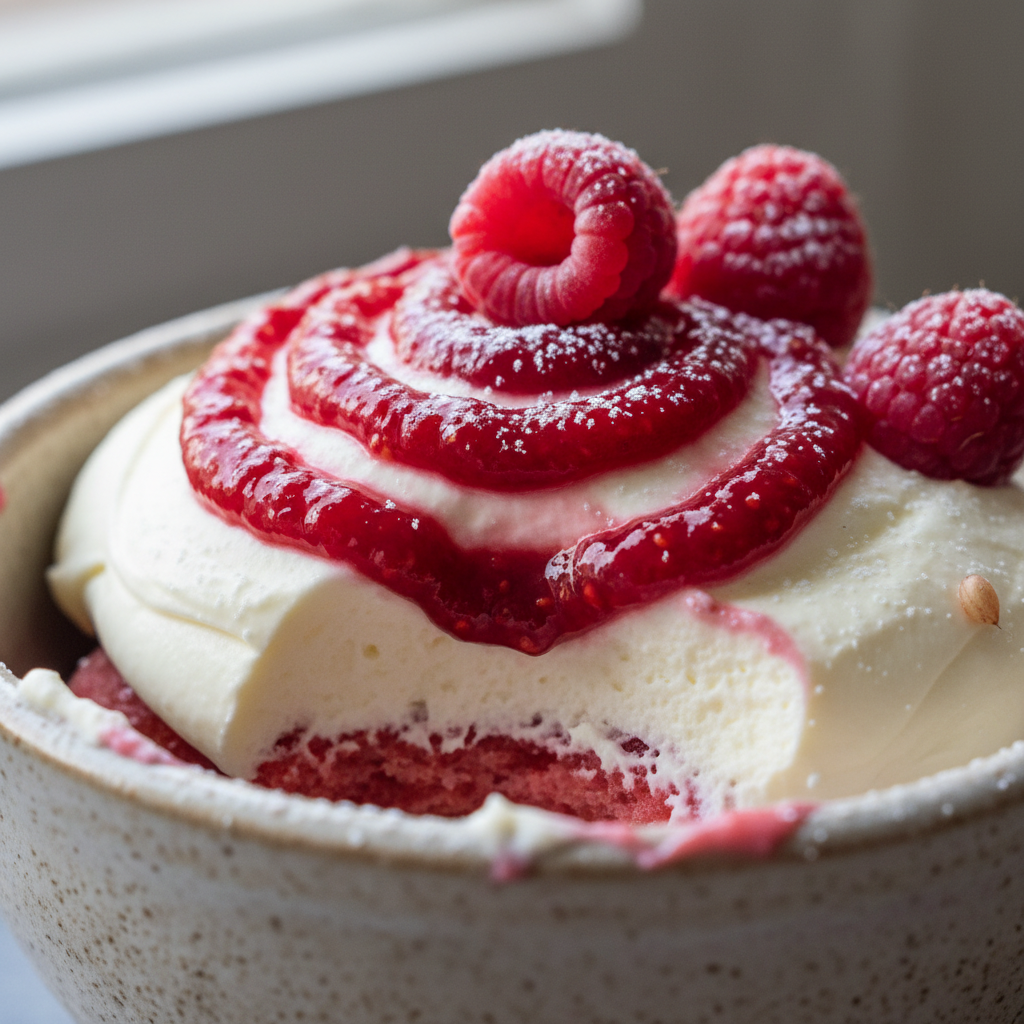
To serve, carefully invert the chilled raspberry tiramisu onto a serving plate. Gently remove the plastic wrap. For an elegant finish, garnish your tiramisu with fresh raspberries and a delicate dusting of confectioner’s sugar, if desired. Each slice will reveal stunning layers of cream, berries, and ladyfingers.
Essential Tools & Recipe Adaptations
Having the right tools and knowing how to adapt your recipe can make all the difference in the kitchen.
Detailed Equipment List
To make this raspberry tiramisu, these are the tools you will find most helpful:
- Loaf Pan (8×4”): An 8×4-inch loaf pan is perfectly sized for the quantities in this recipe, creating a nice tall tiramisu. A similar-sized small rectangular dish would also work. The plastic wrap lining is essential for easy removal without any fuss.
- Hand Mixer (or Stand Mixer): This is crucial for whipping the mascarpone cheese and heavy cream to the perfect fluffy consistency. A hand mixer offers great control, while a stand mixer allows for hands-free operation.
- Medium Saucepan: You will need this for gently cooking the raspberries, water, and sugar to create the flavorful raspberry syrup and coulis base.
- Fine-Mesh Sieve/Strainer: This tool is absolutely critical for achieving the smooth, seedless homemade raspberry coulis that truly sets this recipe apart. It removes any unwanted raspberry seeds, leaving you with a refined fruit layer.
- Mixing Bowls: Have at least two on hand—one for preparing the mascarpone cream and another for the raspberry syrup and coulis components.
- Spatula: A flexible spatula is perfect for spreading the cream and coulis layers smoothly and evenly in the pan.
Scaling the Recipe (Smaller or Larger Batches)
This raspberry tiramisu recipe is quite forgiving if you wish to adjust the size. For a smaller, individual dessert, you can halve all the ingredients and assemble it in a smaller dish or even a few ramekins. If you’re feeding a crowd, simply double the ingredients and assemble in a larger 9×13-inch baking dish. Remember that for significantly larger batches, the chilling time might need a slight extension to ensure everything sets properly.
Other Berry Variations
While raspberries are the star here, you can certainly experiment with other berry variations! Fresh strawberries or blueberries would also make delightful variations. Just be sure to adjust the sweetness of the syrup and coulis as needed, depending on the natural sweetness of your chosen berries. A mixed berry tiramisu would also be a fantastic option.
Pro Tips & Troubleshooting for Perfect Tiramisu
Even seasoned chefs learn new tricks! Here are my best tips for mastering this raspberry tiramisu, along with common pitfalls to avoid.
Pro Tips for Success
Always ensure your mascarpone cheese is at room temperature before you start. This is key to achieving a perfectly smooth, lump-free cream. Gently beat it alone *before* adding the heavy cream.
Start with very cold heavy whipping cream for the best volume and a wonderfully fluffy consistency. Pop it in the freezer for 10-15 minutes before whipping for an extra boost.
Slowly stream in the whipping cream and sugar while beating on medium speed until the mixture is just thickened and fluffy. The moment it holds its shape, stop beating. Over-beating can quickly lead to a grainy or curdled texture.
When dipping your ladyfingers, be swift! A quick dunk on both sides—no more than a second or two per side—is all you need. This prevents over-saturation and ensures your tiramisu isn’t soggy.
Don’t skip the simple step of straining your raspberry syrup for the coulis. This small effort yields an elegant, brighter coulis that truly elevates the texture and flavor of this recipe, making it uniquely special.
Allow your tiramisu to rest for at least 6 hours or, even better, overnight in the fridge. This crucial “chilling time” lets all the flavors meld and the dessert firm up beautifully for clean, impressive slices.
Common Mistakes to Avoid
Over-beating the Cream: This is the most common culprit for a grainy or curdled mascarpone cream. Watch it closely and stop beating as soon as it’s thickened and fluffy.
Soggy Ladyfingers: Over-soaking the ladyfingers is a direct path to a mushy, unappetizing tiramisu. Remember, a quick dip is all you need for them to absorb enough syrup without becoming waterlogged.
Insufficient Chilling: Not chilling the tiramisu long enough will result in a dessert that doesn’t hold its shape when served and whose flavors haven’t fully had a chance to develop. Be patient!
Using Cold Mascarpone: Cold mascarpone will clump and be difficult to incorporate smoothly into the cream, potentially leading to a lumpy texture. Room temperature is essential here.
Skipping the Strain: If you don’t strain the raspberry syrup, you’ll end up with seeds in your coulis. This detracts from the smooth, refined texture that makes our unique twist so delightful.
Serving & Storage
Once your beautiful raspberry tiramisu is chilled and ready, here’s how to best serve and store it.
Serving Ideas
To serve your chilled raspberry tiramisu, invert it onto a plate and carefully remove the plastic wrap. Adorn your dessert with fresh raspberries and a delicate dusting of confectioner’s sugar for an elegant presentation that truly pops.
If you’ve made a little extra raspberry coulis, consider serving individual slices with a small drizzle over the top. A light berry compote would also add a lovely burst of flavor and visual appeal.
This light, summery dessert pairs wonderfully with a glass of sparkling wine, a crisp Prosecco, or a delicate dessert wine to complement its fruity notes without being overly sweet.
For easy serving, use a warm, clean knife to cut the tiramisu into individual squares or slices. This helps ensure clean edges and a beautiful presentation.
Storage and Make-Ahead
This Raspberry Tiramisu is an excellent make-ahead dessert! It truly benefits significantly from an overnight chill, allowing all the flavors to deepen and the textures to set perfectly. You can confidently prepare it 1-2 days in advance for the best results, making it perfect for entertaining.
Store any leftover tiramisu tightly covered with plastic wrap in the refrigerator for up to 3-4 days. Ensure it’s well-sealed to prevent it from absorbing any unwanted fridge odors, keeping its fresh taste intact.
While possible, freezing can slightly alter the texture of the ladyfingers and cream. For best results, freeze individual portions tightly wrapped in plastic wrap and then foil for up to 1 month. Thaw frozen portions in the refrigerator overnight before serving to maintain as much of the original texture as possible.
Conclusion
There you have it—my recipe for a truly unforgettable raspberry tiramisu. It’s a dessert that captures the heart of classic Italian indulgence but lightens it with the vibrant, refreshing taste of summer berries. The homemade raspberry coulis is truly the star here, providing that bright, fresh flavor that cuts through the richness and makes every bite a delight. I designed this recipe to be no-bake and egg-free, proving that sophistication doesn’t have to mean complication. I encourage you to try this recipe in your own kitchen; you’ll be amazed at how easy it is to create such an elegant treat. Whether you stick to the classic garnishes or explore different berry variations, I hope this becomes a cherished addition to your dessert repertoire. Please share your beautiful creations with me; I love to see them!
FAQ
Here are some common questions about making raspberry tiramisu, answered for you.
Is this an egg-free raspberry tiramisu recipe?
Yes, absolutely! My recipe is designed to be a delicious, no-bake, and egg-free version, making it simpler to prepare without compromising on flavor or creamy texture.
How do I prevent my raspberry tiramisu from being soggy?
The key is in quickly dipping the ladyfingers. Submerge each ladyfinger in the raspberry syrup for just a second or two on each side. You want them moistened, not drenched, to prevent sogginess.
How long should raspberry tiramisu chill before serving?
For optimal flavor melding and to allow the layers to firm up beautifully, your raspberry tiramisu should chill in the refrigerator for a minimum of 6 hours, but ideally, overnight is best.
Can I make raspberry tiramisu ahead of time and how long does it last?
Yes, this is a perfect make-ahead dessert! You can prepare it 1-2 days in advance. Store it tightly covered in plastic wrap in the refrigerator, and it will last for up to 3-4 days.
What type of pan is best for assembling raspberry tiramisu?
An 8×4-inch loaf pan is ideal for this recipe. Lining it with plastic wrap extending over the sides will make it incredibly easy to lift out and serve the tiramisu.
Can I use frozen raspberries for the syrup and coulis?
Yes, frozen raspberries work perfectly for making the raspberry syrup and the homemade coulis base. Their texture breaks down easily during cooking, and straining removes any seeds, resulting in a smooth coulis.
What can I substitute for ladyfingers in tiramisu?
While ladyfingers are traditional, you can substitute them with slices of sponge cake, vanilla wafers, or even digestive biscuits for a different texture. Just ensure they can absorb some of the syrup.
What liqueurs pair well with raspberry tiramisu?
For an adult version, you could add a splash of raspberry liqueur (like Chambord), limoncello, or even a touch of white rum to the raspberry syrup for an extra layer of flavor that complements the berries.
What are some common mistakes when making tiramisu?
Common mistakes include over-beating the mascarpone cream (leading to graininess), over-soaking the ladyfingers (resulting in sogginess), and not allowing sufficient chilling time, which prevents the dessert from setting properly and flavors from developing fully.
Easy Raspberry Tiramisu (No-Bake, Egg-Free & Summer Perfect)
Ingredients
Equipment
Method
- Line an 8x4-inch loaf pan with plastic wrap, ensuring it extends over the sides for easy removal and a clean presentation.
- In a medium saucepan, combine ¼ cup of sugar with ½ cup of water and 2 cups of raspberries over medium heat. Stir continuously until the sugar is fully dissolved.
- Once dissolved, immediately remove the pan from the heat. Gently press down on the raspberries with the back of a spoon to release their juices, creating a vibrant red liquid.
- Stir in the 1 teaspoon of lemon zest. This mixture forms the base for both the raspberry syrup for soaking ladyfingers and the homemade raspberry coulis.
- In a medium bowl, gently beat the room-temperature mascarpone cheese with a hand mixer until it is smooth and lump-free.
- Slowly stream in the 1 cup of heavy whipping cream and the remaining ¼ cup of sugar. Continue to beat on medium speed until the mixture is thickened and fluffy, forming soft peaks. Be careful not to over-beat.
- Carefully strain the cooked raspberries from the syrupy mixture, reserving both the clear, bright red syrup and the strained berries separately.
- Take the strained berries and stir 2 tablespoons of this reserved raspberry syrup into them, along with the ¾ cup of raspberry preserves. This creates the homemade coulis layer.
- Quickly dunk each ladyfinger into the prepared raspberry syrup. Saturate both sides with a quick dip, but do not oversoak them. Arrange a single layer of these moistened ladyfingers in the bottom of your prepared loaf pan, breaking some to fit snugly if needed.
- Spoon a generous, heaping cup of the whipped mascarpone cream over the layer of ladyfingers and spread it smoothly and evenly.
- Next, spread half of the vibrant berry preserve and coulis mixture on top of the cream layer.
- Repeat this layering process once more: add another layer of quickly soaked ladyfingers, followed by another generous spoonful of whipped mascarpone cream, and then the remaining berry preserve and coulis mixture.
- Finish off your raspberry tiramisu with a final layer of ladyfingers on top, along with any leftover whipped mascarpone cream. Smooth the top surface gently.
- Cover the pan tightly with plastic wrap and refrigerate for at least 6 hours, or ideally, overnight. This chilling time allows flavors to meld and the tiramisu to firm up properly.
- To serve, carefully invert the chilled raspberry tiramisu onto a serving plate. Gently remove the plastic wrap.
- For an elegant finish, garnish your tiramisu with fresh raspberries and a delicate dusting of confectioner's sugar, if desired.


