 Skip to content
 There’s something truly magical about a batch of homemade brownies, especially when they’re dressed up in vibrant green! These Green Velvet Brownies with Cream Cheese Frosting are not just a festive treat for St. Patrick’s Day; they are a delightful indulgence for any occasion. Prepare for an easy-to-follow recipe that delivers incredibly rich, fudgy-cakey brownies topped with a luscious, tangy cream cheese frosting. Get ready to bake a batch that will impress everyone.
Why You’ll Love This Recipe
In my kitchen, I’m always looking for ways to elevate classic recipes, and these Green Velvet Brownies are no exception. The secret to their intensely rich chocolate flavor lies in one simple addition: 1 teaspoon of espresso powder. This isn’t about adding a coffee taste; it’s a culinary trick that scientifically deepens and intensifies the chocolate, creating a more profound and complex brownie. It beautifully balances the sweetness, making each bite an irresistible experience.
You’ll love the vibrant green color that makes these brownies perfect for St. Patrick’s Day, alongside their perfect fudgy-cakey texture. This small but mighty twist truly elevates a classic to gourmet status, ensuring these Green Velvet Brownies will be a showstopper.
Ingredients Needed
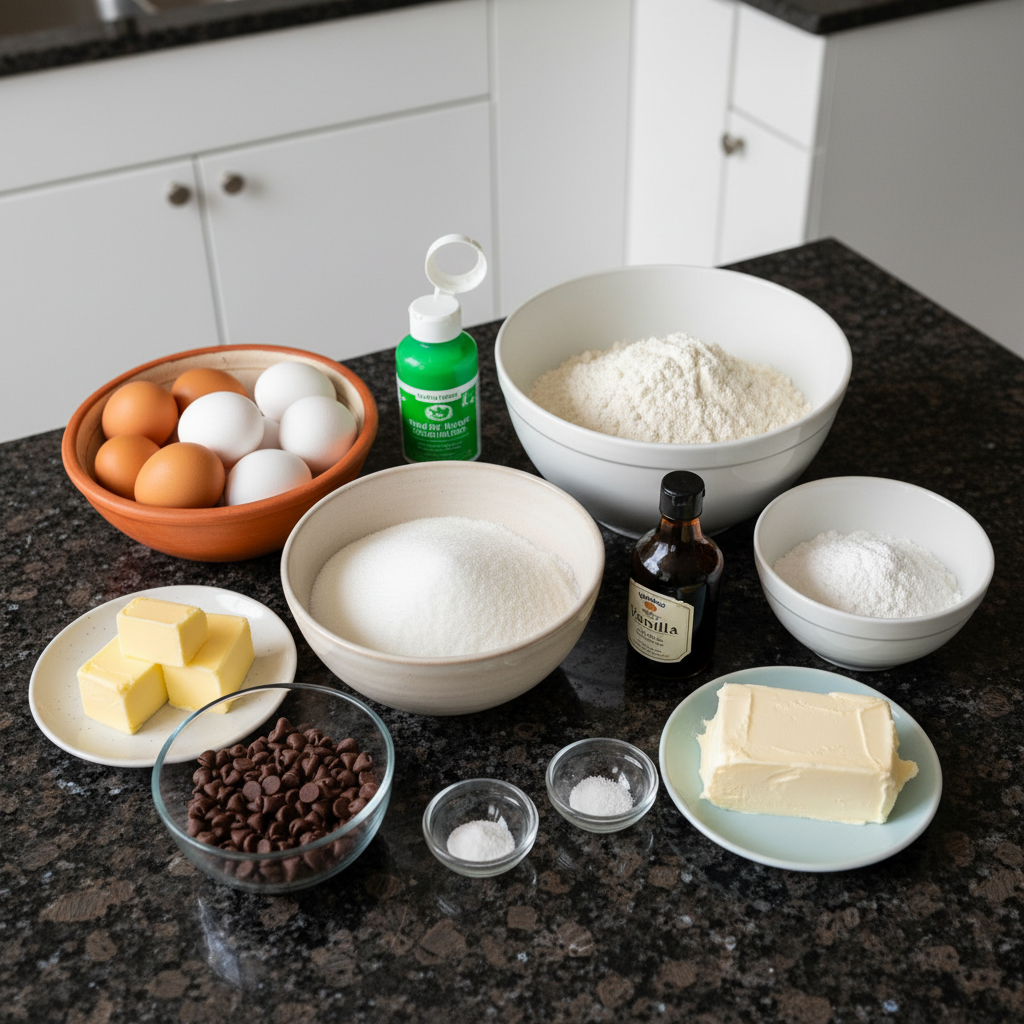
To create these delightful Green Velvet Brownies, here’s what you’ll need from your pantry and fridge:
Brownie Ingredients:
- ¾ cup semi-sweet chocolate chips
- ¾ cup butter
- 2 cups sugar
- 4 large eggs
- 1½ cups all-purpose flour
- 1 (1-oz) bottle green liquid food coloring
- 1½ tsp baking powder
- 1 tsp vanilla extract
- ⅛ tsp salt
- 1 tsp espresso powder
Cream Cheese Frosting Ingredients:
- 1 (8-oz) package cream cheese, softened
- 3 Tbsp butter, softened
- 1½ cups powdered sugar
- ⅛ tsp salt
- 1 tsp vanilla extract
Ingredient Notes & Substitutions
For the semi-sweet chocolate chips, I always recommend choosing a good quality brand as it significantly impacts the depth of your chocolate flavor. If you prefer, you can substitute with a 4-oz bittersweet chocolate bar, finely chopped, for an even richer taste. When it comes to butter, I generally use unsalted so I can control the salt content, but salted butter works if that’s what you have on hand.
To achieve that striking vibrant green color, the recipe calls for liquid food coloring. However, if you want a more intense hue with less liquid, a gel food coloring is a fantastic alternative; just start with a smaller amount and add until you reach your desired shade. For the creamy frosting, it’s crucial that your cream cheese and butter are softened. This ensures a smooth, lump-free consistency that spreads beautifully. All-purpose flour is standard here, but if you’re experimenting, a gluten-free blend can work, though it might result in slight texture variations.
How to Make Green Velvet Brownies with Cream Cheese Frosting
Let’s get baking! Follow these steps for perfect fudgy Green Velvet Brownies with Cream Cheese Frosting every time.
Step 1: Prep the Pan & Oven
First, preheat your oven to 350°F. Line the bottom and sides of a 9-inch square pan with aluminum foil, allowing 2 to 3 inches to extend over the sides. This step is a lifesaver, making it so much easier to lift the cooling brownies out of the pan for neat cutting brownies later. Lightly grease the foil.
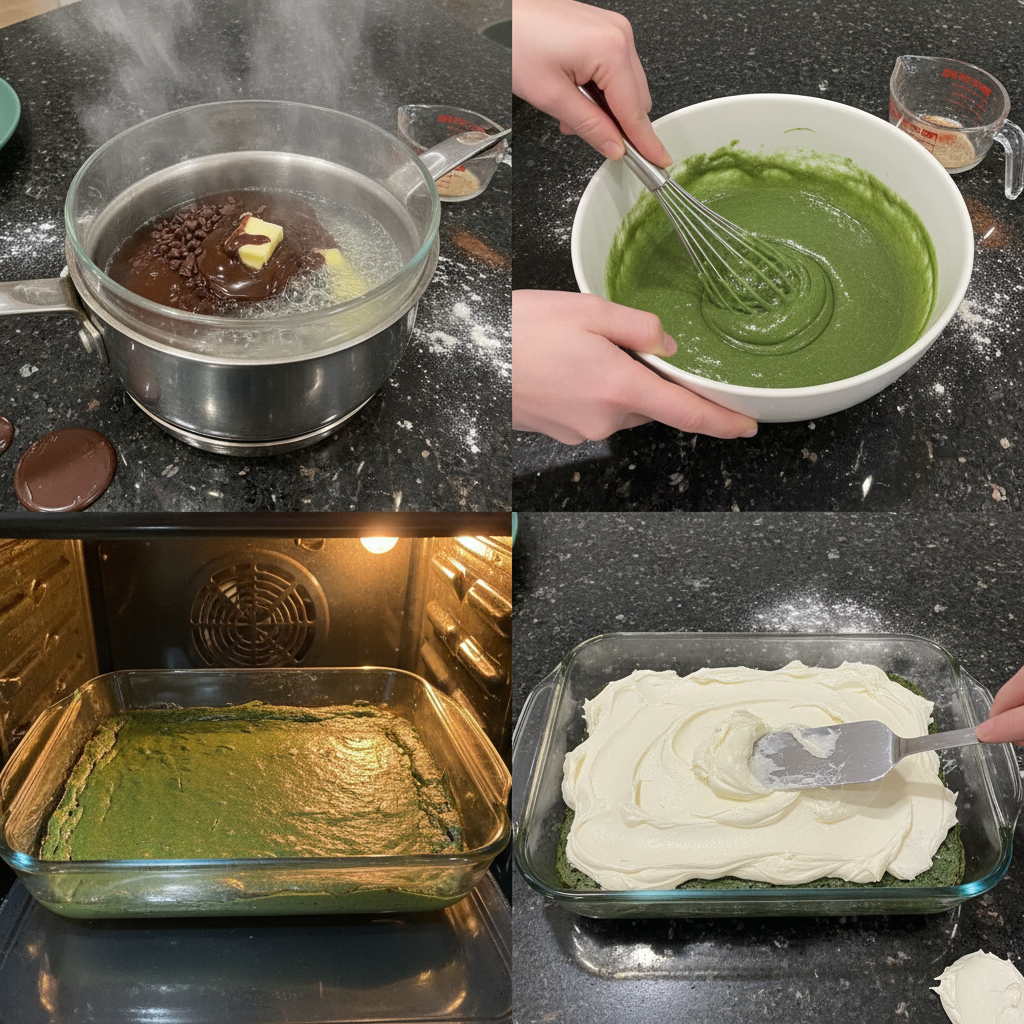
Step 2: Melt Chocolate & Butter
In a large microwave-safe bowl, combine your semi-sweet chocolate chips and butter. Microwave on HIGH for 1-1/2 to 2 minutes, stirring at 30-second intervals until melted and smooth. Let the melted chocolate chips and butter cool slightly before adding the sugar; this helps prevent the eggs from cooking when they are added later.
Step 3: Combine Wet & Dry Ingredients
Whisk the sugar into the slightly cooled chocolate mixture. Add the large eggs one at a time, whisking just until blended after each addition. Now, gently stir in the all-purpose flour, green liquid food coloring, baking powder, vanilla extract, salt, and the all-important 1 tsp espresso powder. Be sure to gently stir to avoid overmixing, which can lead to tough brownies. You’ll see a beautiful vibrant green color develop and the batter will have a rich, thick consistency, promising fudgy brownies. Pour this delicious mixture into your prepared pan.
Step 4: Bake to Perfection
Bake your brownies for 44 to 48 minutes. You’ll know they’re done when a wooden pick inserted in the center comes out with a few moist crumbs. A slightly moist pick means you’re on your way to perfectly fudgy brownies, while a clean pick suggests cakey brownies. Baking time can vary slightly depending on your oven. Once baked, cool completely on a wire rack for about 2 hours before frosting.
Step 5: Prepare the Cream Cheese Frosting
While your brownies are cooling, it’s time to make the Cream Cheese Frosting. In a mixing bowl, beat the softened cream cheese and softened butter at medium speed with an electric mixer until creamy. Gradually add the powdered sugar and salt, beating until just blended. Finally, stir in the vanilla extract. You’ll achieve a smooth, creamy frosting consistency that’s just perfect.
Step 6: Frost & Serve
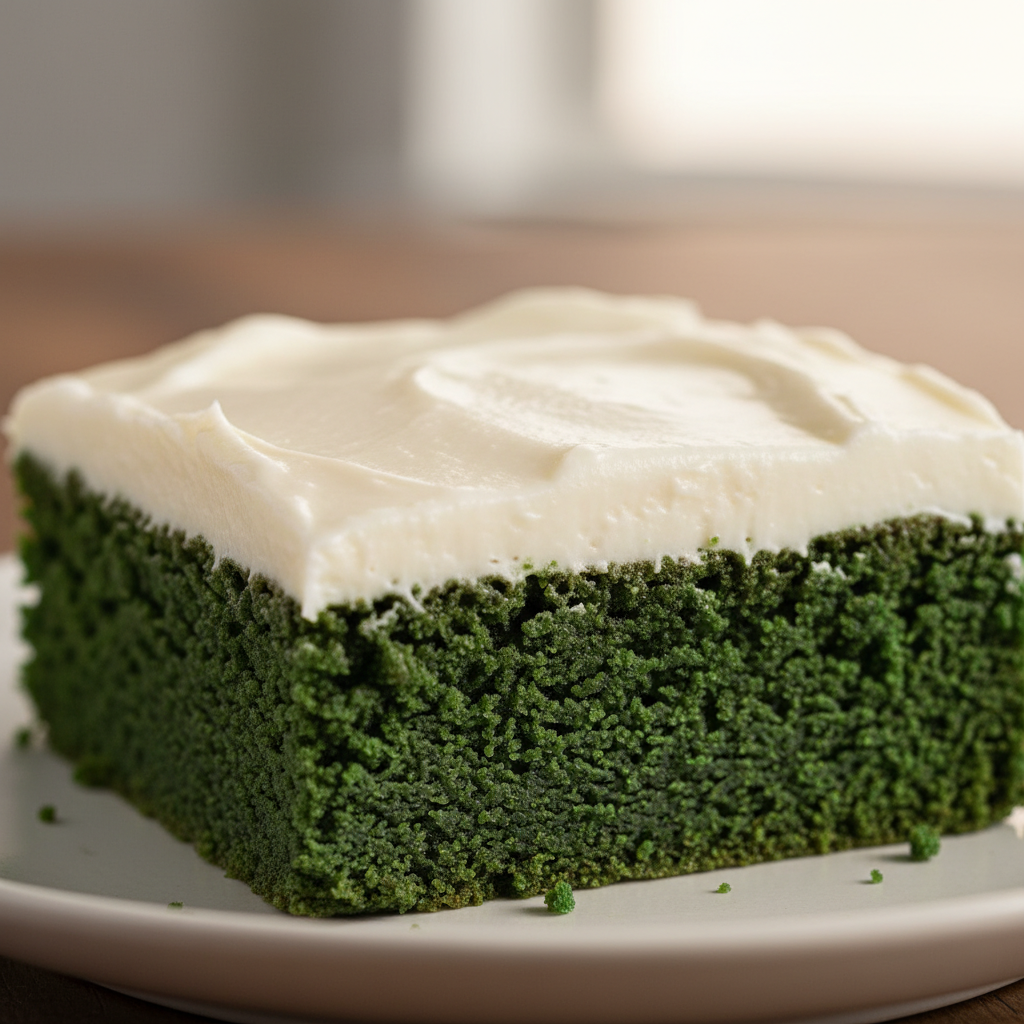
Once the brownies are completely cool, lift them from the pan using the foil sides as handles, then gently remove the foil. Spread the creamy Cream Cheese Frosting evenly on top of the brownies. For neat cutting brownies, I often chill them for about 15-20 minutes after frosting. Then, cut into 16 squares. Garnish with green and white sprinkles, if desired, and enjoy!
Smart Baking: Scaling, Pan Choices & Quick Prep Tips
Understanding how to adapt a recipe can turn a good baker into a great one. Here are some key insights to help you customize this Green Velvet Brownie recipe with confidence.
Scaling the Recipe: Doubling and Pan Size Adjustments
Yes, you can absolutely double this Green Velvet Brownie recipe! If you’re planning to make a larger batch, I recommend using a 9×13-inch pan. When doubling, you will need 8 large eggs, maintaining the ingredient ratios. Your baking time will increase significantly; start checking around 55-65 minutes with the wooden pick test, looking for those crucial moist crumbs. If using a larger 10×14 pan, you might need an additional 5-10 minutes beyond the 9×13 pan’s bake time, so always keep a close eye on your oven.
Optimal Pan Material: Metal vs. Glass Baking Pans
When it comes to brownies, the type of pan you use truly makes a difference in baking time and the texture of the edges. I always recommend metal cake pans for Green Velvet Brownies. Metal conducts heat evenly and helps create those coveted slightly crispier edges. Glass pans tend to retain heat longer and can sometimes lead to overcooked edges or a longer baking time overall. For best results and that perfect chewy texture, stick with metal.
Quick Tips for Softening Cream Cheese & Butter
There’s nothing more frustrating than needing softened cream cheese and butter for creamy frosting and realizing they’re rock hard. My go-to quick tips for softening are to unwrap them and cut into 1-inch cubes. You can leave them at room temperature for 15-30 minutes, or for a faster method, microwave for 10-15 seconds at a time on low power until they are just soft, not melted. This ensures your beating frosting process is smooth and results in a perfectly creamy frosting.
Pro Tips & Troubleshooting
Even the most seasoned bakers can benefit from a few expert insights and knowing how to navigate common pitfalls. Here are my tips for perfect Green Velvet Brownies and how to avoid common mistakes.
Pro Tips for Perfect Brownies
- Enhance Chocolate Flavor: Don’t forget our unique twist! The 1 tsp espresso powder is crucial for deepening that rich chocolate flavor. Make sure it’s fully incorporated with the dry ingredients.
- Achieve a Vibrant Green: For the best vibrant green color, use the entire 1-oz bottle of liquid food coloring as specified. If you want an even more concentrated tint, especially for special occasions like St. Patrick’s Day, consider using gel food coloring, starting with a small amount and adding more as needed.
- Cool Before Frosting: This is non-negotiable! Always allow your cooling brownies to cool completely on a wire rack (about 2 hours) before applying Cream Cheese Frosting. This prevents any melty, messy situations.
- Use the Right Pan: For consistent results, use a metal cake pan. Lining baking pan with foil or parchment paper will make removal incredibly easy.
- Prevent Overmixing: Gently whisking ingredients, especially after adding the all-purpose flour, is key. Overmixing can develop too much gluten, leading to a tough rather than chewy texture.
Common Mistakes to Avoid
- Don’t Skimp on Color: Not using the entire 1-oz bottle of green liquid food coloring may result in less vibrant brownies. For a truly festive holiday dessert, get that green just right!
- Avoid Overbaking: Overbaking is the quickest way to dry brownies. Watch for a wooden pick with a few moist crumbs, not a clean one, for that perfect fudgy texture.
- Incorrect Pan Size: Using an incorrect pan size or adjusting quantities without extending baking time can drastically alter baking time and texture. For example, a 9×13 pan for a doubled recipe will need adjustment.
- Warm Frosting: Trying to spread frosting on warm brownies will lead to melted, messy creamy frosting. Patience is a virtue here!
- Over-whisking Eggs: Whisking just until blended after each egg addition prevents too much air from incorporating, which can make brownies more cake-like than fudgy.
Serving & Storage
Once your Green Velvet Brownies with Cream Cheese Frosting are baked and cooled, here’s how to best enjoy and preserve them.
Serving Ideas
- Festive Garnish: For St. Patrick’s Day or any festive occasion, sprinkle with green and white sprinkles or a light dusting of powdered sugar. A small sprig of fresh mint can add a lovely touch and aroma.
- Holiday Dessert Pairings: These fudgy brownies make a show-stopping holiday dessert. Consider serving them alongside complementary St. Patrick’s Day dishes like Guinness Beer Bread, Reuben Crescents, Guinness Burgers, or Green Velvet Cupcakes for a full festive spread.
- Perfect with Beverages: Enjoy a square (or two!) with a cold glass of milk, a warm cup of coffee, or for adults, a hearty stout beer makes for a surprising but delightful pairing.
Storage and Make-Ahead
- Room Temperature: Unfrosted brownies can be stored in an airtight container at room temperature for up to 3 days.
- Refrigeration: Frosted Green Velvet Brownies with Cream Cheese Frosting should be stored in an airtight container in the refrigerator for up to 5-7 days. For the best flavor and texture, I always recommend letting them come to room temperature before serving.
- Freezing Brownies: Freezing brownies is a fantastic way to enjoy them later. For unfrosted brownies, wrap them tightly in plastic wrap, then again in aluminum foil. Frozen brownies can last for up to 3 months. If you’re freezing frosted brownies, flash freeze them on a baking sheet until the frosting is firm, then wrap tightly in plastic and foil. Thaw at room temperature before serving, or gently warm if you prefer a gooey texture.
Conclusion
I hope you’ll agree that these Green Velvet Brownies are truly special. With their rich chocolate flavor, subtly enhanced by a touch of espresso powder, and that irresistible fudgy-cakey texture, they’re a delightful twist on a classic. Topped with tangy Cream Cheese Frosting, they’re perfect for St. Patrick’s Day or any time you need a little festive cheer. I encourage you to make these homemade recipe brownies, share them with loved ones, and savor every bite. Feel free to print this recipe, share it with friends, or explore other holiday dessert recipes on my site!
FAQ
Can I double this Green Velvet Brownie recipe and what pan size should I use?
Yes, you can double the recipe! For a doubled recipe, use a 9×13-inch pan. Baking time will increase; start checking around 55-65 minutes, looking for the wooden pick test to come out with moist crumbs.
What is the optimal pan material for baking perfect brownies (metal vs. glass)?
A metal cake pan is generally recommended for brownies as it conducts heat more evenly, leading to crispier edges and a consistently cooked center. Glass pans can sometimes lead to overcooked edges due to slower heat distribution.
How long do Green Velvet Brownies with Cream Cheese Frosting last and can they be frozen?
Frosted brownies last 5-7 days in the refrigerator in an airtight container. Unfrosted brownies can be stored at room temp for 3 days. Yes, frozen brownies (both frosted and unfrosted) can be frozen for up to 3 months when properly wrapped. Thaw at room temperature before serving.
What is the best type of green food coloring for a vibrant color, and how much should I use?
While liquid food coloring is used in this recipe (1 (1-oz) bottle), gel food coloring is highly recommended for a more intense vibrant green color with less liquid, preventing any slight changes in batter consistency. Start with half a teaspoon of gel and add more to achieve your desired shade.
What are some key tips for achieving the ideal fudgy-cakey brownie texture?
The ideal fudgy-cakey texture comes from precise baking time (don’t overbake!), proper ingredient ratios (especially fats to flour), and gentle mixing. Cooling completely before cutting also helps set the texture.
What are some creative serving and garnishing ideas for festive Green Velvet Brownies?
Beyond green and white sprinkles, consider a light dusting of powdered sugar, chocolate shavings, or even a drizzle of white chocolate. They’re perfect for St. Patrick’s Day parties and pair well with Guinness Beer Bread or other festive treats.
How do I quickly soften cream cheese and butter for the frosting?
To quickly soften cream cheese and butter, unwrap them and cut into 1-inch cubes. Leave them at room temperature for 15-30 minutes, or microwave for 10-15 seconds at a time on low power until just soft, not melted. This ensures creamy frosting.
What is the difference between red velvet and green velvet brownies?
The primary difference is the food coloring. Green Velvet Brownies use green liquid food coloring for a festive look, while traditional Red Velvet uses red. Both share a similar flavor profile, often enhanced by chocolate notes and a tangy Cream Cheese Frosting.
Fudgy Green Velvet Brownies with Cream Cheese Frosting
Ingredients
Equipment
Method
- First, preheat your oven to 350°F. Line the bottom and sides of a 9-inch square pan with aluminum foil, allowing 2 to 3 inches to extend over the sides. Lightly grease the foil.
- In a large microwave-safe bowl, combine your semi-sweet chocolate chips and butter. Microwave on HIGH for 1-1/2 to 2 minutes, stirring at 30-second intervals until melted and smooth. Let the melted mixture cool slightly before adding the sugar.
- Whisk the sugar into the slightly cooled chocolate mixture. Add the large eggs one at a time, whisking just until blended after each addition. Gently stir in the all-purpose flour, green liquid food coloring, baking powder, vanilla extract, salt, and 1 tsp espresso powder. Avoid overmixing. Pour this mixture into your prepared pan.
- Bake your brownies for 44 to 48 minutes, or until a wooden pick inserted in the center comes out with a few moist crumbs. Cool completely on a wire rack for about 2 hours before frosting.
- While your brownies are cooling, make the Cream Cheese Frosting. In a mixing bowl, beat the softened cream cheese and softened butter at medium speed with an electric mixer until creamy. Gradually add the powdered sugar and salt, beating until just blended. Finally, stir in the vanilla extract.
- Once the brownies are completely cool, lift them from the pan using the foil sides as handles, then gently remove the foil. Spread the creamy Cream Cheese Frosting evenly on top. Chill for about 15-20 minutes after frosting for neat cutting. Cut into 16 squares. Garnish with green and white sprinkles, if desired, and enjoy!


