Skip to content
 Are you tired of the endless search for a breakfast that’s both healthy and utterly delicious? I know the struggle! Finding a meal that truly satisfies, fuels your body, and fits into a busy morning can feel like a culinary quest. But what if I told you that the ultimate solution is here, waiting in your kitchen? These aren’t just any waffles; these are the best high protein waffles you’ll ever make.
I’m going to share my secret for creating incredibly light, crispy, and satisfying high-protein waffles that will revolutionize your breakfast routine. Get ready to master the art of perfect high protein waffles, complete with my expert tips for an unbeatable texture and flavor, and how to effortlessly integrate them into your meal prep.
Why You’ll Love This Recipe
I’ve cracked the code for protein waffles that aren’t dense or gummy. My unique twist ensures every bite is a revelation in taste and texture. I incorporate 1 teaspoon of baking powder and 1/4 teaspoon of baking soda into the dry ingredients, and a generous 1/2 teaspoon of pure vanilla extract into the wet. These simple additions make all the difference.
The Science of Fluff & Crisp: The baking powder is my secret weapon for lift, working in two stages to give these waffles a beautiful rise and a wonderfully light interior. The baking soda plays a crucial role too, reacting with the mild acidity in the cottage cheese. This reaction supercharges the leavening, helps create that desirable golden-brown color through the Maillard reaction, and contributes significantly to the overall crispiness.
Masking the Protein: And that vanilla? It’s not just for sweetness. It deepens the entire flavor profile, expertly masking any subtle “protein powder” taste, delivering a comforting, classic waffle experience every time.
Effortless & Quick: This is a blender recipe, making it perfect for busy mornings or efficient meal prep. You’ll be amazed at how quickly you can whip up a batch of these healthy waffles.
Incredibly Satisfying & Healthy: Packed with protein, these high protein waffles keep you feeling full and energized for hours. They’re a fantastic start to the day, whether you’re focused on fitness goals or simply seeking sustained energy.
Superior Taste & Texture: Say goodbye to dense protein waffles. My method guarantees light, fluffy, and extra crispy waffles that will have you reaching for more.
Ingredients Needed

Here’s what you’ll need to create these amazing high protein waffles:
- 1/2 cup rolled oats
- 1/2 cup cottage cheese
- 2 large eggs
- 1/2 cup protein powder (vanilla flavored)
- 1 teaspoon baking powder
- 1/4 teaspoon baking soda
- 1/2 teaspoon pure vanilla extract
Ingredient Notes & Substitutions
Rolled Oats (or Oat Flour): I use rolled oats to provide a great texture and essential fiber. If you prefer an even smoother batter or are in a rush, oat flour works perfectly as an alternative. For gluten-free waffles, always opt for certified gluten-free rolled oats or oat flour. For oat-free waffles, you can experiment with buckwheat flakes or quinoa flakes, though the texture might vary slightly.
Cottage Cheese: This ingredient is fantastic for adding moisture, a subtle tang, and a significant protein boost without any strong cheesy flavor. For more information on its nutritional benefits, see this article about cottage cheese. If you’re out of cottage cheese, plain, non-fat yogurt can be a good substitution, providing a similar moisture and tang.
Large Eggs: Eggs are crucial in this recipe, acting as a binder to hold everything together and providing structure. They contribute to the overall texture and rise of the waffles.
Protein Powder: The type of protein powder you use matters! I highly recommend a vanilla flavored protein powder. For the best batter consistency, I find casein protein powder or a plant-based protein powder works wonders, yielding a thicker, more ideal batter. Whey protein powder tends to result in a thinner batter, so if you use it, you might need to adjust the liquid slightly or add a tiny bit more oats or flour to thicken it. For even higher protein content, you can try doubling the protein powder, just be prepared to add a splash of almond milk or water to reach the right consistency.
Baking Powder & Baking Soda: These are the dynamic duo for fluffy waffles and that irresistible crispiness. They work together to create air pockets, ensuring a light and airy interior.
Vanilla Extract: This pure vanilla extract is not just for flavor; it’s key to enhancing the overall taste and effectively masking any protein powder notes, making these taste like classic waffles.
Optional: Depending on your protein powder, a splash of almond milk or water might be needed, especially if you’re doubling the protein powder, to achieve the perfect batter consistency.

How to Make High Protein Waffles
Making these high protein waffles is incredibly simple, especially with a blender!
Step 1: Blend the Batter
In a high-speed blender, combine the rolled oats, protein powder, baking powder, and baking soda. Give them a quick pulse to combine. Then, add the eggs, cottage cheese, and vanilla extract to the blender. Blend everything very well until the mixture is completely smooth and no clumps remain. You’re looking for a creamy, velvety smooth batter consistency where the oats are fully pulverized into a fine oat flour within the mix.
Step 2: Preheat and Pour
Heat your waffle iron according to its manufacturer’s directions. This is crucial for crispy waffles! Once it’s hot and the indicator light signals it’s ready, lightly grease the waffle maker very well to prevent sticking, even if it’s non-stick. Pour spoonfuls of the batter onto the hot iron, aiming to fill about 2/3 to 3/4 of the way. This prevents overflow while ensuring the iron is adequately covered.
Step 3: Cook to Perfection
Cook the waffle until it’s golden brown and crispy on the edges, usually about 3-5 minutes depending on your waffle iron. You’ll notice the steam subsiding when it’s nearly done, and it should lift easily from the iron. Don’t open it too early, as this can cause the waffle to tear.
Step 4: Serve Immediately
Remove the cooked waffle from the iron and serve immediately with your favorite sweet or savory toppings for the best texture. If you’re making a batch, keep cooked waffles warm on a wire rack in a warm oven (around 200°F / 95°C) to maintain their crispiness while you finish the remaining batter.
Mastering Your High-Protein Waffle Batter & Iron
Creating perfect high protein waffles involves a little finesse with both your batter and your waffle iron. Let me walk you through my best tips.
Achieving the Perfect Batter Consistency
Beyond just “smooth,” the ideal batter consistency for these high protein waffles should be pourable yet thick enough to generously coat the back of a spoon. Think of it like a slightly thicker crepe batter. The rolled oats provide crucial structure once blended, while the eggs act as a binder, and cottage cheese contributes moisture and body. If your batter seems too thick, add a splash of almond milk or water, one tablespoon at a time, until it reaches the right consistency. If it’s too thin, you can carefully add a tiny bit more oat flour or protein powder, but be cautious not to overdo it, as too much dry ingredient can make the waffles dense.
Optimal Waffle Iron Settings & Usage
Preheating your waffle iron thoroughly is the golden rule for crispy waffles and to prevent gummy waffles. Generally, I recommend setting your waffle iron to medium-high heat. Whether you have a Belgian waffle iron or a standard one, a good preheat ensures the batter starts cooking instantly on contact, leading to that coveted crispy exterior. To avoid overflow or underfilling, start by pouring slightly less batter than you think you’ll need, then add a little more if necessary. And always remember to grease the waffle maker very well to prevent sticking, even if your iron boasts a non-stick coating.
Pro Tips & Troubleshooting
Pro Tips
- Preheat Power: Always preheat your waffle iron thoroughly until the indicator light signals it’s ready. This is absolutely crucial for achieving crispy waffles and avoiding gummy waffles.
- Don’t Rush the Cook: Cook until the steam significantly subsides and the edges are golden and crispy, usually around 3-5 minutes per waffle. Patience is key; don’t open the iron too early!
- Keep ‘Em Crispy: To maintain that satisfying crispiness when making a batch, place cooked waffles on a wire rack (never stacked) in a warm oven (around 200°F / 95°C) while the rest cook. This keeps them warm and fluffy.
- Grease Generously: Even non-stick irons benefit from a light spray of oil or a swipe of butter to prevent sticking and ensure easy release.
- The Vanilla Secret: My addition of vanilla extract truly elevates the flavor, masking any subtle protein notes and giving you a superior tasting high protein waffle. Don’t skip it!
- Customize Your Protein: For the best texture, I suggest using casein protein powder or a plant-based protein powder. Whey protein powder can sometimes thin the batter, requiring slight adjustments.
Common Mistakes to Avoid
- Not Preheating: This is a common culprit for waffles sticking to the waffle iron and turning out gummy instead of crispy. Always wait for that ready light!
- Under-Greasing: Even non-stick irons need a little help. An under-greased iron is a primary cause of waffles sticking.
- Overfilling the Iron: This results in messy batter overflows and unevenly cooked waffles. Start with a bit less batter and add more if needed.
- Opening Too Soon: If you open the iron before the waffle is fully set, it can tear apart, leading to a frustrating experience.
- Ignoring Batter Consistency: A batter that’s too thin will yield flimsy waffles, while one that’s too thick will result in dense ones. The ideal batter consistency is pourable but still thick enough to coat a spoon.
- Using the Wrong Protein Powder: As I mentioned, whey protein powder can make the batter too thin, impacting the final texture. If you use it, be prepared to adjust the liquid.
Serving & Storage
Serving Ideas
These high protein waffles are a fantastic breakfast recipe on their own, but they truly shine with the right toppings. Here are some of my favorite ways to enjoy them:
- Classic Sweet Toppings: A drizzle of warm maple syrup and a melting pat of butter is always a winner.
- Fresh & Fruity: Load them up with fresh berries like strawberries, blueberries, or raspberries for a burst of natural sweetness and antioxidants.
- Creamy Indulgence: A dollop of whipped cream or a rich chocolate sauce turns these healthy waffles into a decadent treat.
- Nutty Boost: For extra protein and healthy fats, spread on a spoonful of your favorite nut butter, such as peanut or almond butter.
- Get Creative: Feel free to mix in chocolate chips, sliced bananas, or a sprinkle of cinnamon directly into the batter before cooking for more flavor variations. They are a versatile base for many American cuisine breakfast traditions!
Storage and Make-Ahead
These high protein waffles are perfect for meal prep waffles, making busy mornings a breeze!
- Refrigerator Storage: Leftover waffles can be stored in an airtight container in the refrigerator for up to 3-4 days.
- Freezing Waffles: For longer storage, freezing waffles is your best bet. First, flash freeze them by placing individual cooked waffles on a baking sheet in a single layer until solid. Once frozen, transfer them to a freezer bag or airtight container. They will keep well in the freezer for up to 2-3 months. This is my go-to method for meal prep waffles!
- Reheating Waffles: To restore that freshly made taste and crisp texture, avoid the microwave if you can.
- Toaster/Toaster Oven: This is the best method for individual waffles, giving them a lovely crispness.
- Oven: For larger batches, preheat your oven to 350°F (175°C) and warm the waffles for about 5-7 minutes, or until heated through and crispy.
- Air Fryer: For quick reheating and extra crispness, an air fryer works wonderfully. Heat at 350°F (175°C) for 2-4 minutes.
Conclusion
There you have it – the secret to truly incredible high protein waffles. With this recipe, you get an easy, high-protein breakfast that boasts an unbeatable combination of crispy waffles on the outside and fluffy waffles on the inside, all thanks to my simple yet effective unique twist. No more compromising on taste for health!
I genuinely believe anyone, regardless of their cooking skill, can master these waffles for a satisfying and healthy start to their day. So go ahead, give this recipe a try, experiment with different serving ideas, and share your delicious creations. Pin this recipe for later, and explore our other healthy breakfast recipes!
FAQ
Here are some of the most common questions I get about making high protein waffles:
How do I keep protein waffles crispy after cooking?
The best way to maintain crispiness is to cool cooked waffles on a wire rack immediately after removing them from the iron, which prevents steaming. To reheat and restore crispiness, use a toaster, oven, or air fryer instead of a microwave.
Can I make these protein waffles without protein powder?
While protein powder is essential for the “high-protein” aspect of these waffles, you can omit it. Be aware that the texture may change slightly. You might need to add an extra tablespoon or two of oats or regular flour to maintain some structure, but the overall protein content will be lower.
Why are my protein waffles sticking to the waffle iron?
This is a common issue! The most frequent culprits are not thoroughly preheating the waffle iron and not greasing the waffle maker very well between batches, even with non-stick surfaces. Make sure your iron is hot and well-lubricated. A dirty iron can also contribute to sticking.
What are the best toppings for high-protein waffles?
I love fresh berries, a dollop of nut butter for extra protein, whipped cream for a treat, a classic drizzle of maple syrup, or even chocolate sauce. For a more savory boost, pair them with eggs or bacon.
How do I store and reheat leftover protein waffles?
You can store leftover waffles in an airtight container in the fridge for 3-4 days. For longer storage, freezing waffles is ideal; flash freeze on a baking sheet then transfer to a freezer bag for up to 2-3 months. Reheat in a toaster, oven, or air fryer to regain crispness.
Can I make these high-protein waffles gluten-free or oat-free?
Yes! For gluten-free waffles, simply use certified gluten-free rolled oats or oat flour. For oat-free waffles, you can experiment with alternatives like buckwheat flakes or quinoa flakes.
What is the ideal batter consistency for protein waffles?
The batter should be pourable but relatively thick, similar to a slightly thicker crepe batter, and capable of coating the back of a spoon. If it’s too thin, add a splash of liquid; if too thick, add a tiny bit more dry ingredients.
What type of protein powder is best for waffles?
For a thicker batter and optimal texture, I recommend casein protein powder or a plant-based protein powder. Vanilla flavored protein powder is great for taste. Whey protein powder tends to result in a thinner batter, which might require minor adjustments to the liquid in the recipe.
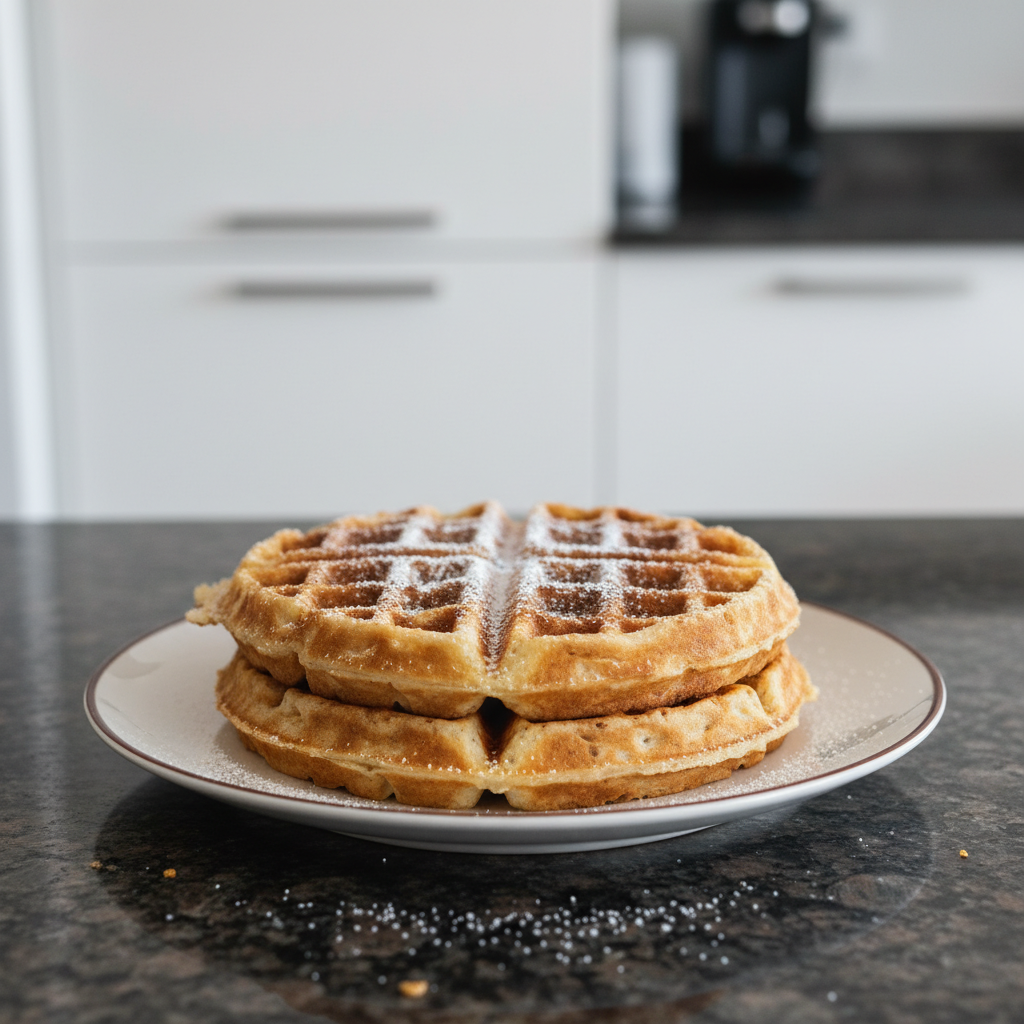
Fluffy, Crispy High Protein Waffles: The Ultimate Blender Recipe
Ingredients
Equipment
Method
- In a high-speed blender, combine the rolled oats, protein powder, baking powder, and baking soda. Give them a quick pulse to combine.
- Then, add the eggs, cottage cheese, and vanilla extract to the blender. Blend everything very well until the mixture is completely smooth and no clumps remain. You’re looking for a creamy, velvety smooth batter consistency where the oats are fully pulverized into a fine oat flour within the mix.
- Heat your waffle iron according to its manufacturer’s directions. This is crucial for crispy waffles! Once it’s hot and the indicator light signals it’s ready, lightly grease the waffle maker very well to prevent sticking, even if it’s non-stick.
- Pour spoonfuls of the batter onto the hot iron, aiming to fill about 2/3 to 3/4 of the way. This prevents overflow while ensuring the iron is adequately covered.
- Cook the waffle until it’s golden brown and crispy on the edges, usually about 3-5 minutes depending on your waffle iron. You’ll notice the steam subsiding when it’s nearly done, and it should lift easily from the iron.
- Don’t open it too early, as this can cause the waffle to tear.
- Remove the cooked waffle from the iron and serve immediately with your favorite sweet or savory toppings for the best texture.
- If you’re making a batch, keep cooked waffles warm on a wire rack in a warm oven (around 200°F / 95°C) to maintain their crispiness while you finish the remaining batter.