 Skip to content
 There’s something universally comforting about a classic chocolate chip cookie. That perfect balance of sweet, salty, and rich chocolate has a way of transporting you back to childhood. But what if I told you we could elevate that experience, taking those nostalgic flavors to a whole new level? In my kitchen, we’re doing just that with these brown butter chocolate chip cookies. We’ll introduce deep, nutty, and caramel notes that will make every bite sing. This article is your guide to mastering not just the technique of browning butter, but also the science behind baking exceptionally chewy cookies, understanding the role of each ingredient, and discovering a unique twist that sets this recipe apart from all the rest. Prepare to bake cookies with crisp edges, truly fudgy centers, and a flavor profile that is simply unforgettable.
Why You’ll Love This Recipe
The moment you try these brown butter chocolate chip cookies, you’ll understand why this recipe has become a staple in my home. It’s more than just a cookie; it’s an experience.
The secret weapon in my recipe is the **Unique Twist**: I incorporate 1-2 tablespoons of malted milk powder into the dry ingredients. This addition is pure magic. Malted milk powder, with its maltose and diastatic enzymes, supercharges the Maillard reaction and caramelization during baking. This means those glorious nutty flavors from the brown butter become even more pronounced and complex. Beyond flavor, the malted milk powder’s protein and starch content contribute to an incredibly tender and wonderfully chewy crumb.
You’ll enjoy **Unrivaled Flavor Depth** from the very first bite. The combination of the rich, toasted brown butter and the subtle, earthy sweetness of malted milk powder creates a complex, bakery-style taste that will have everyone asking for your secret.
These cookies deliver **Perfect Texture Every Time**. Forget flat, crumbly cookies. My detailed instructions ensure you achieve that coveted balance of perfectly crisp edges and delightfully fudgy, chewy centers.
This recipe helps you craft an **Elevated Classic**. You’re not just making a chocolate chip cookie; you’re transforming a beloved comfort food into something truly special and memorable, perfect for impressing family and friends or simply treating yourself to an extraordinary dessert.
Ingredients Needed

Here’s exactly what you’ll need for these spectacular cookies.
- 10 tbsp (140g) salted butter
- 1 ½ cups (215g) all-purpose flour ((measure accurately or the cookies will spread too much))
- ¾ tsp baking soda ((see notes in FAQ section regarding adjustments for taller cookies))
- ¼ tsp salt
- ⅔ cup (145g) packed light brown sugar
- ⅓ cup (65g) granulated sugar
- 1 large egg (at room temperature)
- 1 tbsp (15ml) milk
- 1 tsp (5ml) pure vanilla extract*
- 3 oz (85g) dark chocolate, coarsely chopped into chunks plus extra for topping (I also love this bittersweet chocolate block and these bittersweet callets)
- ½ cup (85g) semisweet chocolate chips
- flaky sea salt (optional for topping)
- 1-2 tablespoons malted milk powder (recommended for enhanced flavor and chewiness)
Ingredient Notes & Substitutions
Let’s dive a little deeper into these key ingredients.
**Salted Butter:** I specify salted butter for a reason. The salt content enhances the flavors of the brown butter and chocolate, creating a more balanced taste profile. If you only have unsalted butter, simply increase the total added salt in the recipe to ½ teaspoon. This precise amount ensures your brown butter develops its full, rich flavor.
**Flour (All-Purpose):** Accurate measurement of your all-purpose flour is absolutely critical for cookie texture. I highly recommend using a kitchen scale to measure by weight. Too much flour leads to dry, crumbly cookies that don’t spread enough, while too little results in greasy cookies that spread excessively. Precise flour hydration is key to proper gluten development, which dictates the final cookie texture.
**Baking Soda:** This is our chosen leavener for its role in creating alkaline conditions. These conditions are vital for promoting the Maillard reaction, which gives our cookies their beautiful browning and delicious flavor. Baking soda specifically contributes to a chewier cookie and helps with spread. For best results, use a fresh baking soda brand like Arm & Hammer or Bob’s Red Mill. If you’re looking to make taller cookies, check the FAQ section for adjustments.
**Sugars (Granulated & Brown):** The ratio of these two sugars is important for the desired cookie texture. Granulated sugar contributes to crispness and helps the cookies spread. Light brown sugar, with its molasses content, is essential for chewiness, moisture, and deeper caramelization. Our 2:1 brown to white sugar ratio creates that perfect balance of crisp edges and a soft, chewy interior.
**Vanilla Extract:** Don’t skimp on your vanilla. I always reach for pure vanilla extract, specifically a high-quality Madagascar Bourbon or Tahitian vanilla. These varieties offer a complex, rich flavor profile that imitation vanilla simply cannot replicate. Real vanilla complements the nutty brown butter and rich chocolate beautifully, adding an extra layer of depth.
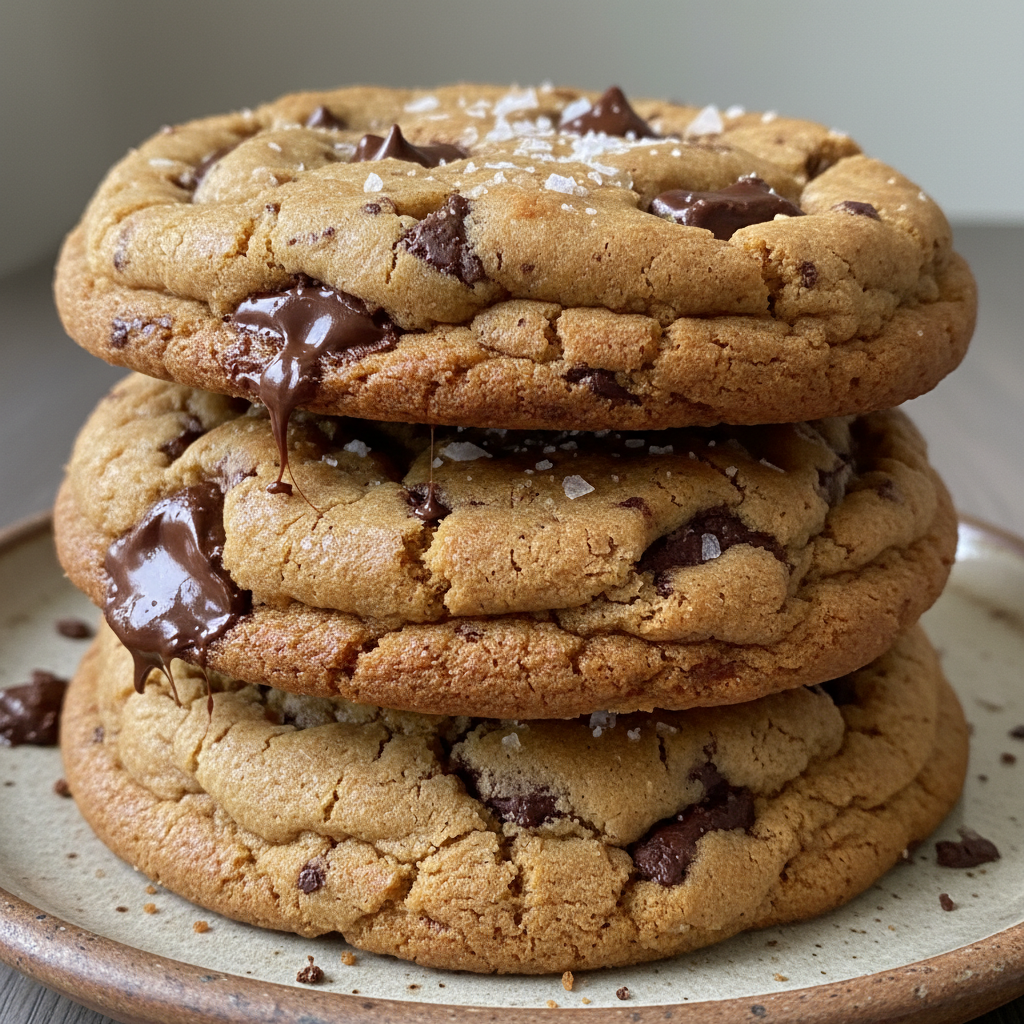
**Chocolate:** For those coveted melty puddles, a combination of high-quality dark chocolate chunks and semisweet chocolate chips is ideal. I recommend using a dark chocolate with 70%+ cocoa solids, chopped from a bar or using couverture callets. These have a higher cocoa butter content, which melts more beautifully than standard chocolate chips. Semisweet chocolate chips, with their stabilizers, help create pockets of chocolate that hold their shape slightly, adding textural contrast.
**Malted Milk Powder:** As mentioned, this is our unique twist! It significantly enhances the caramelization and overall flavor depth while also contributing to a wonderfully chewy texture. Common brands available in the US include Horlicks and Ovaltine.
**Allergen Information/Adaptations:** For those with dietary restrictions, some adaptations are possible. For gluten-free brown butter chocolate chip cookies, you can experiment with a 1:1 gluten-free flour blend, though be aware it may slightly alter the final texture. For dairy-free versions, plant-based butters can be used for browning, but note that the flavor and browning time may differ. Achieving true “brown butter” flavor without dairy is tricky, but some specific vegan butters can come close.

How to Make Chewy Brown Butter Chocolate Chip Cookies
Let’s get baking! This recipe builds on tried-and-true techniques with a few expert twists to ensure perfect brown butter chocolate chip cookies every time.
Browning the Butter
The first and most crucial step is browning the butter. This transforms a simple ingredient into a flavor powerhouse. Start by melting your 10 tablespoons of salted butter in a 1-quart stainless steel saucepan over medium heat. Watch it closely. The butter will melt, then begin to foam. As the water evaporates, you’ll hear less crackling. Keep stirring constantly, scraping the bottom of the pan to prevent scorching. Soon, golden-brown specks will begin to form at the bottom, and a rich, dense golden foam will appear on the surface. You’ll notice a distinct nutty, toasted, almost caramel-like aroma. This is the Maillard reaction at work, deepening the flavor. The whole process takes around 8-10 minutes. Immediately remove the pan from the heat and pour the brown butter, including all those delicious browned bits, into a large mixing bowl. Allow it to cool for 20-30 minutes, or until it reaches a temperature between 32 and 34°C (90 and 93°F) on a digital thermometer. This cooling step is critical; if the brown butter is too hot, your cookies will spread excessively and can become greasy.
Combining Dry Ingredients
In a medium bowl, combine your all-purpose flour, baking soda, salt, and the secret ingredient: malted milk powder. Whisk everything together thoroughly to ensure all ingredients are evenly blended. This prevents pockets of leavener and guarantees a consistent texture throughout your brown butter chocolate chip cookies.
Mixing Wet Ingredients
In the large bowl with your cooled brown butter, add both the light brown sugar and granulated sugar. Mix gently with a spatula to combine. The mixture should be thick, resembling wet sand. You can also use an electric handheld mixer or a stand mixer fitted with the paddle attachment on medium speed for about 20 seconds. Next, add the room temperature egg, milk, and pure vanilla extract. Mix until these wet ingredients are well incorporated and the mixture looks creamy. Be careful not to beat vigorously at this stage; if your kitchen is cool, the butterfat can firm up and become stiff, which can impact the final cookie texture.
Folding in Flour and Chocolate
Gradually add your flour mixture to the wet ingredients. Fold it in or mix on low speed just until it’s mostly combined. Before all the flour is fully incorporated, add your dark chocolate chunks and semisweet chocolate chips. Continue mixing just until the chocolate is evenly distributed throughout the dough. Avoid overmixing once the flour is added, as this can overdevelop the gluten, leading to tougher cookies.
Chilling the Dough
Cover the bowl of dough and refrigerate it. Chilling the cookie dough is a non-negotiable step for these brown butter chocolate chip cookies. It allows the flour to fully hydrate, enhances flavor development, and most importantly, firms up the fat, which controls dough spread during baking. For best results, chill for at least 2 hours, ideally 4, but a minimum of 1 hour will still yield good results if you’re in a pinch. The ideal consistency of cookie dough before chilling should be soft and pliable, holding its shape when scooped but not overly sticky.
Baking the Cookies
When you’re ready to bake, preheat your oven to 375°F (190°C). Line two large cookie sheets with parchment paper. Use a 1.35-oz cookie scoop to portion the dough into 14 pieces (each about 2 oz or 56g). Roll each portion into a smooth ball. This helps ensure uniform shape and even spreading. Place the dough balls onto the prepared baking sheets, spacing them about 3 inches apart. For an extra bakery-style touch, press a few additional chocolate chunks onto the tops of the dough balls. Do not flatten them. Bake for 8-10 minutes, or until the brown butter chocolate chip cookies are golden on top, beautifully browned around the edges, and still wonderfully soft in the middle. The higher baking temperature helps set the edges quickly, preventing excessive spread due to the altered fat properties of the brown butter.
Cooling and Finishing
Once baked, let the cookies cool on the baking sheet for 2 minutes. This allows them to set slightly before you move them. Carefully transfer them to a wire rack to finish cooling completely. If desired, sprinkle a pinch of flaky sea salt on top of the warm cookies; it truly enhances the chocolate and caramel notes.
Mastering Your Bake: Pan Types & Altitude Adjustments
Achieving the perfect brown butter chocolate chip cookies often comes down to understanding your equipment and environment.
Baking Sheet Types
The type of baking sheet you use significantly impacts the browning and baking time of your cookies. Light-colored baking sheets, typically aluminum, reflect heat. This promotes more even baking and prevents the bottoms of your cookies from browning too quickly or excessively. They are generally recommended for delicate items like cookies. Dark-colored baking sheets, often steel, absorb more heat. While this can lead to crispier bottoms, it also increases the risk of burnt edges if not monitored closely. If you use dark sheets, keep a closer eye on your cookies and consider reducing the baking time slightly. Insulated baking sheets provide an air layer that slows heat transfer, preventing over-browning on the bottom. If your cookies are consistently too thick or have burnt edges, assessing your pan type and checking for oven hotspots can be great troubleshooting steps.
High-Altitude Baking Adjustments
Baking at high altitudes (typically above 3,500 feet or 1,000 meters) presents unique challenges due to lower air pressure and increased moisture evaporation. For brown butter chocolate chip cookies, you might need to make some adjustments. Consider slightly increasing the all-purpose flour by 1-2 tablespoons, slightly decreasing the baking soda by about ¼ teaspoon, and potentially reducing the sugar by a tablespoon or two. You might also need to increase liquids slightly (e.g., an extra teaspoon of milk) to compensate for evaporation. Occasionally, slightly raising the oven temperature by 15-25°F (8-14°C) or reducing the baking time can help prevent excessive spread and dryness.
Oven Calibration
For truly consistent baking results with your brown butter chocolate chip cookies, the importance of oven calibration cannot be overstated. An oven that runs too hot or too cold can throw off baking times and textures. If you’re consistently troubleshooting baking issues, consider using an inexpensive oven thermometer to check your oven’s accuracy.
Ingredient Deep Dive & Adaptations
Understanding the science behind your ingredients elevates you from a baker to a true cookie connoisseur.
The Role of Different Sugar Ratios
In this recipe, our 2:1 ratio of light brown sugar to granulated sugar is intentional. Granulated sugar, or white sugar, is primarily sucrose. It contributes to spread and creates a crisper texture in the cookie, as it caramelizes at a higher temperature. Light brown sugar, however, contains molasses, which is slightly acidic and hygroscopic (meaning it attracts and retains moisture). This results in a chewier, softer cookie that stays moist longer and caramelizes beautifully. If you were to reduce the brown sugar slightly, you would likely get a crispier cookie. Conversely, increasing the brown sugar would yield an even chewier and softer brown butter chocolate chip cookie.
Detailed Explanation of Superior Vanilla Extract
Not all vanilla extracts are created equal. Pure vanilla extract, made by steeping vanilla beans in alcohol and water, offers a complex, nuanced flavor that simply cannot be matched by imitation vanilla (which is typically synthesized vanillin). Madagascar Bourbon vanilla extract is often noted for its rich, creamy, sweet, and slightly smoky notes, making it a classic choice for chocolate chip cookies. Tahitian vanilla offers more floral and fruity undertones, while Mexican vanilla can have spicy or woody notes. Using a high-quality pure vanilla extract significantly complements the deep, nutty flavors of the brown butter and the richness of the chocolate, adding layers of sophisticated flavor.
Ideal Dough Consistency
Before chilling, the ideal consistency of your brown butter chocolate chip cookie dough should be soft, pliable, and capable of holding its shape when scooped. It should not be overly sticky, nor should it be crumbly. After mixing the sugars and brown butter, it will be thick like wet sand. Once the all-purpose flour is incorporated, the dough should become more structured but still yield easily to pressure. If, by some chance, your dough seems too wet (which is rare if you’ve measured accurately), you can try adding a tiny bit more all-purpose flour, but be aware this could slightly affect the final dough spread. If it’s too dry (even rarer), a few drops of milk can help, but again, precise measurement is key to avoiding these issues.
Conversion to Volume Measurements
While I strongly advocate for using a kitchen scale for precise measurement, especially for all-purpose flour, I understand that not everyone has one. For those occasions when you absolutely must use volume measurements, please note that they are less accurate. For key ingredients like flour, it’s generally accepted that 1 cup of all-purpose flour weighs approximately 120-125 grams. For butter, 1 tablespoon is roughly 14 grams. Always fluff your flour before lightly spooning it into a measuring cup and leveling it off, rather than packing it.
Pro Tips & Troubleshooting
Even experienced bakers benefit from a few extra insights. Here are my top tips and common pitfalls to avoid for your brown butter chocolate chip cookies.
Pro Tips
**Precision is Key:** Always measure ingredients precisely, especially all-purpose flour. Using a kitchen scale for best results ensures accurate flour hydration and consistent cookie texture.
**Brown Butter Vigilance:** Be patient and attentive when browning butter. It can burn quickly. Use your senses—look for golden-brown specks and a dense golden foam, and smell for a distinctly nutty, toasted aroma.
**Optimal Butter Cooling:** Cool brown butter sufficiently to 32-34°C (90-93°F) using a digital thermometer. This prevents greasy cookies and helps maintain proper dough texture.
**Don’t Rush the Chill:** Refrigerate cookie dough for at least 1-2 hours (up to 4 hours is ideal). This allows for flour hydration, flavor development, fat firming, and controlled dough spread.
**Uniform Dough Balls:** Roll scooped dough into smooth balls. This promotes a uniform shape and even spreading during baking.
**Higher Bake Temp:** Bake at a higher temperature (375°F) to set cookie edges quickly and prevent excessive spread from brown butter’s altered fat properties.
**Chocolate Choice Matters:** Use high-quality couverture dark chocolate (70%+ cocoa solids) chopped from a bar or feves/callets for melty puddles. Its higher cocoa butter content melts beautifully.
**Embrace the Twist:** Remember the malted milk powder enhances caramelization and chewy texture—it’s your secret weapon for superior flavor depth in these brown butter chocolate chip cookies.
Common Mistakes to Avoid
**Incorrect Flour Measurement:** Using too little all-purpose flour results in greasy cookies that spread too much and lack structure. Using too much flour results in dry cookies that don’t spread enough.
**Hot Brown Butter:** Brown butter that is too hot when combined with other ingredients can cause brown butter chocolate chip cookies to spread excessively.
**Insufficient Dough Chilling:** Dough not chilled long enough leads to more spreading and flatter cookies.
**Too Much Baking Soda:** Too much baking soda can cause cookies to be flatter and have a slightly metallic taste.
**Baking Powder vs. Baking Soda:** Using baking powder instead of baking soda generally produces puffier, cakier cookies that rise higher, don’t spread as much, and can be dry or bland—not the desired chewy texture for this recipe.
**Lack of Salt:** Not adding enough salt can make cookies taste flat or too sweet, especially with the richness of dark chocolate and brown butter.
**Over-Chilling Dough:** Over-chilling brown butter dough can make it crumbly and difficult to work with. If this happens, simply let it sit at room temperature for 10-15 minutes until it becomes pliable again.
**Over-Beating Wet Ingredients:** Do not beat vigorously after adding wet ingredients, especially if your kitchen is cold, as the butterfat can firm up and become stiff, negatively affecting the final cookie texture.
Serving & Storage
Once your irresistible brown butter chocolate chip cookies are baked, it’s time to enjoy them and ensure any leftovers are stored perfectly.
Serving Ideas
There’s nothing quite like a warm brown butter chocolate chip cookie fresh from the oven. My favorite way to enjoy them is simply with a cold glass of milk. For an extra touch of gourmet, I always recommend topping them with flaky sea salt immediately after baking; it truly enhances the chocolate and caramelization notes. For an elevated dessert experience, serve them alongside a scoop of vanilla bean ice cream or with a drizzle of warm caramel sauce. They’re also absolutely perfect with a hot cup of coffee or tea for a delightful mid-day treat.
Storage and Make-Ahead
**Storing Baked Cookies:** To maintain that wonderful chewy texture, store your baked brown butter chocolate chip cookies in an airtight container at room temperature for up to 3-5 days. If you want to restore that fresh-from-the-oven warmth, you can reheat them in the microwave for 10-15 seconds, or warm them in a preheated oven at 275°F (135°C) for 5-7 minutes.
**Freezing Cookie Dough:** These brown butter chocolate chip cookies are excellent for making ahead! To freeze the dough, scoop individual balls (as you would for baking) and place them on a parchment-lined tray. Freeze until solid, then transfer the frozen dough balls to a freezer-safe bag or container. You can also freeze the dough as a log, tightly wrapped in plastic wrap and then foil. Label with the date; frozen dough lasts beautifully for up to 2-3 months. When you’re ready to bake from frozen cookie dough, simply place the frozen balls on a prepared baking sheet and add an extra 2-4 minutes to the regular baking time. There’s no need to thaw!
Conclusion
And there you have it—your comprehensive guide to crafting truly irresistible brown butter chocolate chip cookies. With their incredible chewy texture, crisp edges, and fudgy centers, combined with the rich, complex flavor amplified by our unique malted milk twist, these cookies are a game-changer. I promise that with these detailed instructions and my pro tips, you can achieve bakery-quality results right in your own kitchen, even if you’re new to the art of browning butter. So go ahead, don’t hesitate to try this recipe, experiment with different chocolate types or a sprinkle of flaky sea salt. You might also enjoy baking ultimate mint chocolate chip cookies for another delightful variation. Happy baking! Don’t forget to share your delicious creations on social media!
FAQ
What does brown butter do for cookies and why is it important?
Browning butter transforms its flavor from a simple creamy taste to one that is deeply nutty, toasted, and caramel-like. This is due to the Maillard reaction and caramelization of the milk solids present in the butter. This complex flavor adds incredible depth and sophistication to the cookies, making them far superior to those made with regular melted butter. It also subtly impacts cookie texture by slightly altering the fat properties. To explore more recipes using this technique, try these cookies with browned butter.
How can I prevent my brown butter cookies from spreading too much or being too flat?
Several factors contribute to cookie spread. Key steps to prevent excessive spreading include ensuring the brown butter is cooled to the correct temperature (32-34°C/90-93°F) before mixing, accurately measuring all-purpose flour (a kitchen scale is best!), properly chilling the cookie dough for at least 2 hours, and baking at the recommended higher temperature (375°F) to set the edges quickly. Also, double-check that you’re using the correct amount of baking soda, as too much can contribute to flatness.
Is chilling brown butter cookie dough necessary, and how long should I chill it?
Yes, chilling brown butter cookie dough is absolutely crucial. It allows for flour hydration, which improves texture, and gives the flavors time to meld and deepen. Chilling also firms up the fat, which significantly controls dough spread during baking and results in a chewier cookie. I recommend chilling for a minimum of 2 hours, ideally 4 hours, and you can even chill it for up to 24-72 hours for even deeper flavor development. In a pinch, 1 hour can work, but the results may vary slightly. If your dough comes out feeling wet after chilling, it typically means it needs more chilling time or was initially too warm; re-chill it, or, as a last resort, add a tiny amount more flour, understanding it might slightly affect spread.
What is the best type of chocolate for chewy brown butter chocolate chip cookies?
For bakery-style brown butter chocolate chip cookies with those coveted melty puddles, a mix is ideal. I recommend using high-quality dark chocolate chunks (70%+ cocoa solids) chopped from a bar or couverture callets/feves. These have a higher cocoa butter content and melt beautifully. Supplementing with semisweet chocolate chips works well, as they often contain stabilizers that help them hold their shape a bit more, creating pockets of chocolate throughout the cookie. Avoid “dark chocolate flavored melting wafers” as these are often compound chocolate and will not melt like real chocolate.
How long do brown butter chocolate chip cookies last and can I freeze the dough?
Baked brown butter chocolate chip cookies will last 3-5 days when stored in an airtight container at room temperature, maintaining their chewy texture. And yes, you can absolutely freeze brown butter cookie dough! Scoop it into individual balls, freeze them on a tray until solid, then transfer to a freezer-safe bag or container. Frozen dough lasts 2-3 months. To bake from frozen cookie dough, simply place the frozen balls on a prepared baking sheet and add 2-4 minutes to the regular baking time—no need to thaw!
What’s the difference between using baking soda vs. baking powder in cookies?
Baking soda, which is used in this recipe, is a single-acting leavener that requires an acid (like the brown sugar in our recipe) to activate. It promotes spread and browning, contributing to a chewy cookie with crisp edges. Baking powder, on the other hand, is a complete leavener that already contains an acid. It generally produces puffier, cakier cookies that rise higher and spread less, which is not the desired cookie texture for these brown butter chocolate chip cookies.
How do I make even taller, thicker cookies?
For slightly taller, thicker brown butter chocolate chip cookies, you can make a small adjustment to the leavener. Reduce the baking soda from ¾ tsp to ½ tsp. This will minimize spread and encourage a thicker cookie. Additionally, ensure adequate cookie dough chilling, roll your dough into smooth, taller balls, and baking from frozen dough can also help create a thicker final product.
Why are my brown butter cookies greasy?
Greasy brown butter chocolate chip cookies are often a sign that the brown butter was too hot when it was combined with the other ingredients. This can cause the fat to separate or melt other fats prematurely. Ensure your brown butter is cooled to the precise 32-34°C (90-93°F) range before mixing. Another common cause can be using too little all-purpose flour, which affects the dough’s ability to properly absorb and bind the fat.
How much butter is lost after browning?
When browning butter, approximately 15-20% of its initial weight is lost due to water evaporation. This recipe accounts for that loss by specifying the initial 10 tbsp (140g) weight to ensure you have the desired final amount of brown butter solids and fat needed for the perfect cookie dough. You do not need to add extra butter to compensate.
How to tell when brown butter is perfectly done by sight and smell for beginners?
Visually, you’re looking for amber-colored liquid butter with distinct golden-brown specks clustered at the bottom of the pan. A rich, dense golden foam will form on the surface. By smell, the butter will transform from a sweet, milky dairy aroma to a distinctly nutty, toasted, almost caramel-like fragrance. The moment you achieve this, immediately remove it from the heat to prevent burning.
What’s the ideal consistency of cookie dough before chilling?
The ideal consistency for this brown butter chocolate chip cookie dough before chilling is soft and pliable. It should hold its shape easily when scooped but should not feel sticky to the touch. After mixing the sugars and brown butter, it will be thick like wet sand. Once the all-purpose flour is added, the dough will become more structured but still manageable. This consistency is crucial for proper dough spread and achieving the desired cookie texture.
Irresistible Chewy Brown Butter Chocolate Chip Cookies with a Secret Twist
Ingredients
Equipment
Method
- Melt 10 tablespoons of salted butter in a 1-quart stainless steel saucepan over medium heat. Watch closely as it melts, then foams, and the crackling subsides. Stir constantly, scraping the bottom to prevent scorching. Golden-brown specks will form at the bottom, and a dense golden foam will appear on the surface, accompanied by a nutty, toasted, caramel-like aroma. This process takes around 8-10 minutes. Immediately remove from heat and pour the brown butter, including all browned bits, into a large mixing bowl.
- Allow the brown butter to cool for 20-30 minutes, or until it reaches 32-34°C (90-93°F) on a digital thermometer. This cooling is critical to prevent excessive spreading and greasiness in your cookies.
- In a medium bowl, combine the all-purpose flour, baking soda, salt, and malted milk powder. Whisk thoroughly to ensure all ingredients are evenly blended for consistent texture.
- In the large bowl with your cooled brown butter, add both the light brown sugar and granulated sugar. Mix gently with a spatula (or an electric mixer on low speed for about 20 seconds) until combined and the mixture resembles thick, wet sand.
- Add the room temperature egg, milk, and pure vanilla extract. Mix until these wet ingredients are well incorporated and the mixture looks creamy. Avoid vigorous beating, especially if your kitchen is cool, as it can firm up the butterfat and affect texture.
- Gradually add the flour mixture to the wet ingredients. Fold it in or mix on low speed just until mostly combined.
- Before all the flour is fully incorporated, add the dark chocolate chunks and semisweet chocolate chips. Continue mixing just until the chocolate is evenly distributed throughout the dough. Avoid overmixing once flour is added, as this can develop gluten too much, leading to tougher cookies.
- Cover the bowl of dough and refrigerate it. Chilling is a non-negotiable step: it allows flour to hydrate, enhances flavor, and firms up the fat to control dough spread. Chill for at least 2 hours, ideally 4 hours, but a minimum of 1 hour will yield good results if time is limited. The dough should be soft, pliable, and hold its shape before chilling.
- When ready to bake, preheat your oven to 375°F (190°C). Line two large cookie sheets with parchment paper.
- Use a 1.35-oz cookie scoop to portion the dough into 14 pieces (each about 2 oz or 56g). Roll each portion into a smooth ball for uniform shape and even spreading.
- Place dough balls onto the prepared baking sheets, spacing them about 3 inches apart. For a bakery-style touch, press a few additional chocolate chunks onto the tops of the dough balls (do not flatten).
- Bake for 8-10 minutes, or until the cookies are golden on top, beautifully browned around the edges, and still wonderfully soft in the middle. The higher baking temperature helps set edges quickly and prevents excessive spread.
- Once baked, let the cookies cool on the baking sheet for 2 minutes to set slightly.
- Carefully transfer them to a wire rack to finish cooling completely. If desired, sprinkle a pinch of flaky sea salt on top of the warm cookies to enhance chocolate and caramel notes.


