 Skip to content
 Get ready to bake the most adorable and festive mini Easter layer cakes! These charming individual desserts are a delightful way to celebrate the spring season. You’ll love their bright colors and impressive appearance, which is surprisingly easy to achieve. Perfect for any Easter gathering, these mini cakes are sure to bring smiles to everyone’s faces, making your holiday celebration extra special and sweet.
Why You’ll Love This Recipe
You’ll adore these mini Easter layer cakes for so many reasons, especially their charming appeal.
- Cute Individual Desserts: Each guest gets their own personal cake, adding a special touch to your table.
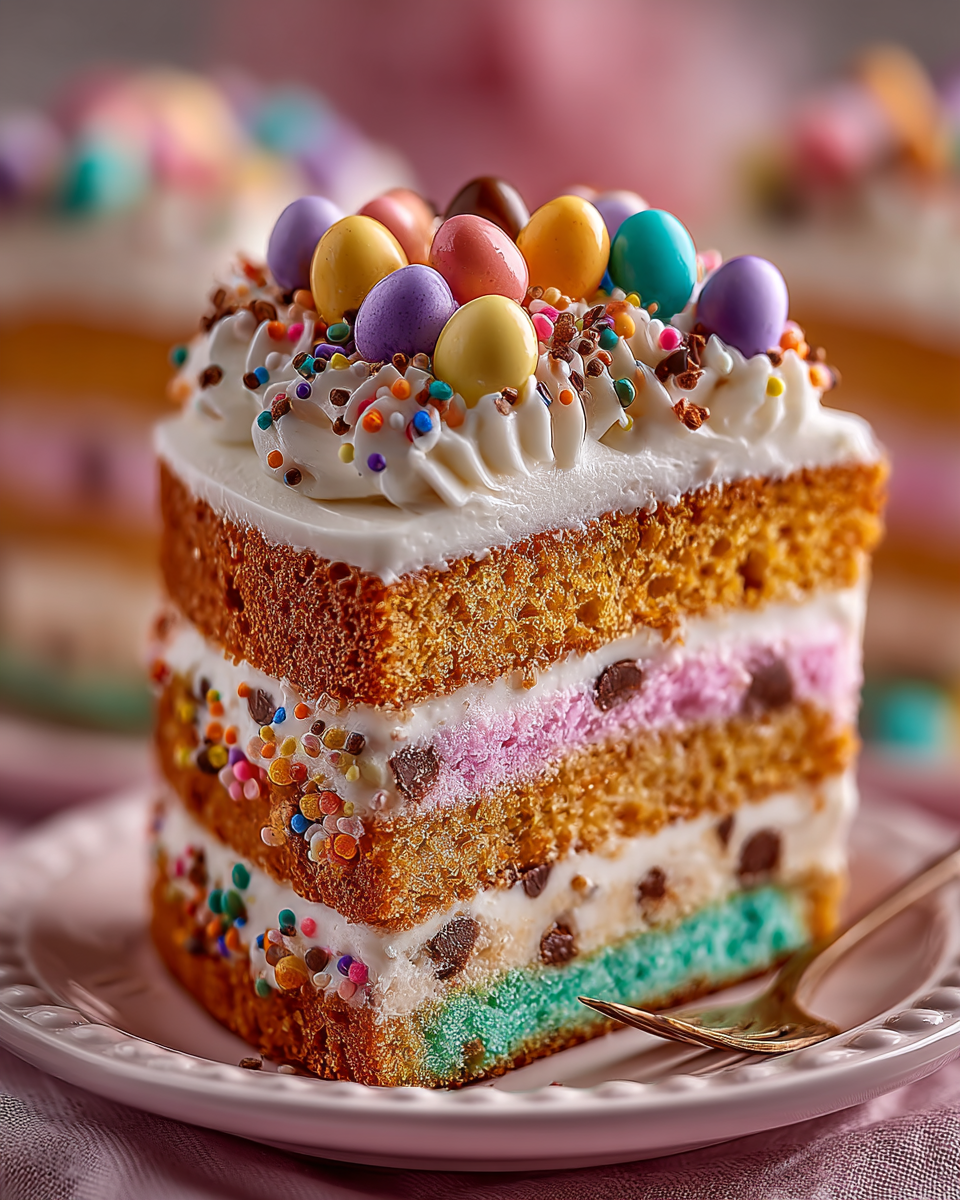
- Fun and Festive for Easter: Bright colors and delightful candy eggs capture the spirit of spring.
- Easier Than a Large Cake: No need for intricate frosting techniques on a big cake; these are simple.
- Customizable Colors and Flavors: Easily change the cake and frosting colors to match your theme.
- Great Family Baking Project: Kids can help with coloring batter and decorating the finished cakes.
Ingredients
Gather these simple ingredients to make these charming mini Easter layer cakes a reality. Starting with a cake mix simplifies the process, making baking approachable for everyone.
For the Cakes:
- Nonstick cooking spray
- All-purpose flour, for dusting
- 1 white cake mix (plus ingredients like eggs, oil, water, as per package)
- Gel food coloring (pink, yellow, green)
For the Frosting & Decoration:
- 2 containers white frosting (store-bought or homemade)
- Candy-coated chocolate eggs (e.g., Cadbury Mini Eggs)
Notes & Substitutions
You can easily adjust these mini Easter layer cakes to suit your preferences. For the cake base, feel free to use your favorite homemade white cake recipe instead of a mix; just ensure it yields two 9-inch layers. Always choose gel food coloring for the most vibrant and rich hues, as liquid coloring can dilute your batter. When selecting frosting, cream cheese or buttercream are excellent stable choices, or you can whip up your own homemade version. If candy eggs aren’t available, mini chocolate candies, colorful sprinkles, or even small sugar flowers make fantastic alternatives for decorating.
Equipment
You will need a few standard kitchen tools to prepare these beautiful mini Easter layer cakes. A stand mixer or hand mixer makes batter preparation quick and easy. Have three 9-inch round cake pans ready for baking. A large liquid measuring cup helps divide batter evenly, along with three medium mixing bowls for coloring. A 2.5-inch round cookie cutter is essential for shaping your individual cakes. A rubber spatula and an offset spatula or butter knife will assist with smoothing frosting. Finally, wire cooling racks are crucial for properly cooling the cake layers.
Instructions
Let’s begin making your delightful mini Easter layer cakes! Follow these steps carefully for the best results.
1. Prepare Cake Layers
Preheat your oven to 350°F (175°C). Generously coat three 9-inch round cake pans with nonstick cooking spray, then dust lightly with all-purpose flour, tapping out any excess. Prepare the white cake mix according to the package directions in a large mixing bowl. Measure the total volume of batter and divide it equally into three separate medium mixing bowls.
Add a different gel food coloring to each bowl; for example, pink in one, yellow in another, and green in the third. Mix each color thoroughly with a rubber spatula until the batter is uniformly colored. Pour each colored batter into one of the prepared 9-inch pans, spreading it evenly across the bottom. Gently tap the pans on the counter a few times to release any trapped air bubbles. Bake for 8-12 minutes, or until a toothpick inserted into the center of each cake comes out clean. Allow the cakes to cool in their pans on wire racks for 10 minutes before carefully inverting them onto the racks to cool completely. This step is crucial for perfect mini Easter layer cakes.
2. Assemble Mini Cakes
Once the cakes are completely cool, carefully remove them from their pans. Using a 2.5-inch round cookie cutter, cut out as many circles as possible from each cake layer; you should get about 7 circles from each 9-inch layer, totaling 21 cake circles. Take one cake circle and place it on your desired serving plate or a clean work surface.
Spread a generous, even layer of white frosting over the top of the first cake circle. Carefully place a second cake layer on top of the frosting. Add another layer of white frosting over the second cake. Finish by placing a third cake layer on top. Frost the top of this final layer evenly. Repeat this process for all 7 sets of mini cakes, creating three-layered individual treats.
3. Decorate & Finish
Once all your mini Easter layer cakes are assembled, smooth any excess frosting from the sides using an offset spatula or a butter knife. For a clean finish, you can also gently run the spatula around the sides. Finally, arrange two or three candy-coated chocolate eggs on top of the frosting of each mini cake. Gently press the eggs into the frosting to secure them in place. These mini layer cakes are ready to serve immediately, or you can store them until you’re ready to enjoy their festive charm.
Pro Tips & Troubleshooting
Achieving perfect mini Easter layer cakes is simple with these helpful pointers. For baking even layers, avoid overfilling your cake pans; precise measurements ensure consistent thickness. Always opt for gel food coloring to achieve the most vibrant and true-to-color results, as it won’t thin your batter. For bakers seeking vibrant hues without altering batter consistency, understanding the benefits of gel food coloring is key. Ensure cakes are fully cooled before cutting to guarantee clean, neat circles that hold their shape. To achieve smooth frosting, frequently wipe your spatula clean between applications. If layers appear uneven, you can level them slightly with a serrated knife before cutting circles, or simply pair slightly uneven layers strategically to minimize their appearance.
Serving, Storage, & Variations
These delightful mini Easter layer cakes are incredibly versatile.
Serving Suggestions
Serve these individual mini cakes on small, decorative plates for an elegant presentation. They are perfect for an Easter brunch, as a festive dessert for dinner, or as a charming treat for any spring celebration. Their individual portions make them ideal for entertaining.
Storage
Store any leftover mini Easter layer cakes in an airtight container at room temperature for up to 2 days, or in the refrigerator for up to 3 days. While they are best enjoyed fresh, chilled cakes taste great when brought back to room temperature before serving.
Flavor & Decoration Variations
Get creative with your mini Easter layer cakes! You can easily swap the white cake mix for vanilla, yellow, or even chocolate cake mix to change the base flavor. Experiment with coloring your frosting to match the cake layers or use a contrasting pastel shade. For a fun “nest effect“, sprinkle shredded coconut on top of the frosted cakes before adding the candy eggs. You can also use a grass piping tip with green frosting to create edible grass. Other fun candy toppings include various mini chocolates, colorful sprinkles, or small marshmallow Peeps. If you prefer, make two-layer mini cakes instead of three for a slightly smaller treat.
Nutrition Information
| Nutrient | Amount Per Serving |
|---|---|
| Calories | 350-450 |
| Total Fat | 15-20g |
| Saturated Fat | 5-7g |
| Cholesterol | 30-40mg |
| Sodium | 300-400mg |
| Carbohydrates | 50-60g |
| Sugars | 35-45g |
| Protein | 3-5g |
FAQ
Q: Can I make these cakes ahead of time?
A: Yes, you can bake the cake layers up to two days in advance. Store them wrapped tightly at room temperature, then assemble and decorate your mini Easter layer cakes closer to serving time.
Q: What if I don’t have 9-inch cake pans?
A: You can use two 8-inch pans; you might need to adjust baking time slightly. Alternatively, use a sheet pan, bake a single layer, then cut out circles.
Q: Can I use liquid food coloring?
A: Gel food coloring is highly recommended for vibrant colors without altering batter consistency. Liquid coloring can thin your batter and result in paler shades.
Q: How do I get my cake layers flat?
A: Avoid overmixing your batter, and don’t overbake. Many bakers find that achieving perfectly level cake layers with cake strips can significantly improve their baking results. You can also use cake strips around your pans to promote more even baking and flatter tops.
Conclusion
These charming and straightforward mini Easter layer cakes are a wonderful way to add a festive touch to your holiday table. Their individual portions and bright, appealing colors make them a joy to both bake and eat. We hope you enjoy making these beautiful mini Easter layer cakes and sharing them with your family and friends. This recipe proves that impressive desserts can also be simple and fun to create. We encourage you to try this delightful recipe and share your colorful creations with us in the comments below!
Mini Easter Layer Cakes
Ingredients
Equipment
Method
- Preheat your oven to 350°F (175°C). Generously coat three 9-inch round cake pans with nonstick cooking spray, then dust lightly with all-purpose flour, tapping out any excess.
- Prepare the white cake mix according to the package directions in a large mixing bowl. Measure the total volume of batter and divide it equally into three separate medium mixing bowls.
- Add a different gel food coloring to each bowl; for example, pink in one, yellow in another, and green in the third. Mix each color thoroughly with a rubber spatula until the batter is uniformly colored.
- Pour each colored batter into one of the prepared 9-inch pans, spreading it evenly across the bottom. Gently tap the pans on the counter a few times to release any trapped air bubbles.
- Bake for 8-12 minutes, or until a toothpick inserted into the center of each cake comes out clean. Allow the cakes to cool in their pans on wire racks for 10 minutes before carefully inverting them onto the racks to cool completely.
- Once the cakes are completely cool, carefully remove them from their pans. Using a 2.5-inch round cookie cutter, cut out as many circles as possible from each cake layer; you should get about 7 circles from each 9-inch layer, totaling 21 cake circles.
- Take one cake circle and place it on your desired serving plate or a clean work surface. Spread a generous, even layer of white frosting over the top of the first cake circle.
- Carefully place a second cake layer on top of the frosting. Add another layer of white frosting over the second cake. Finish by placing a third cake layer on top. Frost the top of this final layer evenly.
- Repeat this process for all 7 sets of mini cakes, creating three-layered individual treats.
- Once all your mini Easter layer cakes are assembled, smooth any excess frosting from the sides using an offset spatula or a butter knife. For a clean finish, you can also gently run the spatula around the sides.
- Finally, arrange two or three candy-coated chocolate eggs on top of the frosting of each mini cake. Gently press the eggs into the frosting to secure them in place. These mini layer cakes are ready to serve immediately, or you can store them until you're ready to enjoy their festive charm.


