 Skip to content
 Easter brings such a special kind of joy to my kitchen. There’s something truly magical about the arrival of spring, and with it, the chance to create delightful treats that evoke nostalgia and smiles. Among my favorite spring desserts are these charming Chocolate Peanut Butter Egg Nests. They are not just a simple no-bake cookie; they are a beloved tradition, a perfect little bite of happiness that captures the spirit of the season. If you’re looking for a reliable recipe and valuable tips to make truly exceptional Chocolate Peanut Butter Egg Nests, you’ve come to the right place. I’m going to show you how to elevate this classic, ensuring a perfect texture and richer flavor for all your Easter or spring gatherings.
Why You’ll Love This Recipe
I have a little secret for making these Chocolate Peanut Butter Egg Nests absolutely irresistible. My unique twist transforms them from good to truly gourmet. Instead of relying on standard baking chips alone, I always reach for high-quality baking chocolate, like a good semi-sweet couverture, and natural creamy peanut butter. To ensure the perfect consistency and stability, I fortify this mixture with just a small amount of coconut oil or butter. This seemingly minor change makes a world of difference.
This approach enhances both the flavor and texture significantly.
Flavor Enhancement: High-quality baking chocolate offers a richer, deeper cocoa profile that you just can’t get from regular chips, avoiding that sometimes overly sweet or artificial taste. Natural peanut butter provides an authentic, less sugary peanut taste that truly shines through.
Texture & Stability: The added coconut oil or butter is a game-changer. It dramatically improves the emulsification and stability of the mixture, ensuring a smoother, more reliable set even at room temperature. This means no more waxy texture; instead, you get a superior, melt-in-your-mouth experience that simply can’t be beaten. Your Chocolate Peanut Butter Egg Nests will be perfectly firm yet wonderfully tender.
Beyond the enhanced taste and texture, this recipe offers several practical benefits for the home cook.
Quick & Easy: These are no-bake cookies, which means minimal prep time and no oven required! They are perfect for busy schedules or last-minute holiday preparations, allowing you to whip up a beautiful dessert without the stress.
Kid-Friendly & Fun: This is a delightful and safe recipe for families to make together. Children especially love to help with shaping the nests and placing the colorful mini eggs, making it a wonderful activity for spring.
Perfect Holiday Treat: Visually appealing and irresistibly delicious, these Chocolate Peanut Butter Egg Nests are an ideal Easter dessert or a charming treat for any spring celebration. They are perfectly suited for parties, potlucks, or even as edible gifts for friends and neighbors.
Ingredients Needed
To create these delightful Chocolate Peanut Butter Egg Nests, you will need a few simple ingredients. Here is the exact list:
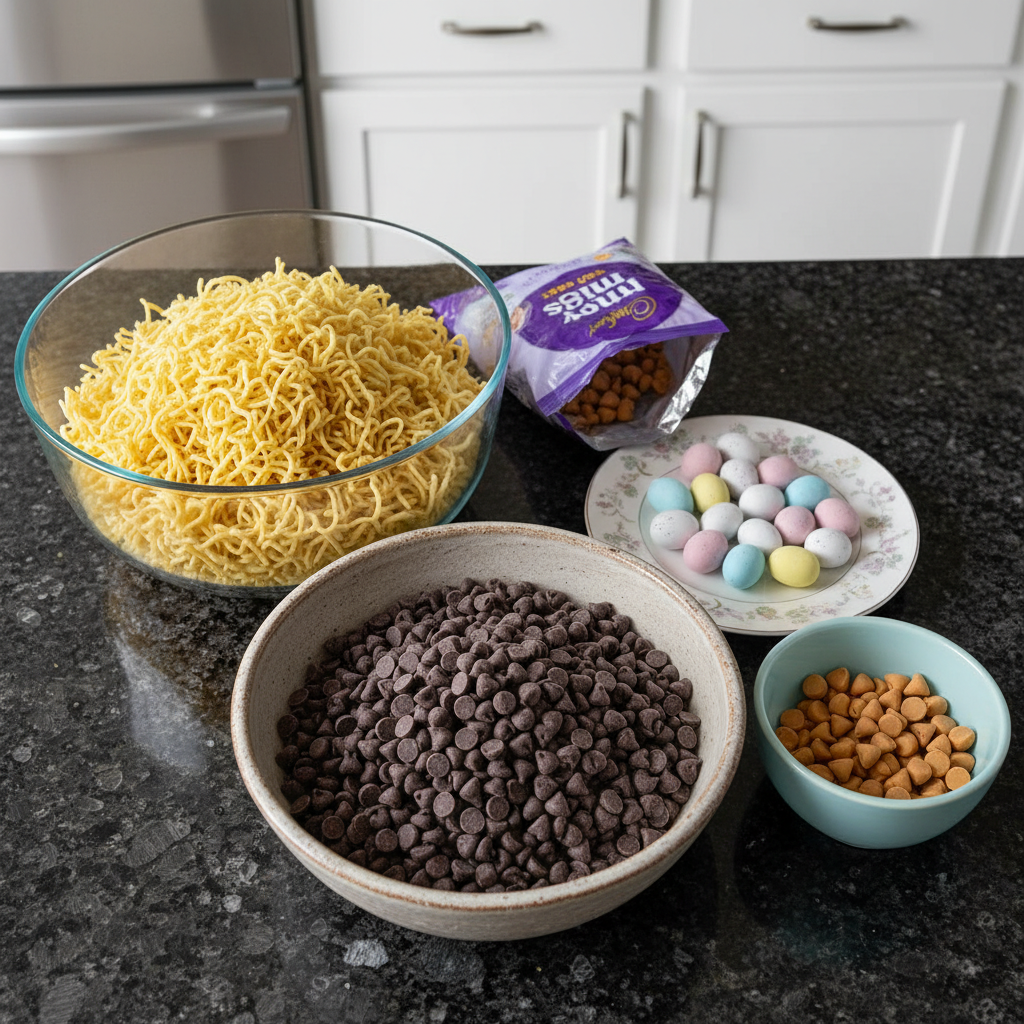
- 12 oz semi-sweet chocolate chips (2 cups)
- 12 oz peanut butter chips (2 cups)
- 12 oz chow mein noodles (about 5 cups)
- 60 Cadbury chocolate mini eggs (1 9-ounce bag, or other candies)
Ingredient Notes & Substitutions
Let’s dive a little deeper into choosing the best ingredients and some smart substitutions to make these Chocolate Peanut Butter Egg Nests truly exceptional.
Chocolate Quality: While semi-sweet chocolate chips are listed, I highly recommend elevating your Chocolate Peanut Butter Egg Nests by using a high-quality baking chocolate, such as a good semi-sweet couverture or even chocolate bars broken into pieces. The difference in flavor and melt is remarkable. Baking chocolate with a higher cocoa percentage will give a deeper, less sweet chocolate flavor, while a lower percentage will be sweeter and milkier. The added coconut oil or butter, as part of our unique twist, plays a crucial role here, ensuring a silky smooth, stable mixture that sets beautifully and avoids any waxy texture, especially when paired with natural peanut butter.
Peanut Butter: My recipe calls for natural creamy peanut butter. Natural peanut butter typically contains just peanuts and salt, offering a more authentic and less sweet flavor profile. When combined with the peanut butter chips, which contain stabilizers, and a touch of coconut oil or butter, you achieve excellent emulsification and a superior texture. Many popular US brands offer great natural creamy peanut butter options. The peanut butter chips are also key for stability and binding due to their fat content.
Chow Mein Noodle Alternatives: If you can’t find chow mein noodles or prefer a different texture, there are fantastic alternatives. You can use Rice Krispies, crushed cornflakes, or even crunchy toasted coconut. For those with dietary restrictions, be sure to choose certified gluten-free versions of these alternatives if needed.
Candy Fillings: While Cadbury mini eggs are a classic for Easter dessert, feel free to get creative! Other delightful Easter candy ideas include jelly beans, marshmallow chicks (Peeps), or small chocolate figurines. You can customize the candy to match any occasion or color scheme.
Dietary Considerations: Making these Chocolate Peanut Butter Egg Nests gluten-free or vegan is entirely possible. For gluten-free nests, ensure you use certified gluten-free chow mein noodles or opt for gluten-free crispy cereal like Rice Krispies. Always double-check that all other ingredients, including your chocolate, peanut butter, and candies, are verified gluten-free. For vegan nests, choose high-quality vegan baking chocolate (checking labels for dairy), natural peanut butter without non-vegan additives, and substitute any butter in the unique twist with coconut oil or a plant-based butter alternative. Don’t forget to select vegan-friendly mini eggs or other candy fillings.
How to Make Ultimate Chocolate Peanut Butter Egg Nests
Crafting these ultimate Chocolate Peanut Butter Egg Nests is a simple and rewarding process. Follow these steps for perfect results every time.
Melting the Chocolate and Peanut Butter
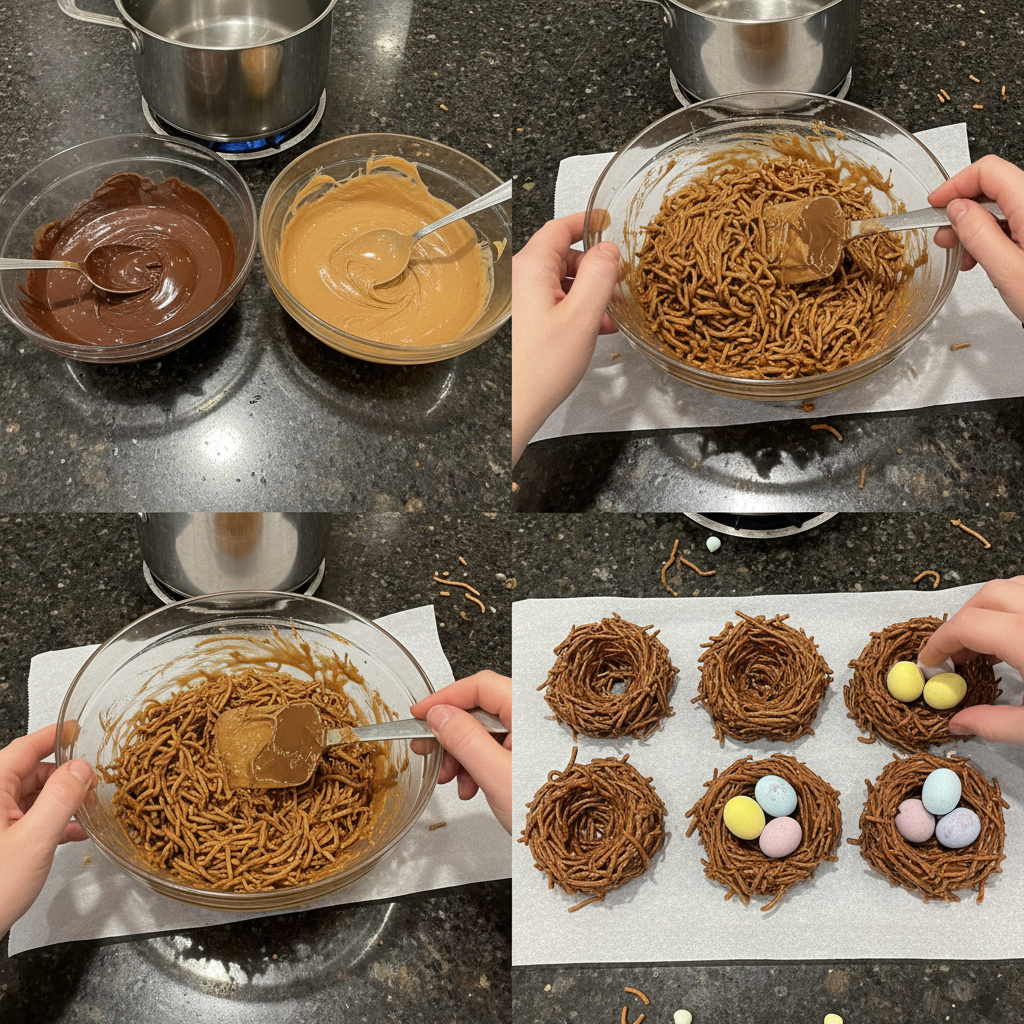
Start by combining the semi-sweet chocolate chips and peanut butter chips in a large, microwave-safe bowl. To melt them gently and evenly, microwave at half power for one minute. After this, remove the bowl and stir the mixture well with a spatula. The chocolate and peanut butter will start to combine, becoming fragrant and slightly glossy.
Return the bowl to the microwave and continue to heat at half power for 30-second intervals, stirring thoroughly after each one. It’s crucial not to rush this step to prevent overheating the chocolate, which can cause it to seize. Keep going until the chips are completely melted and the mixture is silky smooth and glossy. If you prefer, a double boiler method can also be used; simply place the bowl over a pot of simmering water, ensuring the bottom of the bowl does not touch the water, and stir until melted. Just be very careful not to let any water or steam come into contact with the chocolate, as this will also cause it to seize.
Coating the Chow Mein Noodles
Once your chocolate and peanut butter mixture is perfectly melted and smooth, it’s time to add the chow mein noodles. Pour the chow mein noodles into the bowl with the melted chocolate mixture. Stir very well, taking your time to ensure that every single noodle is completely coated. This step is key for consistent texture and optimal binding, making sure your nests hold together beautifully and have no dry spots.
Shaping the Nests
Prepare two baking sheets by lining them with parchment paper. Using a large spoon, scoop out about 1/4 cup of the chocolate-coated chow mein mixture for each nest. Gently place each scoop onto the prepared baking sheet. While the mixture is still warm and pliable, use the back of your spoon to gently spread it into a round shape, creating a distinct, deep indentation in the center. You want to form a nest-like hollow for your candy eggs. You should be able to make about 20 Chocolate Peanut Butter Egg Nests from this recipe. For beginners seeking very uniform results, a mini muffin tin can be used as a mold; simply press the mixture into the cups and then create the indentation.
Topping and Chilling
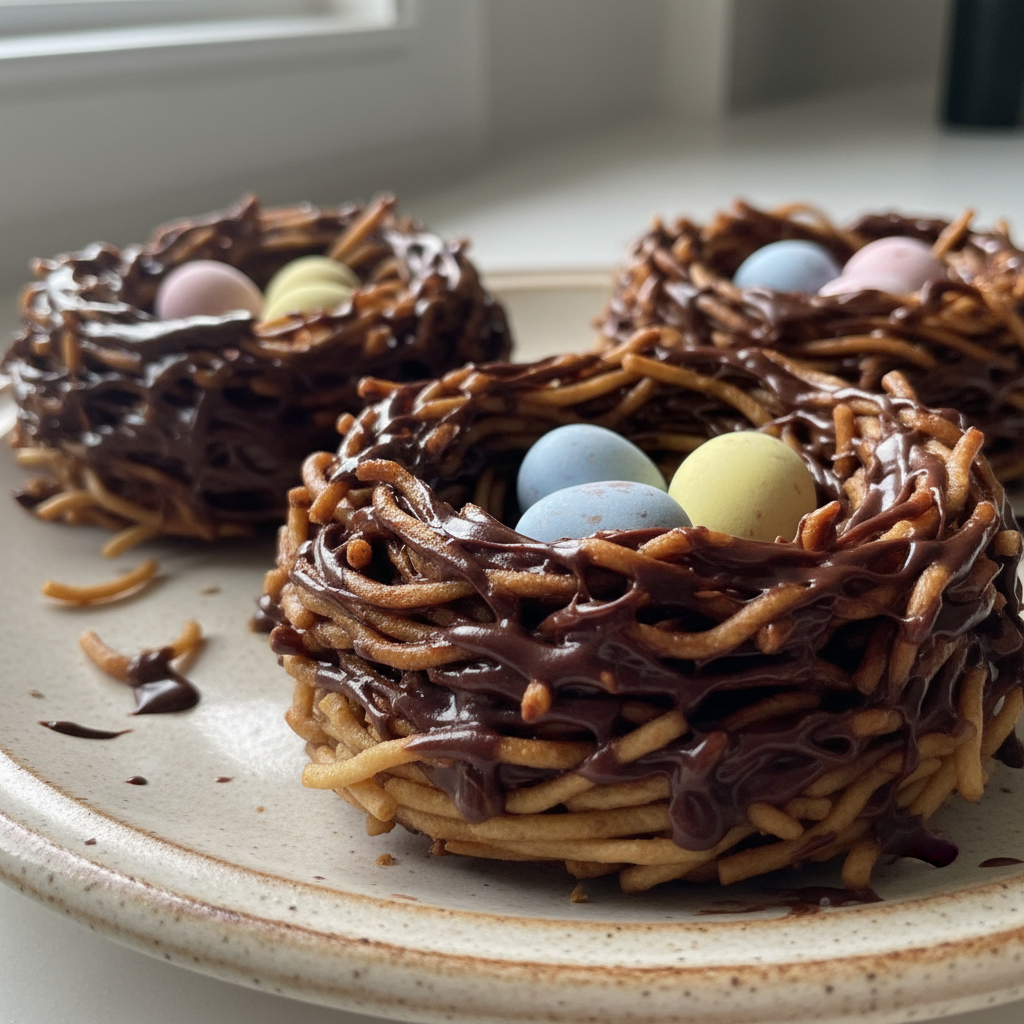
This is where the nests truly come to life! While the chocolate is still wet and pliable, carefully place three Cadbury mini eggs, or your chosen egg-shaped candies, into the center of each nest. The wet chocolate will help secure them in place. Once all your nests are topped, refrigerate the trays for 10-15 minutes. This chilling time is absolutely crucial as it allows the chocolate to set firmly, preventing soft, melty nests at room temperature. Once set, your beautiful Chocolate Peanut Butter Egg Nests are ready to be removed from the trays and served.
`
`
Customizing Your Egg Nests: Dietary Adaptations & Flavor Variations
One of the joys of these Chocolate Peanut Butter Egg Nests is how incredibly versatile they are. You can easily adapt them to various dietary needs or simply explore fun new flavors and textures.
Make Them Gluten-Free or Vegan
It’s wonderful how easily this recipe can be adapted to be more inclusive.
Gluten-Free: To make your Chocolate Peanut Butter Egg Nests gluten-free, the main consideration is the chow mein noodles. Simply opt for certified gluten-free chow mein noodles or substitute them with alternative crispy bases like gluten-free Rice Krispies or cornflakes. Always double-check the labels on your chocolate, peanut butter, and candies to ensure they are also certified gluten-free.
Vegan: Crafting vegan egg nests is also straightforward. Begin by selecting a high-quality vegan baking chocolate; many brands offer excellent dairy-free options. For the peanut butter, ensure you choose a natural peanut butter that doesn’t contain any non-vegan additives like certain palm oils. If you’re incorporating butter as part of the unique twist, simply replace it with coconut oil or a plant-based butter alternative. The final touch is selecting vegan-friendly mini eggs or other candy fillings, as many traditional Easter candies contain dairy or gelatin.
Explore Flavor & Texture Variations
Don’t be afraid to experiment with different flavor profiles and textures!
Chip Swaps: While semi-sweet and peanut butter chips are classic, you can completely change the character of your Chocolate Peanut Butter Egg Nests by swapping the chips. Consider using butterscotch chips for a rich, buttery flavor, white chocolate chips for a sweeter, creamier taste, or caramel chips for a delightful chewiness. You could even use an all-chocolate chips base for a purely chocolate experience.
Crunchy Base Alternatives: Beyond chow mein noodles, Rice Krispies, crushed cornflakes, or toasted coconut make excellent crunchy alternatives. Each offers a distinct textural experience, from the light crispness of Rice Krispies to the tropical chew of toasted coconut.
Candy Fillings: Get creative with your Easter dessert candy options! Besides Cadbury mini eggs, consider jelly beans for a burst of fruitiness, marshmallow chicks (Peeps) for a soft, sweet contrast, or small chocolate figurines to match any theme or personal preference.
Pro Tips & Troubleshooting for Perfect Nests
Achieving perfectly set, delicious Chocolate Peanut Butter Egg Nests every time is easy with a few expert tips and an understanding of common pitfalls.
Pro Tips for Success
Optimal Melting Technique: Always prioritize gentle heat when melting chocolate. If using the microwave melting method, use 50% power in short 30-60 second bursts, stirring diligently between each. This prevents scorching. Alternatively, a double boiler method is excellent; just ensure no water or steam touches the chocolate to prevent chocolate seizing.
Leverage the Twist: Remember my unique twist! Using high-quality baking chocolate with a touch of coconut oil or butter significantly enhances the flavor and creates a smoother, more stable mixture. This not only makes nest formation easier but also results in a superior set and melt-in-your-mouth texture for your Chocolate Peanut Butter Egg Nests.
Uniform Shaping: For consistently sized and perfectly shaped nests, consider using a standardized cookie scoop (about 1/4 cup) to portion the mixture. You can also lightly chill the mixture for a few minutes before shaping, as it becomes slightly firmer and easier to mold. Pressing the mixture into a mini muffin tin is another excellent way to ensure very uniform results. Always work on parchment paper-lined baking sheets for easy removal.
The Waiting Game (Serving Temp): For optimal flavor release and the best texture, allow your Chocolate Peanut Butter Egg Nests to warm at room temperature for 10-15 minutes after refrigerating. Serving them too cold can dull the flavors and make them overly hard.
Emulsification & Stability: The fat content from the peanut butter chips, and especially from the added coconut oil or butter when using natural peanut butter, plays a crucial role in stabilizing the chocolate mixture. This fat aids in emulsification, which prevents the chocolate and peanut butter from separating and ensures a consistent, smooth texture in your finished nests.
Common Mistakes to Avoid
Overheating Chocolate: One of the most common mistakes is overheating chocolate in the microwave. This can lead to scorching or chocolate seizing, turning your smooth mixture grainy and unusable. Always use low power and stir frequently.
Insufficient Chilling: Not chilling your cookies long enough is a recipe for disaster. It results in soft, melty nests at room temperature that won’t hold their shape. Stick to the recommended 10-15 minute refrigeration time to ensure they set firmly.
Serving Too Cold: While chilling is essential, serving Chocolate Peanut Butter Egg Nests directly from the refrigerator without allowing them to warm slightly can dull their flavors and make the texture overly hard. Let them sit out for a few minutes before serving for the best experience.
Nests Not Holding Shape: If your nests are too crumbly, it might indicate not enough chocolate binder, the mixture was too hot when you added the noodles, or an incorrect chocolate-to-noodle ratio. If they are too sticky, they likely haven’t been chilled enough. Adjust accordingly for perfectly shaped nests.
Chocolate Bloom: Have you ever seen grayish streaks or spots on chocolate? That’s chocolate bloom. To minimize it, avoid rapid temperature changes during chilling and storage. Using quality baking chocolate also helps prevent this aesthetic issue.
Serving & Storage
Once your beautiful Chocolate Peanut Butter Egg Nests are made, you’ll want to serve and store them properly to ensure they remain delicious.
Creative Serving Ideas
These Chocolate Peanut Butter Egg Nests are not just tasty; they are also visually charming, making them perfect for special occasions.
Easter Centerpiece: Arrange the nests artfully on an Easter dessert table or a tiered tray to create an edible centerpiece that’s sure to impress your guests.
Decorative Plating: For individual servings, place each nest on a small decorative platter, perhaps with a small parchment square underneath for easy handling.
Seasonal Pairings: These kid-friendly recipes pair wonderfully with festive drinks. Serve them alongside refreshing iced tea, a glass of cool lemonade, or simply a classic glass of milk.
Storage and Make-Ahead Tips
Proper storage is key to enjoying your Chocolate Peanut Butter Egg Nests for as long as possible.
Refrigeration: Keep extra nests in an airtight container in the refrigerator. I always recommend placing pieces of parchment paper or waxed paper between each layer to prevent sticking. Stored this way, your Chocolate Peanut Butter Egg Nests will keep for several weeks in the refrigerator. Remember, they are best when allowed to warm up at room temperature for 10-15 minutes before serving.
Freezing Instructions: For longer storage, you can absolutely freeze these delightful nests. First, freeze the nests individually on a tray until they are firm. Once solid, transfer them to an airtight freezer-safe container, again using parchment paper between layers. They will keep beautifully in the freezer for up to 2-3 months.
Thawing & Serving from Frozen: When you’re ready to enjoy frozen nests, simply transfer them to the refrigerator overnight or allow them to thaw at room temperature for a few hours. Once thawed, bring them to their optimal serving temperature by letting them sit at room temperature for about 10-15 minutes.
Make-Ahead: These no-bake cookies are an excellent make-ahead dessert for holiday treats. They are perfect for Easter planning, allowing you to prepare them well in advance and simply pull them out when you’re ready to serve.
Adaptations for Special Occasions
This recipe is incredibly adaptable beyond Easter. By simply changing the candy fillings, you can tailor these nests for almost any event. Think blue or pink candies for a baby shower, colorful sprinkles for birthdays, or themed chocolate figurines for other holidays.
Conclusion
I hope you’ve enjoyed this journey into creating the ultimate Chocolate Peanut Butter Egg Nests! This recipe truly embodies the joy of spring and Easter with its ease, no-bake nature, and kid-friendly appeal. The real magic, of course, lies in our unique twist: using high-quality baking chocolate and natural peanut butter, fortified with a touch of coconut oil or butter. This ensures a superior flavor and a reliably smooth, perfectly set texture that makes all the difference.
Even if you’re a beginner in the kitchen, I’m confident that with these detailed instructions, expert tips, and troubleshooting advice, you can achieve spectacular results. Don’t hesitate to try this recipe, experiment with the suggested variations, and share your delightful creations with family and friends. Happy baking, and happy spring!
FAQ
What are Chocolate Peanut Butter Egg Nests?
Chocolate Peanut Butter Egg Nests are delightful no-bake cookies made from a crunchy base of chow mein noodles coated in a rich chocolate and peanut butter mixture. They are typically shaped like small bird nests and filled with colorful candies, most commonly Cadbury mini eggs, making them a popular Easter dessert.
How do you melt chocolate for egg nests without seizing?
To melt chocolate for egg nests without seizing, use low, gentle heat. If using the microwave melting method, heat at 50% power in short 30-60 second intervals, stirring well after each. Alternatively, use a double boiler, placing a heatproof bowl over a pot of simmering water, ensuring the bowl’s bottom does not touch the water. Crucially, prevent any water or steam from contacting the chocolate, as even a tiny drop can cause chocolate seizing.
What are some variations for Chocolate Peanut Butter Egg Nests?
You can explore many variations for Chocolate Peanut Butter Egg Nests! For the chocolate base, try swapping peanut butter chips for butterscotch chips, white chocolate chips, or caramel chips. Instead of chow mein noodles, use crispy bases like Rice Krispies, crushed cornflakes, or toasted coconut. For fillings, get creative with jelly beans, marshmallow chicks (Peeps), or small chocolate figurines to match any theme.
How do I store Chocolate Peanut Butter Egg Nests?
Store extra nests in an airtight container in the refrigerator, placing pieces of parchment paper or waxed paper between layers to prevent sticking. They will keep for several weeks. For longer preservation, you can freeze them for up to 2-3 months. To freeze, arrange nests on a tray until firm, then transfer to a freezer-safe container. Thaw in the refrigerator or at room temperature before serving, allowing them to warm for 10-15 minutes for optimal flavor.
Can Chocolate Peanut Butter Egg Nests be made gluten-free or vegan?
Yes, Chocolate Peanut Butter Egg Nests can easily be made gluten-free or vegan. For gluten-free, use certified gluten-free chow mein noodles or crispy cereal. For vegan, ensure you use high-quality vegan baking chocolate, natural peanut butter (checking for non-vegan additives), coconut oil or plant-based butter, and vegan mini eggs or other candies.
What is the best way to shape chocolate nests for a perfect look?
For a perfect look, use a large spoon to scoop about 1/4 cup of the mixture onto parchment paper-lined baking sheets. Then, use the back of the spoon to gently spread it into a round shape with a deep, defined indentation in the center, creating a nest. For consistently perfectly shaped nests, you can also press the mixture into a mini muffin tin as a mold before creating the indentation.
Why are my chocolate nests soft at room temperature?
If your chocolate nests are soft at room temperature, it’s usually due to not chilling them long enough or an imbalance in the chocolate-to-binder ratio. Our unique twist, utilizing high-quality baking chocolate and added fat (coconut oil or butter) with natural peanut butter, helps create a more stable mixture that sets more firmly, preventing soft, melty nests and ensuring a superior texture.
What’s the best temperature to serve Chocolate Peanut Butter Egg Nests?
The best temperature to serve Chocolate Peanut Butter Egg Nests is slightly warmer than refrigerator temperature. After refrigerating, allow them to warm at room temperature for 10-15 minutes. This slight warming helps to soften the chocolate just enough to enhance the flavors and create a more enjoyable, less hard texture.
Ultimate Chocolate Peanut Butter Egg Nests: Rich & Perfect
Ingredients
Equipment
Method
- Combine the semi-sweet chocolate chips and peanut butter chips in a large, microwave-safe bowl.
- Microwave at half power for one minute. Remove the bowl and stir the mixture well with a spatula.
- Return the bowl to the microwave and continue to heat at half power for 30-second intervals, stirring thoroughly after each. Do not rush to prevent overheating.
- Continue heating and stirring until the chips are completely melted and the mixture is silky smooth and glossy.
- Once the chocolate and peanut butter mixture is perfectly melted and smooth, add the chow mein noodles to the bowl.
- Stir very well, ensuring every noodle is completely coated for consistent texture and optimal binding.
- Line two baking sheets with parchment paper.
- Using a large spoon, scoop out about 1/4 cup of the chocolate-coated chow mein mixture for each nest onto the prepared baking sheet. You should be able to make about 20 nests.
- While the mixture is still warm and pliable, use the back of your spoon to gently spread it into a round shape, creating a distinct, deep indentation in the center to form a nest-like hollow.
- While the chocolate is still wet, carefully place three Cadbury mini eggs (or your chosen egg-shaped candies) into the center of each nest.
- Refrigerate the trays for 10-15 minutes. This chilling time allows the chocolate to set firmly, preventing soft nests.
- Once set, remove your Chocolate Peanut Butter Egg Nests from the trays and serve.


